2019 FORD EXPEDITION check transmission fluid
[x] Cancel search: check transmission fluidPage 7 of 583

Driving Aids
Driver Alert
....................................................249
Lane Keeping System ...............................
250
Blind Spot Information System ............
254
Cross Traffic Alert .......................................
258
Steering ...........................................................
261
Pre-Collision Assist ....................................
262
Drive Control ................................................
266
Load Carrying
Rear Under Floor Storage ........................
269
Cargo Nets ......................................................
271
Roof Racks and Load Carriers ................
272
Load Limit ......................................................
273
Towing
Towing a Trailer ............................................
279
Trailer Reversing Aids ...............................
280
Trailer Sway Control ..................................
289
Recommended Towing Weights ..........
290
Essential Towing Checks .........................
293
Towing the Vehicle on Four Wheels ....
300
Driving Hints
Breaking-In ....................................................
303
Reduced Engine Performance ..............
303
Economical Driving ....................................
303
Driving Through Water .............................
304
Floor Mats .....................................................
304
Roadside Emergencies
Roadside Assistance ................................
306
Hazard Flashers ...........................................
307
Fuel Shutoff ..................................................
307
Jump Starting the Vehicle .......................
308
Post-Crash Alert System ..........................
310
Transporting the Vehicle ..........................
310
Towing Points .................................................
311Customer Assistance
Getting the Services You Need
...............
313
In California (U.S. Only) ............................
314
The Better Business Bureau (BBB) Auto Line Program (U.S. Only) ......................
315
Utilizing the Mediation/Arbitration Program (Canada Only) .......................
316
Getting Assistance Outside the U.S. and Canada ........................................................
316
Ordering Additional Owner's Literature ........................................................................\
.
318
Reporting Safety Defects (U.S. Only) ........................................................................\
.
318
Reporting Safety Defects (Canada Only) ........................................................................\
.
318
Fuses
Fuse Box Locations ....................................
320
Fuse Specification Chart .........................
320
Changing a Fuse .........................................
329
Maintenance
General Information ...................................
331
Opening and Closing the Hood ..............
331
Under Hood Overview ...............................
332
Engine Oil Dipstick ......................................
333
Engine Oil Check .........................................
333
Oil Change Indicator Reset .....................
334
Engine Coolant Check ...............................
335
Automatic Transmission Fluid Check ........................................................................\
339
Transfer Case Fluid Check .......................
339
Brake Fluid Check ......................................
340
Washer Fluid Check ...................................
340
Fuel Filter ........................................................
341
Changing the 12V Battery .........................
341
Checking the Wiper Blades .....................
343
Changing the Wiper Blades ....................
343
Adjusting the Headlamps .......................
344
Removing a Headlamp .............................
345
Changing a Bulb ..........................................
345
4
Expedition (TB8) Canada/United States of America, enUSA, Edition date: 201808, Second-Printing Table of Contents
Page 111 of 583

Engine Oil Pressure Gauge
Indicates engine oil pressure. At normal
operating temperature, the level indicator
is in the normal range. If the pressure gauge
falls below the normal range, stop your
vehicle, switch off the engine and check
the engine oil level. Add oil if needed. If the
oil level is correct, have your vehicle
checked by an authorized dealer.
Engine Coolant Temperature
Gauge
WARNING: Do not remove the
coolant reservoir cap when the engine is
on or the cooling system is hot. Wait 10
minutes for the cooling system to cool
down. Cover the coolant reservoir cap
with a thick cloth to prevent the
possibility of scalding and slowly remove
the cap. Failure to follow this instruction
could result in personal injury.
Indicates engine coolant temperature. At
normal operating temperature, the level
indicator is in the normal range. If the
engine coolant temperature exceeds the
normal range, stop your vehicle as soon as
possible, switch off the engine and let the
engine cool.
Fuel Gauge
The fuel gauge indicates about how much
fuel is in the fuel tank.
The arrow adjacent to the fuel pump
symbol indicates on which side of your
vehicle the fuel filler door is located.
Note: The fuel gauge may vary slightly
when your vehicle is moving or on a slope. Low Fuel Reminder
A low fuel level reminder displays and
sounds when the distance to empty
reaches
75 mi (120 km) to empty for
MyKey, and at 50 mi (80 km), 25 mi
(40 km), 10 mi (20 km) and 0 mi (0 km)
for all vehicle keys.
Note: The low fuel reminder can appear at
different fuel gauge positions depending on
fuel economy conditions. This variation is
normal.
Transmission Fluid Temperature
Gauge
Indicates transmission fluid temperature.
At normal operating temperature, the level
indicator is in the normal range. If the
transmission fluid temperature exceeds
the normal range, stop your vehicle as soon
as possible and verify the airflow is not
restricted by snow or debris blocking
airflow through the grille.
Special operating conditions such as
snowplowing, towing, or off-road use may
cause higher than normal operating
temperatures. See
Special Operating
Conditions Scheduled Maintenance
(page
513).
To lower the transmission temperature
into the normal range, alter the severity of
your driving conditions. Operating the
transmission for extended periods with the
gauge in the higher than normal area may
cause internal transmission damage. If the
gauge continues to show high
temperatures, see an authorized dealer.
Turbo Boost Gauge
(If Equipped)
Indicates the amount of manifold air
pressure in the engine.
108
Expedition (TB8) Canada/United States of America, enUSA, Edition date: 201808, Second-Printing Instrument Cluster
Page 334 of 583
GENERAL INFORMATION
Have your vehicle serviced regularly to help
maintain its roadworthiness and resale
value. There is a large network of
authorized dealers that are there to help
you with their professional servicing
expertise. We believe that their specially
trained technicians are best qualified to
service your vehicle properly and expertly.
They are supported by a wide range of
highly specialized tools developed
specifically for servicing your vehicle.
If your vehicle requires professional service,
an authorized dealer can provide the
necessary parts and service. Check your
warranty information to find out which
parts and services are covered.
Use only recommended fuels, lubricants,
fluids and service parts conforming to
specifications. Motorcraft® parts are
designed and built to provide the best
performance in your vehicle.
Precautions
•
Do not work on a hot engine.
• Make sure that nothing gets caught in
moving parts.
• Do not work on a vehicle with the
engine running in an enclosed space,
unless you are sure you have enough
ventilation.
• Keep all open flames and other burning
material (such as cigarettes) away
from the battery and all fuel related
parts.
Working with the Engine Off
1. Set the parking brake and shift the transmission to park (P).
2. Switch off the engine.
3. Block the wheels. Working with the Engine On WARNING: To reduce the risk of
vehicle damage and personal burn
injuries, do not start your engine with the
air cleaner removed and do not remove
it while the engine is running.
1. Set the parking brake and shift the transmission to park (P).
2. Block the wheels.
OPENING AND CLOSING THE
HOOD
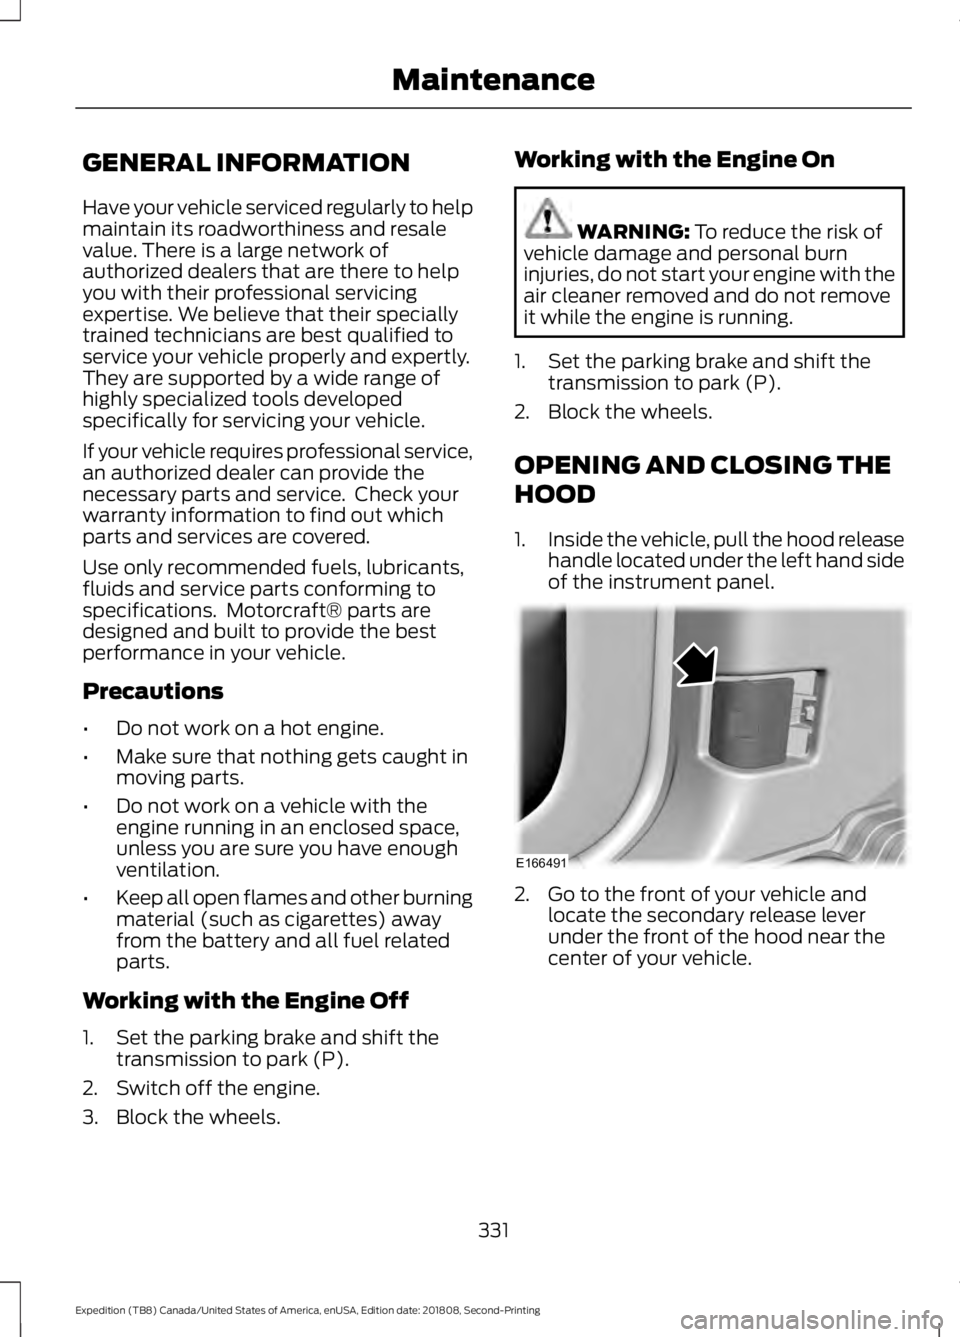
1. Inside the vehicle, pull the hood release
handle located under the left hand side
of the instrument panel. 2. Go to the front of your vehicle and
locate the secondary release lever
under the front of the hood near the
center of your vehicle.
331
Expedition (TB8) Canada/United States of America, enUSA, Edition date: 201808, Second-Printing MaintenanceE166491
Page 336 of 583

Battery. See Changing the 12V Battery (page 341).
C.
Engine oil filler cap.
See Engine Oil Check (page 333).
D.
Engine oil dipstick.
See Engine Oil Dipstick (page 333).
E.
Brake fluid reservoir. See
Brake Fluid Check (page 340).
F.
Air filter.
See Changing the Engine Air Filter (page 347).
G.
Engine coolant reservoir. See
Engine Coolant Check (page 335).
H.
ENGINE OIL DIPSTICK MINA
MAX
B
ENGINE OIL CHECK
To check the engine oil level consistently
and accurately, do the following:
1. Make sure the parking brake is on. Make
sure the transmission is in park (P) or
neutral (N).
2. Run the engine until it reaches normal operating temperature.
3. Make sure that your vehicle is on level ground. 4. Switch the engine off and wait 15
minutes for the oil to drain into the oil
pan. Checking the engine oil level too
soon after you switch the engine off
may result in an inaccurate reading.
5. Open the hood. See
Opening and
Closing the Hood (page 331).
6. Remove the dipstick and wipe it with a clean, lint-free cloth. See
Under
Hood Overview (page 332).
7. Reinstall the dipstick and remove it again to check the oil level. See
Engine Oil Dipstick
(page 333).
8. Make sure that the oil level is between
the maximum and minimum marks. If
the oil level is at the minimum mark,
add oil immediately. See
Capacities
and Specifications (page 391).
9. If the oil level is correct, replace the dipstick and make sure it is fully seated.
Note: Do not remove the dipstick when the
engine is running.
Note: If the oil level is between the
maximum and minimum marks, the oil level
is acceptable. Do not add oil.
Note: The oil consumption of new engines
reaches its normal level after approximately
3,000 mi (5,000 km)
.
Adding Engine Oil WARNING:
Do not remove the
filler cap when the engine is running.
333
Expedition (TB8) Canada/United States of America, enUSA, Edition date: 201808, Second-Printing MaintenanceE146429
Page 342 of 583
1. Stop your vehicle as soon as it is safe
to do so. Fully apply the parking brake,
shift into park (P) or neutral (N).
2. Leave the engine running until the coolant temperature gauge needle
returns to the normal position. After
several minutes, if the temperature
does not drop, follow the remaining
steps.
3. Switch the engine off and wait for it to
cool. Check the coolant level.
4. If the coolant level is at or below the minimum mark, add prediluted coolant
immediately.
5. If the coolant level is normal, restart the engine and continue.
AUTOMATIC TRANSMISSION
FLUID CHECK
If required, have an authorized dealer check
and change the transmission fluid at the
correct service interval. See Scheduled
Maintenance (page 507).
The automatic transmission does not have
a transmission fluid dipstick.
Refer to your scheduled maintenance
information for scheduled intervals for fluid
checks and changes. Your transmission
does not consume fluid. However, if the
transmission slips, shifts slowly or if you
notice a sign of leaking fluid, contact an
authorized dealer.
Do not use supplemental transmission
fluid additives, treatments or cleaning
agents. The use of these materials may
affect transmission operation and result
in damage to internal transmission
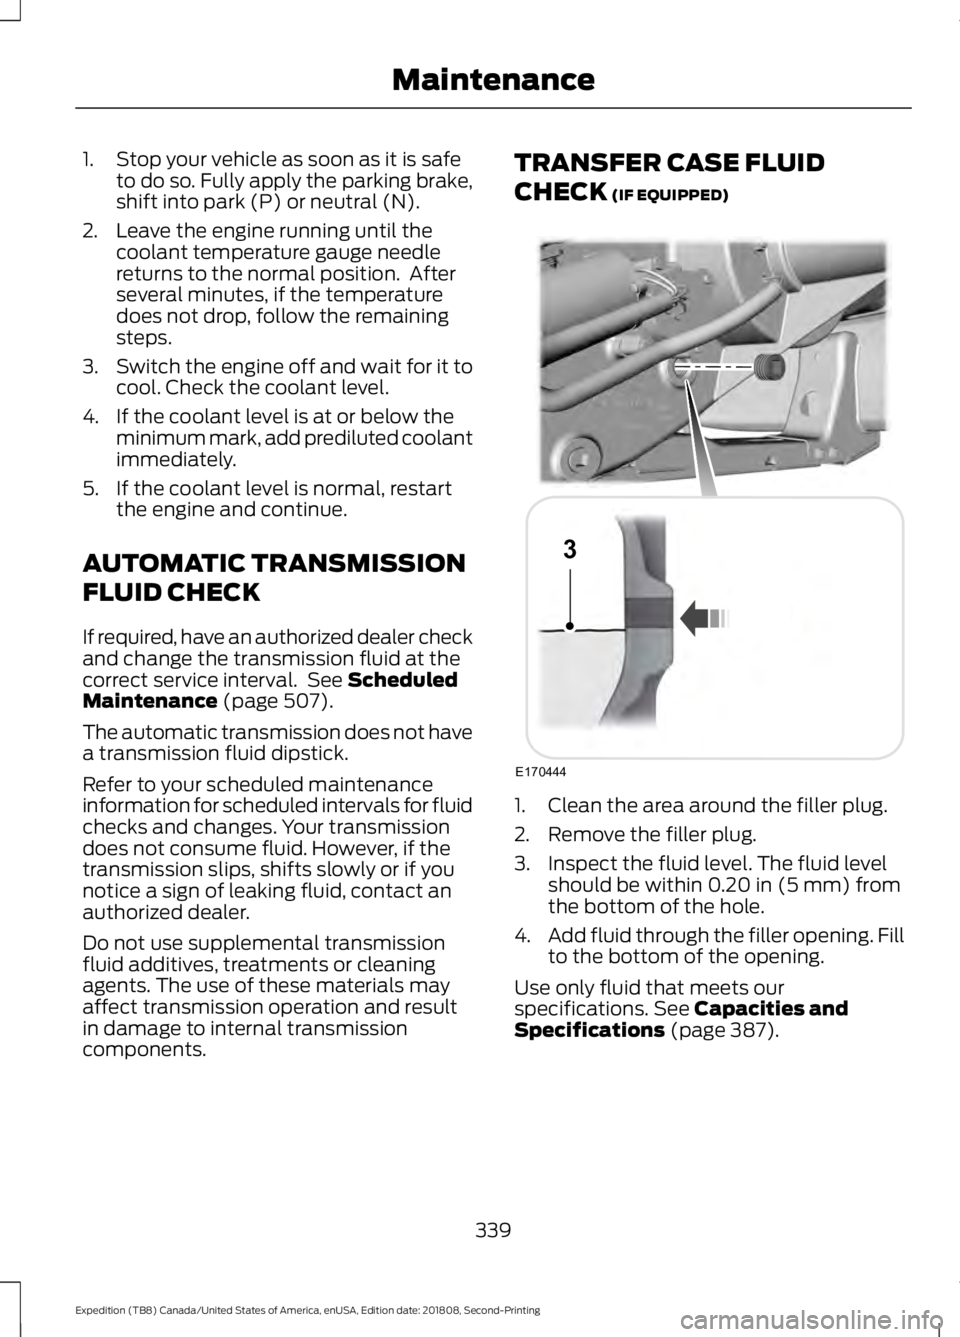
components. TRANSFER CASE FLUID
CHECK
(IF EQUIPPED)
1. Clean the area around the filler plug.
2. Remove the filler plug.
3. Inspect the fluid level. The fluid level
should be within
0.20 in (5 mm) from
the bottom of the hole.
4. Add fluid through the filler opening. Fill
to the bottom of the opening.
Use only fluid that meets our
specifications.
See Capacities and
Specifications (page 387).
339
Expedition (TB8) Canada/United States of America, enUSA, Edition date: 201808, Second-Printing MaintenanceE170444
3
Page 395 of 583
Capacity
Item
39 oz (1.11 kg)
A/C refrigerant (Mexico)
6.1 fl oz (180 ml)
A/C refrigerant compressor oil
1 Reference the reservoir cap for proper fluid.
2 The rear axle is filled with synthetic rear axle lubricant, and it is considered lubricated
for life. Do not check or change the lubricant unless you suspect a leak or submerge the
axle in water. Contact an authorized dealer.
3 Add 4 fl. oz. (118 ml) of Additive Friction Modifier XL-3 or equivalent for complete refill
of our limited-slip differential.
4 Approximate dry fill capacity. Actual amount may vary during fluid changes.
Specifications
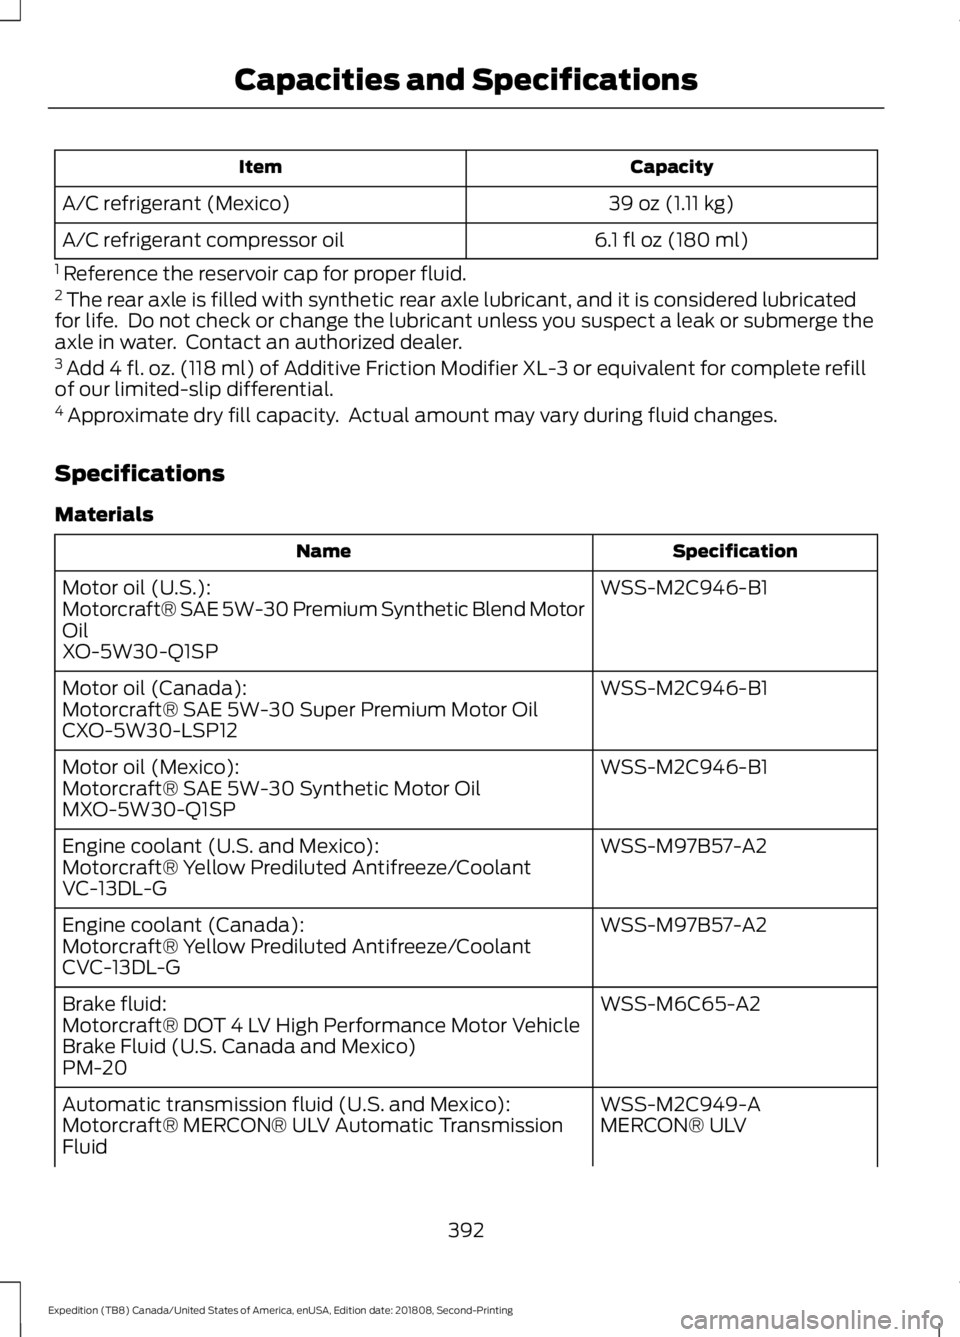
Materials Specification
Name
WSS-M2C946-B1
Motor oil (U.S.):
Motorcraft® SAE 5W-30 Premium Synthetic Blend Motor
Oil
XO-5W30-Q1SP
WSS-M2C946-B1
Motor oil (Canada):
Motorcraft® SAE 5W-30 Super Premium Motor Oil
CXO-5W30-LSP12
WSS-M2C946-B1
Motor oil (Mexico):
Motorcraft® SAE 5W-30 Synthetic Motor Oil
MXO-5W30-Q1SP
WSS-M97B57-A2
Engine coolant (U.S. and Mexico):
Motorcraft® Yellow Prediluted Antifreeze/Coolant
VC-13DL-G
WSS-M97B57-A2
Engine coolant (Canada):
Motorcraft® Yellow Prediluted Antifreeze/Coolant
CVC-13DL-G
WSS-M6C65-A2
Brake fluid:
Motorcraft® DOT 4 LV High Performance Motor Vehicle
Brake Fluid (U.S. Canada and Mexico)
PM-20
WSS-M2C949-A
Automatic transmission fluid (U.S. and Mexico):
MERCON® ULV
Motorcraft® MERCON® ULV Automatic Transmission
Fluid
392
Expedition (TB8) Canada/United States of America, enUSA, Edition date: 201808, Second-Printing Capacities and Specifications
Page 513 of 583
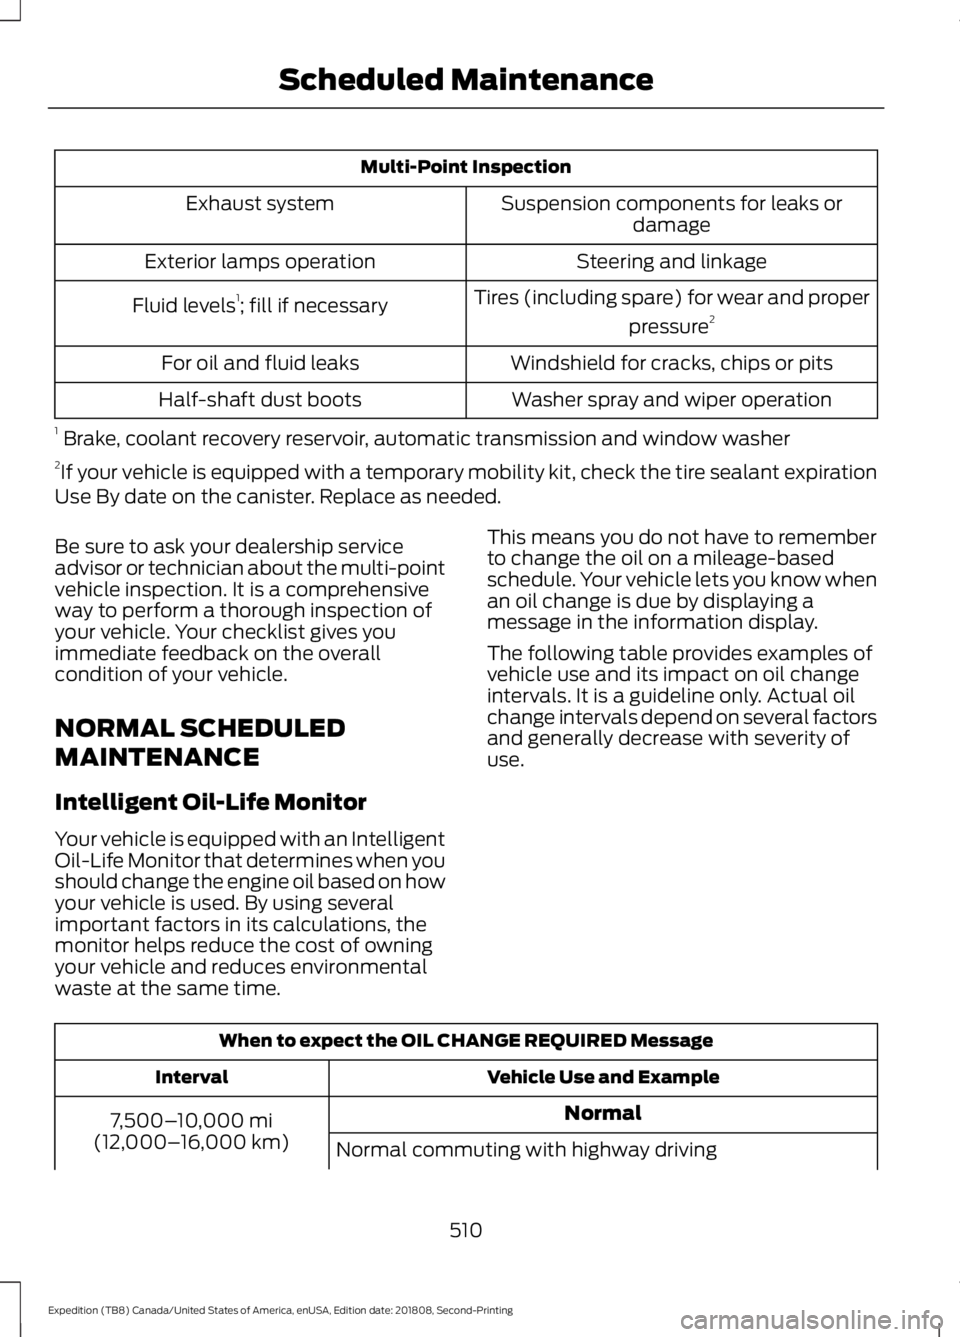
Multi-Point Inspection
Suspension components for leaks ordamage
Exhaust system
Steering and linkage
Exterior lamps operation
Tires (including spare) for wear and properpressure2
Fluid levels 1
; fill if necessary
Windshield for cracks, chips or pits
For oil and fluid leaks
Washer spray and wiper operation
Half-shaft dust boots
1 Brake, coolant recovery reservoir, automatic transmission and window washer
2 If your vehicle is equipped with a temporary mobility kit, check the tire sealant expiration
Use By date on the canister. Replace as needed.
Be sure to ask your dealership service
advisor or technician about the multi-point
vehicle inspection. It is a comprehensive
way to perform a thorough inspection of
your vehicle. Your checklist gives you
immediate feedback on the overall
condition of your vehicle.
NORMAL SCHEDULED
MAINTENANCE
Intelligent Oil-Life Monitor
Your vehicle is equipped with an Intelligent
Oil-Life Monitor that determines when you
should change the engine oil based on how
your vehicle is used. By using several
important factors in its calculations, the
monitor helps reduce the cost of owning
your vehicle and reduces environmental
waste at the same time. This means you do not have to remember
to change the oil on a mileage-based
schedule. Your vehicle lets you know when
an oil change is due by displaying a
message in the information display.
The following table provides examples of
vehicle use and its impact on oil change
intervals. It is a guideline only. Actual oil
change intervals depend on several factors
and generally decrease with severity of
use.
When to expect the OIL CHANGE REQUIRED Message
Vehicle Use and Example
Interval
Normal
7,500– 10,000 mi
(12,000– 16,000 km)
Normal commuting with highway driving
510
Expedition (TB8) Canada/United States of America, enUSA, Edition date: 201808, Second-Printing Scheduled Maintenance
Page 571 of 583
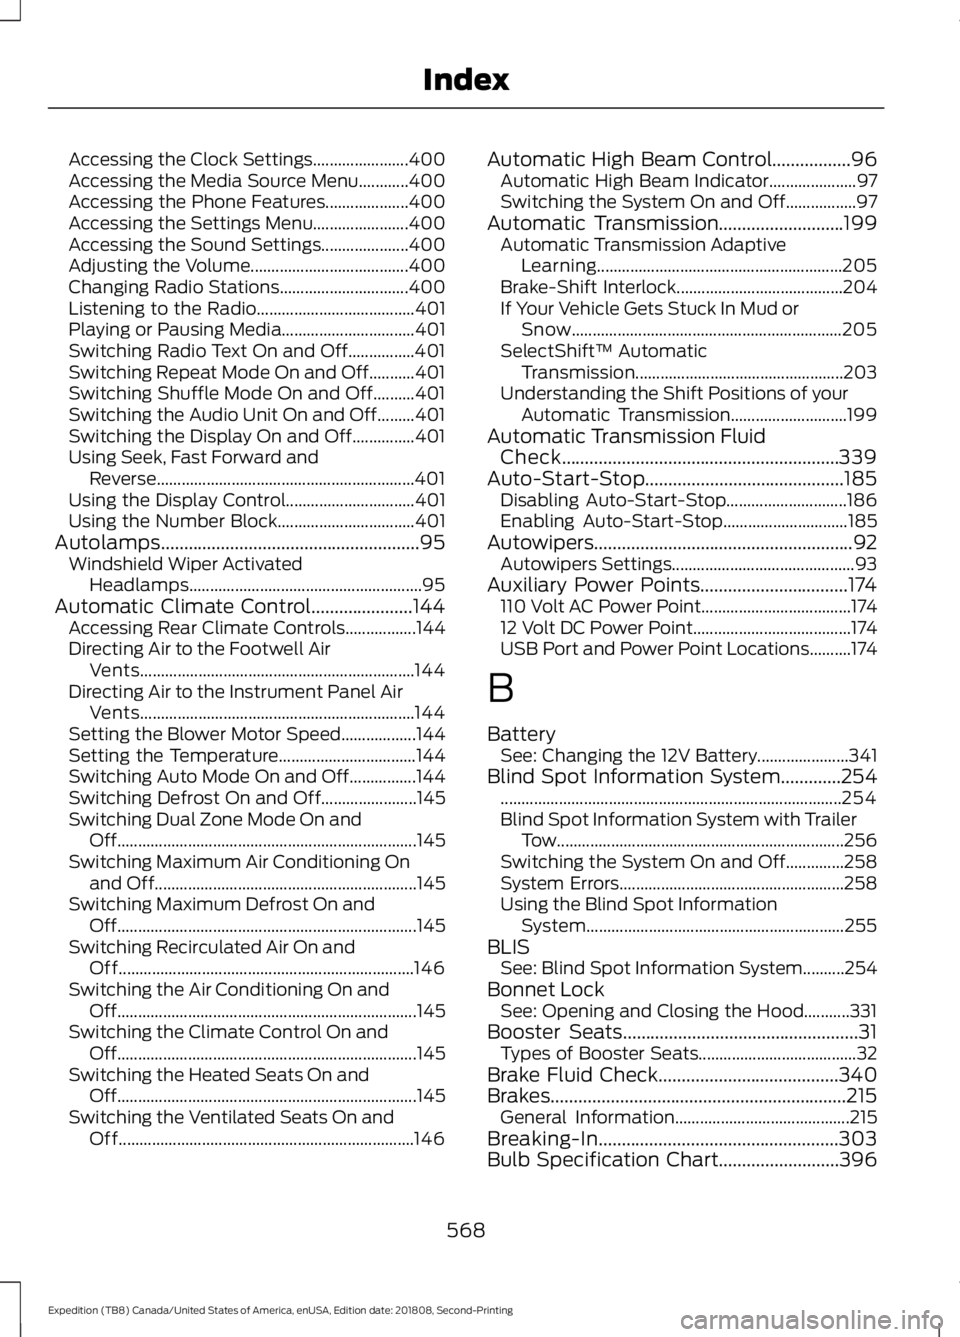
Accessing the Clock Settings.......................
400
Accessing the Media Source Menu............400
Accessing the Phone Features.................... 400
Accessing the Settings Menu....................... 400
Accessing the Sound Settings..................... 400
Adjusting the Volume...................................... 400
Changing Radio Stations............................... 400
Listening to the Radio...................................... 401
Playing or Pausing Media................................ 401
Switching Radio Text On and Off................401
Switching Repeat Mode On and Off...........401
Switching Shuffle Mode On and Off..........401
Switching the Audio Unit On and Off.........401
Switching the Display On and Off...............401
Using Seek, Fast Forward and Reverse.............................................................. 401
Using the Display Control............................... 401
Using the Number Block................................. 401
Autolamps........................................................95 Windshield Wiper Activated
Headlamps........................................................ 95
Automatic Climate Control......................144 Accessing Rear Climate Controls.................144
Directing Air to the Footwell Air
Vents.................................................................. 144
Directing Air to the Instrument Panel Air Vents.................................................................. 144
Setting the Blower Motor Speed.................. 144
Setting the Temperature................................. 144
Switching Auto Mode On and Off................144
Switching Defrost On and Off....................... 145
Switching Dual Zone Mode On and Off........................................................................\
145
Switching Maximum Air Conditioning On and Off............................................................... 145
Switching Maximum Defrost On and Off........................................................................\
145
Switching Recirculated Air On and Off....................................................................... 146
Switching the Air Conditioning On and Off........................................................................\
145
Switching the Climate Control On and Off........................................................................\
145
Switching the Heated Seats On and Off........................................................................\
145
Switching the Ventilated Seats On and Off....................................................................... 146Automatic High Beam Control.................96
Automatic High Beam Indicator..................... 97
Switching the System On and Off.................97
Automatic Transmission...........................199 Automatic Transmission Adaptive
Learning........................................................... 205
Brake-Shift Interlock........................................ 204
If Your Vehicle Gets Stuck In Mud or Snow................................................................. 205
SelectShift™ Automatic Transmission.................................................. 203
Understanding the Shift Positions of your Automatic Transmission............................ 199
Automatic Transmission Fluid Check............................................................339
Auto-Start-Stop...........................................185 Disabling Auto-Start-Stop............................. 186
Enabling Auto-Start-Stop.............................. 185
Autowipers........................................................92
Autowipers Settings............................................ 93
Auxiliary Power Points................................174 110 Volt AC Power Point.................................... 174
12 Volt DC Power Point...................................... 174
USB Port and Power Point Locations..........174
B
Battery See: Changing the 12V Battery...................... 341
Blind Spot Information System
.............254
........................................................................\
.......... 254
Blind Spot Information System with Trailer Tow..................................................................... 256
Switching the System On and Off..............258
System Errors...................................................... 258
Using the Blind Spot Information System.............................................................. 255
BLIS See: Blind Spot Information System..........254
Bonnet Lock See: Opening and Closing the Hood...........331
Booster Seats
...................................................31
Types of Booster Seats...................................... 32
Brake Fluid Check
.......................................340
Brakes................................................................215 General Information.......................................... 215
Breaking-In....................................................303
Bulb Specification Chart..........................396
568
Expedition (TB8) Canada/United States of America, enUSA, Edition date: 201808, Second-Printing Index