Page 257 of 284
CONTROLS BEHIND THE STEERING WHEEL
Buttons Interaction
Button A (left side, behind the steering wheel)
Upper button
Brief button press: search for next radio station or selection of USB next track
Long button press: scan of higher frequencies until released/fast forward of USB
track
Central buttonWith each press it scrolls through sources AM, FM, USB, AUX (where provided). Only
the available sources will be selected.
Lower button
Brief button press: search for next radio station or select USB previous track
Long button press: scan of lower frequencies until released/fast forward of track
on USB and SD (where provided).
Button B (right side, behind the steering wheel)
Upper buttonIncreasing volume
Brief button press: single volume increase.
Long button press: fast volume increase.
Central button Activation/deactivation of Mute function
Lower buttonDecreasing volume
Brief button press: single volume decrease.
Long button press: fast volume decrease.
255
Page 258 of 284
 SWITCHING THE SYSTEM
ON/OFF
The system is switched on/off by
pressing the
button/knob.
Turn the button/knob clockwise to
increase the radio volume or
anticlockwise to decrease it. The
electronic volum")
SWITCHING THE SYSTEM
ON/OFF
The system is switched on/off by
pressing the
button/knob.
Turn the button/knob clockwise to
increase the radio volume or
anticlockwise to decrease it. The
electronic volume adjustment control
rotates continuously (360°) in both
directions, without stop positions.
"TOUCH SCREEN"
FUNCTION
The system uses the "touch screen”
function; to interact with the different
functions, press the "graphic buttons"
displayed.
Confirming a selection: press the
"OK" button.
Return to the previous screen: press
the
(Delete) button or, depending
on the active screen,
/Done.
RADIO MODE
After the desired radio station is
selected, the following information is
shown on the display:
At the top: the list of radio stations
stored (preset) is displayed; the station
currently playing is highlighted.
At the centre: the name of station
being listened too is displayed.On the left side: the "AM", "FM",
"DAB” (for versions/markets, where
provided) buttons to select the desired
frequency band are displayed (the
button corresponding to the selected
band is highlighted);
On the right: display of the following
buttons:
“Info”: additional information on the
source being listened to;
“Map": navigation map view (versions
withUconnect™7" HD Nav LIVE
only).
At the bottom: display of the following
buttons:
“Browse”: list of the radio stations
available;
/selecting previous/next
radio station;
“Tune” : manual radio station tuning;
“Audio”: access to the “Audio
Settings” screen.
Audio menu
To access the "Audio" menu press the
Audio" button located at the bottom of
the display.
The following adjustments can be
carried out using the “Audio” menu:
“Balance & Fader" (left/right and
front/rear audio balance adjustment)
"Equaliser" (for versions/markets,
where provided)
“Speed Adj Volume” (speed-
dependent automatic volume control)
"Loudness" (for versions/markets,
where provided)
“AUX Volume compensation” (only
active if an AUX device is inserted)
(where provided)
“AutoPlay”
“Auto-On Radio”
MEDIA MODE
Press the "Media" button to select the
desired audio source among those
available: USB,
Bluetooth®
and AUX
(where provided).
IMPORTANT Applications used on
portable devices may be not
compatible with theUconnect™
system.
After Media mode is selected, the
following information is shown on the
display.
At the top: information on the track
being played and the following graphic
buttons:
“Repeat”: to repeat the track being
played
“Shuffle”: to play the tracks in
random order
Track progress and duration
In the middle: information on the track
being played.
256
MULTIMEDIA
Page 259 of 284
 On the left: display of the following
buttons:
Selected device or audio source
“Select Source”: select the required
audio source
On the right: display of the following
buttons:
\"Info\": add")
On the left: display of the following
buttons:
Selected device or audio source
“Select Source”: select the required
audio source
On the right: display of the following
buttons:
"Info": additional information about
the track playing
“Tracks”: list of available tracks
“Map": navigation map view (versions
withUconnect™7" HD Nav LIVE only)
At the bottom: information on the
track being played and the following
graphic buttons:
“Bluetooth” (forBluetooth®
audio
source): displays the list of devices
“Browse” (for USB source): opens
browsing
/: previous/next track
selection;
: pause track being played
“Audio”: access to the “Audio
Settings” screen
Track selection
The “Tracks” function allows you to
open a window with the list of tracks
being played.
The choices available depend on the
device connected. For example, on a
USB device you can also scroll through
the list of artists, genres and albums
available on the device depending onthe information present on the tracks
using the TUNE SCROLL button/knob
or by means of the
and
buttons.
Within each list, the “ABC” button
allows the user to skip to the desired
letter in the list.
NOTE This button might be disabled for
some
Apple®
devices.
NOTE The TUNE SCROLL button does
not allow any operation on an AUX
device (where provided).
Bluetooth® SOURCE
This mode is activated by pairing a
Bluetooth®
device containing music
tracks with the system.
PAIRING A Bluetooth®
AUDIO DEVICE
To pair aBluetooth®
audio device,
proceed as follows:
activate theBluetooth®
function on
the device;
press the “Media” button on the
display;
press the "Select Source" button;
select theBluetooth®
Media
source;
press the "Add Device" button;
search forUconnect™on the
Bluetooth®
audio device (during the
pairing stage a screen is displayed
showing the progress of the operation);
when requested by the audio device,
enter the PIN code shown on the
system display or confirm on the device
the PIN displayed;
if the pairing procedure is completed
successfully, a screen is displayed.
Answer “Yes” to the question to pair the
Bluetooth®
audio device as favourite
(the device will have priority over all
other devices to be paired
subsequently). If “No” is selected, the
priority is determined according to the
order of connection. The last device
connected will have the highest priority;
an audio device can also be paired
by pressing the "Phone" graphic button
on the display and by selecting
"Settings" or selecting "Phone/
Bluetooth” from the "Settings" menu.
NOTE When modifying the
name-device in the
Bluetooth®
settings of the phone (where provided),
the Radio may change the track being
played if the device is connected via
USB after the
Bluetooth®
connection.
After updating the phone software, for
proper operation, it is recommended to
remove the phone from the list of
devices linked to the radio, delete the
previous system pairing also from the
list of
Bluetooth®
devices on the
phone and make a new pairing.
257
Page 260 of 284
 IMPORTANT If theBluetooth®
connection between mobile phone and
system is lost, consult the mobile
phone handbook.
USB SOURCE
To activate USB mode, plug a
compatible device into the USB port on
the ce")
IMPORTANT If theBluetooth®
connection between mobile phone and
system is lost, consult the mobile
phone handbook.
USB SOURCE
To activate USB mode, plug a
compatible device into the USB port on
the central tunnelfig. 191 or, where
provided, into the USB port on the back
of the central console fig. 192.
IMPORTANT After using a USB
recharging socket, we recommend
disconnecting the device (smartphone),
always removing the cable from the
vehicle socket first, never from the
device (example infig. 191 ). Cables left
flying or connected incorrectly could
compromise correct recharging and/or
the USB socket condition.
TheUconnect™system may not
support some USB keys: in this case, it
may not automatically switch from
“Radio” mode to “Media” mode.
If the device used does not play, verify
its compatibility by selecting Media
mode: a dedicated message will appear
on theUconnect™system display.
NOTE The USB ports handle data
transmission from the Pen
Drive/Smartphone, etc. and slow
recharging of an external device, which
is not guaranteed as it depends on the
device type/brand.
USB charging port
(where provided)
Some versions have a USB charging
port on the central tunnel fig. 193.
When a USB device is inserted with the
radio on, it starts to play the tracks on
the device if the “AutoPlay” is set to
"ON" in the “Audio” menu.
AUX SOURCE(where provided)
To activate AUX mode, insert an
appropriate device in the AUX socket in
the car.
When a device is inserted using the
AUX output socket the system starts
reproducing the AUX source
connected, if it is already being played.
Adjust the volume using the
button/knob on the front panel
or using the volume adjustment control
on the connected device.
The "AUX Volume Offset" function can
be selected in “Audio” settings only
when the AUX source is active.
IMPORTANT NOTES
The functions of the device connected
with the AUX socket are directly
managed by the device itself: it is not
possible to change track/folder/playlist
191F1B0383C
192F1B0734
193F1B0212C
258
MULTIMEDIA
Page 261 of 284
 or control playing start/end/pause with
the controls on the front panel or on the
steering wheel.
To avoid possible speaker noise, do not
leave the cable of the portable reader
connected to the AUX so")
or control playing start/end/pause with
the controls on the front panel or on the
steering wheel.
To avoid possible speaker noise, do not
leave the cable of the portable reader
connected to the AUX socket after
disconnection.
PHONE MODE
Phone mode activation
Press the “Phone” button on the display
to activate the Phone mode.
NOTE To consult the list of mobile
phones and supported functions, visit
the www.driveuconnect.eu website
Use the buttons on the display to:
dial the phone number (using the
graphic keypad on the display);
display and call the contacts in the
mobile phone phonebook;
display and call contacts from the
registers of previous calls;
pair up to 10 phones/audio devices
to make access and connection easier
and quicker;
transfer calls from the system to the
mobile phone and vice versa and
deactivate the microphone audio for
private conversations.
The mobile phone audio is transmitted
through the vehicle’s audio system; the
system automatically mutes the radio
when the Phone function is used.Pairing a mobile phone
IMPORTANT Carry out this operation
only with vehicle stationary and in safety
conditions; this function is deactivated
when the vehicle is moving.
The pairing procedure for a mobile
phone is described below: always
consult the handbook for the mobile
phone in any case.
To pair the mobile phone, proceed as
follows:
activate theBluetooth®
function on
the mobile phone;
press the “Phone” button on the
display;
if no phone is paired with the system
yet, the display shows a dedicated
screen;
access “Settings” and select “Add
device” to start the pairing procedure,
then search for theUconnect™device
on the mobile phone;
when prompted by the mobile
phone, use its keypad to enter the PIN
code shown on the system display or
confirm on the mobile phone the PIN
displayed;
during the pairing stage a screen is
displayed showing the progress of the
operation;
when the pairing procedure is
completed successfully, a screen is
displayed: answer “Yes” to the questionto pair the mobile phone as favourite
(the mobile phone will have priority over
all other mobile phones to be paired
subsequently). If no other devices are
paired, the system will consider the first
associated device as favourite.
NOTE After updating the phone
software, for proper operation, it is
recommended to remove the phone
from the list of devices linked to the
radio, delete the previous system
pairing also from the list of
Bluetooth®
devices on the phone and make a new
pairing.
Making a phone call
The operations described below can
only be accessed if supported by the
mobile phone in use. For all functions
available, refer to the mobile phone
owner's handbook.
A call can be made by:
selecting "Phonebook";
selecting "Recent";
selecting "Dial";
selecting "Redial".
Favourites
You can add a number or a contact (if
already in Contacts) to the favourite list
during a call by pressing one of the 5
"Empty" graphic buttons on the upper
part of the display. The favourites can
also be managed by using the
Phonebook options
259
Page 262 of 284
 Text message reader
The system can read the messages
received by the mobile phone. To use
this function the mobile phone must
support the SMS exchange function
through
Bluetooth®
.
If this function i")
Text message reader
The system can read the messages
received by the mobile phone. To use
this function the mobile phone must
support the SMS exchange function
through
Bluetooth®
.
If this function is not supported by the
phone, the corresponding "Text" button
is deactivated (greyed out).
When a text message is received, the
display will show a screen where the
options "Read", "Show", "Call" or
"Ignore" can be selected.
Press the "Text Message" graphic
button to access the list of text
messages received by the mobile
phone (the list displays a maximum of
60 messages received).
NOTE On some mobile phones, to
make the SMS voice reading function
available, the SMS notification option
on the phone must be enabled; this
option is usually available on the phone,
in the
Bluetooth®
connections menu
for a device registered asUconnect™.
After enabling this function on the
mobile phone, it must be disconnected
and reconnected with theUconnect™
system in order to make it effective.
IMPORTANT Some mobile phones may
not take the SMS delivery confirmation
settings into account when interfacing
withUconnect™. If a text message issent via theUconnect™system, the
driver could face an additional cost,
without any warning, due to the text
message delivery confirmation request
sent by the phone. For any problems
related to the above, contact your
telephone service provider.
"Do not disturb" function
If supported by the connected phone,
by pressing the "Do not disturb"
graphic button the user will not receive
notifications of incoming calls or text
messages. The user can reply with a
default or customised message by
means of the settings.
SMS message options
Default SMS messages are stored in
the system memory and can be sent to
answer a received message or as a
new message.
Ye s
No
Okay
I can't talk right now
Call me
I'll call you later
I'm on my way
Thanks
I'll be late
Stuck in traffic
Start without me
Where are you?
Are you there yet?
I need directions
I'm lost
See you later
I will be 5 (or 10, 15, 20, 25, 30, 45,
60) (*) minutes late
See you in 5 (or 10, 15, 20, 25, 30,
45, 60) (*) minutes
(*) Only use the numbers listed,
otherwise the system will not take the
message. When receiving an SMS, the
systems also allows the same message
to be forwarded.
NOTE For details on how to send an
SMS using the voice commands, refer
to the dedicated paragraph.
Browsing text messages
(where provided)
Using the steering wheel commands,
you can view and manage the last
10 SMS messages received on the
instrument panel display. To use this
function the mobile phone must
support the SMS exchange function
through
Bluetooth®
.
Select “Phone” on the instrument panel
Setup Menu and then select “SMS
reader” using the steering wheel
controls. The "SMS reader" submenu
allows the last 10 SMS messages to be
displayed.
260
MULTIMEDIA
Page 263 of 284
 Browsing favourites
(where provided)
Using the steering wheel commands,
you can view and manage your
favourite phone numbers on the
instrument panel display. To use this
function, the mobile phone mus")
Browsing favourites
(where provided)
Using the steering wheel commands,
you can view and manage your
favourite phone numbers on the
instrument panel display. To use this
function, the mobile phone must
support SNS exchange via
Bluetooth®
and the favourite numbers
must have been saved previously as
such in theUconnect™system.
Use the steering wheel controls to
select “Phone” on the instrument panel
Setup Menu. If the phone is connected,
select the "Favourite numbers" option:
the "Favourite numbers" submenu
enables you to view and select the
favourite number.
If the "Phone" option is selected with
the phone not connected, the list of
favourite numbers cannot be viewed.
Uconnect™ LIVE
SERVICES
Press theUconnect™button to
access theUconnect™LIVE
applications.
The application functions are present
according to the vehicle configuration
and to the market.To use theUconnect™LIVEservices,
you need to download the
Uconnect™LIVEApp from Google
Play or Apple Store and register using
the app or on www.driveuconnect.eu
First access to the car
After starting theUconnect™LIVE
App and entering your credentials, to
access theUconnect™LIVEApp
services in the car you need
Bluetooth®
pairing between your
smart phone and theUnconnect
™system as described in the
"Registering your cell phone" chapter.
The list of supported mobile phones is
available on www.driveuconnect.eu
After pairing, press the
Uconnect™LIVEbutton on the display
to access the connected services.
Before using the connected services,
you must complete the activation
procedure following the instructions that
appear in theUconnect™LIVEApp
once the
Bluetooth®
pairing has been
completed
Uconnect™ LIVE services setup
using the Uconnect™ system
Through theUconnect™ LIVE
services you can access the "Settings"
section by pressing the
icon. You
can then check the system options and
change them according to your
preferences .System updates
If an update for theUconnect™LIVE
system is available while the
Uconnect™LIVEservices are being
used, the driver will be informed with a
message on the display of the system.
Connected services that can be
accessed on the car
Theeco:Drive™applications and
my:Carapplications are developed to
improve the customer's driving
experience, and they are therefore
usable in all the markets where the
Uconnect™LIVEservices are
accessible.
OnUconnect™7” HD Nav LIVE
versions, the access to
Uconnect™LIVEservices enables the
use of “LIVE” services.
eco:Drive™
Theeco:Drive™application allows you
to display your driving behaviour in real
time, in order to help you achieve a
more efficient driving style as far as
consumption and emissions are
concerned.
In addition, the data can be saved on a
USB flash drive, and the data analysis
can be made on your personal
computer thanks to theeco:Drive™
desktop application, available on
www.fiat.it (for Italy) or www.fiat.com
261
Page 264 of 284
 (for other countries) or
www.driveuconnect.eu
Driving style is evaluated by means of
four indices which monitor the following
parameters:
Acceleration
Deceleration
Transmission
Speed
Display of the ec")
(for other countries) or
www.driveuconnect.eu
Driving style is evaluated by means of
four indices which monitor the following
parameters:
Acceleration
Deceleration
Transmission
Speed
Display of the eco:Drive™
Press theeco:Drive™button to
interact with the function. A screen will
be displayed showing the 4 indices
described above.
These indices are grey until the system
has enough data to evaluate the driving
style. Once sufficient data are available,
the indices will have 5 colours
depending on the evaluation: dark
green (very good), light green, yellow,
orange and red (very bad).
In the event of extended inactivity the
display will show the average of the
indices up to that moment (“Average
index”) then the indices will be coloured
again in real time as soon as the car is
restarted.
Recording and transferring trip data
The trip data can be stored in the
system memory and transferred
through a properly configured USB
memory stick or by theUconnect™LIVE App. This allows you
to display the history of the collected
data, showing the complete analysis of
the trip data and of your driving style.
For further information visit the
www.driveuconnect.eu website
IMPORTANT Do not remove the USB
memory stick nor unpair the
smartphone and theUconnect™LIVE
App before the system has
downloaded the data, since these
could be lost. During the transfer of
data to the devices,Uconnect™
messages may appear on the display
to guide the user correctly through the
operation; follow these instructions.
These messages are only displayed
with the ignition device at STOP and
when a delay in theUconnect™
system switching off is set. The data
are automatically transferred to the
devices when the engine is switched
off. Transferred data will be deleted
from the system memory in this
manner. You can choose to store the
trip data or not, by pressing the
"Settings" button and by setting the
storage activation and the transfer
mode (USB or Cloud), as required.
When the USB memory stick is full, the
dedicated messages are shown on the
Uconnect™system display.
When theeco:Drive™data have notbeen transferred to the USB key for a
while, theUconnect™system internal
memory could become saturated: in
this case, follow the recommendations
provided by the messages on the
display.
my:Car
my:Carallows you to keep the
condition of your car always under
control. Themy:Carapplication is
capable of detecting malfunctioning in
real time and lets the driver know about
the expiry of maintenance coupons, To
interact with the application, press "
my:Car" button: a screen will appear
on the display showing the "care:Index"
section which contains detailed
information on car status. Press the
"Active warnings" button to show the
details of any faults on the car which
caused a warning light to switch on.
The car status can be seen both on
www.driveuconnect.eu or through the
Uconnect™LIVEApp.
Apple CarPlay AND
Android Auto
(where provided)
The Apple CarPlay and Android Auto
applications allow you to use your
smartphone in the car safely and
intuitively.
262
MULTIMEDIA
 1
1 2
2 3
3 4
4 5
5 6
6 7
7 8
8 9
9 10
10 11
11 12
12 13
13 14
14 15
15 16
16 17
17 18
18 19
19 20
20 21
21 22
22 23
23 24
24 25
25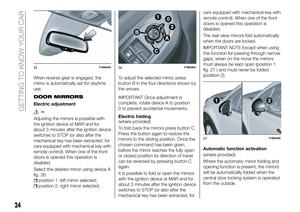 26
26 27
27 28
28 29
29 30
30 31
31 32
32 33
33 34
34 35
35 36
36 37
37 38
38 39
39 40
40 41
41 42
42 43
43 44
44 45
45 46
46 47
47 48
48 49
49 50
50 51
51 52
52 53
53 54
54 55
55 56
56 57
57 58
58 59
59 60
60 61
61 62
62 63
63 64
64 65
65 66
66 67
67 68
68 69
69 70
70 71
71 72
72 73
73 74
74 75
75 76
76 77
77 78
78 79
79 80
80 81
81 82
82 83
83 84
84 85
85 86
86 87
87 88
88 89
89 90
90 91
91 92
92 93
93 94
94 95
95 96
96 97
97 98
98 99
99 100
100 101
101 102
102 103
103 104
104 105
105 106
106 107
107 108
108 109
109 110
110 111
111 112
112 113
113 114
114 115
115 116
116 117
117 118
118 119
119 120
120 121
121 122
122 123
123 124
124 125
125 126
126 127
127 128
128 129
129 130
130 131
131 132
132 133
133 134
134 135
135 136
136 137
137 138
138 139
139 140
140 141
141 142
142 143
143 144
144 145
145 146
146 147
147 148
148 149
149 150
150 151
151 152
152 153
153 154
154 155
155 156
156 157
157 158
158 159
159 160
160 161
161 162
162 163
163 164
164 165
165 166
166 167
167 168
168 169
169 170
170 171
171 172
172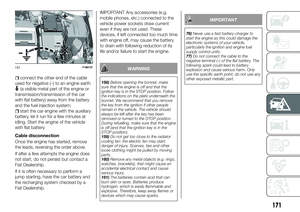 173
173 174
174 175
175 176
176 177
177 178
178 179
179 180
180 181
181 182
182 183
183 184
184 185
185 186
186 187
187 188
188 189
189 190
190 191
191 192
192 193
193 194
194 195
195 196
196 197
197 198
198 199
199 200
200 201
201 202
202 203
203 204
204 205
205 206
206 207
207 208
208 209
209 210
210 211
211 212
212 213
213 214
214 215
215 216
216 217
217 218
218 219
219 220
220 221
221 222
222 223
223 224
224 225
225 226
226 227
227 228
228 229
229 230
230 231
231 232
232 233
233 234
234 235
235 236
236 237
237 238
238 239
239 240
240 241
241 242
242 243
243 244
244 245
245 246
246 247
247 248
248 249
249 250
250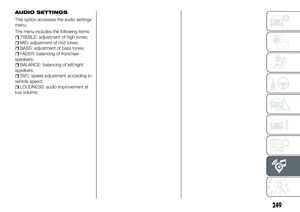 251
251 252
252 253
253 254
254 255
255 256
256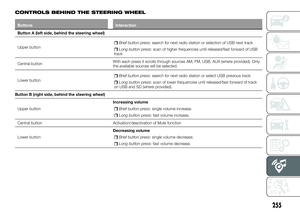 257
257 258
258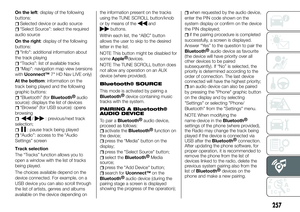 259
259 260
260 261
261 262
262 263
263 264
264 265
265 266
266 267
267 268
268 269
269 270
270 271
271 272
272 273
273 274
274 275
275 276
276 277
277 278
278 279
279 280
280 281
281 282
282 283
283 CONTROLS BEHIND THE STEERING WHEEL
Buttons Interaction
Button A (left side, behind the steering wheel)
Upper button
Brief button press: search for next radio station or selection of USB next track
Lon")