Page 63 of 496

Power Mirrors
The power mirror controls are located on the driver’s door
trim panel.
The power mirror controls consist of mirror select buttons
and a four-way mirror control switch. To adjust a mirror,
push either the L (left) or R (right) button to select the
mirror that you want to adjust.
NOTE:A light in the select button will illuminate indicat-
ing the mirror is activated and can be adjusted.
Using the mirror control switch, push on any of the four
arrows for the direction that you want the mirror to move.
Heated Mirrors — If Equipped
These mirrors are heated to melt frost or ice. This
feature will be activated whenever you turn on the
rear window defroster (if equipped). Refer to “Climate
Controls” in “Getting To Know Your Vehicle” for further
information.
Tilt Side Mirrors In Reverse — If Equipped
Tilt Side Mirrors In Reverse provides automatic outside
mirror positioning which will aid the driver ’s view of the
ground rearward of the front doors. The outside mirrors
will move slightly downward from the present position
when the vehicle is shifted into REVERSE. The outside
mirrors will then return to the original position when the
vehicle is shifted out of the REVERSE position. Each stored
memory setting will have an associated Tilt Side Mirrors In
Reverse position.
NOTE: The Tilt Side Mirrors In Reverse feature is not
turned on when delivered from the factory. The Tilt Side
Mirrors In Reverse feature can be turned on and off using
the Uconnect System. Refer to “Uconnect Settings” in
“Multimedia” for further information.
Power Mirror Control
3
GETTING TO KNOW YOUR VEHICLE 61
Page 78 of 496

IconDescription
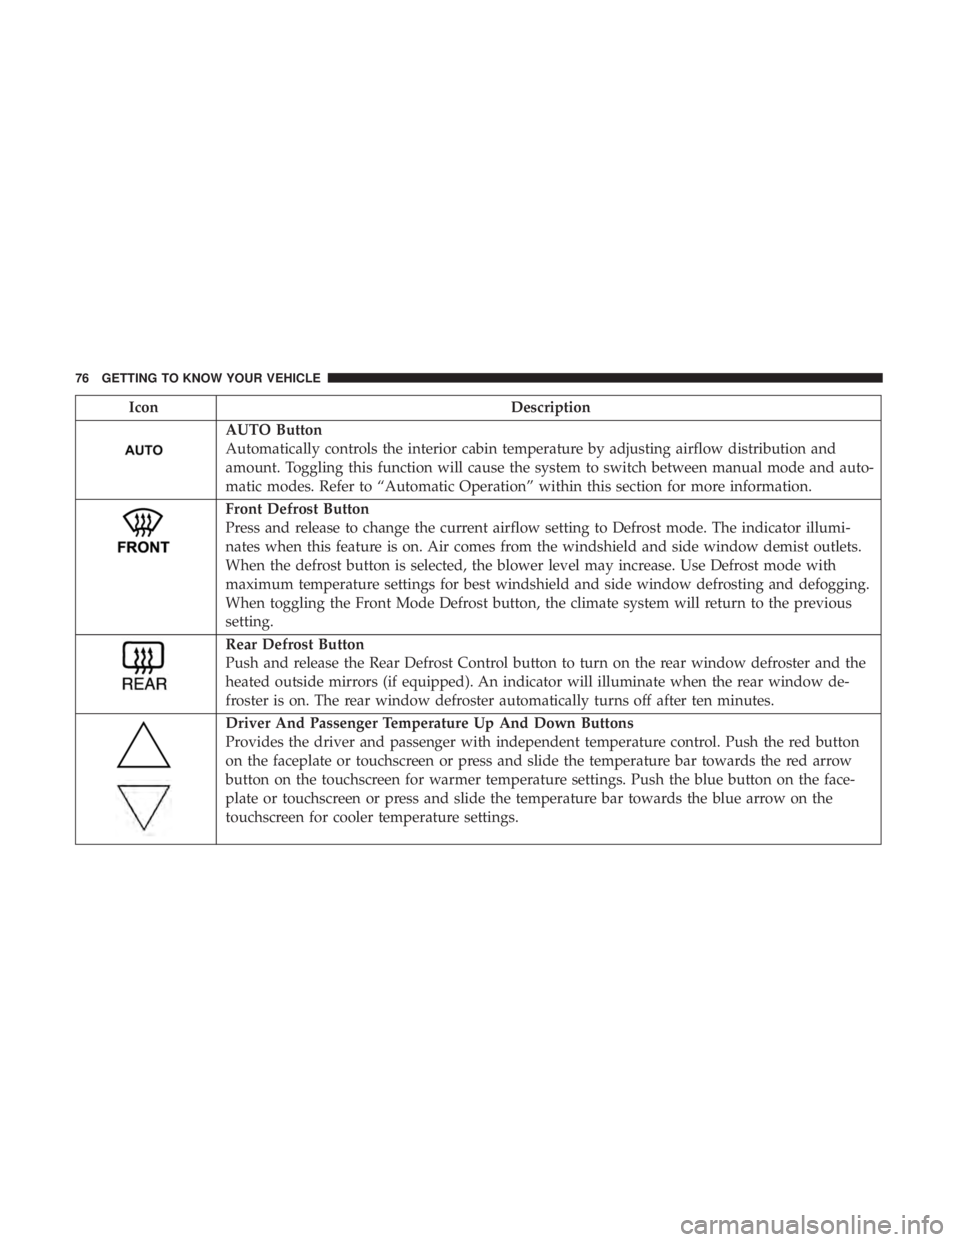
AUTO Button
Automatically controls the interior cabin temperature by adjusting airflow distribution and
amount. Toggling this function will cause the system to switch between manual mode and auto-
matic modes. Refer to “Automatic Operation” within this section for more information.
Front Defrost Button
Press and release to change the current airflow setting to Defrost mode. The indicator illumi-
nates when this feature is on. Air comes from the windshield and side window demist outlets.
When the defrost button is selected, the blower level may increase. Use Defrost mode with
maximum temperature settings for best windshield and side window defrosting and defogging.
When toggling the Front Mode Defrost button, the climate system will return to the previous
setting.
Rear Defrost Button
Push and release the Rear Defrost Control button to turn on the rear window defroster and the
heated outside mirrors (if equipped). An indicator will illuminate when the rear window de-
froster is on. The rear window defroster automatically turns off after ten minutes.
Driver And Passenger Temperature Up And Down Buttons
Provides the driver and passenger with independent temperature control. Push the red button
on the faceplate or touchscreen or press and slide the temperature bar towards the red arrow
button on the touchscreen for warmer temperature settings. Push the blue button on the face-
plate or touchscreen or press and slide the temperature bar towards the blue arrow on the
touchscreen for cooler temperature settings.
76 GETTING TO KNOW YOUR VEHICLE
Page 214 of 496

STARTING THE ENGINE
Before starting your vehicle, adjust your seat, adjust the
inside and outside mirrors, fasten your seat belt, and if
present, instruct all other occupants to buckle their seat
belts.
WARNING!
•When exiting the vehicle, always make sure the
ignition is in “OFF” mode, remove the key fob from
the vehicle and lock the vehicle.
• Never leave children alone in a vehicle, or with
access to an unlocked vehicle. Leaving children in a
vehicle unattended is dangerous for a number of
reasons. A child or others could be seriously or
fatally injured. Children should be warned not to
touch the parking brake, brake pedal or the trans-
mission gear selector.
• Do not leave the key fob in or near the vehicle (or in
a location accessible to children), and do not leave
the ignition (of a vehicle equipped with Keyless
Enter-N-Go) in the ACC or ON/RUN mode. A child
could operate power windows, other controls, or
move the vehicle.
(Continued)
WARNING! (Continued)
•Do not leave children or animals inside parked
vehicles in hot weather. Interior heat build-up may
cause serious injury or death.
Automatic Transmission
The gear selector must be in the PARK position before you
can start the engine. Apply the brakes before shifting into
any driving gear.
CAUTION!
Damage to the transmission may occur if the following
precautions are not observed:
• Shift into or out of PARK or REVERSE only after the
vehicle has come to a complete stop.
• Do not shift between PARK, REVERSE, NEUTRAL,
or DRIVE when the engine is above idle speed.
• Before shifting into any gear, make sure your foot is
firmly pressing the brake pedal.
212 STARTING AND OPERATING
Page 285 of 496
HAZARD WARNING FLASHERS
The Hazard Warning flasher switch is located on the switch
bank just above the climate controls.Push the switch to turn on the Hazard Warning
flasher. When the switch is activated, all direc-
tional turn signals will flash on and off to warn
oncoming traffic of an emergency. Push the
switch a second time to turn off the Hazard Warning
flashers.
This is an emergency warning system and it should not be
used when the vehicle is in motion. Use it when your
vehicle is disabled and it is creating a safety hazard for
other motorists.
When you must leave the vehicle to seek assistance, the
Hazard Warning flashers will continue to operate even
though the ignition is placed in the OFF position.
NOTE: With extended use, the Hazard Warning flashers
may discharge the battery.
ASSIST AND SOS MIRROR — IF EQUIPPED
If equipped, the rearview mirror contains an ASSIST and a
SOS button.
Assist And SOS Mirror
7
IN CASE OF EMERGENCY 283