2019 AUDI TT ROADSTER ignition
[x] Cancel search: ignitionPage 72 of 304
Assist systems
Assist systems
Speed warning system
Applies to: vehicles with speed warning system
The speed warning system helps you to stay be-
low a specified maximum speed that can be set,
changed or deleted in the Infotainment system.
The speed warning system warns you if you are
exceeding the maximum speed that you have set.
A warning tone will sound as soon as your speed
exceeds the stored value slightly. The oe) in-
dicator light and a message will appear in the in-
strument cluster display at the same time. The
owe indicator light and the message turn off if
the speed falls back below the stored maximum
speed.
Setting a threshold is recommended if you would
like to be reminded when you reach a certain
maximum speed. Situations where you may want
to do so include driving in a country with a gener-
al speed limit or if there is a specified maximum
speed for winter tires.
Setting the warning threshold
> Select in the Infotainment system: MENU but-
ton > Vehicle > left control button > Driver as-
sistance > Speed warning > Manual.
G) Tips
Regardless of the speed warning system, you
should always monitor your speed using the
speedometer and make sure you are following
the legal speed limit.
Cruise control system
Applies to: vehicles with cruise control system
The cruise control system assists the driver in
maintaining a constant speed above approxi-
mately 15 mph (20 km/h). The system maintains
the desired speed by braking and accelerating.
70
Z\ WARNING
— Always pay attention to the traffic around
your vehicle when the cruise control system
is in operation. As the driver, you are always
responsible for controlling your vehicle
speed and the distance between your vehicle
and
other vehicles.
— For safety reasons, cruise control should not
be used in the city, in stop-and-go traffic, on
winding roads, and when road conditions are
poor (such as ice, fog, gravel, heavy rain,
and conditions that could lead to hydroplan-
ing), because this increases the risk of an ac-
cident.
— Switch the cruise control off temporarily
when driving in turning lanes, highway exits,
or in construction zones.
—To reduce the risk of an accident, you should
only resume the stored speed if it is suitable
for the current traffic conditions.
() Note
Before driving downhill a long distance on a
steep hill, decrease your speed and select a
lower gear. This makes use of the engine brak-
ing effect and reduces the load placed on the
brakes.
G) Tips
The brake lights turn on when the brakes are
applied automatically.
Switching the system on
Applies to: vehicles with cruise control system
@ g
©
f ©
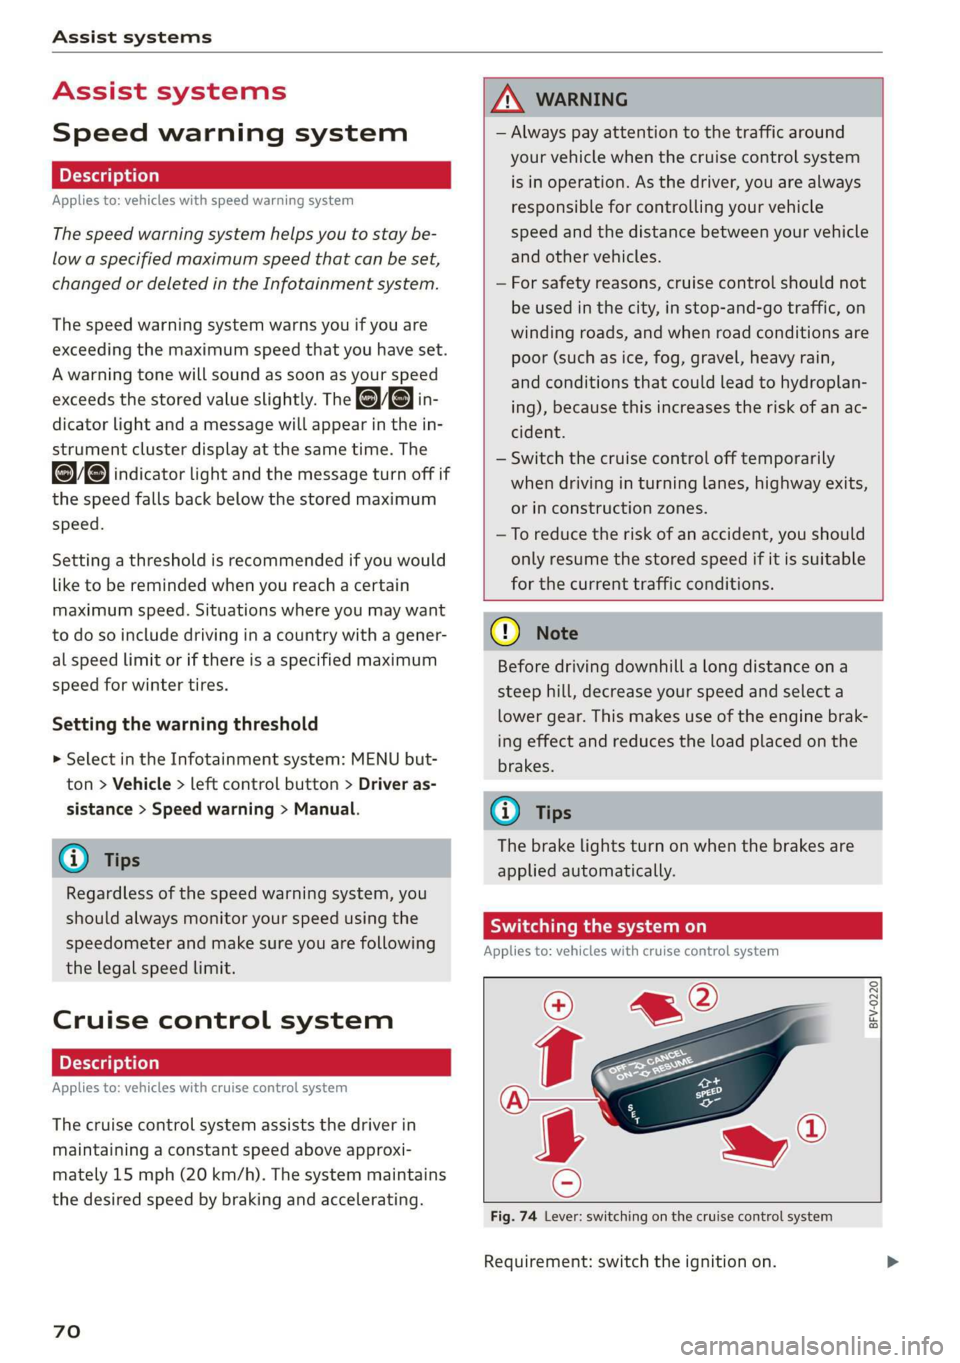
Fig. 74 Lever: switching on the cruise control system
Requirement: switch the ignition on.
Page 73 of 304
![AUDI TT ROADSTER 2019 Owners Manual 8S58012721BA
Assist systems
> To switch the system on, pull the lever toward
you to position @).
The Gig or (§] indicator light and the corre-
sponding message will appear in the instrument AUDI TT ROADSTER 2019 Owners Manual 8S58012721BA
Assist systems
> To switch the system on, pull the lever toward
you to position @).
The Gig or (§] indicator light and the corre-
sponding message will appear in the instrument](/manual-img/6/57667/w960_57667-72.png)
8S58012721BA
Assist systems
> To switch the system on, pull the lever toward
you to position @).
The Gig or (§] indicator light and the corre-
sponding message will appear in the instrument
cluster.
Z\ WARNING
If the brakes are malfunctioning (for example,
overheating) while the cruise control system
is switched on, it may shut off automatically.
Preselecting or activating a cruise control
ry ey-t-fe)
Applies to: vehicles with cruise control system
When the vehicle is stationary, you can preselect
the cruise control speed or activate the speed
while driving.
Requirement: the system must be switched on.
> To preselect a cruise control speed when the ve-
hicle is stationary, tap the lever toward @)/G)
=> page 70, fig. 74.
> To activate the cruise control speed, pull the
lever toward position @ while driving, or
> To set the current driving speed as the cruise
control speed, press the button () on the lever.
The active cruise control speed is indicated with
the ICRUISE| or BS indicator light in the instrument
cluster.
Changing the cruise control speed
Applies to: vehicles with cruise control system
> To increase or decrease the cruise control speed
in small increments, tap the lever up to the
first level toward @/@) > page 70, fig. 74.
> To increase or decrease the cruise control speed
in larger increments, tap the lever up to the
second level toward @)/G).
> To increase or decrease the cruise control speed
continuously, tap and hold the lever at the first
or second level toward (#)/G).
Overriding or deactivating the cruise
control speed
Applies to: vehicles with cruise control system
You can override or deactivate the cruise control
system. When you deactivate the system, your
cruise control speed will be stored and you can
resume that speed.
Requirement: the system must be switched on
and activated.
Overriding
> To temporarily override the cruise control
speed, press the accelerator pedal.
> Once you release the accelerator pedal, the sys-
tem will adjust back to the stored cruise control
speed.
If you override the cruise control system for a
long period of time, the cruise control system
will be deactivated. The system indicator light
will turn off and the cruise control speed will be
stored.
Deactivating
> To deactivate the cruise control speed, press
the lever toward (2) (not locked into place)
=> page 70, fig. 74.
> Press the brake pedal.
Z\ WARNING
Resting your foot on the accelerator pedal
could override the cruise control. This will pre-
vent braking interventions by the system.
Siem eel
Applies to: vehicles with cruise control system
When you switch the system off completely, the
cruise control speed will be deleted.
Requirement: the system must be switched on.
> To switch the system off, press the lever toward
@ (locked into place) > page 70, fig. 74, or
> Switch the ignition off.
71
Page 75 of 304
8S8012721BA
Assist systems
Switching on/off
Applies to: vehicles with Audi active lane assist
B8V-0692
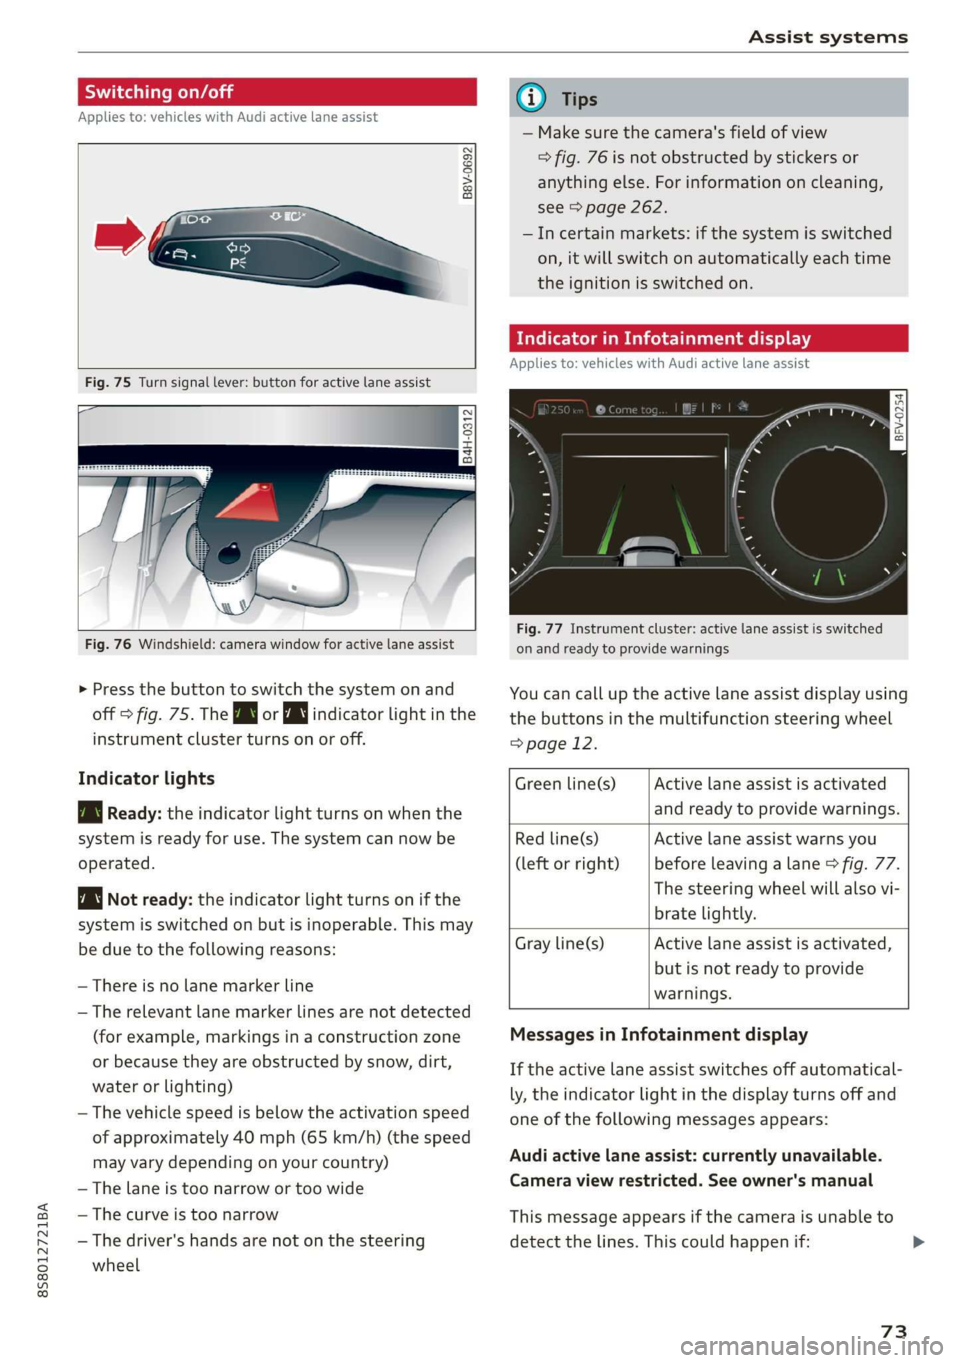
Fig. 75 Turn signal lever: button for active lane assist
B4H-0312
Fig. 76 Windshield: camera window for active lane assist
> Press the button to switch the system on and
off > fig. 75. The Bw or indicator light in the
instrument cluster turns on or off.
Indicator lights
Bg Ready: the indicator light turns on when the
system is ready for use. The system can now be
operated.
Not ready: the indicator light turns on if the
system is switched on but is inoperable. This may
be due to the following reasons:
— There is no lane marker line
— The relevant lane marker lines are not detected
(for example, markings in a construction zone
or because they are obstructed by snow, dirt,
water or lighting)
— The vehicle speed is below the activation speed
of approximately 40 mph (65 km/h) (the speed
may vary depending on your country)
— The lane is too narrow or too wide
— The curve is too narrow
— The driver's hands are not on the steering
wheel
@) Tips
— Make sure the camera's field of view
> fig. 76 is not obstructed by stickers or
anything else. For information on cleaning,
see > page 262.
—Incertain markets: if the system is switched
on, it will switch on automatically each time
the ignition is switched on.
Mee MUM clei meele
Applies to: vehicles with Audi active lane assist
= z
aS
Be g
Fig. 77 Instrument cluster: active lane assist is switched
on and ready to provide warnings
You can call up the active lane assist display using
the buttons in the multifunction steering wheel
=> page 12.
Active lane assist is activated
and ready to provide warnings.
Green line(s)
Red line(s)
(left or right)
Active lane assist warns you
before leaving a lane > fig. 77.
The steering wheel will also vi-
brate lightly.
Active lane assist is activated,
but is not ready to provide
warnings.
Gray line(s)
Messages in Infotainment display
If the active lane assist switches off automatical-
ly, the indicator light in the display turns off and
one
of the following messages appears:
Audi active lane assist: currently unavailable.
Camera view restricted. See owner's manual
This message appears if the camera is unable to
detect the lines. This could happen if:
73
Page 84 of 304

Parking aid
Switching on and off
Applies to: vehicles with parking system plus
a 3 q a >
z oO
Fig. 84 Center console: parking aid button
Fig. 85 Optical distance display
Switching on
> Shift into reverse, or
> Press the Pv button in the center console
> fig. 84. A short confirmation tone sounds and
the LED in the button turns on.
Switching off
> Drive faster than 6 mph (10 km/h), or
> Press the P button, or
> Switch the ignition off.
Activating automatically
The parking aid is activated automatically at
speeds less than 6 mph (10 km/h) and when ap-
proaching an obstacle from approximately
3.1 feet (95 cm) away. There are audible signals
when approximately 1.6 ft (50 cm) away from the
obstacle. If you press the P” button to switch the
parking aid off, it can only be reactivated auto-
matically when one of the following conditions is
met:
— The vehicle speed exceeds 6 mph (10 km/h)
— The ignition is switched off and back on again
— The parking brake is set and then released
82
— The selector lever must be in the "P" position.
Segments in the visual display
The segments in front of and behind the vehicle
(vehicles with parking system plus”) > fig. 85
help you to determine the distance between your
vehicle and an obstacle. The red lines mark the
expected direction of travel according to the
steering angle. A white segment indicates an
identified obstacle that is outside of the vehicle's
path. Red segments show identified obstacles
that are in your vehicle's path. As your vehicle
comes closer to the obstacle, the segments move
closer to the vehicle. The collision area has been
reached when the next to last segment is dis-
played. Obstacles in the collision area, including
those outside of the vehicle's path, are shown in
red. Do not continue driving forward or in reverse
= A in Introduction on page 80, >@ in Intro-
duction on page 80!
Rearview camera
Introduction
Applies to: vehicles with rearview camera
B8V-0629
Fig. 86 Diagram: lines to aid in parking
The rearview camera helps you to park or maneu-
ver using the orientation lines.
Page 85 of 304

8S8012721BA
Parking aid
General information
Applies to: vehicles with rearview camera
oO m q
2 > z
oO
Fig. 87 Diagram: area covered @) and area not covered (2)
by the rearview camera.
BFV-0087
the image may be affected by the sun shin-
ing into the lens, dirt on the lens, or if there
is a malfunction.
— Use the rearview camera only if the luggage
compartment lid is completely closed. Make
sure any objects you may have mounted on
the luggage compartment lid do not block
the rearview camera.
— The camera lens enlarges and distorts the
field of vision. The object appears both al-
tered and inaccurate on the screen.
—Incertain situations, people or objects in
the display appear closer or farther away:
— For objects that do not touch the ground,
such as the bumper of a parked vehicle, a
trailer hitch or the rear of a truck. Do not
use the
orientation lines in this case.
—If driven from a level surface onto an in-
cline, or a downward slope.
— If driven toward protruding objects.
— If the vehicle is carrying too much load in
Fig. 88 Luggage compartment lid: location of the rear-view
camera
The rearview camera is located above the rear li-
cense plate bracket. Make sure that the lens for
the parking system > fig. 88 is not covered by de-
posits or any other obstructions because this can
impair the function of the parking system. For in-
formation on cleaning, see > page 262.
The rearview camera coverage area includes (4)
=> fig. 87. Only this area is shown in the Infotain-
ment display. Objects that are in area (2), which is
not covered, are not displayed.
ZA\ WARNING
— Always read and follow the applicable warn-
ings > A\ in Introduction on page 80.
— If the position and the installation angle of
the rearview camera was changed, for exam-
ple after a collision, do not continue to use
the system for safety reasons. Have it
checked by an authorized Audi dealer or au-
thorized Audi Service Facility.
— Only use the rearview camera to assist you if
it shows a good, clear picture. For example,
the rear.
CG) Note
— Always read and follow the applicable warn-
ings >@ in Introduction on page 80.
— The orange-colored orientation lines in the
Infotainment display show the vehicle path
based on the steering wheel angle. The
front
of the vehicle swings out more than
the rear of the vehicle. Maintain plenty of
distance so that an exterior mirror or a cor-
ner of the vehicle does not collide with any
obstacles.
Scale Le molal
Applies to: vehicles with rearview camera
Switching on
> Shift into reverse, or
> Press the P™ button in the center console
=> page 82, fig. 84. A short confirmation tone
sounds and the LED in the button turns on.
Switching off
>» Drive faster than 6 mph (10 km/h), or
> Press the Pv button, or
>» Switch the ignition off.
83
Page 86 of 304
Parking aid
® Tips
— The visual display in the left part of the dis-
play should help you detect the critical vehi-
cle areas.
— You can change the volume of the signals
and the display > page 84.
Perpendicular parking
Applies to: vehicles with rearview camera
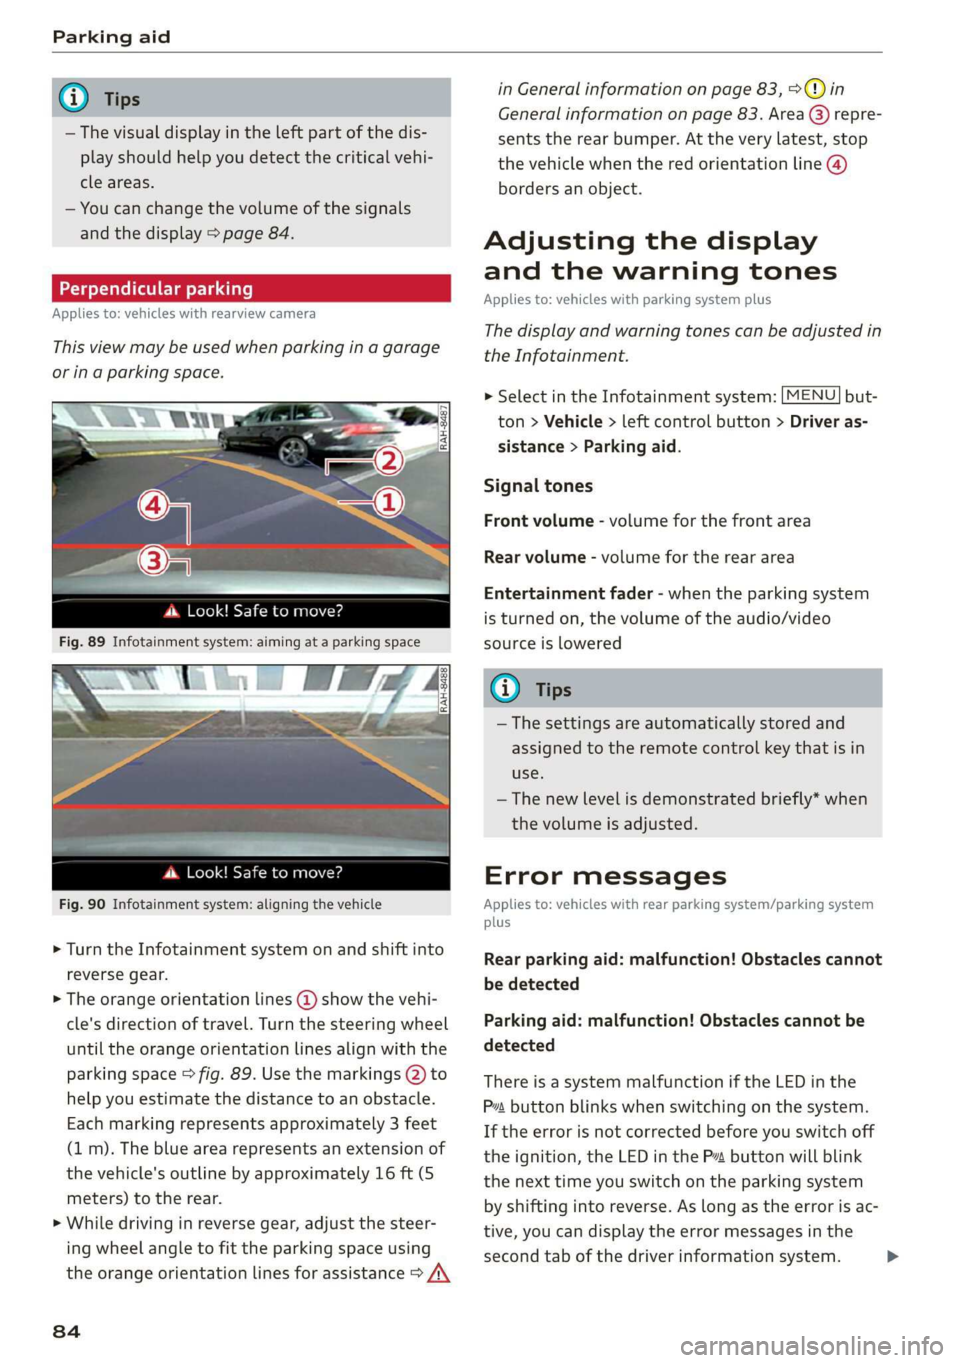
This view may be used when parking in a garage
or ina parking space.
4d. Look! Safe to move?
Fig. 90 Infotainment system: aligning the vehicle
> Turn the Infotainment system on and shift into
reverse gear.
> The orange orientation lines @ show the vehi-
cle's direction of travel. Turn the steering wheel
until the orange orientation lines align with the
parking space > fig. 89. Use the markings @) to
help you estimate the distance to an obstacle.
Each marking represents approximately 3 feet
(1 m). The blue area represents an extension of
the vehicle's outline by approximately 16 ft (5
meters) to the rear.
> While driving in reverse gear, adjust the steer-
ing wheel angle to fit the parking space using
the orange orientation lines for assistance > /\
84
in General information on page 83, >@) in
General information on page 83. Area @) repre-
sents the rear bumper. At the very latest, stop
the vehicle when the red orientation line @)
borders an object.
Adjusting the display
and the warning tones
Applies to: vehicles with parking system plus
The display and warning tones can be adjusted in
the Infotainment.
MENU > Select in the Infotainment system: but-
ton > Vehicle > left control button > Driver as-
sistance > Parking aid.
Signal tones
Front volume - volume for the front area
Rear volume - volume for the rear area
Entertainment fader - when the parking system
is turned on, the volume of the audio/video
source is lowered
G) Tips
— The settings are automatically stored and
assigned to the remote control key that is in
use.
— The new level is demonstrated briefly* when
the volume is adjusted.
Error messages
Applies to: vehicles with rear parking system/parking system
plus
Rear parking aid: malfunction! Obstacles cannot
be detected
Parking aid: malfunction! Obstacles cannot be
detected
There is a system malfunction if the LED in the
Pva button blinks when switching on the system.
If the error is not corrected before you switch off
the ignition, the LED in the P button will blink
the next time you switch on the parking system
by shifting into reverse. As long as the error is ac-
tive, you can display the error messages in the
second tab of the driver information system. >
Page 89 of 304
8S58012721BA
Intelligent Technology
— Accelerate carefully when driving on condition. Different tire sizes can lead toa
smooth, slippery surfaces such as ice and reduction in engine power.
snow. The drive wheels can spin even when — You may hear noises when the systems de-
these control systems are installed and this scribed are working.
can affect driving stability and increase the
risk of a collision.
G@) Tips
— The ABS and ASR only function correctly
when all four wheels have a similar wear
Sic melal
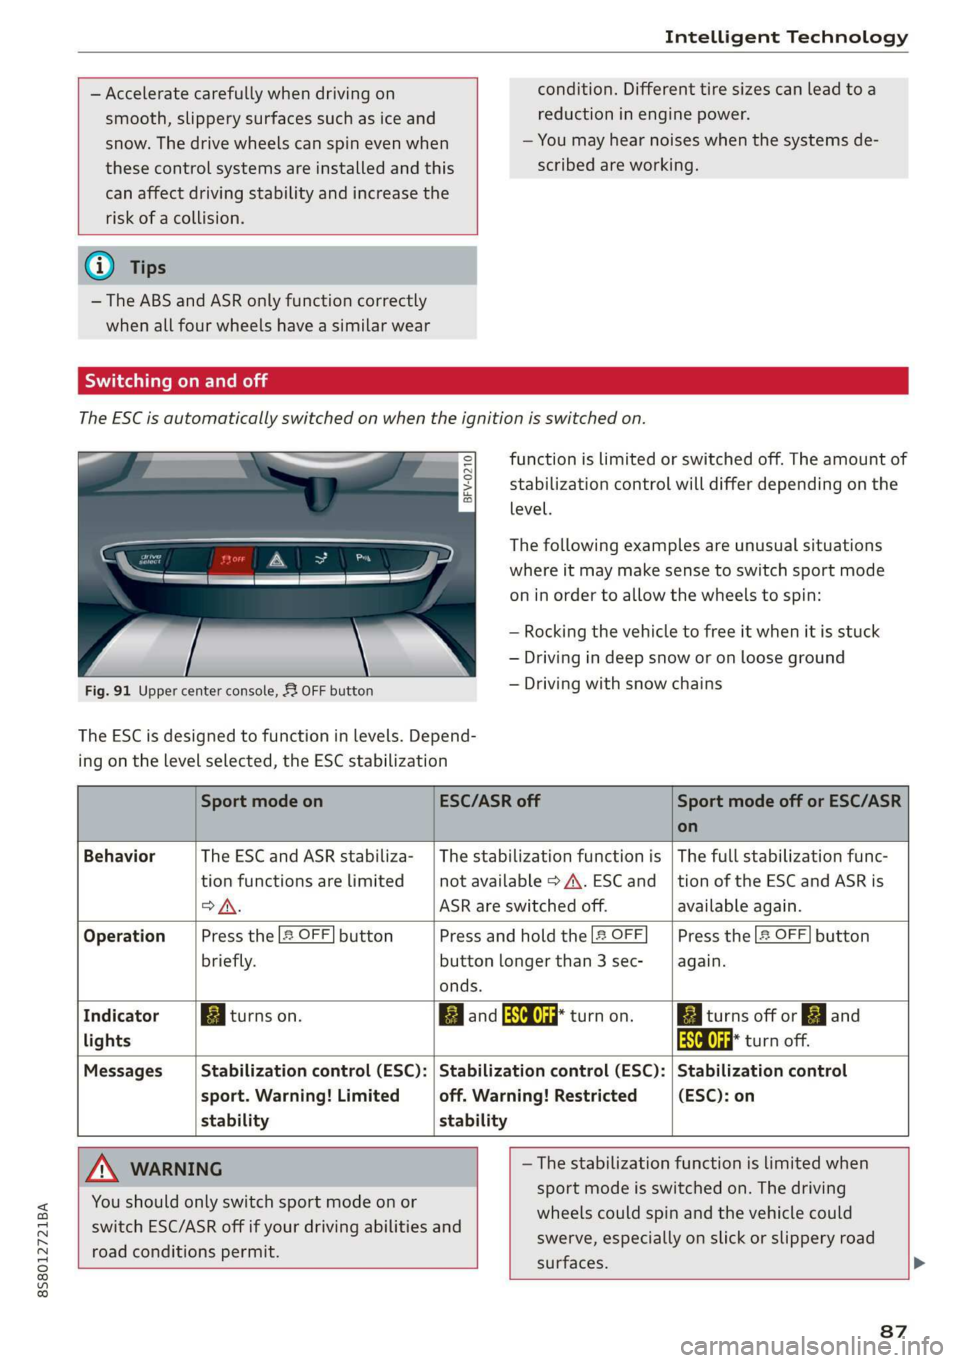
The ESC is automatically switched on when the ignition is switched on.
function is limited or switched off. The amount of
stabilization control will differ depending on the
level.
eS
gS s
= o
The following examples are unusual situations
where it may make sense to switch sport mode
on in order to allow the wheels to spin:
— Rocking the vehicle to free it when it is stuck
— Driving in deep snow or on loose ground
— Driving with snow chains
Fig. 91 Upper center console, 52 OFF button
The ESC is designed to function in levels. Depend-
ing on the level selected, the ESC stabilization
Sport mode on ESC/ASR off Sport mode off or ESC/ASR
on
Behavior The ESC and ASR stabiliza- | The stabilization function is | The full stabilization func-
tion functions are limited not available > A\. ESC and _|tion of the ESC and ASR is
>A. ASR are switched off. available again.
Operation Press the 2 OFF] button Press and hold the |2 OFF Press the [2 OFF] button
briefly. button longer than 3 sec- again.
onds.
Indicator Biturns on. Band aa turn on. Biturns off or EJ and
lights aa turn off.
Messages Stabilization control (ESC): | Stabilization control (ESC): | Stabilization control
sport. Warning! Limited off. Warning! Restricted (ESC): on
stability stability
A WARNING —The stabilization function is limited when
sport mode is switched on. The driving
wheels could spin and the vehicle could
swerve, especially on slick or slippery road
surfaces.
You
should only switch sport mode on or
switch ESC/ASR off if your driving abilities and
road conditions permit.
87
Page 94 of 304
Multi Media Interface
Multi Media Interface
Traffic safety
information
Audi recommends performing certain Infotain-
ment system functions, such as entering a desti-
nation, only when the vehicle is stationary. Al-
ways be prepared to stop operating the Infotain-
ment system in the interest of your safety and
the safety of other road users.
Z\ WARNING
Only use the Infotainment system when road,
traffic, weather, and visibility conditions per-
mit and always in a way that allows you to
maintain complete control over your vehicle.
@ Tips
Certain functions are not available while driv-
ing.
Introduction
The Multi Media Interface, or MMI for short,
combines various systems for communication,
navigation* and entertainment in your Audi. You
can operate the MMI using the MMI control pan-
el, the multifunction steering wheel or the voice
recognition system*.
@
‘eo
OTe I @
Se2
Fig. 93 MMI control panel
[RAH-8837|
:
MMI control panel overview
@ Control knob with joystick function . 93
@ MMI touch control pad* ......... 94
@® Left control button ............. 93
@ Right control button ............ 93
©) Buttons for opening menus directly . 93
92
(GB) [MENU] button sess ss cosencs vs soteane » 93
@ [BACK] button ............0.08. 93
MMI On/Off knob with
joystick function
Operating
[RAH-8739
Fig. 94 MMI On/Off knob with joystick function
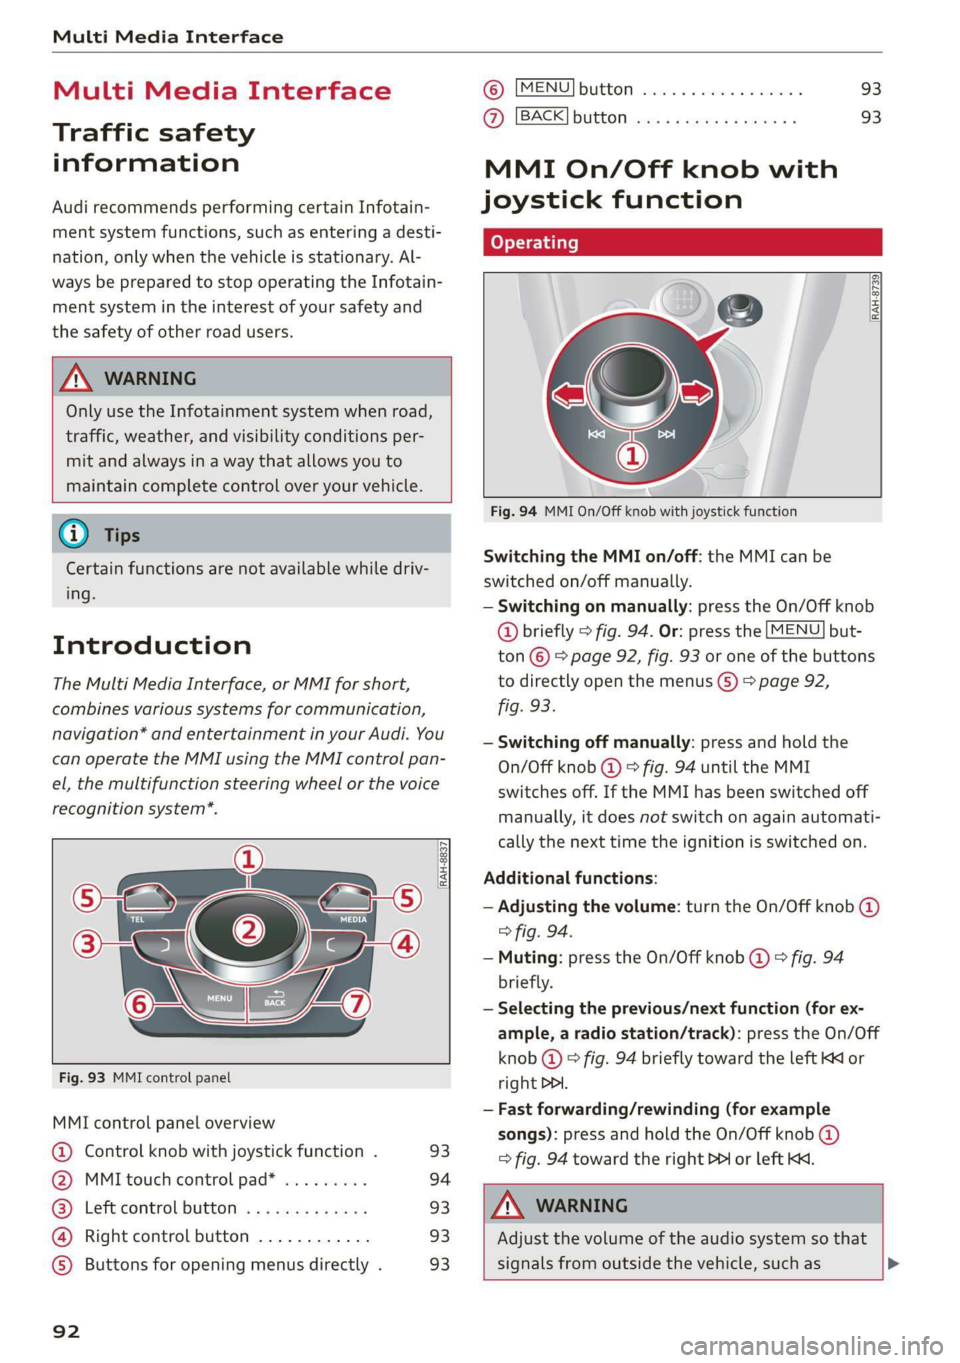
Switching the MMI on/off: the MMI can be
switched on/off manually.
— Switching on manually: press the On/Off knob
@ briefly > fig. 94. Or: press the [MENU] but-
ton © & page 92, fig. 93 or one of the buttons
to directly open the menus () > page 92,
fig. 93.
— Switching off manually: press and hold the
On/Off knob @ © fig. 94 until the MMI
switches off. If the MMI has been switched off
manually, it does not switch on again automati-
cally the next time the ignition is switched on.
Additional functions:
— Adjusting the volume: turn the On/Off knob @)
> fig. 94.
— Muting: press the On/Off knob @ © fig. 94
briefly.
— Selecting the previous/next function (for ex-
ample, a radio station/track): press the On/Off
knob @ ° fig. 94 briefly toward the left KK or
right DDI.
— Fast forwarding/rewinding (for example
songs): press and hold the On/Off knob @)
=> fig. 94 toward the right PPI or left Kd.
Z\ WARNING
Adjust the volume of the audio system so that
signals from outside the vehicle, such as >