Page 129 of 280

83A012721BA
Parking and maneuvering
Parking and
maneuvering
Introduction
Depending on the vehicle equipment, various
parking aids will help you when parking and ma-
neuvering.
The parking system plus assists you while park-
ing using audio and visual signals to warn you
about objects detected in front of, behind, and
next to* the vehicle > page 127.
The rearview camera shows the area behind the
vehicle in the center display. The lines in the rear-
view camera image help you to park and maneu-
ver > page 129.
The peripheral cameras are an addition to the
rearview camera and help you to see various
areas around the vehicle while parking and ma-
neuvering > page 129.
The rear cross-traffic assist can warn you of ap-
proaching cross traffic when driving in reverse or
exiting a parking space > page 133.
Assisted parking
Park assist helps you to find suitable parking
spaces > page 134 and to park in and exit these
spaces while the driver monitors the area around
the vehicle and controls the parking process.
A WARNING
Follow the safety precautions and note the
limits of the assist systems, sensors, and
cameras > page 104.
@) Tips
Practicing parking in a traffic-free location or
parking lot to become familiar with the sys-
tems is recommended. When doing this,
there should be good light and weather condi-
tions.
Parking system plus
Sic Ee moll
Applies to: vehicles with parking system plus
2
3 3
> © oO
Fig. 107 Center console: parking aid button
The parking system plus uses audio and visual
warnings to help you avoid obstacles when park-
ing.
Switching on and off
Requirement: the vehicle speed must be under
approximately 6 mph (10 km/h).
> Press the Ps button in the center console.
When switching on, a brief tone sounds and the
LED in the button turns on.
Switching on automatically
The system switches on automatically when re-
verse gear is engaged while the engine is run-
ning. A brief tone will sound.
If Automatic activation is switched on in the
MMI and if the vehicle approaches ) an obstacle
at speeds below approximately 6 mph (10 km/h),
the parking aid will switch on automatically. Au-
dible signals will sound once the obstacle is with-
in the sensor detection area.
Switching off automatically
The distance indicator for the parking system
plus switches off automatically when driving for-
ward faster than approximately 6 mph (10
km/h).
127
Page 130 of 280
 Note
Keep enough distance from the cu")
Parking and maneuvering
ZA WARNING
Follow the safety precautions and note the
limits of the assist systems, sensors, and
cameras > page 104.
@) Note
Keep enough distance from the curb to avoid
damage to the rims.
G) Tips
If the parking aid is switched off, it can only
be reactivated automatically when one of the
following conditions is met:
— The vehicle speed exceeds 6 mph (10 km/h)
— The ignition is switched off and back on
again
— The parking brake is set and then released
— The "P" gear is engaged and released again
Applies to: vehicles with parking system plus
Fig. 108 Center display: distance display
If the sensors detect an obstacle, audible and vis-
ual signals will warn you.
Audio signals
The closer your vehicle gets to a detected obsta-
cle, the shorter the time between the audible sig-
nals. A continuous tone sounds when an obstacle
is less than approximately 1 foot (0.30 m) away
from the front or rear of the vehicle. A continu-
ous tone sounds when an obstacle is less than
approximately 0.7 feet (0.20 m) away from the
sides* of the vehicle. Do not continue driving for-
ward or in reverse >.
To switch off audio signals while parking, press
in the center display. The audio warnings will
128
turn on again automatically the next time the
parking system is switched on. The volume can
be changed in the settings |] > page 138.
Visual warnings
The visual warnings in the center display help you
to detect the critical vehicle area and to estimate
the distance to an obstacle.
Red segments (2) show detected obstacles that
are in your vehicle's path. The red lines (2) mark
the expected direction of travel based on the
steering angle. A white segment @) indicates a
detected obstacle that is outside of the vehicle's
path. The closer your vehicle comes to the obsta-
cle, the closer the segments will move to the ve-
hicle. The collision area has been reached when
the next to last segment is displayed. Obstacles
in the collision area, including those outside of
the vehicle's path, are shown in red. Do not con-
tinue driving farther.
Error messages
If P4 appears, the sensor in the respective area
or the speaker is faulty. Drive immediately to an
authorized Audi dealer or authorized Audi Service
Facility to have the malfunction repaired. The
LED
in the Ps button may also flash when the
system is switched on.
ff is displayed when there is a malfunction,
the parking system functions may be unavailable
or may be limited.
A message that indicates the cause and possible
solution may appear with some displays. The
weather conditions may be too poor or a sensor
may be covered. Clean the area in front of the
sensors > page 105, fig. 87 and try to turn on
the systems again later.
If the malfunction remains, drive to an author-
ized Audi dealer or authorized Audi Service Facili-
ty immediately to have the malfunction correct-
ed.
Z\ WARNING
— Follow the safety precautions and note the
limits of the assist systems, sensors, and
cameras > page 104. >
Page 131 of 280

83A012721BA
Parking and maneuvering
— Sensors and cameras have spots in which
the surrounding area cannot be detected.
Objects, animals, and people may only be
detected with limitations may not be detect-
ed at all. Always monitor the traffic and the
vehicle's surroundings directly and do not
become distracted.
@) Note
— Keep enough distance from the curb to
avoid damage to the rims.
— Applies to: vehicles with park assist: If you
park in short parking spaces using park as-
sist, a continuous tone sounds from the
parking system when the distance to an ob-
ject is less than approximately 0.7 ft
(0.20 m). Do not continue driving farther.
G) Tips
— The segments in the side area* are detected
and analyzed when passing. There may have
been changes to the surrounding area after
switching the ignition off and on again, af-
ter opening the doors, or if the vehicle is left
stationary for a long period of time. In this
scenario, the side area* will appear black
until the area has been detected and evalu-
ated.
— If the distance to an obstacle remains con-
stant, the volume of the distance warning
gradually lowers after a few seconds until it
is muted (this does not apply to the continu-
ous tone). If the obstacle comes closer than
it was before the sound was muted, the
tone will sound again. If the obstacle be-
comes farther away than it was before the
sound was muted, no tone will sound. Pay
attention to the vehicle's surroundings
when you start to drive.
— There is no distance warning for the rear
and the sides* when trailer towing mode is
detected. The front sensors remain activat-
ed. The visual display switches to trailer
mode. There is no guarantee the functions
will switch off when using a retrofitted trail-
er hitch.
Rearview camera and
peripheral cameras
Introduction
Applies to: vehicles with rearview camera/peripheral cameras
B8V-0629
Fig. 109 Diagram: orientation lines for parking
Depending on the vehicle equipment, a rearview
camera or multiple peripheral cameras may be
available.
The rearview camera helps you to park or maneu-
ver using the orientation lines.
The peripheral cameras expand the vehicle over-
view to include various views around the vehicle
that can be selected.
Z\ WARNING
Follow the safety precautions and note the
limits of the assist systems, sensors, and
cameras > page 104.
Switching on and off
Applies to: vehicles with rearview camera/peripheral cameras
B8V-0643
Fig. 110 Center console: parking aid button
Switching on and off
Requirement: the vehicle speed must be under
approximately 6 mph (10 km/h).
129
Page 132 of 280

Parking and maneuvering
> Press the P4 button in the center console. Or
> Select J on the center display if the visual dis-
tance indicator is shown > page 128, fig. 108.
When switching on, a brief tone sounds and the
LED in the button turns on.
Switching on automatically
The system switches on automatically when re-
verse gear is engaged while the engine is run-
ning. A brief tone will sound.
Switching off automatically
The system switches off automatically when driv-
ing forward faster than approximately 6 mph (10
km/h).
ZX WARNING
Follow the safety precautions and note the
limits of the assist systems, sensors, and
cameras > page 104.
Warnings
Applies to: vehicles with rearview camera/peripheral cameras
Fig. 112 -Applies to: vehicles with trailer view-Center dis-
play: trailer view
When parking with the rearview camera or pe-
ripheral camera, the parking system plus audio
and visual warnings* will also assist you
=> page 128.
130
For vehicles with peripheral cameras, the area
surrounding the vehicle is shown on the side of
the center display. You can switch between the
optical display and camera image > page 138.
Visual orientation lines
@ The orange orientation lines show the vehi-
cle's direction of travel > ©. Turn the steer-
ing wheel until the orange orientation lines
align with the parking space.
@ Use the blue markings to help you estimate
the distance to an obstacle. Each marking
represents approximately 3 ft (1 m). The blue
area represents an extension of the vehicle's
outline by approximately 16 feet (5 meters)
to the rear.
@® You can recognize the rear bumper in the
lower display.
@ You should stop driving in reverse when the
red orientation line touches the edge of an
object, at the latest.
Trailer view
Applies to: vehicles with trailer view
The trailer view > fig. 112 assists you in position-
ing the vehicle in front of a trailer.
— Applies to: vehicles with peripheral cameras:
Switch to the Rear view > page 131, fig. 113.
— Select |--Jin the center display when the parking
system is active.
— Select the Trailer view > page 138.
Now you can position your vehicle in front of the
trailer. The orange orientation line ©) ° fig. 112
indicates the expected path toward the trailer
hitch. Use the blue markings © to help you esti-
mate the distance to the trailer hitch. Each mark-
ing equals approximately 12 inches (30 cm). The
width of the blue surface represents the maxi-
mum steering wheel angle.
Symbols
Applies to: vehicles with peripheral cameras
If $2/&9/< is displayed and the display area
represented by that symbol is not available, then
the camera on the that side is not available. The
power exterior mirrors may have been folded in >
Page 133 of 280

83A012721BA
Parking and maneuvering
or a door or the luggage compartment lid may
have been opened.
If # is displayed, there is a system malfunction
and the display area represented by that symbol
is not available. The camera is not working in this
area.
If one of the symbols continues to be displayed,
drive immediately to an authorized Audi dealer or
authorized Audi Service Facility to have the mal-
function repaired.
IX WARNING
— Follow the safety precautions and note the
limits of the assist systems, sensors, and
cameras > page 104.
— Sensors and cameras have spots in which
the surrounding area cannot be detected.
Objects, animals, and people may only be
detected with limitations may not be detect-
ed at all. Always monitor the traffic and the
vehicle's surroundings directly and do not
become distracted.
@) Note
— The orange orientation lines @ show the di-
rection the rear of the vehicle will be travel-
ing, based on the steering wheel angle. The
front of the vehicle swings out more than
the rear of the vehicle. Maintain plenty of
distance so that an exterior mirror or a cor-
ner of the vehicle does not collide with any
obstacles.
— Keep enough distance from the curb to
avoid damage to the rims.
— Only use the images provided by the camera
on the rear of the vehicle when the luggage
compartment lid is completely closed. Make
sure any objects you may have mounted on
the luggage compartment lid do not block
the rearview camera.
@) Tips
There is no distance warning for the rear and
the sides* when trailer towing mode is detect-
ed. The front sensors remain activated. The
visual display switches to trailer mode. The
rearview camera image will not show the ori-
entation lines and the blue surfaces. There is
no guarantee the functions will switch off
when using a retrofitted trailer hitch.
CO) eee mat eel ee
Applies to: vehicles with peripheral cameras
Fig. 113 Center display: peripheral cameras.
On vehicles with peripheral cameras, you can se-
lect among different views.
) Requirement: the vehicle surroundings (Camera) must be
selected and visible in the side View of the screen
=> page 138.
Selecting the views
> To display the entire selection bar, tap the cur-
rent view (@) or swipe at the edge of the selec-
tion bar from left to right.
> To select a view, select the desired view @-@
on the center display, or tap in an area on the
side View of the screen )).
131
Page 134 of 280

or display the selec-
tion bar
This view makes it easier to drive out of tight parking spaces or areas and")
Parking and maneuvering
Symbol/Descrip-
tion
Description
Corner view (front)
or display the selec-
tion bar
This view makes it easier to drive out of tight parking spaces or areas and
intersections with poor visibility. It shows an almost 180° panorama view
in front of the vehicle.
Front
This view assists you in using the full area for maneuvering in front of the
vehicle.
Surroundings
This view helps you to maneuver and position the vehicle more precisely.
The area around the vehicle is shown using the camera images. The vehi-
cle image is shown by the system > A\.
Rear
This view assists you in using the full area for maneuvering behind the ve-
hicle. This is the rearview camera image.
Corner view (rear)
This view can assist you when driving out of tight parking spaces or areas
with poor visibility. It shows an almost 180° panorama view behind the
vehicle.
Front tires
This view helps you to see the distance between the front tires and the
curb and the steering wheel angle when parking.
G/@}
©
|O|}
©
|@]}]
©
Rear tires
This view helps you to detect the distance between the rear wheels and
the curb when parking.
Steering wheel an-
gle
The red lines represent the estimated direction of travel based on the
steering wheel angle >@.
Z\ WARNING
— Follow the safety precautions and note the
limits of the assist systems, sensors, and
cameras > page 104.
— The Surroundings view is created from the
individual camera images. The vehicle image
is shown by the system. Objects and obsta-
cles above the camera are not displayed.
@) Note
— Only use the images provided by the camera
on the rear of the vehicle when the luggage
compartment lid is completely closed. Make
sure any objects you may have mounted on
the luggage compartment lid do not block
the rearview camera.
— The front of the vehicle swings out more
than the rear of the vehicle. Maintain plenty
of distance so that an exterior mirror or a
corner of the vehicle does not collide with
any obstacles.
132
G) Tips
— Depending on the selected gear, it will auto-
matically switch between the Front and
Rear views. If you switch the view manually,
the automatic front/rear camera change will
be temporarily deactivated.
— When first activated while a forward gear is
engaged, the Corner view (front) is dis-
played.
Page 135 of 280

83A012721BA
Parking and maneuvering
Rear cross-traffic assist
Applies to: vehicles with rear cross-traffic assist
Fig. 115 Center display: rear cross-traffic assist display
The rear cross-traffic assist can warn you of a po-
tential collision with approaching cross-traffic
detected when driving in reverse. Within the lim-
its of the system, the system monitors the areas
behind and next to the vehicle using the radar
sensors when exiting a parking space. Moving ob-
jects that are approaching, such as vehicles, are
detected > A.
Requirements for using the rear cross-traffic
assist:
— The rear cross-traffic assist must be switched
on in the parking system settings in the MMI
> page 138.
— Reverse gear must be engaged and the speed
while driving in reverse must not be higher than
6 mph (10 km/h).
Displays, warnings, and braking
— Display: The display @ appears only when the
parking system is active. For vehicles with pe-
ripheral cameras, this only appears in the Rear
and Corner view (rear) camera views. Arrows
show the direction from which the cross traffic
is approaching.
— Audible warnings: a continuous tone may
sound as an additional warning when driving in
reverse.
— Automatic brake activation: if you do not react
to a warning, a brief braking by the system can
warn you of a potential collision with an ap-
proaching object.
The audible warning signal and the automatic
brake activation occur only when driving in re-
verse.
Messages
if or > is displayed when there is a mal-
function, the rear cross traffic assist functions
may be unavailable or may be limited.
A message that indicates the cause and possible
solution may appear with some displays. The
weather conditions may be too poor or a sensor
may be covered. Clean the sensor area in the ve-
hicle rear and try to turn the systems on again
later.
If the malfunction remains, drive to an author-
ized Audi dealer or authorized Audi Service Facili-
ty immediately to have the malfunction correct-
ed.
ZX WARNING
— Follow the safety precautions and note the
limits of the assist systems, sensors, and
cameras > page 104.
— The rear cross-traffic assist will not provide
alerts about people and cannot warn you
about every type of approaching objects,
such as cyclists. Always monitor the traffic
as well as the vehicle's surroundings with di-
rect eye contact.
— The system may not react if objects are ap-
proaching very quickly.
— The rear cross-traffic assist will not provide
alerts if your vehicle is parallel or diagonally
parked or if your vehicle is pulled too far in-
to the parking space so that it is hidden by
adjacent vehicles.
133
Page 136 of 280

Parking and maneuvering
— Once an automatic brake activation occurs,
the system cannot brake automatically
again for several seconds.
—If there is an acoustic warning signal from
the rear cross-traffic assist, then the park-
ing system may not warn you of detected
obstacles under certain circumstances.
— The system is not available when the vehicle
detects that you are towing a trailer. There
is no guarantee the functions will switch off
when using a retrofitted trailer hitch. Do not
use
these functions when towing a trailer.
— For an explanation on conformity with the
FCC regulations in the United States and the
Industry Canada regulations, see
=> page 261.
Assisted parking
(er eee)
Applies to: vehicles with park assist
If your vehicle is equipped with park assist, this
system helps you find suitable parking spaces.
Parking spaces are measured using ultrasonic
sensors on the sides of the vehicle.
If a parking space is found, the system helps you
to park while the driver monitors the vehicle's
surroundings with the parking aids, cameras”,
and direct eye contact. The vehicle moves the
steering wheel autonomously.
Follow the safety precautions and note the
limits of the assist systems, sensors, and
cameras > page 104.
134
Parking options
Applies to: vehicles with park assist
Fig. 116 Diagram: street parking options
Parking options
Backing into parallel parking spaces
Backing into perpendicular parking spaces
Driving forward into perpendicular parking
spaces that you have already driven past
®
©80
Driving forward into perpendicular parking
spaces if you have already driven to the space
yourself and the front of the vehicle is al-
ready in the space
Options for exiting parking spaces
@ Exiting parallel parking spaces
You can also drive into a perpendicular park-
ing space yourself and then activate the sys-
tem. If this is the case, the front of the vehi-
cle should already be in the space (4) so that
the sensors can measure the space.
 1
1 2
2 3
3 4
4 5
5 6
6 7
7 8
8 9
9 10
10 11
11 12
12 13
13 14
14 15
15 16
16 17
17 18
18 19
19 20
20 21
21 22
22 23
23 24
24 25
25 26
26 27
27 28
28 29
29 30
30 31
31 32
32 33
33 34
34 35
35 36
36 37
37 38
38 39
39 40
40 41
41 42
42 43
43 44
44 45
45 46
46 47
47 48
48 49
49 50
50 51
51 52
52 53
53 54
54 55
55 56
56 57
57 58
58 59
59 60
60 61
61 62
62 63
63 64
64 65
65 66
66 67
67 68
68 69
69 70
70 71
71 72
72 73
73 74
74 75
75 76
76 77
77 78
78 79
79 80
80 81
81 82
82 83
83 84
84 85
85 86
86 87
87 88
88 89
89 90
90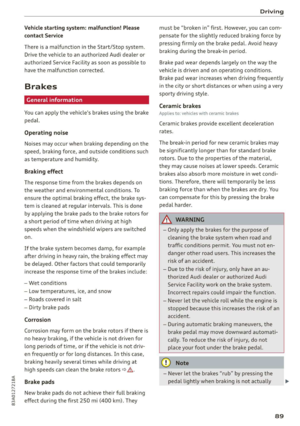 91
91 92
92 93
93 94
94 95
95 96
96 97
97 98
98 99
99 100
100 101
101 102
102 103
103 104
104 105
105 106
106 107
107 108
108 109
109 110
110 111
111 112
112 113
113 114
114 115
115 116
116 117
117 118
118 119
119 120
120 121
121 122
122 123
123 124
124 125
125 126
126 127
127 128
128 129
129 130
130 131
131 132
132 133
133 134
134 135
135 136
136 137
137 138
138 139
139 140
140 141
141 142
142 143
143 144
144 145
145 146
146 147
147 148
148 149
149 150
150 151
151 152
152 153
153 154
154 155
155 156
156 157
157 158
158 159
159 160
160 161
161 162
162 163
163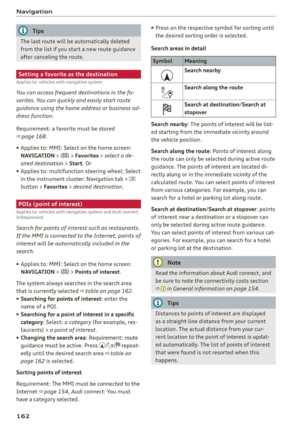 164
164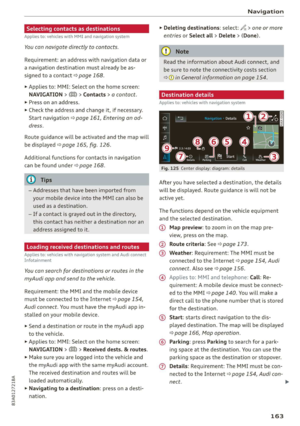 165
165 166
166 167
167 168
168 169
169 170
170 171
171 172
172 173
173 174
174 175
175 176
176 177
177 178
178 179
179 180
180 181
181 182
182 183
183 184
184 185
185 186
186 187
187 188
188 189
189 190
190 191
191 192
192 193
193 194
194 195
195 196
196 197
197 198
198 199
199 200
200 201
201 202
202 203
203 204
204 205
205 206
206 207
207 208
208 209
209 210
210 211
211 212
212 213
213 214
214 215
215 216
216 217
217 218
218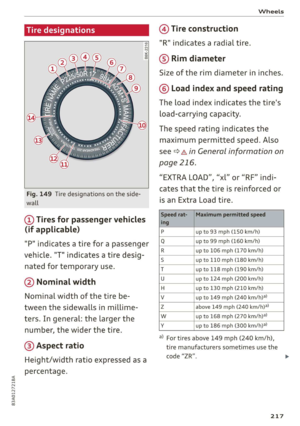 219
219 220
220 221
221 222
222 223
223 224
224 225
225 226
226 227
227 228
228 229
229 230
230 231
231 232
232 233
233 234
234 235
235 236
236 237
237 238
238 239
239 240
240 241
241 242
242 243
243 244
244 245
245 246
246 247
247 248
248 249
249 250
250 251
251 252
252 253
253 254
254 255
255 256
256 257
257 258
258 259
259 260
260 261
261 262
262 263
263 264
264 265
265 266
266 267
267 268
268 269
269 270
270 271
271 272
272 273
273 274
274 275
275 276
276 277
277 278
278 279
279