Page 225 of 280

83A012721BA
Wheels
by the tire manufacturer. This in-
formation is used to contact con-
sumers if a tire defect requires a
recall.
Vehicle capacity weight
means the rated cargo and lug-
gage load plus 150 lbs. (68 kilo-
grams) times the vehicle's desig-
nated seating capacity.
Vehicle maximum load on the
tire
means that load on an individual
tire that is determined by distrib-
uting to each axle its share of the
maximum loaded vehicle weight
and dividing by two.
Vehicle normal load on the tire
means that load on an individual
tire that is determined by distrib-
uting to each axle its share of the
curb weight, accessory weight,
and normal occupant weight (dis-
tributed in accordance with > ta-
ble on page 228) and dividing by
two.
Occupant loading and distri-
bution for vehicle normal load
for various designated seating
capacities
Refer to the tire inflation pressure
label > page 226, fig. 152 for the
number of seating positions. Re-
fer to the table > table on
page 228 for the number of peo-
ple that correspond to the vehicle
normal load.
New tires or wheels
Audi recommends having all work
on tires or wheels performed by
an authorized Audi dealer or au-
thorized Audi Service Facility.
These facilities have the proper
knowledge and are equipped with
the required tools and replace-
ment parts.
>New tires do not yet have the
optimum gripping properties.
Drive carefully and at moderate
speeds for the first 350 miles
(500 km) with new tires.
> Only use tires with the same de-
sign, size (rolling circumfer-
ence), and as close to the same
tread pattern as possible on all
four wheels.
>Do not replace tires individually.
At least replace both tires on the
same axle at the same time.
> Audi recommends that you use
Audi Original Tires. If you would
like to use different tires, please
note that the tires may perform >
223
Page 226 of 280

Wheels
differently even if they are the
same size > A.
>If you would like to equip your
vehicle with a tire/rim combina-
tion that is different from what
was installed at the factory, con-
sult with an authorized Audi
dealer or authorized Audi Service
Facility before making a pur-
chase > A.
Because the spare tire® is differ-
ent from the regular tires instal-
led on the vehicle (such as winter
tires or wide tires), only use the
spare tire* temporarily in case of
emergency and drive carefully
while it is in use. It should be re-
placed with a regular tire as soon
as possible.
Applies to: vehicles with all wheel
drive: all four wheels must be
equipped with tires that are the
same brand and have the same
construction and tread pattern so
that the drive system is not dam-
aged by different wheel speeds.
For this reason, in case of emer-
gency, only use a spare tire* that
is the same circumference as the
regular tires.
224
Z\ WARNING
—Only use tire/rim combina-
tions and suitable wheel bolts
that have been approved by
Audi. Otherwise, damage to
the vehicle and an accident
could result.
—For technical reasons, it is not
possible to use tires from oth-
er vehicles - in some cases,
you cannot even use tires from
the same vehicle model.
—Make sure that the tires you
select have enough clearance
to the vehicle. Replacement
tires should not be chosen
simply based on the nominal
size, because tires with a dif-
ferent construction can differ
greatly even if they are the
same size. If there is not
enough clearance, the tires or
the vehicle can be damaged
and this can reduce driving
safety and increase the risk of
an accident.
—Only use tires that are more
than six years old when abso-
lutely necessary and drive
carefully when doing so.
—Do not use run-flat tires on
your vehicle. Using them when
Page 227 of 280

83A012721BA
Wheels
not permitted can lead to ve-
hicle damage or accidents.
—If you install wheel covers on
the vehicle, make sure they al-
low enough air circulation to
cool the brake system. If they
do not, this could increase the
risk of an accident.
Tire wear/damage
B4H-0415
Fig. 150 Tire profile: treadwear indica-
tor
Tire wear
Check the tires regularly for wear.
—Inflation pressure that is too low
or high can increase tire wear
considerably.
—Driving quickly through curves,
rapid acceleration and heavy
braking increase tire wear.
—Have an authorized Audi dealer
or authorized Audi Service Facili-
D Obey any applicable regulations in your
country.
ty check the wheel alignment if
there is unusual wear.
—Have the wheels rebalanced if an
imbalance is causing noticeable
vibration in the steering wheel.
If you do not, the tires and other
vehicle components could wear
more quickly.
Treadwear indicator
Original equipment tires contain
treadwear indicators in the tread
pattern, which are bars that are
1/16 in (1.6 mm) high and are
spaced evenly around the tire per-
pendicular to the running direc-
tion > fig. 150. The letters “TWI”
or triangles on the tire sidewall
indicate the location of the tread-
wear indicators.
The tires have reached the mini-
mum tread depth )) when they
have worn down to the treadwear
indicators. Replace the tires with
new ones > A.
Tire rotation
Rotating the tires regularly is rec-
ommended to ensure the tires
wear evenly. To rotate the tires,
install the tires from the rear axle
225
Page 228 of 280

Wheels
on the front axle and vice versa.
This will allow the tires to have
approximately the same length of
service life.
For unidirectional tires, make sure
the tires are installed according to
the running direction indicated on
the tire sidewall > page 245.
Hidden damage
Damage to tires and rims can of-
ten occur in locations that are hid-
den. Unusual vibrations in the ve-
hicle or pulling to one side may
indicate that there is tire damage.
Reduce your speed immediately.
Check the tires for damage. If no
damage is visible from the out-
side, drive slowly and carefully to
the nearest authorized Audi deal-
er or authorized Audi Service Fa-
cility to have the vehicle inspect-
ed.
Z\ WARNING
Tread that has worn too low or
different tread depths on the
tires can reduce driving safety.
This can increase the risk of an
accident because it has a nega-
tive effect on handling, driving
through curves, and braking,
and because it increases the
226
risk of hydroplaning when driv-
ing through deep puddles.
Nee cela
B4H-0664
L
Fig. 151 Driver's side B-pillar: tire pres-
sure label
B8K-1151
REAR armene_ Ml
AVANT
REAR
ARRIERE
‘SPARE
DE SECOURS
a KPA, Ml PSI
Fig. 152 Tire pressure label
The correct tire pressure for tires
installed at the factory is listed on
a label. The label is located on the
B-pillar (driver's side) > fig. 151,
> fig. 152.
Use the tire pressure specified for
a normal vehicle load when the
vehicle is partially loaded > table
on page 228. If driving the vehi-
cle when fully loaded, you must
increase the tire pressure to the
maximum specified pressure > A. >
Page 229 of 280

83A012721BA
Wheels
Checking/correcting tire
pressure
>Check the tire pressure at least
once per month and also check it
before every long drive.
> Always check the tire pressure
when the tires are cold. Do not
reduce the pressure if it increas-
es when the tires are warm.
>Refer to the sticker > fig. 152
for the correct tire pressure.
>Correct the tire pressure if nec-
essary.
> Save the changed tire pressure
> page 235.
> Check the pressure in the spare
tire (compact spare tire)*. Al-
ways maintain the maximum
temperature that is specified for
the tire.
the risk of an accident. Read
and follow the important safe-
ty precautions in > page 228.
—The tire must flex more if the
tire pressure is too low or if
the vehicle speed or load are
too high. This heats the tire up
too much. This increases the
risk of an accident because it
can cause the tire to burst and
result in loss of vehicle con-
trol.
—Incorrect tire pressure increas-
es tire wear and has a negative
effect on driving and braking
behavior, which increases the
risk of an accident.
Z\, WARNING
Always adapt the tire pressure
to your driving style and vehicle
load.
—Overloading can lead to loss of
vehicle control and increase
@) Note
Replace lost valve caps to re-
duce the risk of damage to the
tire valves.
(*) For the sake of the envi-
ronment
Tire pressure that is too low in-
creases fuel consumption.
Tire pressure table
Please note that the information
contained in the following table
was correct at the time of print-
ing, and the information is sub-
ject to change. If there are any
differences, you should always
follow the tire pressure sticker
=> page 226, fig. 151.
227
Page 230 of 280

Wheels
Make sure that the tire designa-
tion on your tire matches the des-
ignation on the tire pressure label
and the tire pressure table.
The following table lists recom-
mended tire pressures in cold
tires according to the load and
the size of the tires installed.
Model/ Tire designation Tire pressure
Engine Normal load Maximum load
(up to 3 people)?
Front Rear Front Rear
PSI | kPA | PSI | kPA | PSI | kPA | PSI | kPA
Q3: 215/65 R17 99H 38 | 260 | 38 | 260 | 38 | 260 | 38 | 260
2.0L 235/55R18100H | 33 230 | 33 | 230 | 38 | 260 | 38 | 260
4cylinders /535755R18100V| 33 | 230 | 33 | 230 | 38 | 260 | 38 | 260
235/50 R19 99H 33 230 | 33 | 230 | 38 | 260 | 38 | 260
235/50 R19 99V 33 230 | 33 | 230 | 38 | 260 | 38 | 260
255/45 R19104Y | 33 230 | 33 | 230 | 38 | 260 | 38 | 260
255/40 R20101Y | 33 230 | 33 | 230 | 38 | 260 | 38 | 260
AN WARNING
Please note the important safe-
ty precautions regarding tire
pressure > page 226 and load
limits > page 228.
Tires and vehicle load limits
There are limits to the amount of
load or weight that any vehicle
and any tire can carry. A vehicle
that is overloaded will not handle
well and is more difficult to stop.
Overloading can not only lead to
loss of vehicle control, but can al-
so damage important parts of the
vehicle and can lead to sudden
tire failure, including a blowout
228
@) Two people in the front, one person in the rear
and sudden deflation that can
cause the vehicle to crash.
Your safety and that of your pas-
sengers also depends on making
sure that load limits are not ex-
ceeded. Vehicle load includes ev-
erybody and everything in and on
the vehicle. These load limits are
technically referred to as the vehi-
cle’s Gross Vehicle Weight Rating
(“GVWR”).
The “GVWR” includes the weight
of the basic vehicle, all factory in-
stalled accessories, a full tank of
fuel, oil, coolant and other fluids
plus maximum load. The maxi-
mum load includes the number of >
Page 231 of 280

83A012721BA
Wheels
passengers that the vehicle is in-
tended to carry (“seating capaci-
ty”) with an assumed weight of
150 lbs. (68 kg) for each passen-
ger at a designated seating posi-
tion and the total weight of any
luggage in the vehicle. If you tow
a trailer, the weight of the trailer
hitch and the tongue weight of
the loaded trailer must be includ-
ed as part of the vehicle load.
The Gross Axle Weight Rating
(“GAWR”) is the maximum load
that can be applied at each of the
vehicle’s two axles.
The fact that there is an upper
limit to your vehicle’s Gross Vehi-
cle Weight Rating means that the
total weight of whatever is being
carried in the vehicle (including
the weight of a trailer hitch and
the tongue weight of the loaded
trailer) is limited. The more pas-
sengers in the vehicle or passen-
gers who are heavier than the
standard weights assumed mean
that less weight can be carried as
luggage.
The Gross Vehicle Weight Rating
and the Gross Axle Weight Rating
are listed on the safety compli-
ance sticker label located on the
driver’s side B-pillar.
AN WARNING
Overloading a vehicle can cause
loss of vehicle control, a crash
or other accident, serious per-
sonal injury, and even death.
—Carrying more weight than
your vehicle was designed to
carry will prevent the vehicle
from handling properly and in-
crease the risk of the loss of
vehicle control.
—The brakes on a vehicle that
has been overloaded may not
be able to stop the vehicle
within a safe distance.
—Tires ona vehicle that has
been overloaded can fail sud-
denly, including a blowout and
sudden deflation, causing loss
of control and a crash.
—Always make sure that the to-
tal load being transported -
including the weight of a trail-
er hitch and the tongue
weight of a loaded trailer -
does not make the vehicle
heavier than the vehicle’s
Gross Vehicle Weight Rating.
229
Page 232 of 280

Wheels
Determining correct load
limit
Use the example below to calcu-
late the total weight of the pas-
sengers and luggage or other
things that you plan to transport
so that you can make sure that
your vehicle will not be overload-
ed.
Steps for Determining Correct
Load Limit
1. Locate the statement “THE
COMBINED WEIGHT OF OCCU-
PANTS AND CARGO SHOULD
NEVER EXCEED XXX KG OR XXX
LBS” on your vehicle’s placard
(tire inflation pressure label)
=> page 226, fig. 152.
2. Determine the combined
weight of the driver and pas-
sengers that will be riding in
your vehicle.
3. Subtract the combined weight
of the driver and passengers
from “XXX” kilograms or “XXX”
pounds shown on the sticker
=> page 226, fig. 152.
4. The resulting figure equals the
available amount of cargo and
luggage load capacity. For ex-
ample, if the “XXX” amount
equals 1400 lbs. and there will
230
be five 150 lbs. passengers in
your vehicle, the amount of
available cargo and luggage
oad capacity is 650 lbs.
(1400-750 (5 x 150) = 650
bs.)
5. Determine the combined
weight of luggage and cargo
being loaded on the vehicle.
That weight may not safely ex-
ceed the available cargo and
uggage load capacity calculat-
ed in Step 4.
6. If your vehicle will be towing a
trailer, load from your trailer
will be transferred to your vehi-
cle. Consult this manual to de-
termine how this reduces the
available cargo and luggage
load capacity of your vehicle.
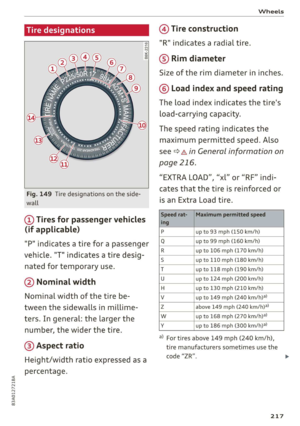
>Check the tire sidewall
(=> page 217, fig. 149) to deter-
mine the designated load rating
for a specific tire.
Wheel bolts and rims
Wheel bolts
Wheel bolts must be clean and loosen/tighten
easily. You will need a special adapter to loosen
the anti-theft wheel bolts* > page 243.
Rims
Rims with a bolted rim ring* or with bolted wheel
covers* consist of multiple pieces. These compo-
nents were bolted together using special bolts
and a special procedure. You must not repair or
disassemble them > A\.