Page 145 of 224
8-6
8
EBU35801General maintenance and lubrication chartNO. ITEMROUTINE INITIAL
EVERY
Whichev- er comes first month 1 3 6 6 12
km
(mi) 320
(200) 1300
(800) 2500
(1600) 2500
(1600) 5000
(3200)
hours 20 80 160 160 320
1 *Cooling system • Check coolant leakage.
• Repair if necessary.
√√√√√
• Change coolant. Every 2 years
2 Primary air filter
(foam)
•Clean.
• Replace if necessary. Every 300–600 km (200–400 mi)
(more often in wet or dusty condi-
tions)
* Secondary air fil-
ter (paper)
• Replace. Every 2000–5000 km (1200–3000
mi)
(more often in wet or dusty condi-
tions)
3Engine oil • Change (warm engine before draining). √√√√
4 Engine oil filter
cartridge • Replace.
√√√
5 Transmission oil • Check oil level and for leakage.
√√√√√
• Change. √√√√
6 Final gear oil • Check oil level.
√√√√√
• Change. √√
UB0F7AE0.book Page 6 Monday, November 6, 2017 2:30 PM
Page 146 of 224
8-7
8
7Differential gear
oil • Check oil level.
√√√√√
•Change. √√
8 *YCC-S clutch • Check operation and for fluid leakage.
• Correct if necessary. √√√√√
9 *Brake system • Check operation, brake pad wear, and for
fluid leakage.
• Correct if necessary, replace pads if worn to the limit. √√√√√
10 *Parking brake • Check operation and free play/brake pad
wear.
• Correct if necessary. Replace pads if worn to the limit. √√√√√
11 *Brake fluid and
internals • Change the brake fluid.
• Replace internal components of master cyl-
inder and calipers. Every 2 years
12 *Brake hoses • Replace. Every 4 years
13 *Accelerator pedal • Check operation and free play. √√√√√
NO. ITEM
ROUTINE INITIAL
EVERY
Whichev- er comes first month136612
km
(mi) 320
(200) 1300
(800) 2500
(1600) 2500
(1600) 5000
(3200)
hours 20 80 160 160 320UB0F7AE0.book Page 7 Monday, November 6, 2017 2:30 PM
Page 147 of 224

8-8
8
14*Wheels • Check balance, runout, and for damage.
• Balance wheel if necessary.
• Replace wheel if damaged or if runout is
over specified limits. √√√√
• Check and tighten the bead lock (for equipped models). Every 500 km (300 mi)
15 *Wheel bearings • Check bearing assemblies for loose-
ness/damage.
• Replace if damaged. √√√√
16 *Front and rear
suspension • Check operation and for oil leakage.
• Correct if necessary.
√√
17 *Steering system • Check operation and for looseness. Replace
if damaged.
• Check toe-in. Adjust if necessary. √√√√√
18 *Stabilizer bushes • Check for cracks or other damage, and re-
place if necessary. √√√
19 *Upper and lower
arm pivots • Lubricate with lithium-soap-based grease.
√√√
20 *Rear knuckle up-
per and lower piv-
ots • Lubricate with lithium-soap-based grease.
√√√
NO. ITEM ROUTINE
INITIAL EVERY
Whichev- er comes first month 1 3 6 6 12
km
(mi) 320
(200) 1300
(800) 2500
(1600) 2500
(1600) 5000
(3200)
hours 20 80 160 160 320UB0F7AE0.book Page 8 Monday, November 6, 2017 2:30 PM
Page 148 of 224

8-9
8
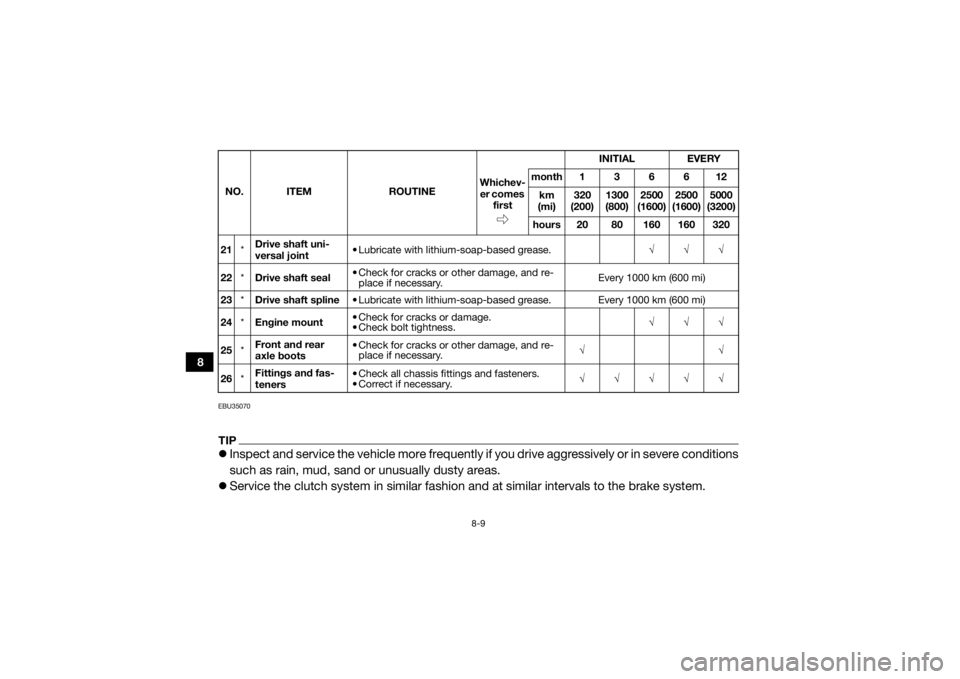
EBU35070TIPInspect and service the vehicle more frequently if you drive aggressively or in severe conditions
such as rain, mud, sand or unusually dusty areas.
Service the clutch system in similar fashion and at similar intervals to the brake system.21 *Drive shaft uni-
versal joint • Lubricate with lithium-soap-based grease.
√√√
22 *Drive shaft seal • Check for cracks or other damage, and re-
place if necessary. Every 1000 km (600 mi)
23 *Drive shaft spline • Lubricate with lithium-soap-based grease. Every 1000 km (600 mi)
24 *Engine mount • Check for cracks or damage.
• Check bolt tightness.
√√√
25 *Front and rear
axle boots • Check for cracks or other damage, and re-
place if necessary. √√
26 *Fittings and fas-
teners • Check all chassis fittings and fasteners.
• Correct if necessary.
√√√√√
NO. ITEM
ROUTINE INITIAL
EVERY
Whichev- er comes first month136612
km
(mi) 320
(200) 1300
(800) 2500
(1600) 2500
(1600) 5000
(3200)
hours 20 80 160 160 320UB0F7AE0.book Page 9 Monday, November 6, 2017 2:30 PM
Page 149 of 224
8-10
8
The service items contained herein should not be considered exhaustive, therefore:
• have your YXZ1000R checked and serviced by your Yamaha dealer at regular intervals.
• replace any damaged or visibly worn part immediately. UB0F7AE0.book Page 10 Monday, November 6, 2017 2:30 PM
Page 150 of 224
8-11
8
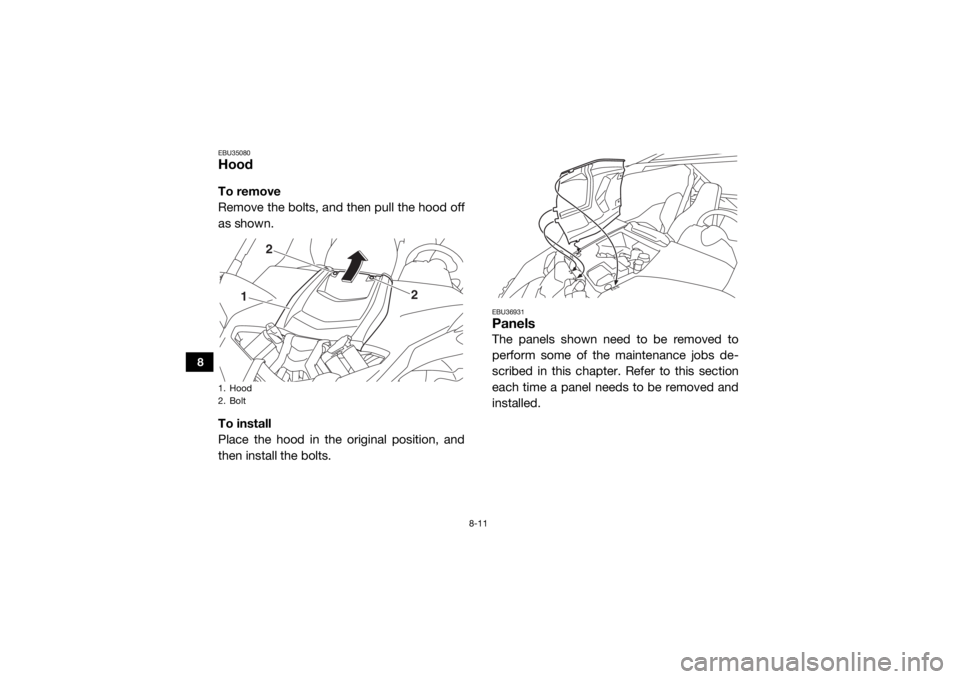
EBU35080HoodTo remove
Remove the bolts, and then pull the hood off
as shown.
To install
Place the hood in the original position, and
then install the bolts.
EBU36931PanelsThe panels shown need to be removed to
perform some of the maintenance jobs de-
scribed in this chapter. Refer to this section
each time a panel needs to be removed and
installed.
1. Hood
2. Bolt
1
2
2
UB0F7AE0.book Page 11 Monday, November 6, 2017 2:30 PM
Page 151 of 224
8-12
8
Panel A
To remove the panel1. Unhook the projections as shown.
2. Disconnect the interior light couplers (forequipped models), and then remove the
panel.
1. Panel A
2. Panel B
1. Panel C
1
2
1
1. Panel A
2. Projection
1
2
2
UB0F7AE0.book Page 12 Monday, November 6, 2017 2:30 PM
Page 152 of 224
8-13
8
For interior-light-equipped models
To install the panel1. Connect the interior light couplers. (Forequipped models)
2. Place the panel in the original position. Panel B
To remove the panel
1. Remove the hood. (See page 8-11.)
2. Remove panel A.
3. Remove the top cover by removing the
quick fastener screw and the bolts.
1. Interior light coupler
1
1
UB0F7AE0.book Page 13 Monday, November 6, 2017 2:30 PM