2018 VOLVO V90 CROSS COUNTRY ECU
[x] Cancel search: ECUPage 564 of 662
||
LOADING, STORAGE AND PASSENGER COMPARTMENT
* Option/accessory.
562
Extra cargo space
The rear seat backrests can be folded down to increase cargo compartment space and simplifyloading. If the rear seat backrests are foldeddown, make sure that no objects loaded into thevehicle prevent the WHIPS system for the frontseats from functioning correctly. The ski hatch in the rear seat can be folded down to carry skis or other long, thin objects.
Related information
• Load anchoring eyelets (p. 563)
• Folding down the rear seat backrests(p. 196)
• Rear seat ski hatch (p. 564)
• Roof loads and load carriers (p. 562)
• Leveling control
* and suspension (p. 428)
• Weights (p. 637)
Roof loads and load carriers Volvo-developed load carriers are recommended for carrying loads on the roof of the vehicle.
Volvo load carriers are specially designed to help prevent damage to your vehicle and help ensuremaximum safety while driving. Volvo load carriersare available from authorized Volvo retailers. Carefully follow the installation instructions provi- ded with the load carriers. •Check periodically to ensure that the load carriers and load are properly secured.Secure the load firmly using tie straps orsimilar.
• Distribute the load evenly throughout theload carriers. Place heavier cargo at the bot-tom of the load.
• The vehicle's wind resistance and fuel con-sumption increase with the size of the load.
• Drive smoothly. Avoid rapid acceleration, hardbraking and fast cornering.
WARNING
The vehicle's center of gravity and driving characteristics are altered by roof loads. Follow the vehicle's specifications regarding weights and maximum permitted load.
Related information
•Loading recommendations (p. 561)
• Weights (p. 637)
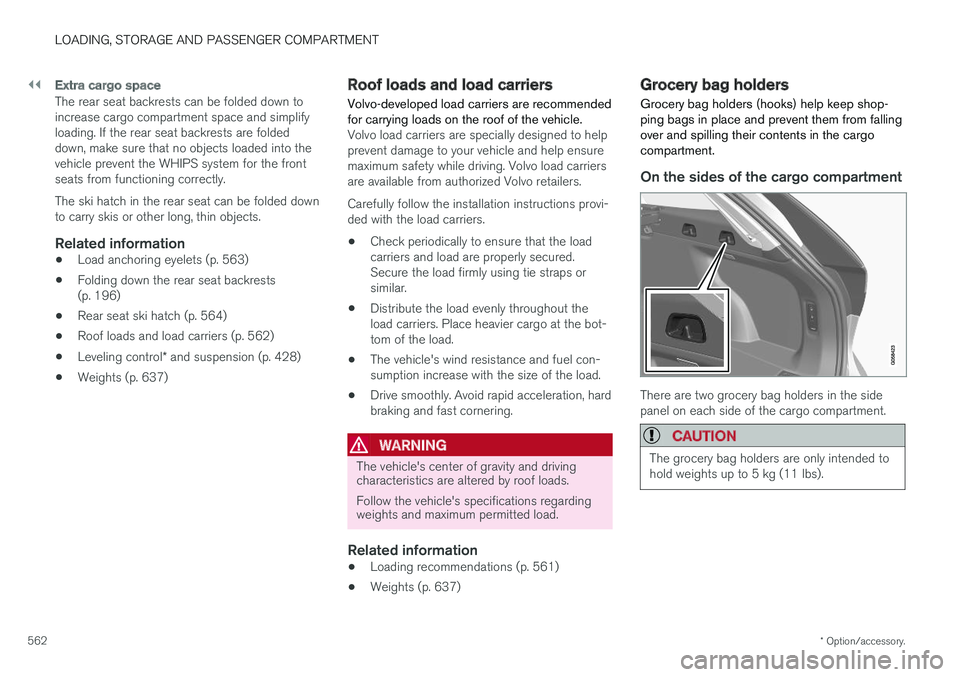
Grocery bag holders Grocery bag holders (hooks) help keep shop- ping bags in place and prevent them from fallingover and spilling their contents in the cargocompartment.
On the sides of the cargo compartment
There are two grocery bag holders in the side panel on each side of the cargo compartment.
CAUTION
The grocery bag holders are only intended to hold weights up to 5 kg (11 lbs).
Page 565 of 662
LOADING, STORAGE AND PASSENGER COMPARTMENT
* Option/accessory.563
Under the floor hatch *
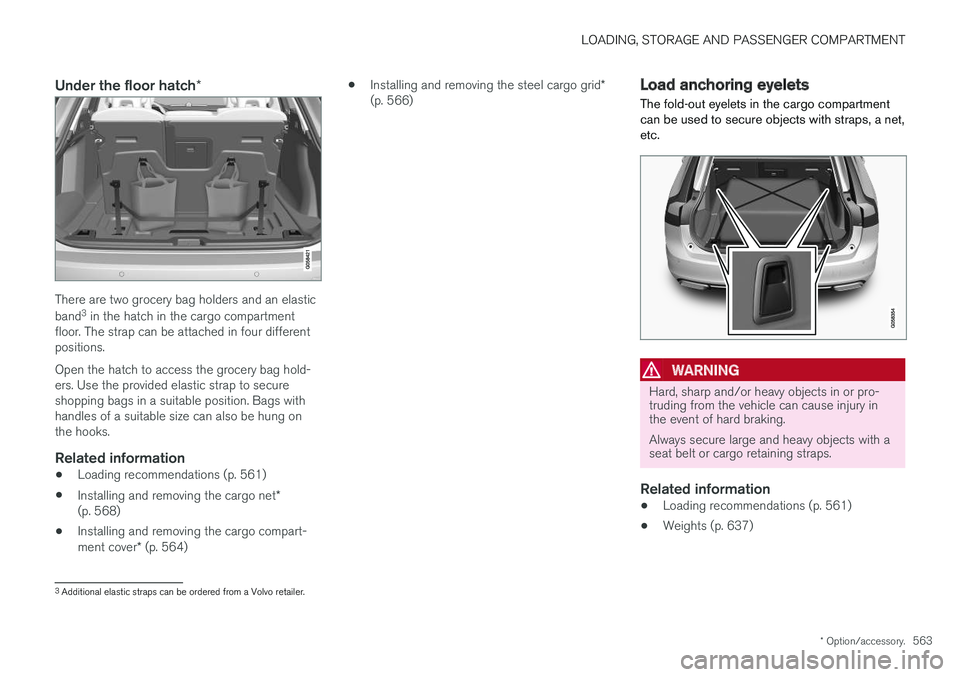
There are two grocery bag holders and an elastic band3
in the hatch in the cargo compartment
floor. The strap can be attached in four different positions. Open the hatch to access the grocery bag hold- ers. Use the provided elastic strap to secureshopping bags in a suitable position. Bags withhandles of a suitable size can also be hung onthe hooks.
Related information
• Loading recommendations (p. 561)
• Installing and removing the cargo net
*
(p. 568)
• Installing and removing the cargo compart- ment cover
* (p. 564) •
Installing and removing the steel cargo grid
*
(p. 566)
Load anchoring eyelets
The fold-out eyelets in the cargo compartment can be used to secure objects with straps, a net,etc.
WARNING
Hard, sharp and/or heavy objects in or pro- truding from the vehicle can cause injury inthe event of hard braking. Always secure large and heavy objects with a seat belt or cargo retaining straps.
Related information
• Loading recommendations (p. 561)
• Weights (p. 637)
3
Additional elastic straps can be ordered from a Volvo retailer.
Page 566 of 662
LOADING, STORAGE AND PASSENGER COMPARTMENT
* Option/accessory.
564
Rear seat ski hatch
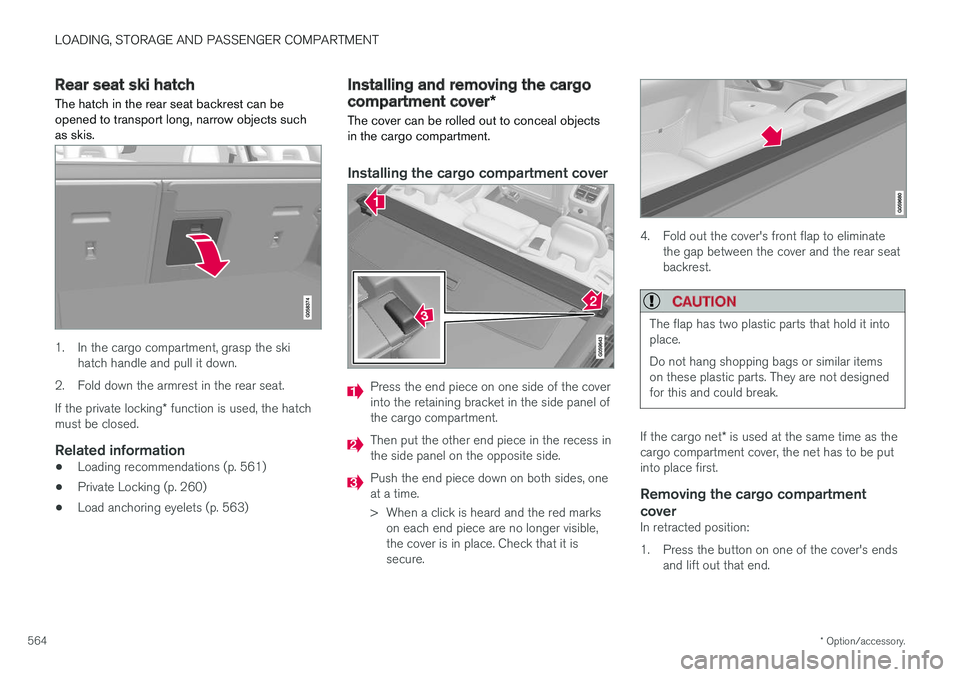
The hatch in the rear seat backrest can be opened to transport long, narrow objects suchas skis.
1. In the cargo compartment, grasp the ski hatch handle and pull it down.
2. Fold down the armrest in the rear seat. If the private locking * function is used, the hatch
must be closed.
Related information
• Loading recommendations (p. 561)
• Private Locking (p. 260)
• Load anchoring eyelets (p. 563)
Installing and removing the cargo
compartment cover
*
The cover can be rolled out to conceal objects in the cargo compartment.
Installing the cargo compartment cover
Press the end piece on one side of the cover into the retaining bracket in the side panel ofthe cargo compartment.
Then put the other end piece in the recess in the side panel on the opposite side.
Push the end piece down on both sides, one at a time.
> When a click is heard and the red marks on each end piece are no longer visible, the cover is in place. Check that it issecure.
4. Fold out the cover's front flap to eliminate the gap between the cover and the rear seat backrest.
CAUTION
The flap has two plastic parts that hold it into place. Do not hang shopping bags or similar items on these plastic parts. They are not designedfor this and could break.
If the cargo net * is used at the same time as the
cargo compartment cover, the net has to be put into place first.
Removing the cargo compartment
cover
In retracted position:
1. Press the button on one of the cover's ends and lift out that end.
Page 567 of 662
LOADING, STORAGE AND PASSENGER COMPARTMENT
}}
* Option/accessory.565
2. Carefully lift the cover up and out.
> The other end will release automaticallyand the cover can then be lifted out of the cargo compartment.
Related information
• Operating the cargo compartment cover
*
(p. 565)
• Loading recommendations (p. 561)
Operating the cargo compartment
cover
*
The cover can be used in two positions: fully open to completely cover the cargo compart-ment or partially retracted to make it easier toreach further into the cargo compartment.
Fully open
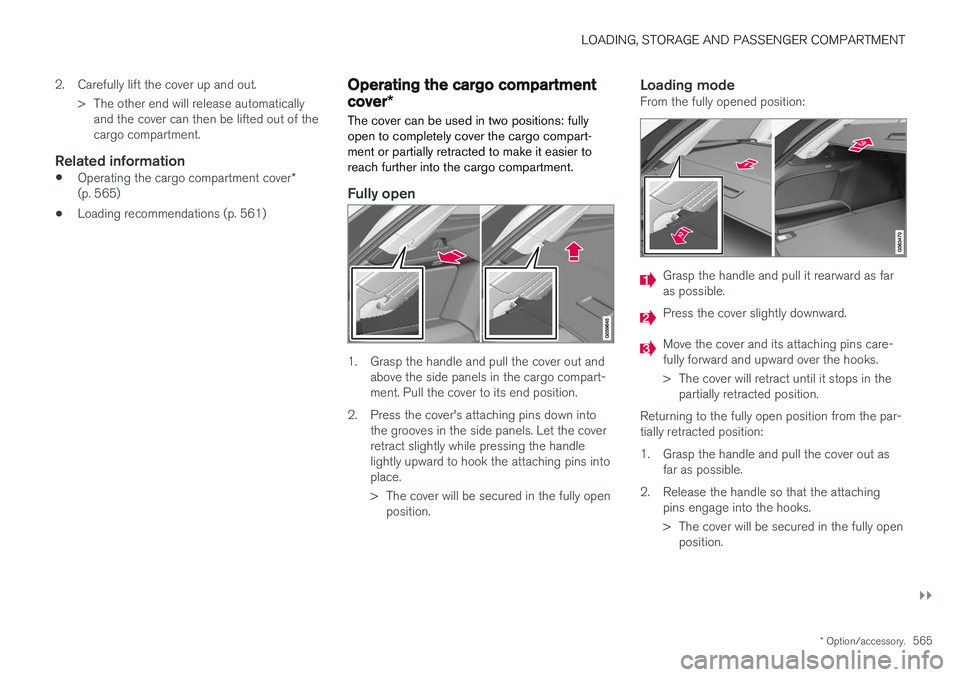
1. Grasp the handle and pull the cover out and above the side panels in the cargo compart- ment. Pull the cover to its end position.
2. Press the cover's attaching pins down into the grooves in the side panels. Let the coverretract slightly while pressing the handlelightly upward to hook the attaching pins intoplace.
> The cover will be secured in the fully openposition.
Loading modeFrom the fully opened position:
Grasp the handle and pull it rearward as far as possible.
Press the cover slightly downward.
Move the cover and its attaching pins care- fully forward and upward over the hooks.
> The cover will retract until it stops in thepartially retracted position.
Returning to the fully open position from the par- tially retracted position:
1. Grasp the handle and pull the cover out as far as possible.
2. Release the handle so that the attaching pins engage into the hooks.
> The cover will be secured in the fully openposition.
Page 568 of 662
||
LOADING, STORAGE AND PASSENGER COMPARTMENT
* Option/accessory.
566 In vehicles equipped with the automatic cargo compartment cover
*, the cover will retract from
the fully open position to the partially retracted position every time the tailgate is opened, and willreturn to the fully open position when the tailgateis closed. The cover will detect if anythingobstructs its movement and automatically retract.
WARNING
Be aware of the risk of injury when opening and closing the electrically operated * cargo
compartment cover.
CAUTION
Do not place objects on top of the cargo compartment cover.
CAUTION
If large or bulky objects are placed in the cargo compartment, put the automatic * cargo
compartment cover in the fully retracted posi- tion to help prevent it from coming into con-tact with the object.
NOTE
Automatic operation of the cargo compart- ment cover may not be possible at low pas-senger compartment temperatures.
Retracting the cover
1. From the fully opened position:
Lift the cover's handle and pull it rearward to release the cover's attaching pins from thegrooves. Let the cover retract. From the partially retracted position:Grasp the handle and pull the cover out of the groves to the fully open position. Lift thehandle and pull it rearward to release thecover's attaching pins from the grooves. Letthe cover retract.
2. Let the cover retract with its attaching pins above the side panels until it stops in thefully retracted position.
Keep in mind that a retracted cover could reducerearward visibility.
Related information
• Installing and removing the cargo compart- ment cover
* (p. 564)
Installing and removing the steel
cargo grid *
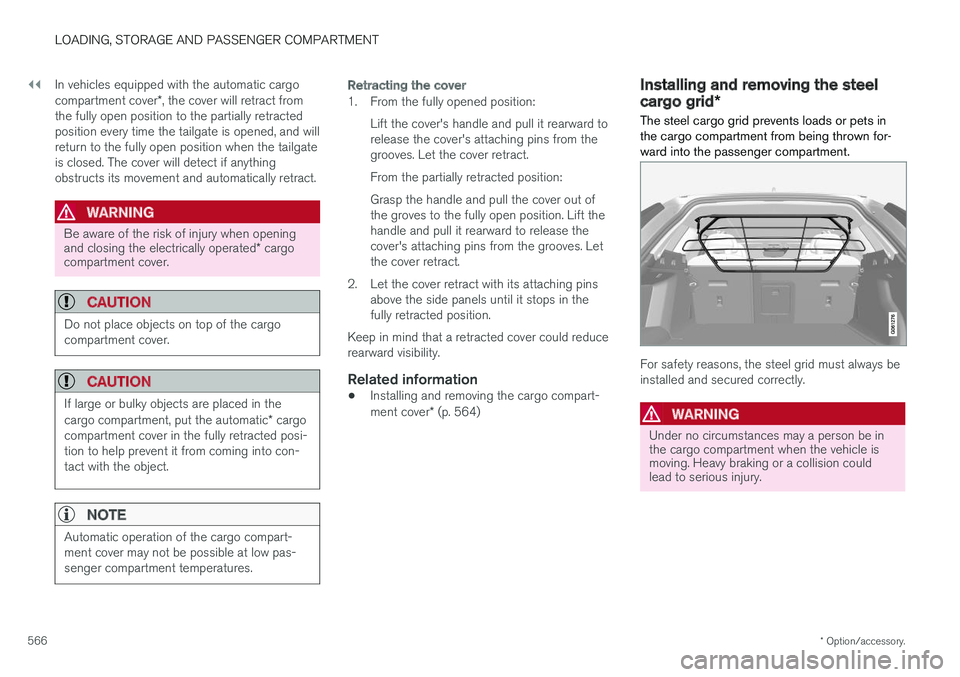
The steel cargo grid prevents loads or pets in the cargo compartment from being thrown for-ward into the passenger compartment.
For safety reasons, the steel grid must always be installed and secured correctly.
WARNING
Under no circumstances may a person be in the cargo compartment when the vehicle ismoving. Heavy braking or a collision couldlead to serious injury.
Page 569 of 662
LOADING, STORAGE AND PASSENGER COMPARTMENT
567
Installation
CAUTION
The steel cargo grid may only be used in the rear position (behind the rear seat) describedhere.
Before installing the steel grid, the existing plas- tic ceiling mounting consoles must be replacedwith steel consoles. Volvo recommends that theceiling consoles are only replaced by an author-ized Volvo workshop or retailer.
1. Fold down the rear seat backrests.
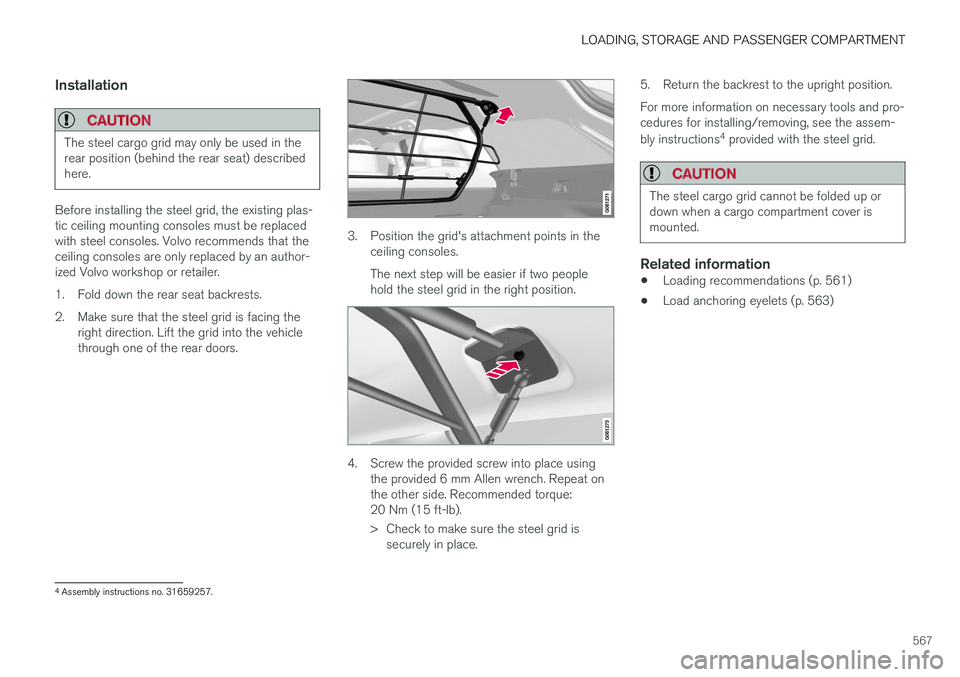
2. Make sure that the steel grid is facing theright direction. Lift the grid into the vehicle through one of the rear doors.
3. Position the grid's attachment points in theceiling consoles. The next step will be easier if two people hold the steel grid in the right position.
4. Screw the provided screw into place usingthe provided 6 mm Allen wrench. Repeat on the other side. Recommended torque:20 Nm (15 ft-lb).
> Check to make sure the steel grid issecurely in place. 5. Return the backrest to the upright position. For more information on necessary tools and pro- cedures for installing/removing, see the assem- bly instructions
4
provided with the steel grid.
CAUTION
The steel cargo grid cannot be folded up or down when a cargo compartment cover ismounted.
Related information
• Loading recommendations (p. 561)
• Load anchoring eyelets (p. 563)
4
Assembly instructions no. 31659257.
Page 570 of 662
LOADING, STORAGE AND PASSENGER COMPARTMENT
* Option/accessory.
568
Installing and removing the cargo
net *
The cargo net helps prevent objects in the cargo compartment from entering the passenger com-partment in the event of a sudden stop or hardbraking.
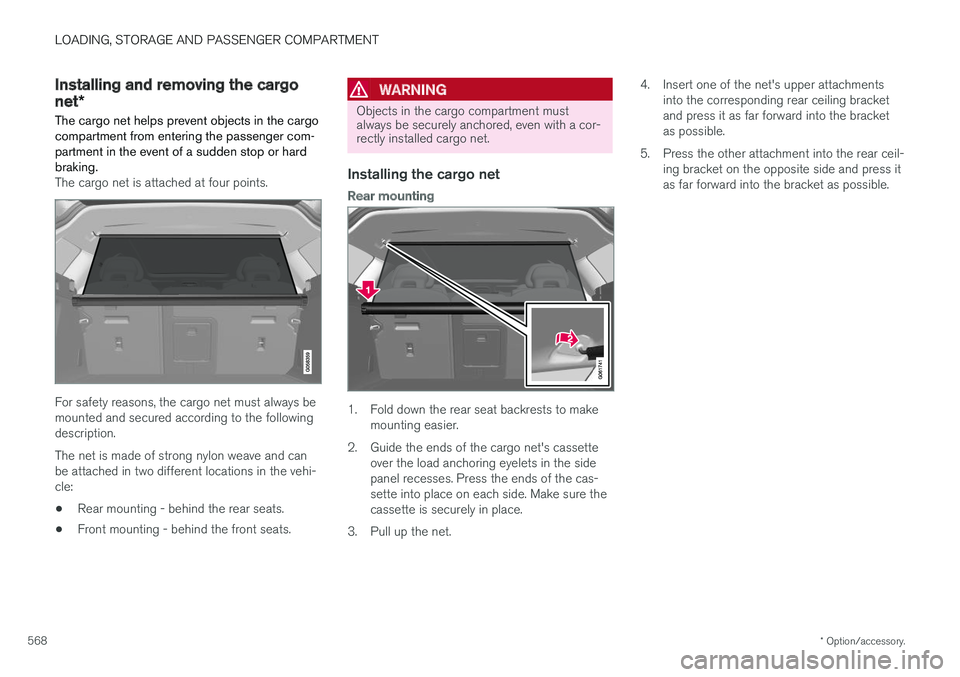
The cargo net is attached at four points.
For safety reasons, the cargo net must always be mounted and secured according to the followingdescription. The net is made of strong nylon weave and can be attached in two different locations in the vehi-cle:
• Rear mounting - behind the rear seats.
• Front mounting - behind the front seats.
WARNING
Objects in the cargo compartment must always be securely anchored, even with a cor-rectly installed cargo net.
Installing the cargo net
Rear mounting
1. Fold down the rear seat backrests to make
mounting easier.
2. Guide the ends of the cargo net's cassette over the load anchoring eyelets in the side panel recesses. Press the ends of the cas-sette into place on each side. Make sure thecassette is securely in place.
3. Pull up the net. 4. Insert one of the net's upper attachments
into the corresponding rear ceiling bracketand press it as far forward into the bracketas possible.
5. Press the other attachment into the rear ceil- ing bracket on the opposite side and press itas far forward into the bracket as possible.
Page 576 of 662
||
MAINTENANCE AND SERVICE
574
Related information
•Vehicle status (p. 576)
• Scheduling service and repairs (p. 576)
• Connecting equipment to the vehicle's data link connector (p. 36)
• Technician certification (p. 37)
• Climate control system service (p. 582)
• Maintenance of the brake system (p. 407)
• Engine compartment overview (p. 583)
Data transfer between vehicle andworkshop over Wi-Fi
Volvo workshops have a designated Wi-Fi net- work for secure data transfer between your vehi-cle and the workshop. Your visit to the workshopwill be easier and more effective when diagnos-tics information and software can be transferredover the workshop's network.
When you arrive at the workshop, your technician can connect your vehicle to the workshop's Wi-Finetwork to perform troubleshooting and down-load software. For this type of communication,the vehicle only connects to the workshop's net-work. The vehicle can only be connected to thedesignated workshop networks, not to any othernetwork, e.g. your home network.
Manual connection to workshop Wi-FiManual connection is usually performed by aservice technician. Because the technician usesthe buttons on your remote key to connect thevehicle, it is important that you bring a key withbuttons when taking the vehicle in to a workshop.Pressing the lock button on the remote key threetimes will connect the vehicle to the workshop'sWi-Fi network. When the car is connected to a Wi-Fi network, the
symbol appears in the center display.
WARNING
The vehicle may not be driven when it is con- nected to the workshop's networks and sys-tems.
Related information
• Handling system updates via Download Cen- ter (p. 575)
• Scheduling service and repairs (p. 576)