2018 VOLVO V90 CROSS COUNTRY lock
[x] Cancel search: lockPage 447 of 662
STARTING AND DRIVING
}}
445
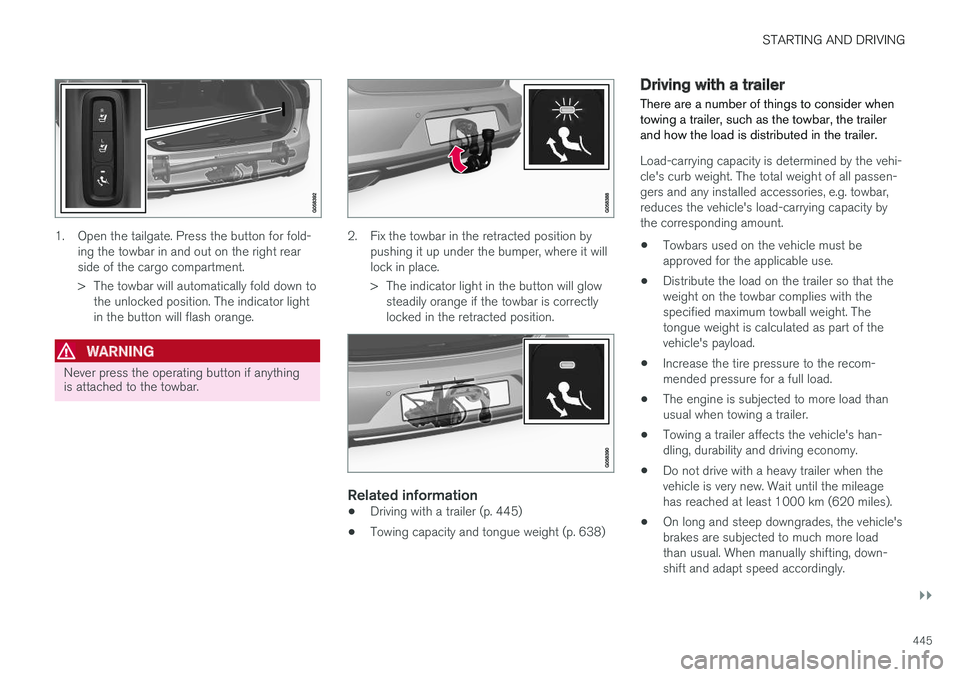
1. Open the tailgate. Press the button for fold-ing the towbar in and out on the right rear side of the cargo compartment.
> The towbar will automatically fold down tothe unlocked position. The indicator light in the button will flash orange.
WARNING
Never press the operating button if anything is attached to the towbar.
2. Fix the towbar in the retracted position by pushing it up under the bumper, where it will lock in place.
> The indicator light in the button will glowsteadily orange if the towbar is correctly locked in the retracted position.
Related information
• Driving with a trailer (p. 445)
• Towing capacity and tongue weight (p. 638)
Driving with a trailer
There are a number of things to consider when towing a trailer, such as the towbar, the trailerand how the load is distributed in the trailer.
Load-carrying capacity is determined by the vehi- cle's curb weight. The total weight of all passen-gers and any installed accessories, e.g. towbar,reduces the vehicle's load-carrying capacity bythe corresponding amount. • Towbars used on the vehicle must be approved for the applicable use.
• Distribute the load on the trailer so that theweight on the towbar complies with thespecified maximum towball weight. Thetongue weight is calculated as part of thevehicle's payload.
• Increase the tire pressure to the recom-mended pressure for a full load.
• The engine is subjected to more load thanusual when towing a trailer.
• Towing a trailer affects the vehicle's han-dling, durability and driving economy.
• Do not drive with a heavy trailer when thevehicle is very new. Wait until the mileagehas reached at least 1000 km (620 miles).
• On long and steep downgrades, the vehicle'sbrakes are subjected to much more loadthan usual. When manually shifting, down-shift and adapt speed accordingly.
Page 449 of 662

STARTING AND DRIVING
}}
* Option/accessory.447
The automatic transmission selects the optimal gear for the current load and engine speed.
Steep inclines
Do not lock the automatic transmission into a higher gear than what the engine can handle
‒ it
is not always preferable to drive in high gears at low rpm.
Parking on a hill
1. Depress the brake pedal.
2. Apply the parking brake.3. Put the gear selector in P.
4. Release the brake pedal.Put chocks behind the wheels when the vehicle is parked on a hill with a trailer attached.
Starting on a hill
1. Depress the brake pedal. 2. Put the gear selector in D.
3. Release the parking brake.
4. Release the brake pedal and start driving.
Related information
• Trailer Stability Assist
* (p. 447)
• Checking trailer lights (p. 448)
• Towing capacity and tongue weight (p. 638)
• Overheating of engine and transmission (p. 440)
Trailer Stability Assist
*
Trailer Stability Assist (TSA 10
) is a function
designed to help stabilize a vehicle that is tow- ing a trailer when the vehicle and trailer havebegun to sway. The function is part of the Elec- tronic Stability Control system ESC 11
.
Reasons for swayingA vehicle towing a trailer may begin to sway for various reasons. Normally this only occurs at highspeeds. However, if the trailer is overloaded orunevenly distributed, e.g. too far back, there is arisk of swaying even at low speeds. Swaying may be caused by factors such as:
• The vehicle and trailer are hit by a sudden, strong crosswind.
• The vehicle and trailer are traveling on anuneven road or over a bump.
• Sudden movements of the steering wheel.
Once swaying has begun, it can be difficult orimpossible to stop it. This makes the vehicle andtrailer difficult to control and there is a risk ofswerving into oncoming traffic or driving off theroad.
Trailer Stability Assist functionTrailer Stability Assist continuously monitors thevehicle's movements, particularly lateral move- ments. If swaying is detected, the brakes areapplied individually on the front wheels, which hasa stabilizing effect on the vehicle and trailer. Thisis often enough to enable the driver to regaincontrol of the vehicle. If the Trailer Stability Assist function's first attempt is not adequate to stop the swayingmotion, the brakes are applied on all wheels andengine power is temporarily reduced. As theswaying motion begins to decrease and the vehi-cle and trailer have once again become stable,TSA stops regulating the brakes/engine powerand the driver regains control of the vehicle.
NOTE
Trailer Stability Assist is deactivated if the driver selects the sport mode by deactivating
ESC in the center display's menu system.
Trailer Stability Assist may not intervene if the driver tries to compensate for the swaying motionby moving the steering wheel rapidly, becausethe system will then not be able to determine if itis the trailer or the driver causing the swaying.
10
Trailer Stability Assist
11 Electronic Stability Control
Page 451 of 662

STARTING AND DRIVING
}}
449
Disabling the automatic check
The automatic light check can be disabled in the center display. 1.Tap
Settings in the Top view.
2. Tap
My CarLights and Lighting.
3. Deselect
Automatic Trailer Lamp Check.
Manual check
If the automatic check has been disabled, the check can be started manually. 1.Tap
Settings in the Top view.
2. Tap
My CarLights and Lighting.
3. Select
Manual Trailer Lamp Check.
> The light check will begin. Get out of the vehicle to perform the check.
Related information
• Driving with a trailer (p. 445)
Towing using a towline
This section refers to one vehicle being towed behind another using a towline.
Before towing another vehicle, check applicable speed limit regulations.
Preparations and towing
CAUTION
Note that the vehicle must always be towed with the wheels rolling forward.
• Do not tow a vehicle with automatictransmission at a speed greater than80 km/h (50 mph) or for a distancegreater than 80 km (50 miles).
WARNING
•
Ignition mode
II must be active – all air-
bags are deactivated in ignition mode I.
• Always have the remote key in the vehicle when it is towed.
WARNING
The brake and steering servos do not work when the engine is off – it takesabout 5 times more pressure on the brakepedal and steering requires much more effortthan normal. 1. Turn on the hazard warning flashers.
2. Attach the towline to the towing eyelet.3.
Put the vehicle in ignition mode II – without
pressing the brake pedal, turn the start knob clockwise and hold it there for about4 seconds. Release the knob, which willautomatically return to its original position.
4. Move the gear selector to neutral ( N) and
release the parking brake. If the battery charge level is too low, it may not be possible to release the parking brake.Connect an auxiliary battery to the vehicle ifthe battery is discharged.
> The towing vehicle can now start driving.
5. Keep the towline taut when the towing vehi- cle slows down by applying light pressure to the brake pedal. This will help avoid jarringmovements.
6. Be prepared to apply the brakes to stop the vehicle.
Jump startingDo not tow the vehicle to start the engine. Use anauxiliary battery if the start battery's charge levelis so low that the engine cannot be started.
Page 452 of 662
||
STARTING AND DRIVING
450
CAUTION
Attempting to tow with the engine running could result in damage to the three-way cata-lytic converter.
Related information
•Attaching and removing the towing eyelet (p. 450)
• Hazard warning flashers (p. 164)
• Recovery (p. 452)
• Jump starting using another battery (p. 442)
• Selecting ignition mode (p. 404)
Attaching and removing the towingeyelet
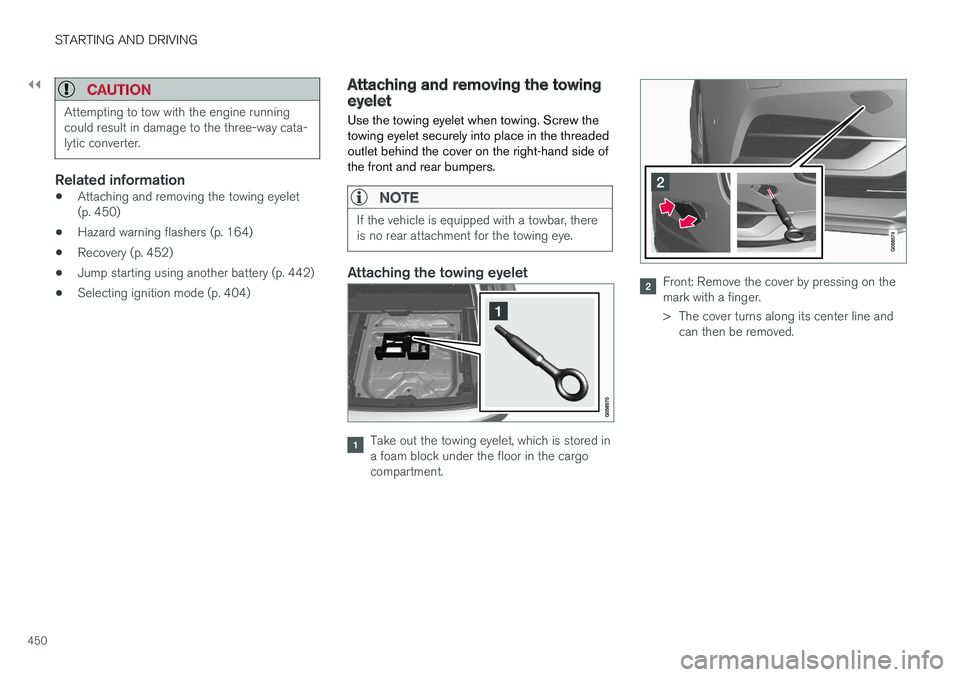
Use the towing eyelet when towing. Screw the towing eyelet securely into place in the threadedoutlet behind the cover on the right-hand side ofthe front and rear bumpers.
NOTE
If the vehicle is equipped with a towbar, there is no rear attachment for the towing eye.
Attaching the towing eyelet
Take out the towing eyelet, which is stored in a foam block under the floor in the cargocompartment.
Front: Remove the cover by pressing on the mark with a finger.
> The cover turns along its center line and can then be removed.
Page 510 of 662
||
AUDIO, MEDIA AND INTERNET
* Option/accessory.
508 2. Tap
CommunicationVehicle Wi-Fi
Hotspot.
3. Tap
Network name to assign a name to the
hotspot.
4. Tap
Password and create a password. This
password can then be used to connect other devices to this hotspot.
5. Tap
Frequency band and select a fre-
quency for the hotspot to use to transmit data. Please note that selecting a frequencyis not possible on all markets.
6. Activate/deactivate by tapping to check/ uncheck the
Vehicle Wi-Fi Hotspot box.
7. If Wi-Fi was previously used to connect to the Internet, confirm the change of connec- tions.
> It is now possible for external devices toconnect to the vehicle's Wi-Fi hotspot.
NOTE
Activation of Wi-Fi hotspot can cause addi- tional charges from your network operator. Contact your network operator about data traffic costs.
The connection status is shown by a symbol in the center display's status bar. Tap
Connected devices to see a list of cur-
rently connected devices.
Related information
• Symbols in the center display status bar (p. 126)
• Internet-connected vehicle
* (p. 503)
• No or poor Internet connection (p. 508)
No or poor Internet connection Factors affecting the Internet connection.
The amount of data transmitted depends on the services or apps currently in use in the vehicle.Streaming music, for example, involves the trans-mission of a large amount of data, and thisrequires a good connection and a strong signal.
Phone to vehicleInternet connection speed may vary dependingon the location of the cellular phone in the vehi-cle. Move the phone closer to the center displayto increase signal strength. Make sure that noth-ing is between the phone and center display thatcould be blocking the signal.
Phone to network operatorThe speed of the mobile network varies depend-ing on the coverage in the vehicle's current loca-tion. Coverage may be poorer in e.g. tunnels,mountainous areas, deep valleys or indoors. Con-nection speed is also dependent on the subscrip-tion you have with your service provider.
NOTE
If you experience any problems with data traf- fic, contact your network service provider.
13
This does not apply when the vehicle is connected to the Internet via Wi-Fi.
Page 540 of 662
||
WHEELS AND TIRES
* Option/accessory.
538
Related information
• Recommended tire pressure (p. 533)
• Adjusting tire pressure (p. 532)
• Calibrating the tire pressure monitoring sys- tem
* (p. 535)
• Viewing tire pressure status in the centerdisplay
* (p. 536)
• Tire pressure monitoring system
* (p. 533)
• Inflate tires with the compressor included in the tire sealing system (p. 551)
When changing wheels
The wheels can be changed, e.g. to switch to snow tires or spare tires. Follow the applicableinstructions for removing and installing thewheel.
Changing to tires of another dimensionMake sure that the tire dimension is approved for use on the vehicle. If you change to tires of another dimension, con- tact an authorized Volvo workshop to update thevehicle's software. A software update may benecessary when changing to tires of larger/smaller dimensions or when changing to or fromsnow tires.
Related information
• Removing a wheel (p. 540)
• Installing a wheel (p. 542)
• Tool kit (p. 538)
• Snow tires (p. 545)
• Spare wheel (p. 543)
• Wheel bolts (p. 539)
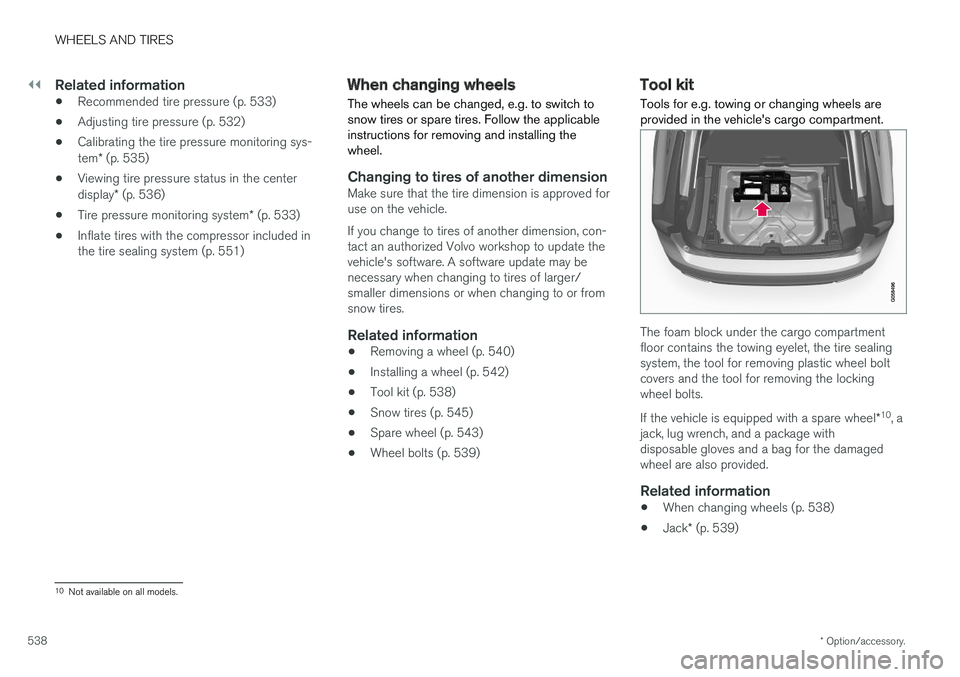
Tool kit Tools for e.g. towing or changing wheels are provided in the vehicle's cargo compartment.
The foam block under the cargo compartment floor contains the towing eyelet, the tire sealingsystem, the tool for removing plastic wheel boltcovers and the tool for removing the lockingwheel bolts. If the vehicle is equipped with a spare wheel
*10
, a
jack, lug wrench, and a package with disposable gloves and a bag for the damagedwheel are also provided.
Related information
• When changing wheels (p. 538)
• Jack
* (p. 539)
10
Not available on all models.
Page 541 of 662
WHEELS AND TIRES
}}
* Option/accessory.539
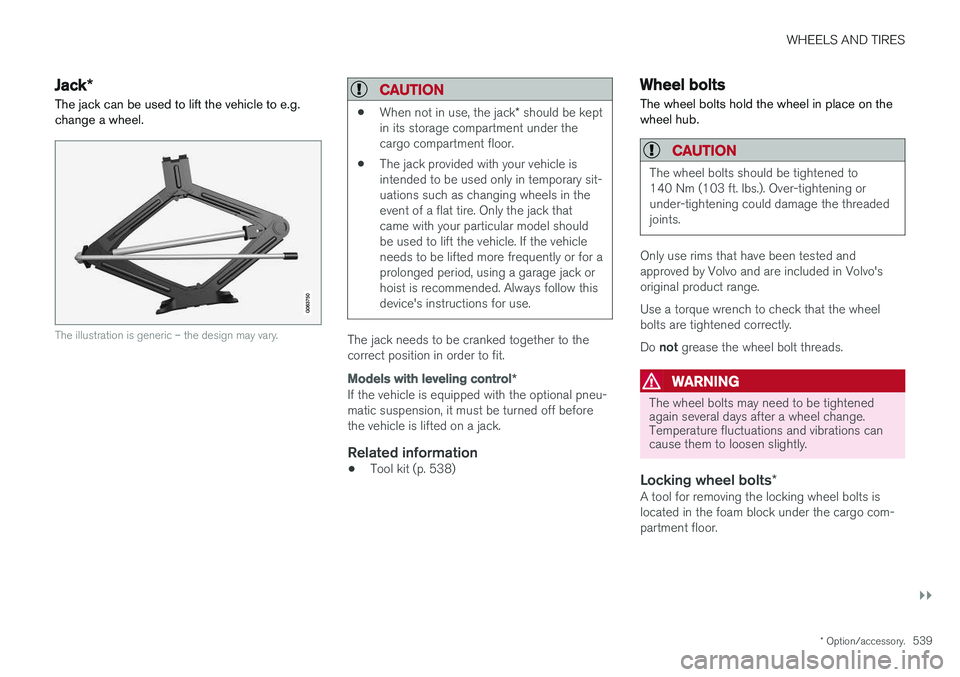
Jack*
The jack can be used to lift the vehicle to e.g. change a wheel.
The illustration is generic – the design may vary.
CAUTION
• When not in use, the jack
* should be kept
in its storage compartment under the cargo compartment floor.
• The jack provided with your vehicle isintended to be used only in temporary sit-uations such as changing wheels in theevent of a flat tire. Only the jack thatcame with your particular model shouldbe used to lift the vehicle. If the vehicleneeds to be lifted more frequently or for aprolonged period, using a garage jack orhoist is recommended. Always follow thisdevice's instructions for use.
The jack needs to be cranked together to the correct position in order to fit.
Models with leveling control
*
If the vehicle is equipped with the optional pneu- matic suspension, it must be turned off beforethe vehicle is lifted on a jack.
Related information
•Tool kit (p. 538)
Wheel bolts
The wheel bolts hold the wheel in place on the wheel hub.
CAUTION
The wheel bolts should be tightened to 140 Nm (103 ft. lbs.). Over-tightening orunder-tightening could damage the threadedjoints.
Only use rims that have been tested and approved by Volvo and are included in Volvo'soriginal product range. Use a torque wrench to check that the wheel bolts are tightened correctly. Do not grease the wheel bolt threads.
WARNING
The wheel bolts may need to be tightened again several days after a wheel change.Temperature fluctuations and vibrations cancause them to loosen slightly.
Locking wheel bolts *A tool for removing the locking wheel bolts is located in the foam block under the cargo com-partment floor.
Page 542 of 662
||
WHEELS AND TIRES
* Option/accessory.
540
Related information
• Removing a wheel (p. 540)
• Installing a wheel (p. 542)
Removing a wheel
Instructions for removing a wheel when chang- ing wheels. Wheel changes must always be car-ried out correctly.
CAUTION
• When not in use, the jack
* should be kept
in its storage compartment under the cargo compartment floor.
• The jack provided with your vehicle isintended to be used only in temporary sit-uations such as changing wheels in theevent of a flat tire. Only the jack thatcame with your particular model shouldbe used to lift the vehicle. If the vehicleneeds to be lifted more frequently or for aprolonged period, using a garage jack orhoist is recommended. Always follow thisdevice's instructions for use.
WARNING
•Apply the parking brake and put the gear selector in the Park (
P) position.
• Block the wheels standing on the ground, use rigid wooden blocks or large stones.
• Check that the jack is not damaged, thethreads are properly lubricated and it isfree from dirt.
• Be sure the jack is on a firm, level, non-slippery surface and that it is upright andnot leaning.
• The jack must correctly engage in thejack attachment.
• No objects should be placed between thebase of the jack and the ground, orbetween the jack and the attachment baron the vehicle.
• Never let anyone remain in the vehiclewhen it is raised on a jack.
• If a tire must be changed near passingtraffic, make sure all passengers move toa safe location.
• Use a jack intended for the vehicle whenchanging a tire. For any other job, usestands to support the vehicle.
• Never crawl under or allow any part ofyour body to be extended under a vehiclesupported by a jack.