Page 250 of 672

2504-5. Using the driving support systems
■Conditions in which function s may not operate properly
In the following situations, the camera sensor may not detect w hite (yellow)
lines and various functions may not operate normally.
● There are shadows on the road that run parallel with, or cover, the white
(yellow) lines.
● The vehicle is driven in an area without white (yellow) lines, such as in front
of a tollgate or checkpoint, or at an intersection, etc.
● The white (yellow) lines are cracked, “Botts’ dots”, “Raised pa vement
marker” or stones are present.
● The white (yellow) lines cannot be seen or are difficult to see due to sand,
etc.
● The vehicle is driven on a road surface that is wet due to rain , puddles, etc.
● The traffic lines are yellow (which may be more difficult to re cognize than
lines that are white).
● The white (yellow) lines cross over a curb, etc.
● The vehicle is driven on a bright surface, such as concrete.
● The vehicle is driven on a surface that is bright due to reflec ted light, etc.
● The vehicle is driven in an area where the brightness changes s uddenly,
such as at the entrances and exits of tunnels, etc.
● Light from the headlights of an oncoming vehicle, the sun, etc. , enters the
camera.
● The vehicle is driven where the road diverges, merges, etc.
● The vehicle is driven on a slope.
● The vehicle is driven on a road which tilts left or right, or a winding road.
● The vehicle is driven on an unpaved or rough road.
● The vehicle is driven around a sharp curve.
● The traffic lane is excessively narrow or wide.
● The vehicle is extremely tilted due to carrying heavy luggage or having
improper tire pressure.
● The distance to the preceding vehicle is extremely short.
● The vehicle is moving up and down a large amount due to road co nditions
during driving (poor roads or road seams).
● The headlight lenses are dirty and emit a faint amount of light at night, or the
beam axis has deviated.
● The vehicle has just changed lanes or crossed an intersection.
Page 283 of 672

2834-5. Using the driving support systems
4
Driving
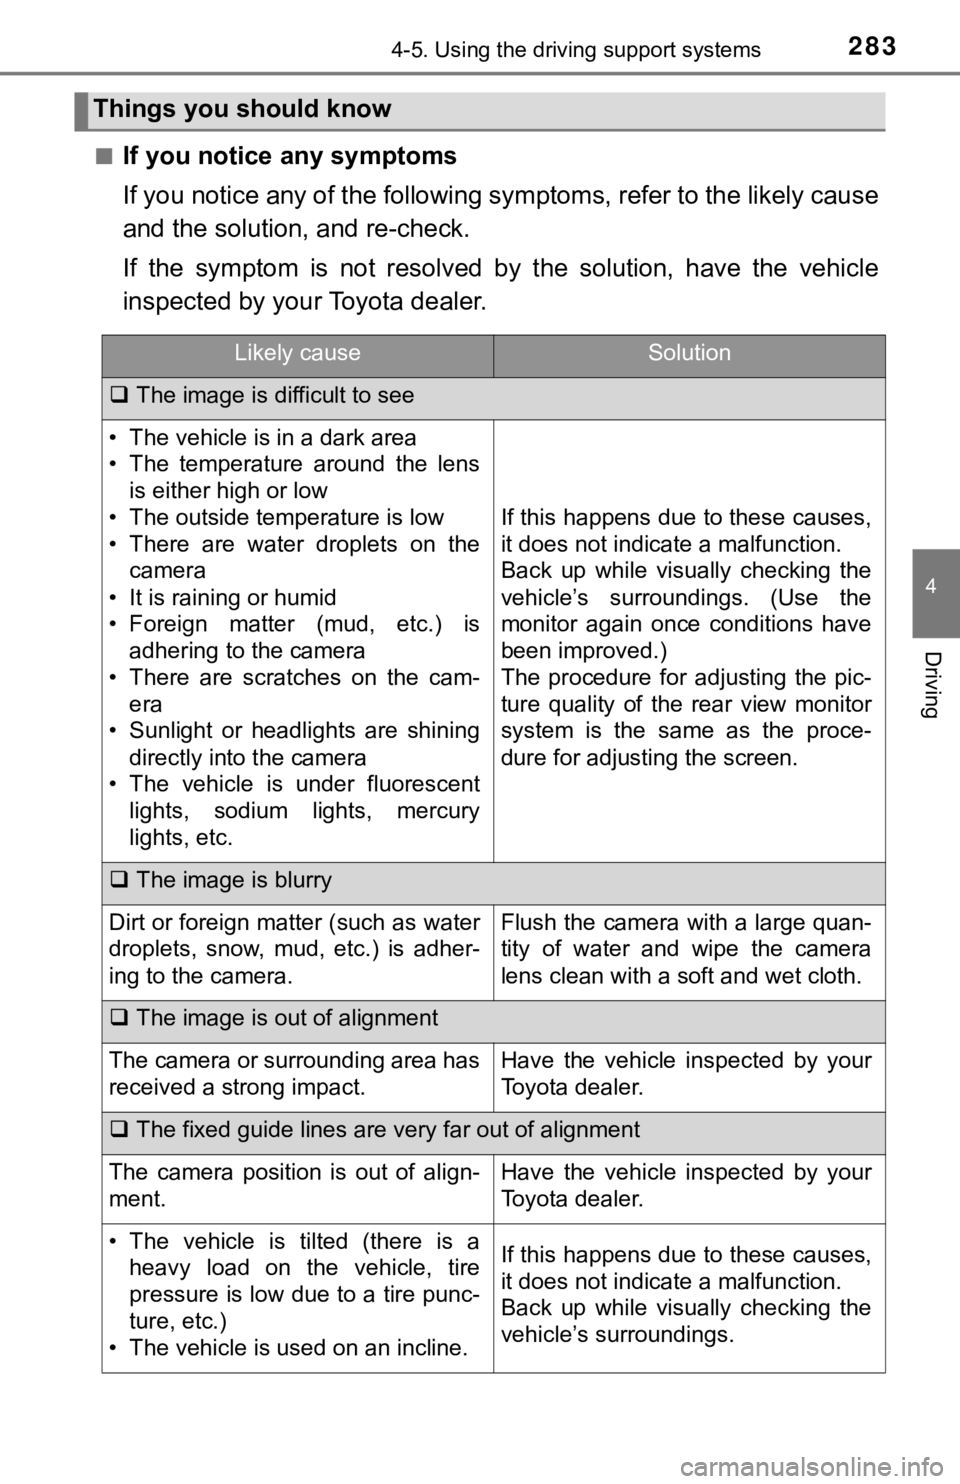
■If you notice any symptoms
If you notice any of the following symptoms, refer to the likel y cause
and the solution, and re-check.
If the symptom is not resolved by the solution, have the vehicl e
inspected by your Toyota dealer.
Things you should know
Likely causeSolution
The image is difficult to see
• The vehicle is in a dark area
• The temperature around the lens
is either high or low
• The outside temperature is low
• There are water droplets on the camera
• It is raining or humid
• Foreign matter (mud, etc.) is adhering to the camera
• There are scratches on the cam- era
• Sunlight or headlights are shining
directly into the camera
• The vehicle is under fluorescent lights, sodium lights, mercury
lights, etc.
If this happens due to these causes,
it does not indicate a malfunction.
Back up while visually checking the
vehicle’s surroundings. (Use the
monitor again once conditions have
been improved.)
The procedure for adjusting the pic-
ture quality of the rear view monitor
system is the same as the proce-
dure for adjusting the screen.
The image is blurry
Dirt or foreign matter (such as water
droplets, snow, mud, etc.) is adher-
ing to the camera.Flush the camera with a large quan-
tity of water and wipe the camera
lens clean with a soft and wet cloth.
The image is out of alignment
The camera or surrounding area has
received a strong impact.Have the vehicle inspected by your
Toyota dealer.
The fixed guide lines are very far out of alignment
The camera position is out of align-
ment.Have the vehicle inspected by your
Toyota dealer.
• The vehicle is tilted (there is a
heavy load on the vehicle, tire
pressure is low due to a tire punc-
ture, etc.)
• The vehicle is used on an incline.If this happens due to these causes,
it does not indicate a malfunction.
Back up while visually checking the
vehicle’s surroundings.
Page 333 of 672
3335-2. Setup
5
Multimedia
Display settings
Press the “SETUP” button.
Select “Display” on the “Setup” screen.Adjust general screen con-
trast/brightness
Adjust camera screen con-
trast/brightness
Changes to day mode.
Select “General” or “Camera” on t he “Display Settings” screen.
Adjust the display as desir ed by selecting “+” or “-”.
When the headlights are tur ned on, the screen dims.
However, the screen can be switched to day mode by selecting “D ay
Mode”.
The screen will stay in day mode when the headlights are turned on until
“Day Mode” is selected again.
Settings are available for adjus ting the contrast and brightness
of the screen.
Screen for display settings
1
2
1
2
3
Adjusting the screen contrast/brightness
Day mode
1
2
Page 521 of 672
5217-3. Do-it-yourself maintenance
7
Maintenance and care
Light bulbs
Check the wattage of the light bulb to be replaced. ( P. 609)
■Front
You may replace the following bul bs by yourself. The difficulty
level of replacement varies depending on the bulb. If neces-
sary bulb replacement seems difficult to perform, contact your
To y o t a d e a l e r.
For more information about replacing other light bulbs, contact
your Toyota dealer.
Preparing for light bulb replacement
Bulb locations
Headlights (bulb type)
Front turn signal lights/parking lights (bulb type)
Front side marker lights
Fog lights (bulb type) (if equipped)1
2
3
4
Page 523 of 672
5237-3. Do-it-yourself maintenance
7
Maintenance and care
■Headlights (bulb type)To allow enough working
space, turn the steering
wheel to the opposite side of
the bulb to be replaced.
Remove the screws and
fender liner clip, and remove
the fender liner.
Turn the steering wheel to the
left when replacing the right side
light bulb, and turn the steering
wheel to the right when replac-
ing the left side light bulb.
Open the fender liner and
unplug the connector.
Replacing light bulbs
1
2
Page 527 of 672
5277-3. Do-it-yourself maintenance
7
Maintenance and care
■Front turn signal/parking lights (bulb type headlights)
Turn the bulb base counter-
clockwise.
Remove the light bulb.
■Front turn signal lights (LED type headlights)
Turn the bulb base counter-
clockwise.
Remove the light bulb.
1
2
1
2
Page 535 of 672

5357-3. Do-it-yourself maintenance
7
Maintenance and care
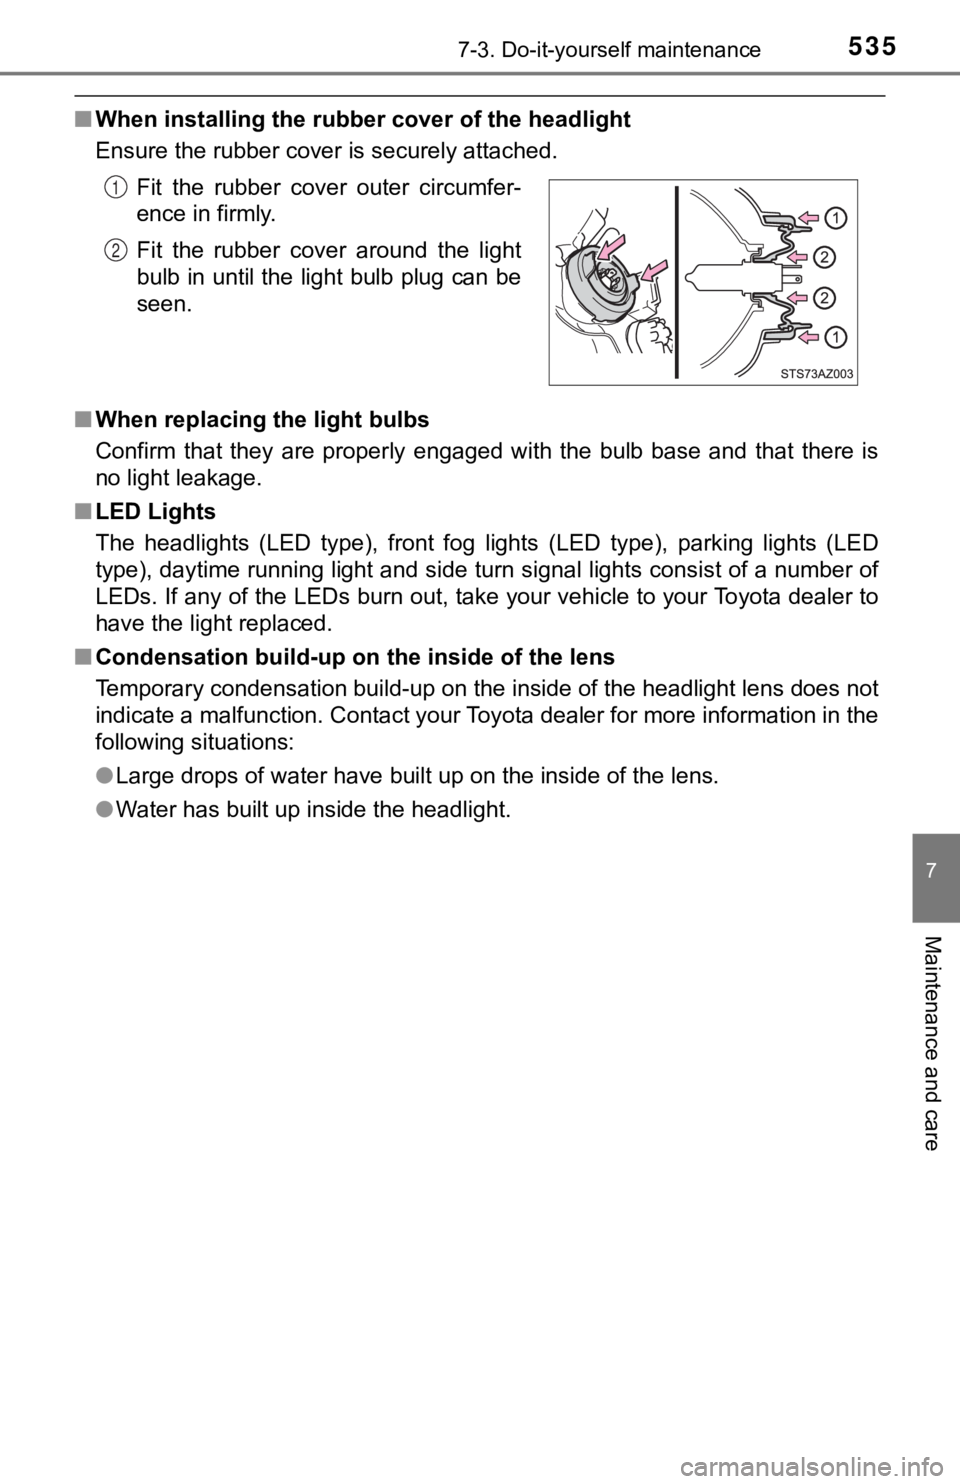
■When installing the rubber cover of the headlight
Ensure the rubber cover is securely attached.
■ When replacing the light bulbs
Confirm that they are properly engaged with the bulb base and that there is
no light leakage.
■ LED Lights
The headlights (LED type), front fog lights (LED type), parking lights (LED
type), daytime running light and side turn signal lights consis t of a number of
LEDs. If any of the LEDs burn out, take your vehicle to your To yota dealer to
have the light replaced.
■ Condensation build-up on the inside of the lens
Temporary condensation build-up on the inside of the headlight lens does not
indicate a malfunction. Contact your Toyota dealer for more information in the
following situations:
● Large drops of water have built up on the inside of the lens.
● Water has built up inside the headlight.Fit the rubber cover outer circumfer-
ence in firmly.
Fit the rubber cover around the light
bulb in until the light bulb plug can be
seen.
1
2
Page 562 of 672

5628-2. Steps to take in an emergency
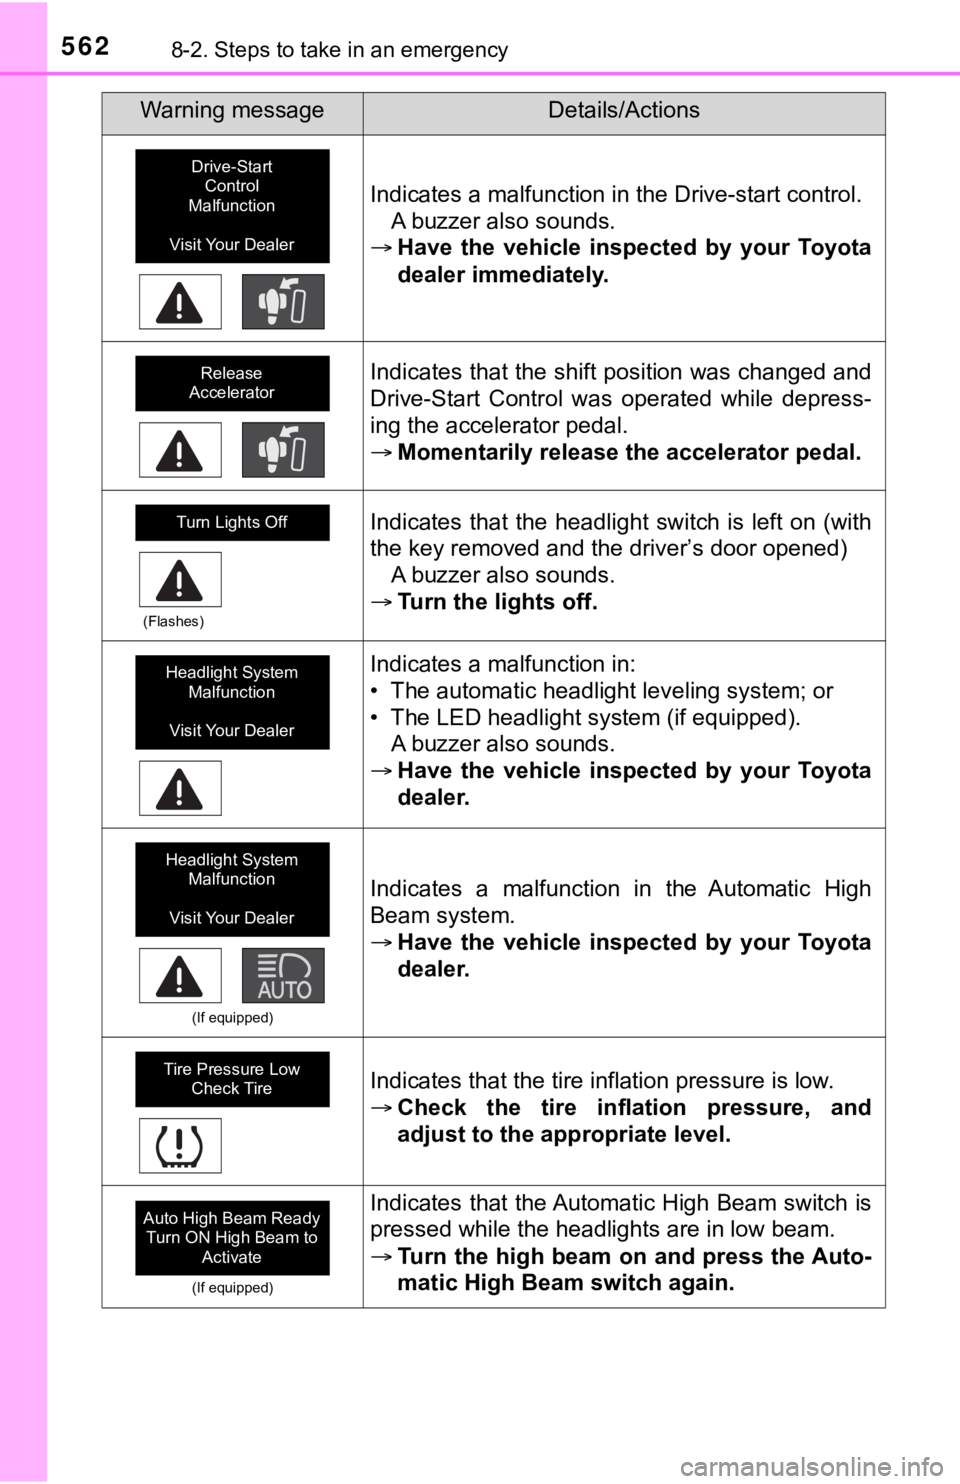
Indicates a malfunction in the Drive-start control.A buzzer also sounds.
Have the vehicle inspected by your Toyota
dealer immediately.
Indicates that the shift position was changed and
Drive-Start Control was operated while depress-
ing the accelerator pedal.
Momentarily release the accelerator pedal.
(Flashes)
Indicates that the headlight switch is left on (with
the key removed and the driver’s door opened)
A buzzer also sounds.
Turn the lights off.
Indicates a malfunction in:
• The automatic headlight leveling system; or
• The LED headlight system (if equipped).
A buzzer also sounds.
Have the vehicle inspected by your Toyota
dealer.
(If equipped)
Indicates a malfunction in the Automatic High
Beam system.
Have the vehicle inspected by your Toyota
dealer.
Indicates that the tire inflation pressure is low.
Check the tire inflation pressure, and
adjust to the appropriate level.
(If equipped)
Indicates that the Automatic High Beam switch is
pressed while the headlights are in low beam.
Turn the high beam on and press the Auto-
matic High Beam switch again.
Warning messageDetails/Actions
Drive-Start
Control
Malfunction
Visit Your Dealer
Release
Accelerator
Turn Lights Off
Headlight System Malfunction
Visit Your Dealer
Headlight System Malfunction
Visit Your Dealer
Tire Pressure Low Check Tire
Auto High Beam Ready Turn ON High Beam to
Activate