Page 1 of 672
Pictorial indexSearch by illustration
1For safety
and securityMake sure to read through them
2Instrument
clusterHow to read the gauges and meters, the variety of
warning lights and indicators, etc.
3
Operation of
each
componentOpening and closing the doors and windows,
adjustment before driving, etc.
4DrivingOperations and advices which are necessary for
driving
5MultimediaOperating the multimedia system
6Interior featuresUsage of the interior features, etc.
7Maintenance
and careCaring for your vehicle and maintenance
procedures
8When trouble
arisesWhat to do in case of malfunction or emergency
9Vehicle
specificationsVehicle specifications, customizable features, etc.
10For ownersReporting safety defects for U.S. owners, and seat
belt and SRS airbag instructions for Canadian
owners
IndexSearch by symptom
Search alphabetically
Page 31 of 672

311-1. For safe use
1
For safety and security
WARNING
Observe the following precautions.
Failure to do so may result in death or serious injury.
●Do not adjust the position of the driver’s seat while driving.
Doing so could cause the driver to lose control of the vehicle.
● Do not place a cushion between the driver or passenger and the seatback.
A cushion may prevent correct posture from being achieved, and reduce
the effectiveness of the seat belt and head restraint.
● Do not place anything under the front seats.
Objects placed under the front seats may become jammed in the s eat
tracks and stop the seat from locking in place. This may lead t o an acci-
dent and the adjustment mechanism may also be damaged.
● Always observe the legal speed limit when driving on public roads.
● When driving over long distances, take regular breaks before yo u start to
feel tired.
Also, if you feel tired or sleepy while driving, do not force y ourself to con-
tinue driving and take a break immediately.
Page 123 of 672
1233-3. Adjusting the seats
3
Operation of each component
Front seats
■Driver’s seat
■Passenger’s seat
Manual seat
Adjustment procedure (separated type seats)
Seat position adjustment
switch
Seatback angle adjustment
switch
Seat cushion length adjust-
ment switch (if equipped) Seat cushion (front) angle
adjustment switch
Seat vertical height adjust-
ment switch
Seat lumbar support adjust-
ment switch1
2
3
4
5
6
Seat position adju
stment lever Seatback angle adjustment
lever12
Page 124 of 672
1243-3. Adjusting the seats
Power seat
Seat position adjustment
switch
Seatback angle adjustment
switchSeat lumbar support adjust-
ment switch
Adjustment procedure (bench type seats)
1
2
3
Seat position adjustment
levers
Seatback angle adjustment
leversCenter seat seatback angle
adjustment lever1
2
3
Page 125 of 672

1253-3. Adjusting the seats
3
Operation of each component
■Power easy access system (vehicles with driving position memory )
The driver’s seat and steering wheel move in accordance with en gine switch
position and the driver’s seat belt condition. ( P. 128)
WARNING
■When adjusting the seat position
● Take care when adjusting the seat position to ensure that other passen-
gers are not injured by the moving seat.
● Do not put your hands under the seat or near the moving parts t o avoid
injury.
Fingers or hands may become jammed in the seat mechanism.
■ Seat adjustment
● To reduce the risk of sliding under the lap belt during a collision, do not
recline the seat more than necessary.
If the seat is too reclined, the lap belt may slide past the hi ps and apply
restraint forces directly to the abdomen, or your neck may cont act the
shoulder belt, increasing the risk of death or serious injury in the event of
an accident.
Adjustments should not be made while driving as the seat may un expect-
edly move and cause the driver to lose control of the vehicle.
● Manual seat type only: After adjusting the seat, make sure that the seat is
locked in position.
■ When adjusting the seat positions
Make sure to leave enough space around the feet so they do not get stuck.
Page 130 of 672

1303-3. Adjusting the seats
■To stop the position recall operation part-way through
Perform any of the following:
●Press the “SET” button.
● Press button “1” or “2”.
● Operate any of the seat adjustment switches (only cancels seat position
recall).
● Operate the tilt and telescopic steering control switch (only cancels steering
wheel position recall).
■ Seat positions that can be memorized ( P. 123)
The adjusted seat positions can be recorded except for lumbar s upport posi-
tions.
■ Operating the driving position me mory after the key is removed from the
engine switch
Recorded seat positions (except the steering wheel position) can be activated
up to 30 seconds after the driver’s door is opened, even if the key is removed
from the engine switch.
■ In order to correctly use the dr iving position memory function
If a seat position is already in the furthest possible position and the seat is
operated in the same direction, the recorded position may be sl ightly different
when it is recalled.
Page 131 of 672

1313-3. Adjusting the seats
3
Operation of each component
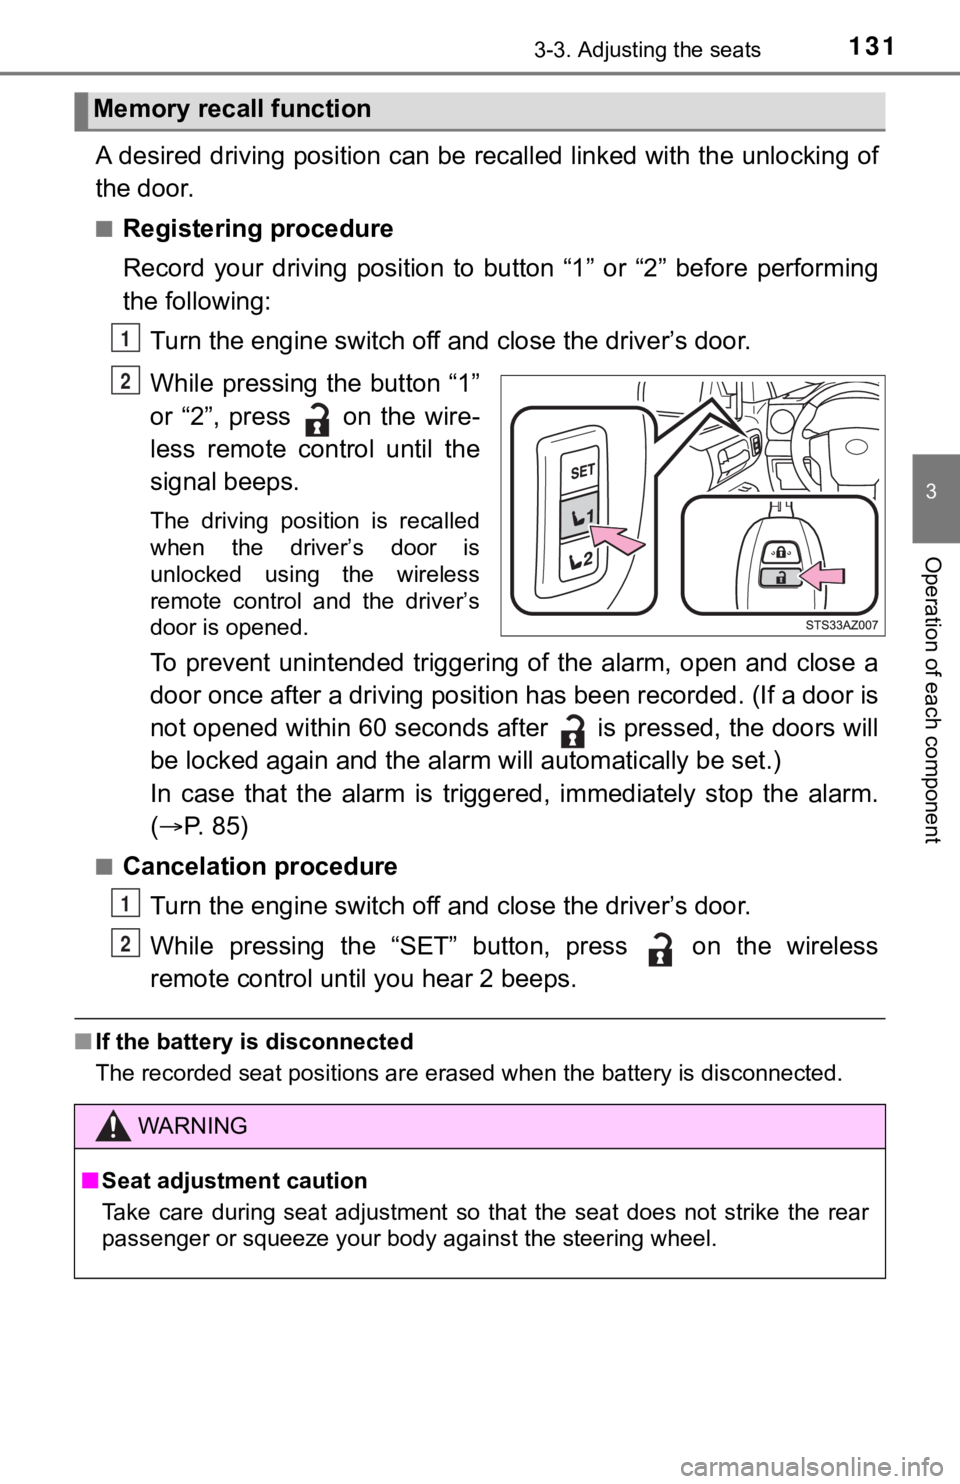
A desired driving position can be recalled linked with the unlo cking of
the door.
■Registering procedure
Record your driving position to button “1” or “2” before perfor ming
the following:
Turn the engine switch off and close the driver’s door.
While pressing the button “1”
or “2”, press on the wire-
less remote control until the
signal beeps.
The driving position is recalled
when the driver’s door is
unlocked using the wireless
remote control and the driver’s
door is opened.
To prevent unintended triggering of the alarm, open and close a
door once after a driving position has been recorded. (If a doo r is
not opened within 60 seconds after is pressed, the doors will
be locked again and the alarm will au tomatically be set.)
In case that the alarm is triggered, immediately stop the alarm .
( P. 85)
■Cancelation procedure
Turn the engine switch off and close the driver’s door.
While pressing the “SET” button, press on the wireless
remote control until you hear 2 beeps.
■ If the battery is disconnected
The recorded seat positions are erased when the battery is disc onnected.
Memory recall function
1
2
WARNING
■Seat adjustment caution
Take care during seat adjustment so that the seat does not stri ke the rear
passenger or squeeze your body against the steering wheel.
1
2
Page 136 of 672
1363-4. Adjusting the steering wheel and mirrors
Steering wheel
Hold the steering wheel and
push the lever down.
Vehicles with front bench type seat
Adjust to the ideal position by
moving the steering wheel.
After adjustment, pull the lever up
to secure the steering wheel.
Vehicles with front separate type seats
Adjust to the ideal position by
moving the steering wheel hori-
zontally and vertically.
After adjustment, pull the lever up
to secure the steering wheel.
Adjustment procedure (manually adjustable type)
1
2
2