Page 407 of 660

4076-1. Using the air conditioning system and defogger
AVENSIS_OM_OM20C79E_(EE)
6
Interior features
Seat heaters
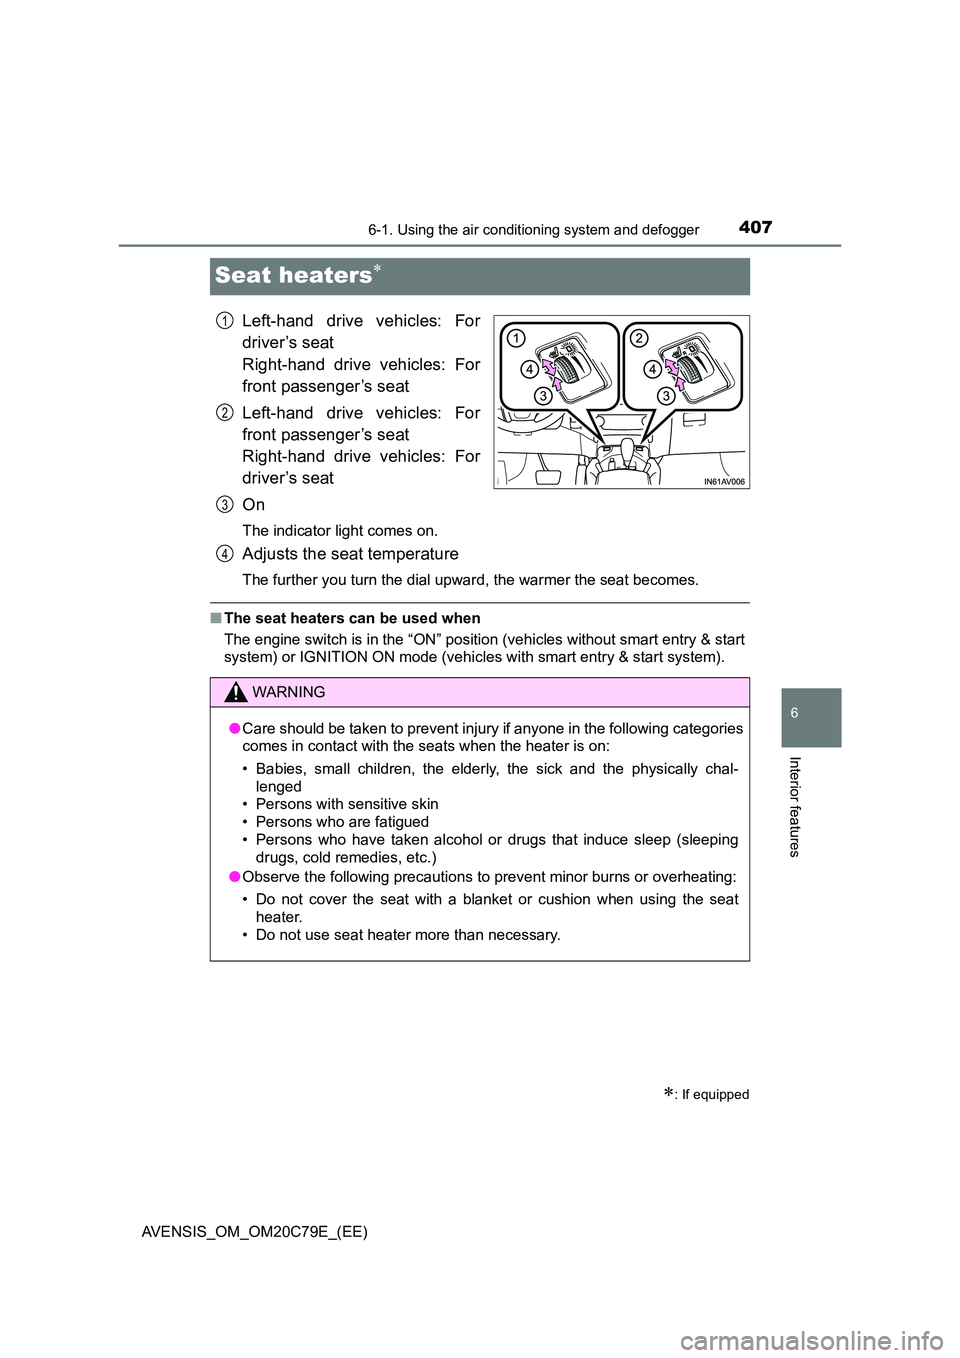
Left-hand drive vehicles: For
driver’s seat
Right-hand drive vehicles: For
front passenger’s seat
Left-hand drive vehicles: For
front passenger’s seat
Right-hand drive vehicles: For
driver’s seat
On
The indicator light comes on.
Adjusts the seat temperature
The further you turn the dial upward, the warmer the seat becomes.
■ The seat heaters can be used when
The engine switch is in the “ON” position (vehicles without smart entry & start
system) or IGNITION ON mode (vehicles with smart entry & start system).
: If equipped
1
2
3
WARNING
● Care should be taken to prevent injury if anyone in the following categories
comes in contact with the seats when the heater is on:
• Babies, small children, the elderly, the sick and the physically chal-
lenged
• Persons with sensitive skin
• Persons who are fatigued
• Persons who have taken alcohol or drugs that induce sleep (sleeping
drugs, cold remedies, etc.)
● Observe the following precautions to prevent minor burns or overheating:
• Do not cover the seat with a blanket or cushion when using the seat
heater.
• Do not use seat heater more than necessary.
4
Page 442 of 660

4427-1. Maintenance and care
AVENSIS_OM_OM20C79E_(EE)
NOTICE
■Cleaning detergents
● Do not use the following types of detergent, as they may discolor the vehi-
cle interior or cause streaks or damage to painted surfaces:
• Non-seat portions: Organic substances such as benzene or gasoline,
alkaline or acidic solutions, dye, and bleach
• Seats: Alkaline or acidic solutions, such as thinner, benzene, and alco-
hol
● Do not use polish wax or polish cleaner. The instrument panel’s or other
interior part’s painted surface may be damaged.
■ Preventing damage to leather surfaces
Observe the following precautions to avoid damage to and deterioration of
leather surfaces.
● Remove any dust or dirt from leather surfaces immediately.
● Do not expose the vehicle to direct sunlight for extended periods of time.
Park the vehicle in the shade, especially during summer.
● Do not place items made of vinyl, plastic, or containing wax on the uphol-
stery, as they may stick to the leather surface if the vehicle interior heats
up significantly.
■ Water on the floor
Do not wash the vehicle floor with water.
Vehicle systems such as the audio system may be damaged if water comes
into contact with electrical components such as the audio system above or
under the floor of the vehicle. Water may also cause the body to rust.
■ When cleaning the inside of the windshield (vehicles with Toyota
Safety Sense system)
Be careful not to touch the front sensor ( P. 272).
If the camera is accidentally scratched or hit, Toyota Safety Sense system
may not operate properly or may cause a malfunction.
■ Cleaning the inside of the rear window or right-side rear quarter win-
dow
● Do not use glass cleaner to clean the rear window or right-side rear quar-
ter window (wagon), as this may cause damage to the rear window defog-
ger heater wires or antenna. Use a cloth dampened with lukewarm water
to gently wipe the window clean. Wipe the window in strokes running par-
allel to the heater wires or antenna.
● Be careful not to scratch or damage the heater wires or antenna.
Page 501 of 660
5017-3. Do-it-yourself maintenance
AVENSIS_OM_OM20C79E_(EE)
7
Maintenance and care
Light bulbs
Check the wattage of the light bulb to be replaced. (P. 625)
P. 4 5 5
■Front
You may replace the following bulbs by yourself. The difficulty
level of replacement varies depending on the bulb. As there is a
danger that components may be damaged, we recommend that
replacement is carried out by any authorized Toyota retailer or
Toyota authorized repairer, or any reliable repairer.
Preparing for light bulb replacement
Removing the engine compartment cover
Bulb locations
Headlights (halogen headlights)
Front fog light (if equipped)
Cornering/fog light (if equipped)Front turn signal light
Side turn signal light1
2
3
4
Page 505 of 660
5057-3. Do-it-yourself maintenance
AVENSIS_OM_OM20C79E_(EE)
7
Maintenance and care
■Front fog light (if equipped)
Remove the fender liner
bolts. Partly remove the
fender liner.
Unplug the connector while
pushing the lock release.
Turn the bulb base counter-
clockwise.
Replace the light bulb, and
install the bulb base.
Align the 3 tabs on the light bulb
with the mounting, and insert.
1
2
3
4
Page 506 of 660
5067-3. Do-it-yourself maintenance
AVENSIS_OM_OM20C79E_(EE)
Turn and secure the bulb
base.
Set the connector.
Shake the bulb base gently to
check that it is not loose, turn
the front fog light on once and
visually confirm that no light is
leaking through the mounting.
Reinstall the fender liner with bolts by conducting in reverse.
■Cornering/fog light (if equipped)
Remove the fender liner
bolts. Partly remove the
fender liner.
Unplug the connector while
pushing the lock release.
5
6
71
1
2
Page 507 of 660
5077-3. Do-it-yourself maintenance
AVENSIS_OM_OM20C79E_(EE)
7
Maintenance and care
Turn the bulb base counter-
clockwise.
Replace the light bulb, and
install the bulb base.
Align the 3 tabs on the light bulb
with the mounting, and insert.
Turn and secure the bulb
base.
Set the connector.
Shake the bulb base gently to
check that it is not loose, turn
the cornering/fog light on once
and visually confirm that no light
is leaking through the mounting.
Reinstall the fender liner with bolts by conducting in reverse.
3
4
5
6
71
Page 515 of 660

5157-3. Do-it-yourself maintenance
AVENSIS_OM_OM20C79E_(EE)
7
Maintenance and care
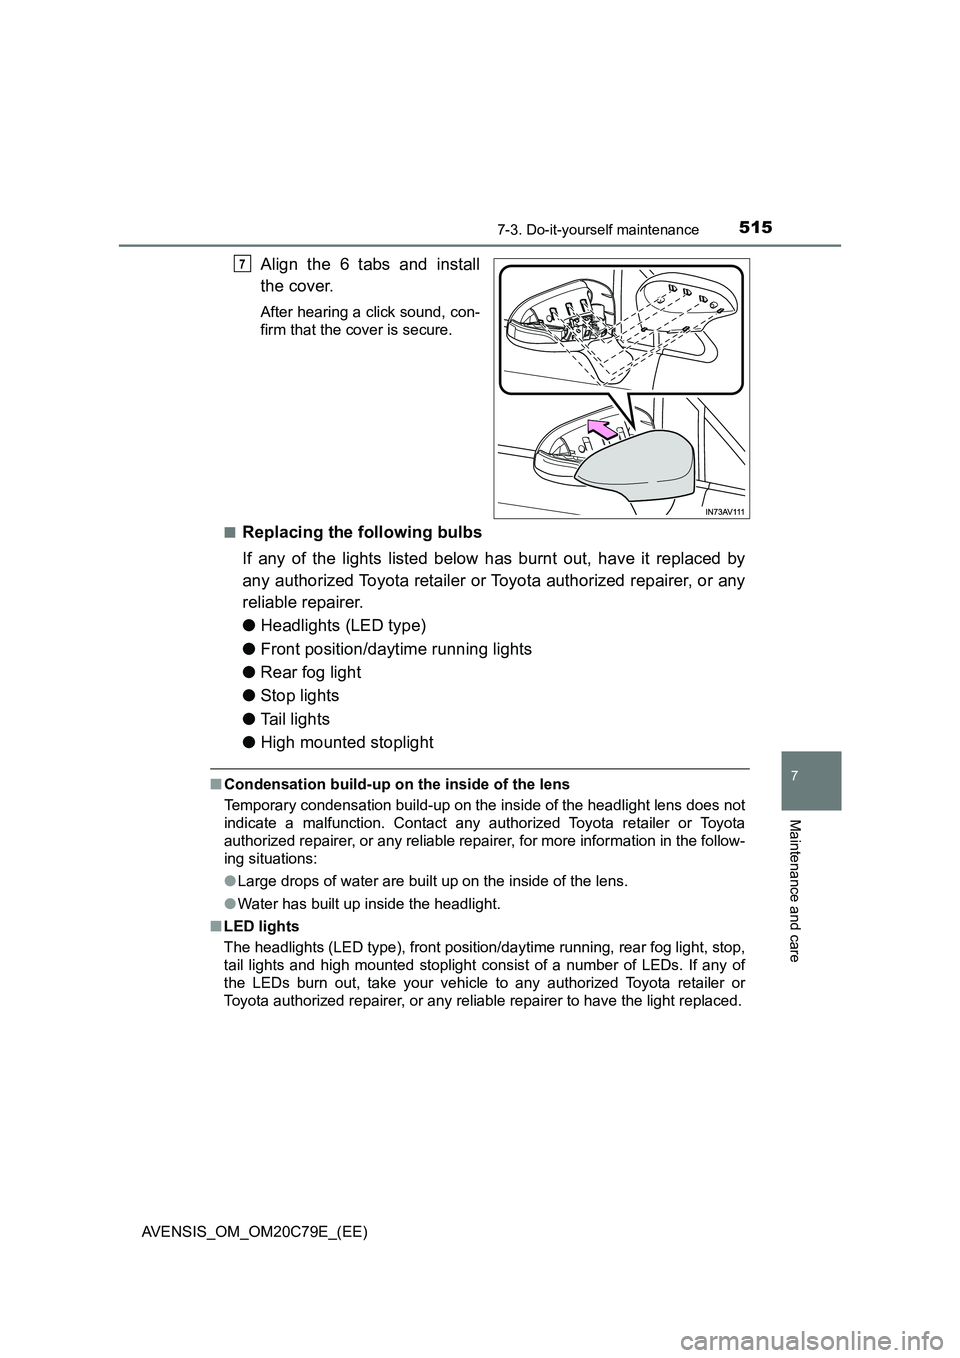
Align the 6 tabs and install
the cover.
After hearing a click sound, con-
firm that the cover is secure.
■
Replacing the following bulbs
If any of the lights listed below has burnt out, have it replaced by
any authorized Toyota retailer or Toyota authorized repairer, or any
reliable repairer.
●Headlights (LED type)
●Front position/daytime running lights
●Rear fog light
●Stop lights
●Tail lights
●High mounted stoplight
■Condensation build-up on the inside of the lens
Temporary condensation build-up on the inside of the headlight lens does not
indicate a malfunction. Contact any authorized Toyota retailer or Toyota
authorized repairer, or any reliable repairer, for more information in the follow-
ing situations:
●Large drops of water are built up on the inside of the lens.
●Water has built up inside the headlight.
■LED lights
The headlights (LED type), front position/daytime running, rear fog light, stop,
tail lights and high mounted stoplight consist of a number of LEDs. If any of
the LEDs burn out, take your vehicle to any authorized Toyota retailer or
Toyota authorized repairer, or any reliable repairer to have the light replaced.
7
Page 531 of 660

5318-2. Steps to take in an emergency
AVENSIS_OM_OM20C79E_(EE)
8
When trouble arises
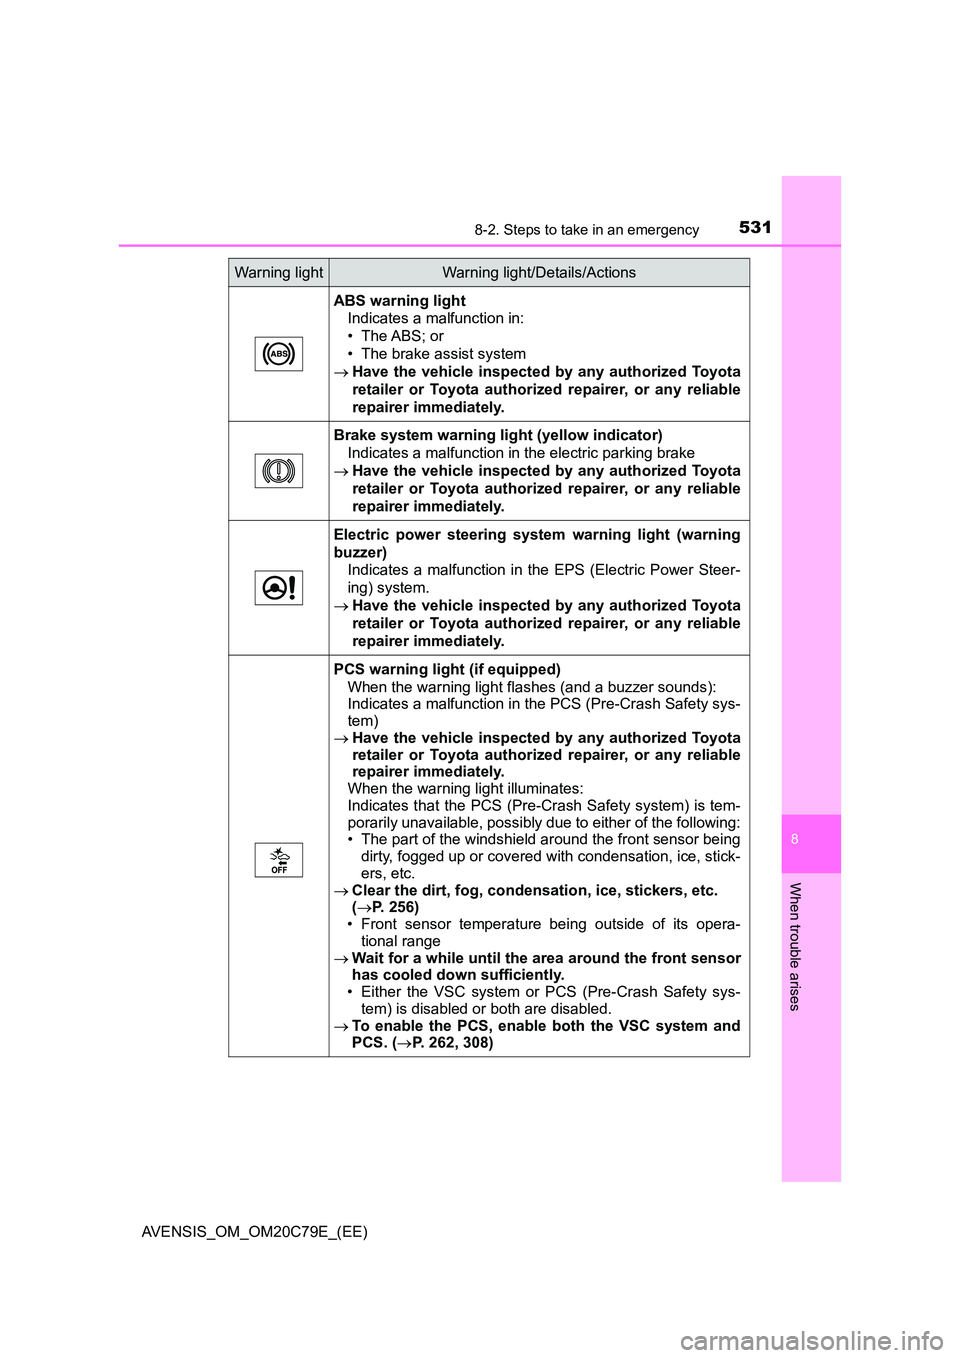
ABS warning light
Indicates a malfunction in:
• The ABS; or
• The brake assist system
Have the vehicle inspected by any authorized Toyota
retailer or Toyota authorized repairer, or any reliable
repairer immediately.
Brake system warning light (yellow indicator)
Indicates a malfunction in the electric parking brake
Have the vehicle inspected by any authorized Toyota
retailer or Toyota authorized repairer, or any reliable
repairer immediately.
Electric power steering system warning light (warning
buzzer)
Indicates a malfunction in the EPS (Electric Power Steer-
ing) system.
Have the vehicle inspected by any authorized Toyota
retailer or Toyota authorized repairer, or any reliable
repairer immediately.
PCS warning light (if equipped)
When the warning light flashes (and a buzzer sounds):
Indicates a malfunction in the PCS (Pre-Crash Safety sys-
tem)
Have the vehicle inspected by any authorized Toyota
retailer or Toyota authorized repairer, or any reliable
repairer immediately.
When the warning light illuminates:
Indicates that the PCS (Pre-Crash Safety system) is tem-
porarily unavailable, possibly due to either of the following:
• The part of the windshield around the front sensor being
dirty, fogged up or covered with condensation, ice, stick-
ers, etc.
Clear the dirt, fog, condensation, ice, stickers, etc.
( P. 256)
• Front sensor temperature being outside of its opera-
tional range
Wait for a while until the area around the front sensor
has cooled down sufficiently.
• Either the VSC system or PCS (Pre-Crash Safety sys-
tem) is disabled or both are disabled.
To enable the PCS, enable both the VSC system and
PCS. ( P. 262, 308)
Warning lightWarning light/Details/Actions