2018 TESLA MODEL 3 speed
[x] Cancel search: speedPage 79 of 165
Warning: Forward Collision Warning may
provide a warning in situations where the
likelihood of collision may not exist. Stay
alert and always pay attention to the area
in front of Model 3 so you can anticipate whether any action is required.Warning: Forward Collision Warning
operates only when driving between
approximately 7 mph (10 km/h) and 90
mph (150 km/h).Warning: Forward Collision Warning does
not provide a warning when the driver is
already applying the brake.
Automatic Emergency Braking
The forward looking camera(s) and the radar
sensor are designed to determine the distance
from an object (vehicle, motorcycle, bicycle, or
pedestrian) traveling in front of Model 3.
When a frontal collision is considered
unavoidable, Automatic Emergency Braking is
designed to apply the brakes to reduce the
severity of the impact.
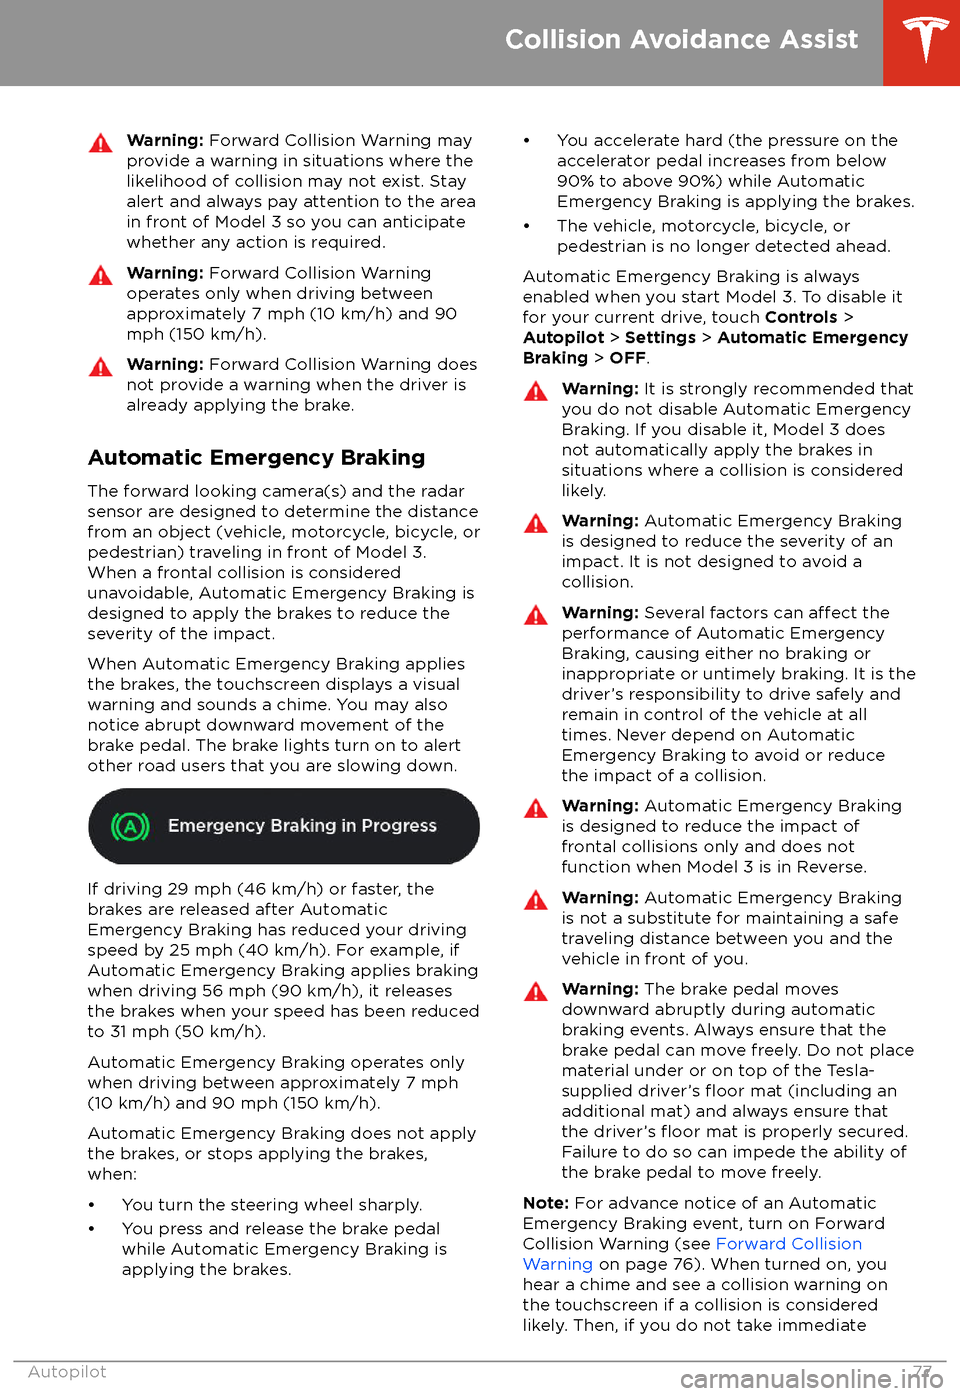
When Automatic Emergency Braking applies
the brakes, the touchscreen displays a visual
warning and sounds a chime. You may also
notice abrupt downward movement of the
brake pedal. The brake lights turn on to alert
other road users that you are slowing down.
If driving 29 mph (46 km/h) or faster, the
brakes are released after Automatic
Emergency Braking has reduced your driving
speed by 25 mph (40 km/h). For example, if
Automatic Emergency Braking applies braking
when driving 56 mph (90 km/h), it releases
the brakes when your speed has been reduced to 31 mph (50 km/h).
Automatic Emergency Braking operates only
when driving between approximately 7 mph (10 km/h) and 90 mph (150 km/h).
Automatic Emergency Braking does not apply the brakes, or stops applying the brakes,when:
Page 80 of 165

corrective action, a collision is considered
imminent and Automatic Emergency Braking
applies braking to reduce driving speed. If
enabled, Automatic Emergency Braking
applies braking when a collision is considered
inevitable, even if Forward Collision Warning is
turned
off.
Limitations and Inaccuracies
Collision Avoidance features cannot always
detect all objects, vehicles, bikes, or
pedestrians, and you may experience
unnecessary, inaccurate, invalid, or missed
warnings for many reasons, particularly if:
Page 81 of 165
How Speed Assist Works
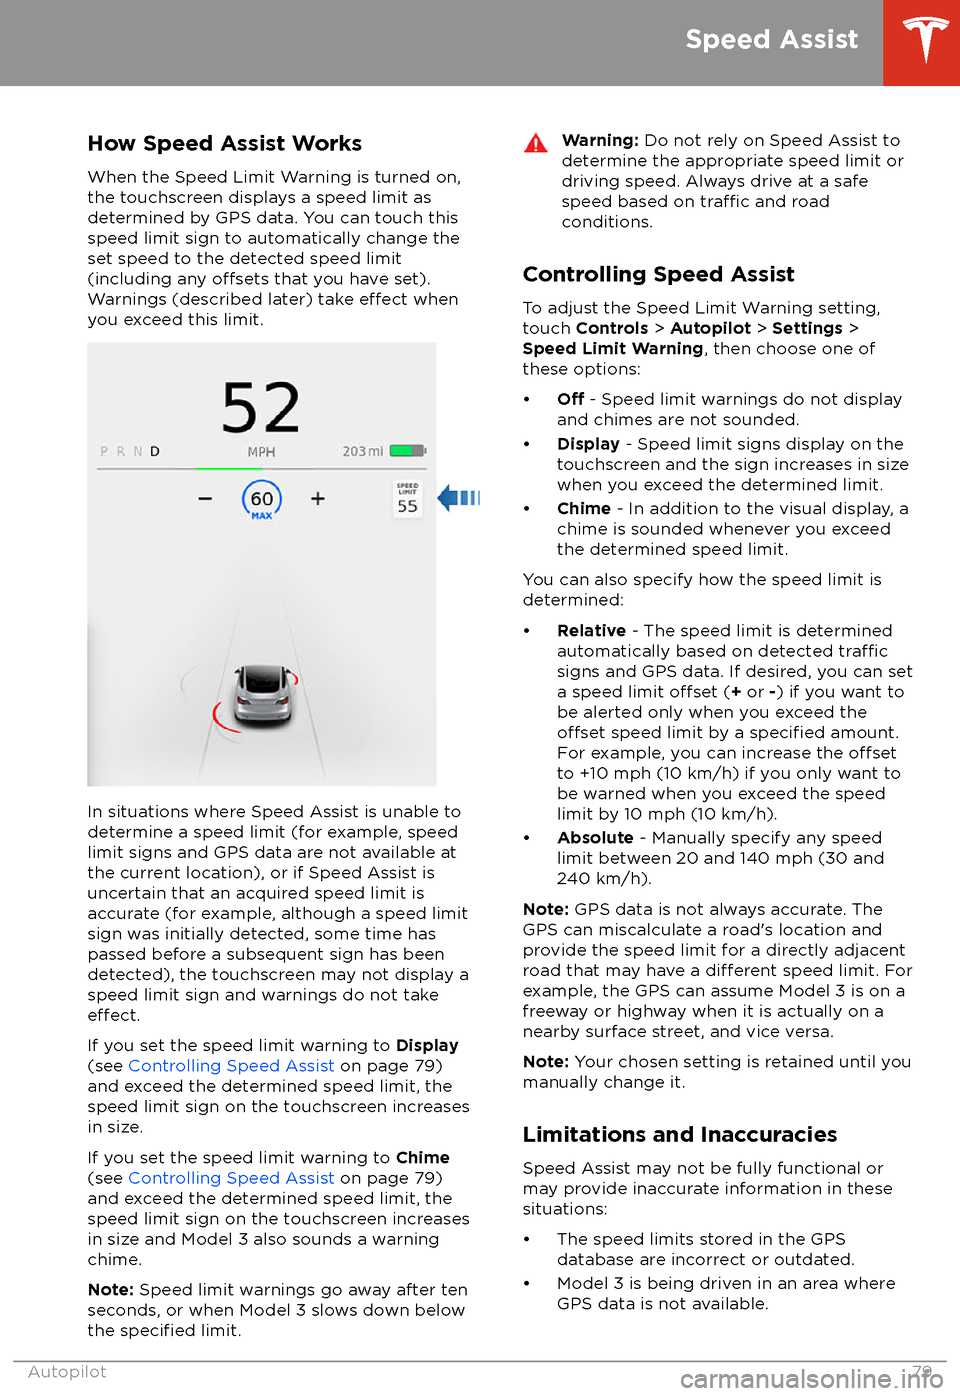
When the Speed Limit Warning is turned on,
the touchscreen displays a speed limit as determined by GPS data. You can touch this
speed limit sign to automatically change the
set speed to the detected speed limit
(including any
offsets that you have set).
Warnings (described later) take effect when
you exceed this limit.
In situations where Speed Assist is unable to
determine a speed limit (for example, speed
limit signs and GPS data are not available at the current location), or if Speed Assist is
uncertain that an acquired speed limit is
accurate (for example, although a speed limit sign was initially detected, some time has
passed before a subsequent sign has been
detected), the touchscreen may not display a
speed limit sign and warnings do not take
effect.
If you set the speed limit warning to Display
(see Controlling Speed Assist on page 79)
and exceed the determined speed limit, the
speed limit sign on the touchscreen increases
in size.
If you set the speed limit warning to Chime
(see Controlling Speed Assist on page 79)
and exceed the determined speed limit, the
speed limit sign on the touchscreen increases
in size and Model 3 also sounds a warning
chime.
Note: Speed limit warnings go away after ten
seconds, or when Model 3 slows down below
the
specified limit.
Warning: Do not rely on Speed Assist to
determine the appropriate speed limit or driving speed. Always drive at a safe
speed based on
traffic and road
conditions.
Controlling Speed Assist
To adjust the Speed Limit Warning setting,
touch Controls > Autopilot > Settings >
Speed Limit Warning , then choose one of
these options:
Page 85 of 165
DrivingAcceleration: Adjust the amount of acceleration. Chill limits acceleration for
a slightly smoother and gentler ride, whereas Standard provides the normal
level of acceleration.
Note: When Chill is selected, Chill displays on the touchscreen above the
driving speed.
Steering Mode : Adjust the amount of
effort required to turn the steering
wheel. Sport feels more responsive whereas Comfort feels easier to drive
and park (see Adjusting Steering
Effort on page 36).
Regenerative Braking : When you release the accelerator when driving,
regenerative braking slows Model 3 and feeds any surplus energy back to
the Battery. If set to LOW, Model 3 does not slow down as quickly, but also
feeds less energy back to the Battery (see Regenerative Braking on page
49).
Note: Regardless of the setting selected, the energy gained by regenerative
braking is reduced if the Battery is full, or is extremely cold or hot (in which
case, surplus energy is used to heat or cool it).
Traction Control : Turn slip start on to allow wheels to spin (see Traction
Control on page 51).
Creep : When on, Model 3 applies forward torque in Drive and backwards
torque in Reverse when you release the brake pedal (similar to a conventional vehicle with an automatic transmission). The torque moves the
vehicle slowly on
flat roads, but may require you to press the accelerator
pedal in some situations (for example, when on a steep hill or driveway).
When
off, Model 3 is free rolling when you let your foot off the brake pedal
and the motor does not apply torque until the accelerator pedal is pressed.
You can adjust this setting only when Model 3 is in Park.
Warning: Never rely on Creep to apply enough torque to prevent your
vehicle from rolling down a hill. Always apply brakes to remain stopped
or the accelerator to proceed up the hill. Failure can result in property
damage and/or a collision.
Controls and Settings
Using the Touchscreen83
Page 88 of 165
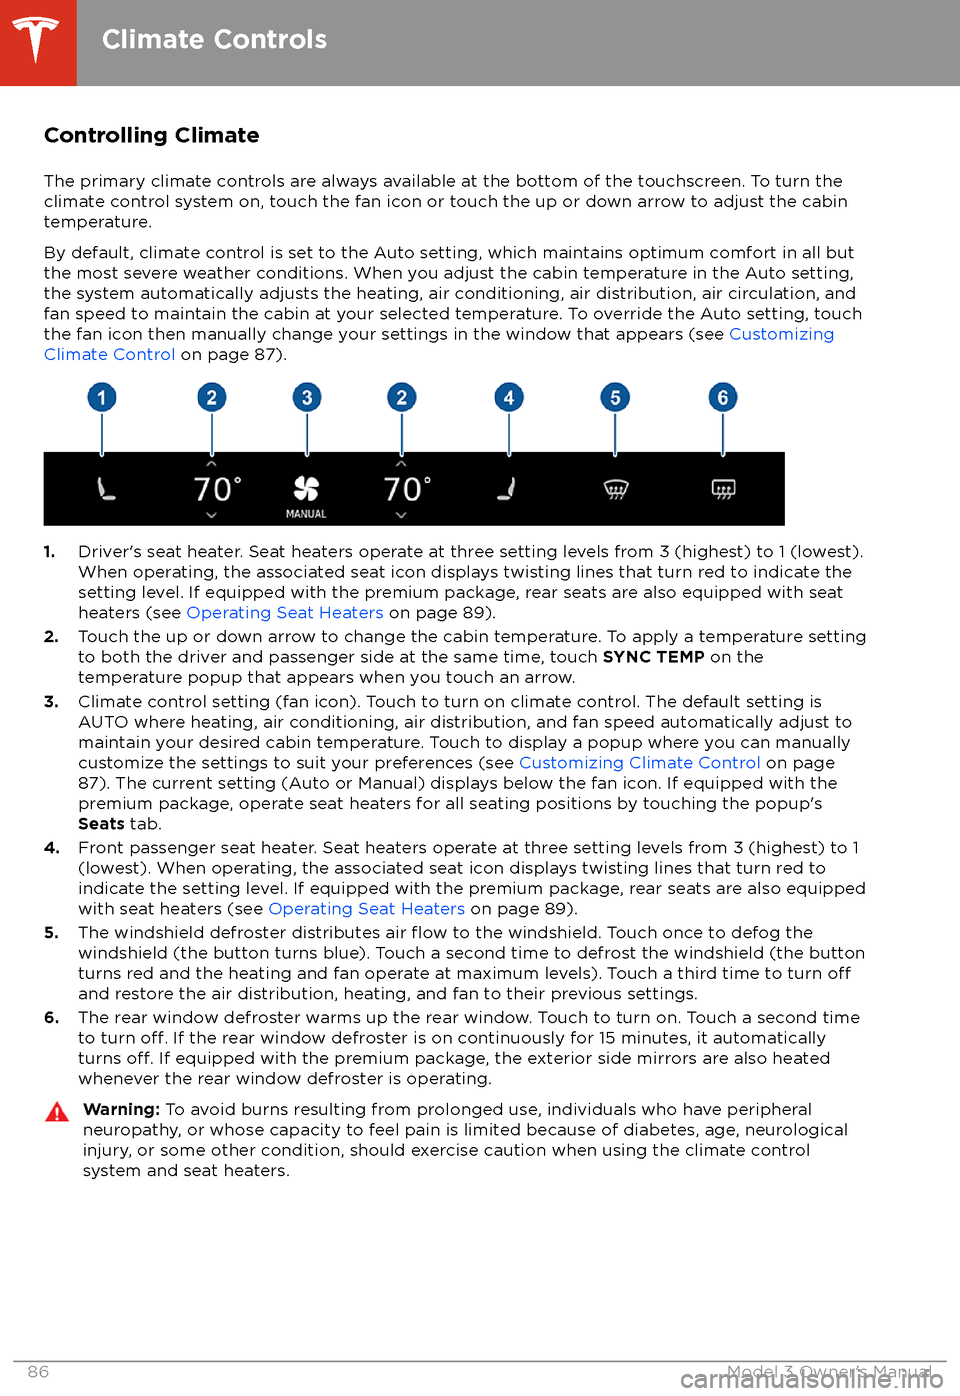
Controlling Climate
The primary climate controls are always available at the bottom of the touchscreen. To turn the
climate control system on, touch the fan icon or touch the up or down arrow to adjust the cabin
temperature.
By default, climate control is set to the Auto setting, which maintains optimum comfort in all but
the most severe weather conditions. When you adjust the cabin temperature in the Auto setting,
the system automatically adjusts the heating, air conditioning, air distribution, air circulation, and fan speed to maintain the cabin at your selected temperature. To override the Auto setting, touch
the fan icon then manually change your settings in the window that appears (see Customizing
Climate Control on page 87).
1.Driver
Page 89 of 165
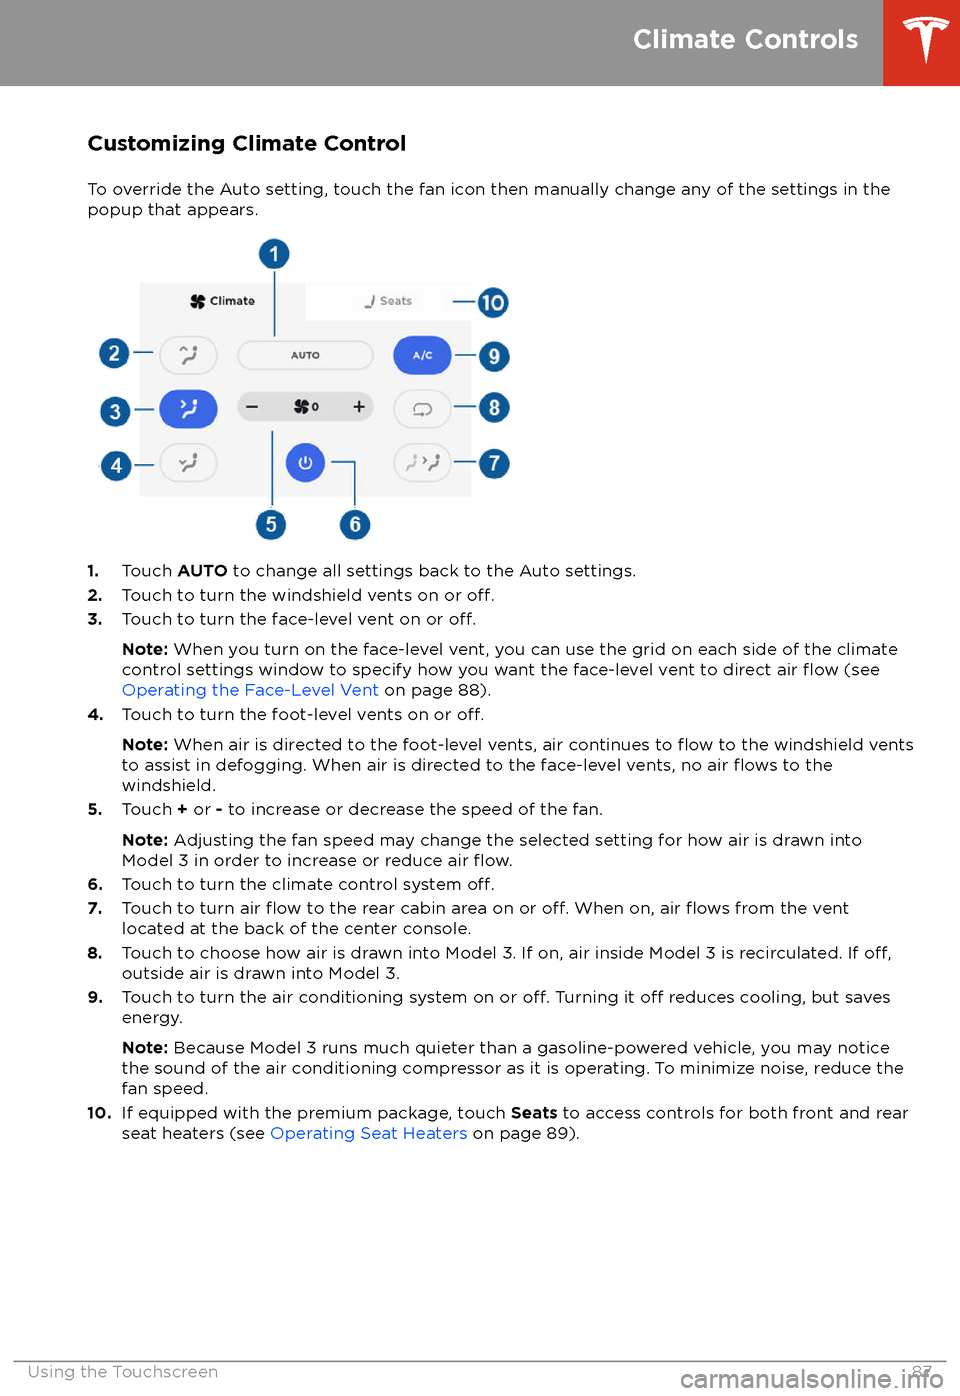
Customizing Climate ControlTo override the Auto setting, touch the fan icon then manually change any of the settings in thepopup that appears.
1. Touch AUTO to change all settings back to the Auto settings.
2. Touch to turn the windshield vents on or off.3.Touch to turn the face-level vent on or off.
Note: When you turn on the face-level vent, you can use the grid on each side of the climate
control settings window to specify how you want the face-level vent to direct air flow (see
Operating the Face-Level Vent on page 88).
4. Touch to turn the foot-level vents on or
off.
Note: When air is directed to the foot-level vents, air continues to flow to the windshield vents
to assist in defogging. When air is directed to the face-level vents, no air flows to the
windshield.
5. Touch + or - to increase or decrease the speed of the fan.
Note: Adjusting the fan speed may change the selected setting for how air is drawn into
Model 3 in order to increase or reduce air
flow.6. Touch to turn the climate control system off.7. Touch to turn air flow to the rear cabin area on or off. When on, air flows from the vent
located at the back of the center console.
8. Touch to choose how air is drawn into Model 3. If on, air inside Model 3 is recirculated. If
off,outside air is drawn into Model 3.
9. Touch to turn the air conditioning system on or off. Turning it off reduces cooling, but saves
energy.
Note: Because Model 3 runs much quieter than a gasoline-powered vehicle, you may notice
the sound of the air conditioning compressor as it is operating. To minimize noise, reduce the fan speed.
10. If equipped with the premium package, touch Seats to access controls for both front and rear
seat heaters (see Operating Seat Heaters on page 89).
Climate Controls
Using the Touchscreen87
Page 99 of 165

Predicting Energy Usage
When navigating to a destination, Model 3
helps you anticipate your charging needs by
calculating the amount of energy that remains
when you reach your destination. The
calculation is an estimate based on driving
style (predicted speed, etc.) and
environmental factors (elevation changes,
weather, etc.). When you initiate a navigation
route, the touchscreen displays this calculation
at the bottom of the turn-by-turn direction list.
Thereafter, you can display it by touching the
area at the bottom of the turn-by-turn
direction list.
Throughout your route, Model 3 monitors energy usage and updates the calculation. A
popup warning displays at the bottom of the
turn-by-turn direction list in these situations:
Page 116 of 165

Inspecting and Maintaining TiresRegularly inspect the tread and side walls for
any sign of distortion (bulges), foreign objects,
cuts or wear.Warning: Do not drive Model 3 if a tire is
damaged, excessively worn, or inflated to
an incorrect pressure. Check tires
regularly for wear, and ensure there are
no cuts, bulges or exposure of the ply/
cord structure.
Tire Wear
Adequate tread depth is important for proper
tire performance. Tires with a tread depth less
than 4/32” (3 mm) are more likely to
hydroplane in wet conditions and should not be used. Tires with a tread depth less than5/32” (4 mm) do not perform well in snow andslush and should not be used when driving inwinter conditions.
Model 3 is originally
fitted with tires that have
wear indicators molded into the tread pattern.
When the tread has been worn down to 4/32”
(3 mm), the indicators start to appear at the surface of the tread pattern, producing the
effect of a continuous band of rubber across
the width of the tire. For optimal performance
and safety, Tesla recommends replacing tires
before the wear indicators are visible.
Tire Rotation, Balance, and Wheel Alignment
Tesla recommends rotating the tires every
6,250 miles (10,000 km).
Unbalanced wheels (sometimes noticeable as
vibration through the steering wheel)
affectvehicle handling and tire life. Even with regular
use, wheels can get out of balance. Therefore,
they should be balanced as required.
If tire wear is uneven (on one side of the tire
only) or becomes abnormally excessive, check
the alignment of wheels.
Note: When replacing only two tires, always
install the new tires on the rear.
Punctured Tires
A puncture eventually causes the tire to lose
pressure, which is why it is important to check
tire pressures frequently. Permanently repair
or replace punctured or damaged tires as
soon as possible.
Your tubeless tires may not leak when
penetrated, provided the object remains in the tire. If, however, you feel a sudden vibration or
ride disturbance while driving, or you suspect a tire is damaged, immediately reduce your
speed. Drive slowly, while avoiding heavy
braking or sharp steering and, when safe to do so, stop the vehicle. Arrange to have Model 3
transported to a Tesla Service Center, or to a nearby tire repair center.
Note: In some cases, you can temporarily
repair small tire punctures (under 1/4” (6
mm)) using an optional tire repair kit available
from Tesla. This allows you to slowly drive
Model 3 to Tesla or to a nearby tire repair
facility.Warning: Do not drive with a punctured
tire, even if the puncture has not caused the tire to
deflate. A punctured tire candeflate suddenly at any time.
Flat Spots
If Model 3 is stationary for a long period in
high temperatures, tires can form
flat spots.
When Model 3 is driven, these flat spots cause
a vibration which gradually disappears as the
tires warm up and regain their original shape.
To minimize
flat spots during storage, inflatetires to the maximum pressure indicated on the tire wall. Then, before driving, release airto adjust tire pressure to the recommendedlevels.
Improving Tire Mileage
To improve the mileage you get from your
tires, maintain tires at the recommended tire
pressures, observe speed limits and advisory
speeds, and avoid: