Page 2 of 165
DOCUMENT APPLICABILITY
Features released in the most recent versions of software may not be described in this document but are
described in Release Notes. Display Release Notes on the touchscreen by touching the Tesla “T” at the top
center of the touchscreen, then touching the Release Notes link. If information provided in this document
conflicts with information in the Release Notes, the Release Notes take precedence.
ILLUSTRATIONS
The
illustrations provided in this document are for demonst
ration purposes only. Depending on vehicle
op
tions, software version
and market region, the information displayed on the touchscreen in your
vehicle
may appear slightly different.
P ROD
UCT SPECIFICATIONS
All specifications
and descriptions
contained in
this
docum ent
ar
e veri fied
to be
accurate at
the time of
p
rinting. However,
because continuous
improvement is
a goal at Tesla, we reserve the right to make
product modifications at any
time. To communicate any inaccuracies or omissions in this document,
please send an email to: [email protected].
©2012-2018 TESLA, INC.
All information in this document and all vehicle software is subject to copyright an
d other intellectual
prop
erty rights of Tesla, Inc. and its licensors. This material may not be modified, reproduced or copied, in
whole or in part, without the prior written
permission of Tesla, Inc. and its licensors. Additional
information is available upon request. The following are trademarks or registered trademarks of Tesla, Inc.
in the United States and other countries: TESLA
TESLA MOTORS MODEL S MODEL X
ROADSTER MODEL 3
The Model 3 Owner's Manual is ava
ilable on the touchscreen.
To view it, touch Controls > Service > Owner's Manual or
access it after touching the Tesla "T".
More information about your Model 3 and the latest version of this document is available at www.tesla.com/teslaaccount.
To contact Tesla, call 1-877-79TESLA (1-877-798-3752).
Page 6 of 165
The features and information you need to drive Model 3 are displayed on the touchscreen. When
driving, the touchscreen displays driving-related information such as driving speed, vehicle range,
warnings, etc. The touchscreen is used to control many features that, in traditional cars, are controlled using physical buttons (for example, adjusting mirrors). You can also use the
touchscreen to customize Model 3 to suit your preferences.Warning: Always pay attention to road and traffic conditions when driving. To minimize driver
distraction and ensure the safety of vehicle occupants as well as other road users, avoid using
the touchscreen to adjust settings while the vehicle is in motion.
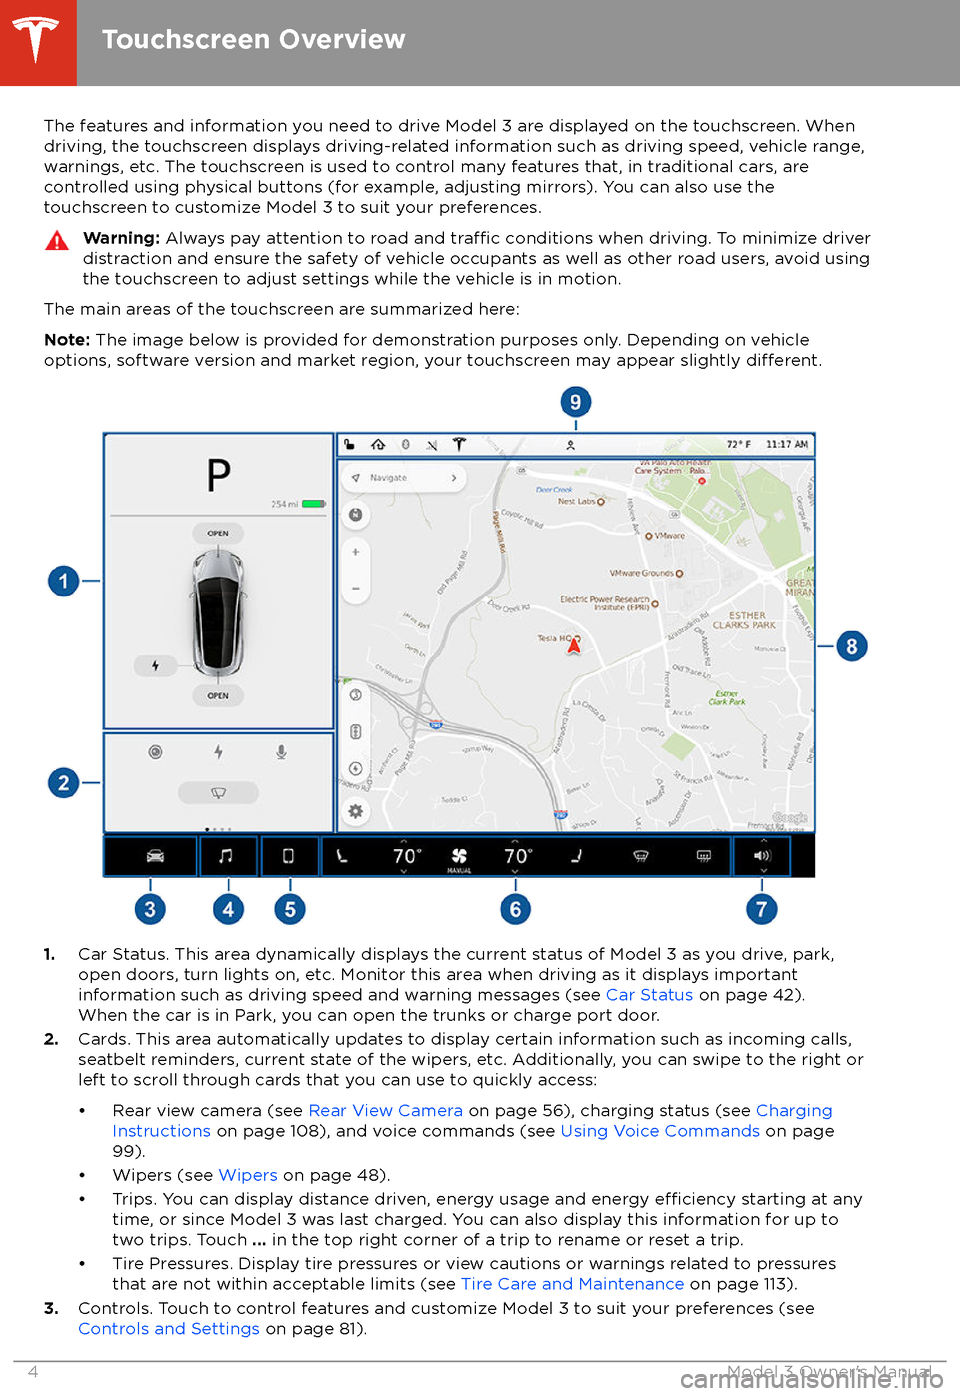
The main areas of the touchscreen are summarized here:
Note: The image below is provided for demonstration purposes only. Depending on vehicle
options, software version and market region, your touchscreen may appear slightly
different.
1. Car Status. This area dynamically displays the current status of Model 3 as you drive, park,
open doors, turn lights on, etc. Monitor this area when driving as it displays important
information such as driving speed and warning messages (see Car Status on page 42).
When the car is in Park, you can open the trunks or charge port door.
2. Cards. This area automatically updates to display certain information such as incoming calls,
seatbelt reminders, current state of the wipers, etc. Additionally, you can swipe to the right or
left to scroll through cards that you can use to quickly access:
Page 7 of 165
4.Media Player (see Media and Audio on page 90).
5. Phone (see Phone on page 93).
6. Climate Controls (see Climate Controls on page 86).
7. Volume Control (see Volume Control on page 90).
8. Navigation (see Maps and Navigation on page 95).
Note: When you touch Controls, the controls and settings window displays on top of this
navigation window (see Controls and Settings on page 81). To close the window and see the
map, touch Controls again.
9. This area on the top of the touchscreen displays the time, outdoor temperature, vehicle
information (the Tesla "T"), network strength, Bluetooth
Page 16 of 165
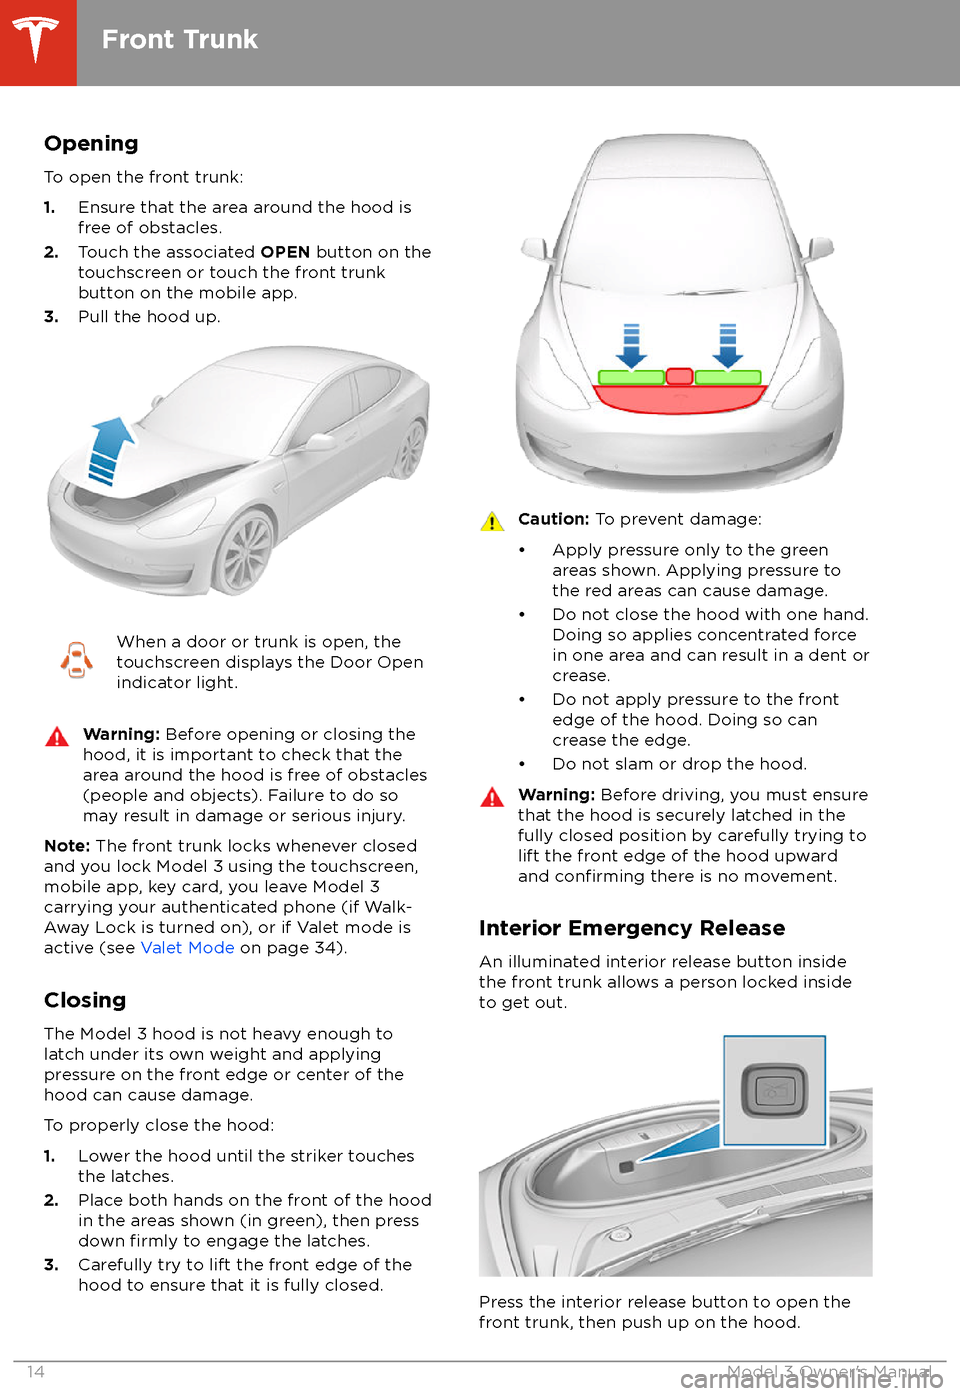
Opening
To open the front trunk:
1. Ensure that the area around the hood is
free of obstacles.
2. Touch the associated OPEN button on the
touchscreen or touch the front trunk
button on the mobile app.
3. Pull the hood up.When a door or trunk is open, the
touchscreen displays the Door Open indicator light.Warning: Before opening or closing the
hood, it is important to check that the area around the hood is free of obstacles
(people and objects). Failure to do so
may result in damage or serious injury.
Note: The front trunk locks whenever closed
and you lock Model 3 using the touchscreen,
mobile app, key card, you leave Model 3
carrying your authenticated phone (if Walk-
Away Lock is turned on), or if Valet mode is
active (see Valet Mode on page 34).
Closing The Model 3 hood is not heavy enough tolatch under its own weight and applyingpressure on the front edge or center of the
hood can cause damage.
To properly close the hood:
1. Lower the hood until the striker touches
the latches.
2. Place both hands on the front of the hood
in the areas shown (in green), then press
down
firmly to engage the latches.
3. Carefully try to lift the front edge of the
hood to ensure that it is fully closed.
Caution: To prevent damage:
Page 34 of 165
Passenger Front AirbagModel 3 has an occupancy sensor in the front
passenger seat that controls the status of the
airbags based on the weight of the occupant. If the passenger airbag is OFF, it will not
inflate when a collision occurs, and the
passenger airbag off indicator displays in the
top right corner of the touchscreen. If the
passenger airbag is ON, it will
inflate when a
collision occurs, and its status does not
display in the top right corner of the
touchscreen.
The Passenger Airbag Offindicator displays in the top right
corner of the touchscreen only
when the front passenger airbag
is turned
off.
Note: The occupancy sensor system meets the
regulatory requirement of FMVSS 208 and
automatically detects when
inflating the
passenger front airbags would be unnecessary
or potentially harmful.
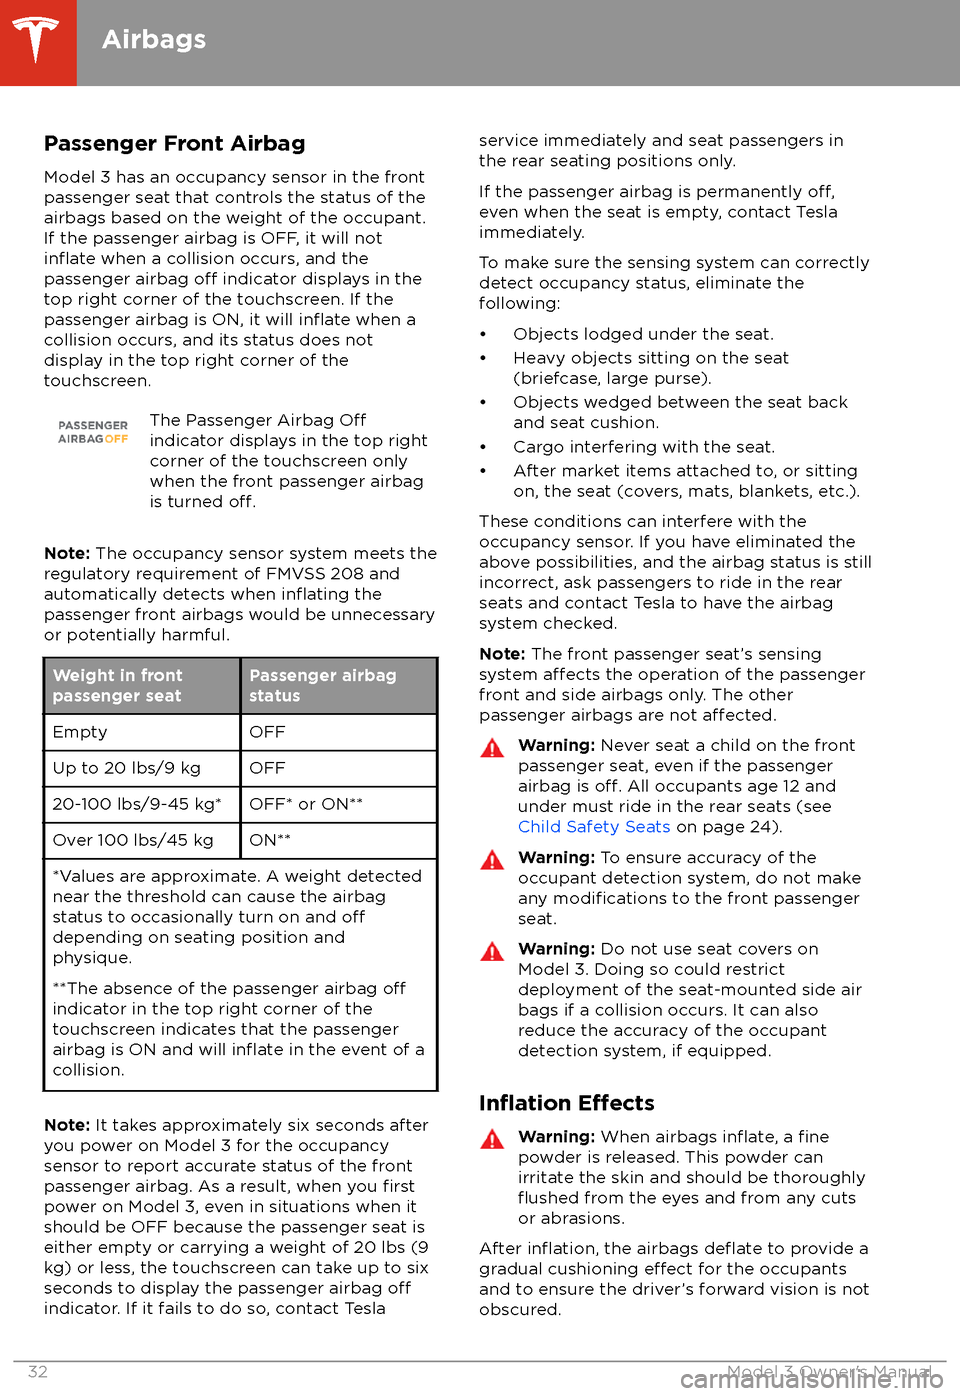
Weight in front
passenger seatPassenger airbag
statusEmptyOFFUp to 20 lbs/9 kgOFF20-100 lbs/9-45 kg*OFF* or ON**Over 100 lbs/45 kgON***Values are approximate. A weight detected
near the threshold can cause the airbag
status to occasionally turn on and
offdepending on seating position and
physique.
**The absence of the passenger airbag
offindicator in the top right corner of the
touchscreen indicates that the passenger
airbag is ON and will
inflate in the event of a
collision.
Note: It takes approximately six seconds after
you power on Model 3 for the occupancy
sensor to report accurate status of the front
passenger airbag. As a result, when you
firstpower on Model 3, even in situations when it
should be OFF because the passenger seat is
either empty or carrying a weight of 20 lbs (9
kg) or less, the touchscreen can take up to six seconds to display the passenger airbag
offindicator. If it fails to do so, contact Tesla
service immediately and seat passengers in
the rear seating positions only.
If the passenger airbag is permanently
off,even when the seat is empty, contact Tesla
immediately.
To make sure the sensing system can correctly detect occupancy status, eliminate the
following:
Page 37 of 165
Starting Valet Mode
With Model 3 in Park, touch the driver
profileicon (located next to the Tesla "T" on the
touchscreen), then touch Valet Mode.
The
first time you enter Valet mode, you will
be prompted to create a 4-digit PIN that you
will use to cancel Valet mode.
When Valet mode is active, the touchscreen displays the word Valet above the driving
speed and the Valet mode driver
profiledisplays on the touchscreen.
You can also use the mobile app to start and
cancel Valet mode (provided Model 3 is in
Park). When using the mobile app, you do not
need to enter a PIN because you are already
required to log into the app using your Tesla
Account credentials.
Note: If you forget your PIN, reset it from
inside Model 3 by entering your Tesla Account
credentials (which also cancels Valet mode).
You can also reset your PIN using the mobile
app.
Canceling Valet Mode
With Model 3 in Park, touch the Valet Mode
driver icon on the touchscreen
Page 41 of 165
StartingWhen you open a door, Model 3 powers on the
touchscreen and you can operate all controls.
To drive Model 3:
1. PRESS THE BRAKE PEDAL - Model 3
powers on and is ready to drive.
2. SELECT A GEAR - Move the gear lever all
the way down for Drive and all the way up
for Reverse. See Shifting Gears on page
41.
Everything you need to know when driving
Model 3 displays on the touchscreen.
Drive Disabled - Requires Authentication
If Model 3 does not detect a key when you
press the brake (an authenticated phone is not
detected, or 30 seconds has passed since you
used the key card), the touchscreen displays a
message telling you that driving requires
authentication.
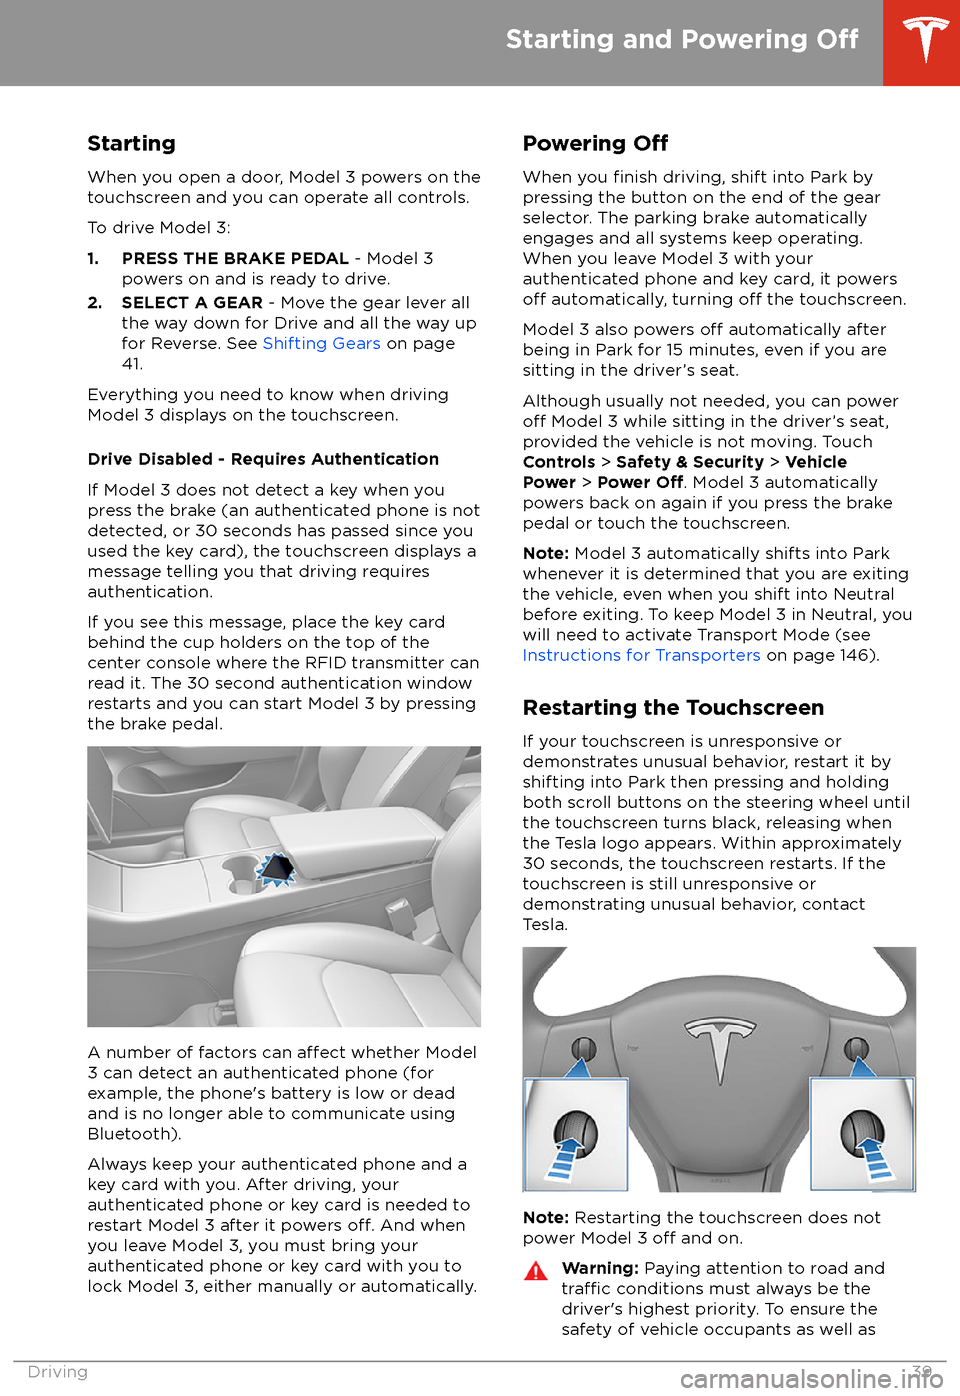
If you see this message, place the key card
behind the cup holders on the top of the
center console where the RFID transmitter can
read it. The 30 second authentication window
restarts and you can start Model 3 by pressing
the brake pedal.
A number of factors can affect whether Model
3 can detect an authenticated phone (for
example, the phone
Page 44 of 165
Overview
The left side of the touchscreen displays the
status of Model 3 at all times. What you see
depends on whether the vehicle is: