Page 5 of 165
1.Exterior lights ( Lights on page 45)
2. Autopilot camera ( About Autopilot on page 58)
3. Front door handle ( Using Exterior Door Handles on page 9)
4. Key card sensor ( Keys on page 6), Autopilot camera ( About Autopilot on page 58)
5. Rear door handle ( Using Exterior Door Handles on page 9)
6. Charge port ( Charging Instructions on page 108)
7. Autopilot cameras ( About Autopilot on page 58)
8. Exterior mirrors ( Mirrors on page 38)
9. Radar sensor (hidden from view) ( About Autopilot on page 58)
10. Hood/front trunk ( Front Trunk on page 14)
11. Tow eye cover ( Instructions for Transporters on page 146)
12. Wheels and tires ( Wheels and Tires on page 138)
13. Rear view camera ( Rear View Camera on page 56)
14. Rear trunk ( Rear Trunk on page 12)
Exterior Overview
Overview3
Page 19 of 165
Note: Always use USB 2.0 compliant cables
when connecting devices to the USB ports.
Using non-compliant cables can result in
slower charging and, if plugged into either of the front two ports, can result in potentialconnection problems when trying to access
media
files on the device.
Note: Do not connect multiple devices using a
USB hub. This can prevent connected devices from charging or from being recognized by
Media Player.
12V Power Socket
Your Model 3 has a power socket located in the center console
Page 99 of 165
Predicting Energy Usage
When navigating to a destination, Model 3
helps you anticipate your charging needs by
calculating the amount of energy that remains
when you reach your destination. The
calculation is an estimate based on driving
style (predicted speed, etc.) and
environmental factors (elevation changes,
weather, etc.). When you initiate a navigation
route, the touchscreen displays this calculation
at the bottom of the turn-by-turn direction list.
Thereafter, you can display it by touching the
area at the bottom of the turn-by-turn
direction list.
Throughout your route, Model 3 monitors energy usage and updates the calculation. A
popup warning displays at the bottom of the
turn-by-turn direction list in these situations:
Page 107 of 165
High Voltage Components
1.Air Conditioning Compressor
2. Cabin Heater
3. High Voltage Battery
4. High Voltage Battery Service Panel
5. Rear Motor
6. High Voltage Cabling
7. Charge Port
Warning:
The high voltage system has no user serviceable parts. Do not disassemble, remove
or replace high voltage components, cables or connectors. High voltage cables are typically colored orange for easy
identification.
Warning: Read and follow all instructions provided on the labels that are attached to Model 3.
These labels are there for your safety.Warning: In the unlikely event that a fire occurs, immediately contact your local fireemergency responders.
Electric Vehicle Components
Charging105
Page 108 of 165
Charging EquipmentCharging equipment designed
specifically to
charge your Model 3 is available from Tesla. A
Tesla Wall Connector, which installs in your
garage, is the fastest way to charge Model 3 at
home.
In several market regions, Model 3 is equipped
with a Mobile Connector and the adapter(s)
you need to plug into commonly used power outlets. When using the Mobile Connector,
first plug the Mobile Connector into the power
outlet, and then plug in Model 3. For more
information about your Mobile Connector, see
the Mobile Connector Owner
Page 111 of 165

If the charge port light turns red while
charging, a fault is detected. Check the touchscreen for a message describing the
fault. A fault can occur due to something as
common as a power outage. If a power outage
occurs, charging resumes automatically when power is restored.
Note: When charging, particularly at high
currents, the refrigerant compressor and fan
operate as needed to keep the Battery cool.
Therefore, it is normal to hear sounds during charging.
Note: Air conditioning performance is
generally not
affected by charging. However,
under certain circumstances (for example, you
are charging at high currents during a
particularly warm day), the air coming from
the vents may not be as cool as expected and
a message displays on the touchscreen. This is
normal behavior and ensures that the Battery stays within an optimum temperature range
while charging to support longevity and optimum performance.
Warning: Never spray liquid at a high
velocity (for example, if using a pressure
washer) towards the charge port while
charging. Failure to follow these
instructions can result in serious injury or
damage to the vehicle, charging
equipment, or property.
Stopping Charging
Stop charging at any time by disconnecting
the charge cable or touching Stop Charging
on the touchscreen.
Note: To prevent unauthorized unplugging of
the charge cable, Model 3 must be unlocked
or able to recognize your authenticated phone before you can disconnect the charge cable.
To disconnect the charge cable:
1. Press and hold the button on a Tesla
connector to release the latch. You can
also touch Stop Charging on the charging
screen (see Charging Status and Settings
on page 109).
2. Pull the connector from the charge port.
Note: The charge port automatically closes
within approximately 10 seconds of removing
the connector from the charge port.
Caution: Tesla strongly recommends
leaving Model 3 plugged in when not in use. This maintains the Battery at the
optimum level of charge.Charge Port Light
Page 112 of 165

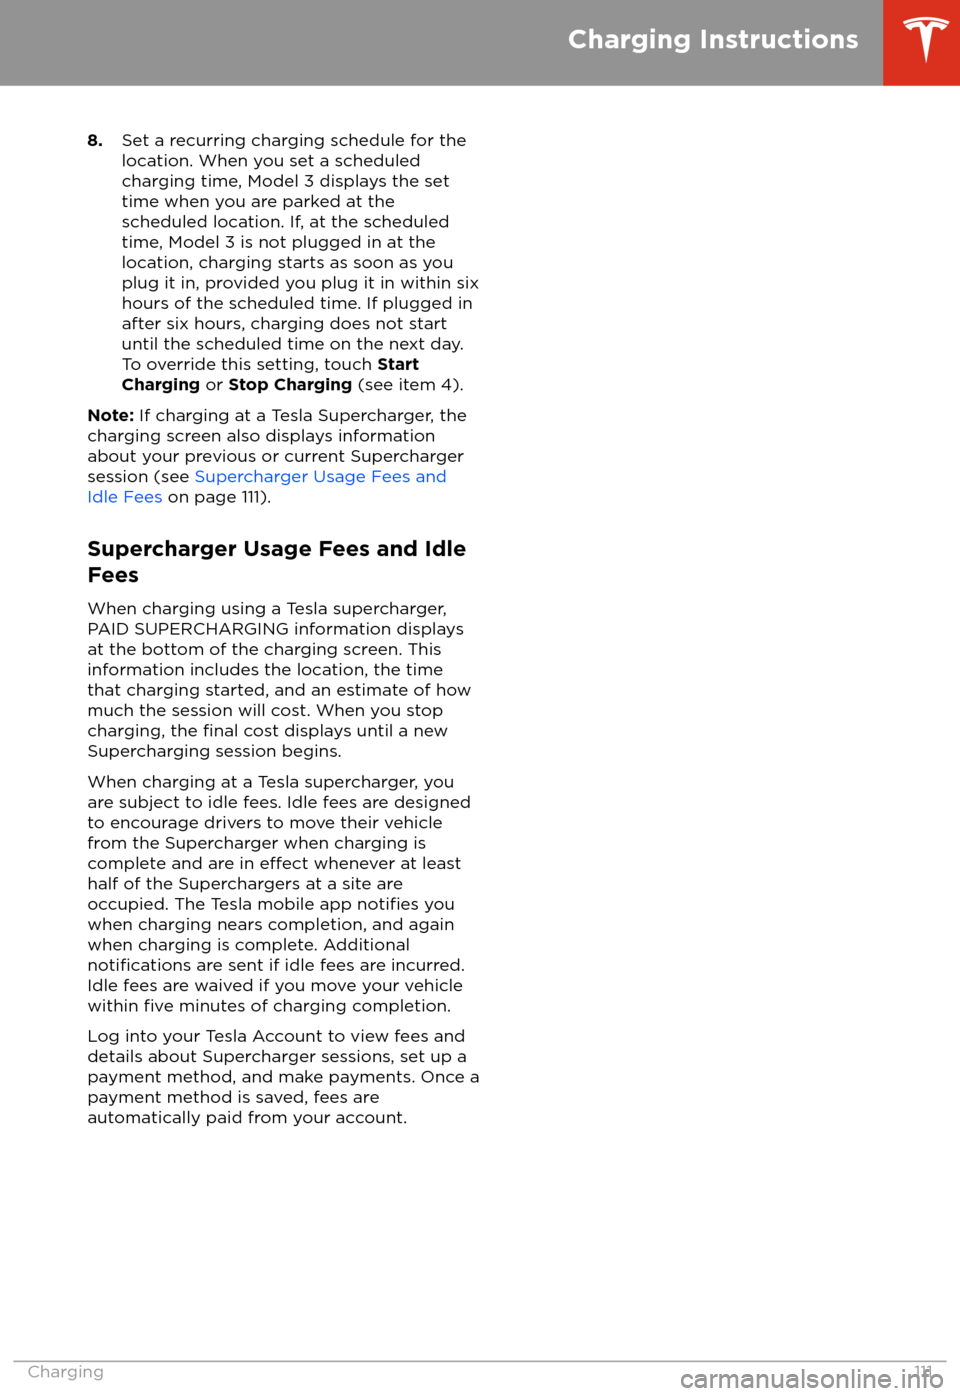
Note: The following illustration is provided for
demonstration purposes only and may vary
slightly depending on software version and
market region.
1. Charge status messages (such as
Charging, Charging Scheduled) display
here. While charging, the estimated time
remaining to achieve your set limit is also
displayed.
2. Adjust the charge limit by touching Set
Limit , and drag the arrow to move the
charge limit setting. The setting you
choose applies to immediate and
scheduled charging sessions.
3. The current automatically sets to the
maximum current available from the
attached charge cable, unless it was
previously reduced to a lower level. If
needed, touch the - or + buttons to
change the current (for example, you may
want to reduce the current if you are
concerned about overloading a domestic
wiring circuit shared by other equipment).
It is not possible to set the charging current to a level that exceeds the
maximum available from the attached
charge cable. When you change the
current, Model 3 remembers the location.
If you charge at the same location, you do
not need to change it again.
Note: If Model 3 is charging and detects
unexpected
Page 113 of 165

8.Set a recurring charging schedule for the
location. When you set a scheduled
charging time, Model 3 displays the set
time when you are parked at the
scheduled location. If, at the scheduled
time, Model 3 is not plugged in at the location, charging starts as soon as you
plug it in, provided you plug it in within six
hours of the scheduled time. If plugged in
after six hours, charging does not start
until the scheduled time on the next day.
To override this setting, touch Start
Charging or Stop Charging (see item 4).
Note: If charging at a Tesla Supercharger, the
charging screen also displays information
about your previous or current Supercharger session (see Supercharger Usage Fees and
Idle Fees on page 111).
Supercharger Usage Fees and Idle Fees
When charging using a Tesla supercharger,
PAID SUPERCHARGING information displays
at the bottom of the charging screen. This
information includes the location, the time
that charging started, and an estimate of how
much the session will cost. When you stop
charging, the
final cost displays until a new
Supercharging session begins.
When charging at a Tesla supercharger, you
are subject to idle fees. Idle fees are designed to encourage drivers to move their vehiclefrom the Supercharger when charging iscomplete and are in
effect whenever at least
half of the Superchargers at a site are
occupied. The Tesla mobile app
notifies you
when charging nears completion, and again when charging is complete. Additional
notifications are sent if idle fees are incurred.
Idle fees are waived if you move your vehicle
within
five minutes of charging completion.
Log into your Tesla Account to view fees and
details about Supercharger sessions, set up a payment method, and make payments. Once a
payment method is saved, fees are
automatically paid from your account.
Charging Instructions
Charging111