2018 SUBARU CROSSTREK seat adjustment
[x] Cancel search: seat adjustmentPage 34 of 474
(35,1)
北米Model "A1320BE-C" EDITED: 2017/ 10/ 10
&Front seats!Manual seat (if equipped)
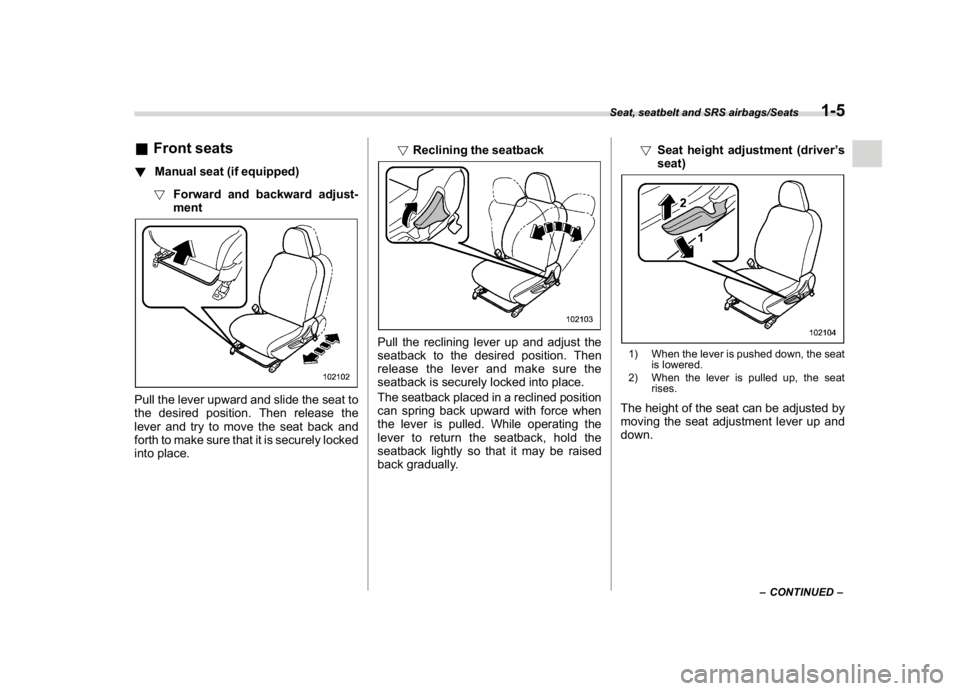
!Forward and backward adjust-
mentPull the lever upward and slide the seat to
the desired position. Then release the
lever and try to move the seat back and
forth to make sure that it is securely locked
into place.!Reclining the seatback
Pull the reclining lever up and adjust the
seatback to the desired position. Then
release the lever and make sure the
seatback is securely locked into place.
The seatback placed in a reclined position
can spring back upward with force when
the lever is pulled. While operating the
lever to return the seatback, hold the
seatback lightly so that it may be raised
back gradually.!Seat height adjustment (driver’s
seat)
1) When the lever is pushed down, the seat
is lowered.
2) When the lever is pulled up, the seat
rises.The height of the seat can be adjusted by
moving the seat adjustment lever up and
down.
–CONTINUED–
Seat, seatbelt and SRS airbags/Seats
1-5
1
Page 37 of 474
(38,1)
北米Model "A1320BE-C" EDITED: 2017/ 10/ 10
fold down in the event of sudden
braking, or objects may move out
from the cargo area, which could
cause serious injury or death.&Head restraints
WARNING
The front seat head restraints are
designed to be installed into the
front seats only. The rear seat head
restraints are designed to be in-
stalled into the rear seats only. Do
not attempt to install the front seat
head restraints into the rear seats, or
the rear seat head restraints into the
front seats.NOTEIt is possible to adjust the angle of the
front seat head restraints only. When
installing the front seat head restraints,
make sure that the angle of the head
restraints can be adjusted.!Front seats
Both the driver’s seat and the front
passenger’s seat are equipped with head
restraints. Both head restraints are adjus-
table in the following ways.
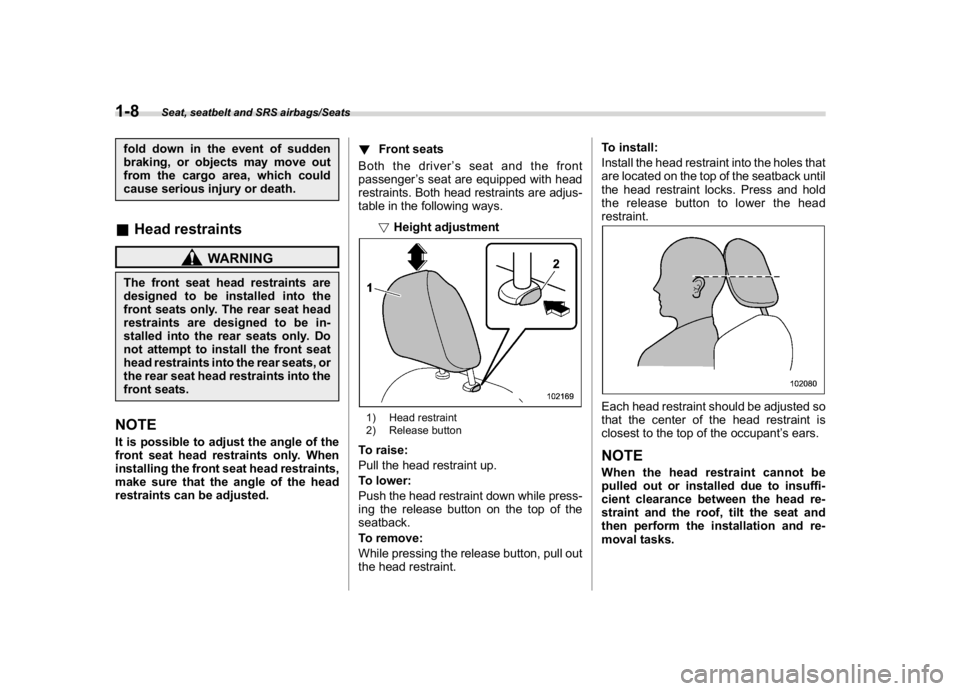
!Height adjustment
1) Head restraint
2) Release buttonTo raise:
Pull the head restraint up.
To lower:
Push the head restraint down while press-
ing the release button on the top of the
seatback.
To remove:
While pressing the release button, pull out
the head restraint.To install:
Install the head restraint into the holes that
are located on the top of the seatback until
the head restraint locks. Press and hold
the release button to lower the head
restraint.
Each head restraint should be adjusted so
that the center of the head restraint is
closest to the top of the occupant’s ears.NOTEWhen the head restraint cannot be
pulled out or installed due to insuffi-
cient clearance between the head re-
straint and the roof, tilt the seat and
then perform the installation and re-
moval tasks.
Seat, seatbelt and SRS airbags/Seats
1-8
Page 38 of 474
(39,1)
北米Model "A1320BE-C" EDITED: 2017/ 10/ 10
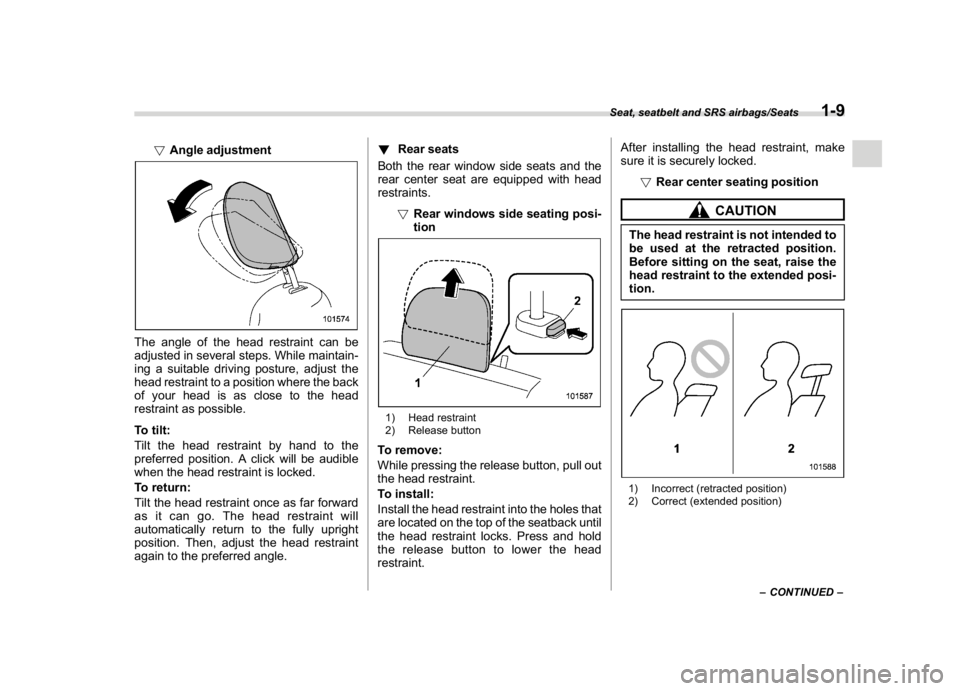
!Angle adjustment
The angle of the head restraint can be
adjusted in several steps. While maintain-
ing a suitable driving posture, adjust the
head restraint to a position where the back
of your head is as close to the head
restraint as possible.
To tilt:
Tilt the head restraint by hand to the
preferred position. A click will be audible
when the head restraint is locked.
To return:
Tilt the head restraint once as far forward
as it can go. The head restraint will
automatically return to the fully upright
position. Then, adjust the head restraint
again to the preferred angle.!Rear seats
Both the rear window side seats and the
rear center seat are equipped with head
restraints.
!Rear windows side seating posi-
tion
1) Head restraint
2) Release buttonTo remove:
While pressing the release button, pull out
the head restraint.
To install:
Install the head restraint into the holes that
are located on the top of the seatback until
the head restraint locks. Press and hold
the release button to lower the head
restraint.After installing the head restraint, make
sure it is securely locked.
!Rear center seating position
CAUTION
The head restraint is not intended to
be used at the retracted position.
Before sitting on the seat, raise the
head restraint to the extended posi-
tion.1) Incorrect (retracted position)
2) Correct (extended position)
–CONTINUED–
Seat, seatbelt and SRS airbags/Seats
1-9
1
Page 77 of 474

(78,1)
北米Model "A1320BE-C" EDITED: 2017/ 10/ 10
!Front passenger’s SRS frontal air-
bag
The front passenger’s SRS frontal airbag
uses a dual stage inflator. The inflator
operates in different ways depending on
the severity of impact.1) Occupant detection sensorsThe occupant detection system sensors
are installed between the seat and seat
rails, and monitor the physique and pos-
ture of the front passenger. Using this
information, the occupant detection sys-
tem determines whether the front passen-
ger’s SRS frontal airbag should be de-
ployed or not.
The occupant detection system may not
inflate the front passenger’s SRS frontal
airbag even when the driver’s SRS frontalairbag deploys. This is normal. In this
case, although the front passenger’s SRS
frontal airbag does not operate, the front
passenger’s seatbelt pretensioner oper-
ates with the driver’s seatbelt preten-
sioner. For details about the seatbelt
pretensioner, refer to“Seatbelt preten-
sioners”F1-21.
CAUTION
Observe the following precautions.
Failure to do so may prevent the
SUBARU advanced frontal airbag
system from functioning correctly
or cause the system to fail.
.Do not apply any strong impact to
the front passenger’s seat such
as by kicking.
.Do not let rear passengers rest
their feet between the front seat-
back and seat cushion.
.Do not spill liquid on the front
passenger’s seat. If liquid is
spilled, wipe it off immediately.
.Do not remove or disassemble
the front passenger’s seat.
.Do not install any accessory
(such as an audio amplifier) other
than a genuine SUBARU acces-
sory under the front passenger’sseat.
.Do not place anything (shoes,
umbrella, etc.) under the front
passenger’s seat.
.Do not place any objects (books,
etc.) around the front passen-
ger’s seat.
.Do not use the front passenger’s
seat with the head restraint re-
moved.
.Do not leave any articles on the
front passenger’s seat or the
seatbelt tongue and buckle en-
gaged when you leave your vehi-
cle.
.Do not put sharp object(s) on the
seat or pierce the seat uphols-
tery.
.Do not place a magnet near the
seatbelt buckle and the seatbelt
retractor.
.Do not use front seats with their
forward-backward position and
seatback not being locked into
place securely. If any of them are
not locked securely, adjust them
again. For adjusting procedure,
refer to“Forward and backward
adjustment”F1-5 and“Reclining
the seatback”F1-5.
Seat, seatbelt and SRS airbags/SRS airbag (Supplemental Restraint System airbag)
1-48
Page 224 of 474
(229,1)
北米Model "A1320BE-C" EDITED: 2017/ 10/ 10
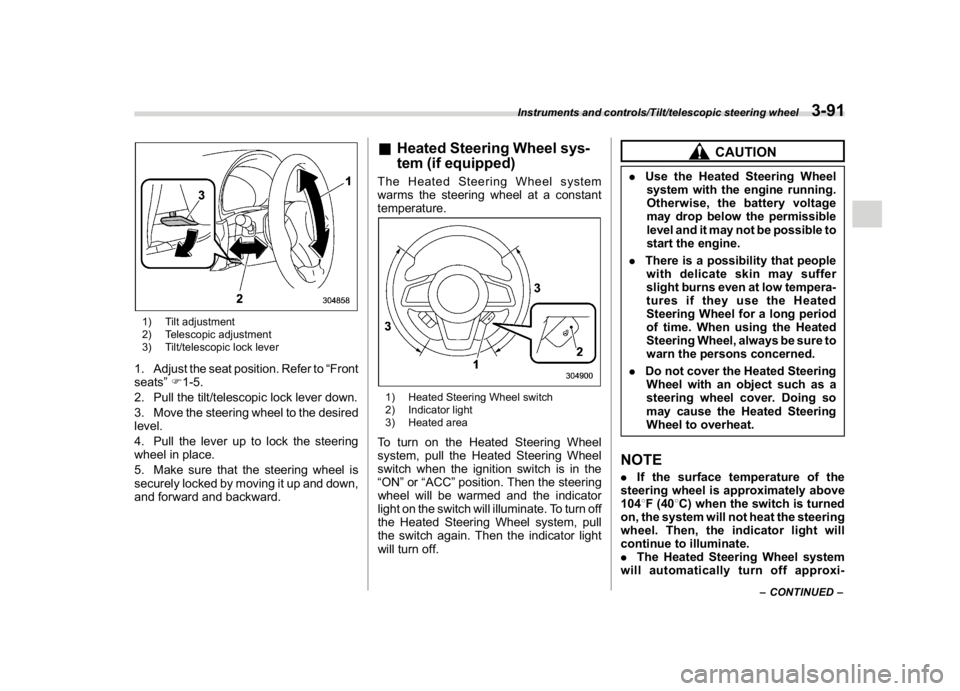
1) Tilt adjustment
2) Telescopic adjustment
3) Tilt/telescopic lock lever1. Adjust the seat position. Refer to“Front
seats”F1-5.
2. Pull the tilt/telescopic lock lever down.
3. Move the steering wheel to the desired
level.
4. Pull the lever up to lock the steering
wheel in place.
5. Make sure that the steering wheel is
securely locked by moving it up and down,
and forward and backward.
&Heated Steering Wheel sys-
tem (if equipped)The Heated Steering Wheel system
warms the steering wheel at a constant
temperature.1) Heated Steering Wheel switch
2) Indicator light
3) Heated areaTo turn on the Heated Steering Wheel
system, pull the Heated Steering Wheel
switch when the ignition switch is in the
“ON”or“ACC”position. Then the steering
wheel will be warmed and the indicator
light on the switch will illuminate. To turn off
the Heated Steering Wheel system, pull
the switch again. Then the indicator light
will turn off.
CAUTION
.Use the Heated Steering Wheel
system with the engine running.
Otherwise, the battery voltage
may drop below the permissible
level and it may not be possible to
start the engine.
.There is a possibility that people
with delicate skin may suffer
slight burns even at low tempera-
tures if they use the Heated
Steering Wheel for a long period
of time. When using the Heated
Steering Wheel, always be sure to
warn the persons concerned.
.Do not cover the Heated Steering
Wheel with an object such as a
steering wheel cover. Doing so
may cause the Heated Steering
Wheel to overheat.NOTE.If the surface temperature of the
steering wheel is approximately above
1048F (408C) when the switch is turned
on, the system will not heat the steering
wheel. Then, the indicator light will
continue to illuminate.
.The Heated Steering Wheel system
will automatically turn off approxi-
–CONTINUED–
Instruments and controls/Tilt/telescopic steering wheel
3-91
3
Page 265 of 474
(274,1)
北米Model "A1320BE-C" EDITED: 2017/ 10/ 10
on a dynamometer, tell your emission
inspector not to place your SUBARU
AWD vehicle on a two-wheel dynam-
ometer.Otherwise, serious transmis-
sion damage will result.
The U.S. Environmental Protection
Agency (EPA) and states using two-wheel
dynamometers in their emission testing
program have EXEMPTED SUBARU
AWD vehicles from the portion of the
testing program that involves a two-wheel
dynamometer. There are some states that
use four-wheel dynamometers in their
testing program. When properly used, this
equipment should not damage a SUBARU
AWD vehicle.
Under no circumstances should the rear
wheels be jacked off the ground, nor
should the driveshaft be disconnected in
an attempt to bypass AWD for state
emission testing. An AWD vehicle must
be tested using an AWD dynamometer
with all 4 wheels driven and loaded.
Preparing to driveYou should perform the following checks
and adjustments every day before you
start driving.
1. Check that all windows, mirrors, and
lights are clean and unobstructed.
2. Check the appearance and condition
of the tires. Also check tires for proper
inflation.
3. Look under the vehicle for any sign of
leaks.
4. Check that no small animals enter the
engine compartment.
5. Check that the hood and rear gate are
fully closed.
6. Check the adjustment of the seat.
7. Check the adjustment of the inside and
outside mirrors.
8. Fasten your seatbelt. Check that your
passengers have fastened their seatbelts.
9. Check the operation of the warning
and indicator lights when the ignition
switch is turned to the“ON”position.
10. Check the gauges, indicator and warn-
ing lights after starting the engine.
CAUTION
Trapping small animals in the cool-
ing fan and belts of the engine may
result in a malfunction. Check that
no small animal enters the engine
compartment and under the vehicle
before starting the engine.NOTE.Engine oil, engine coolant, brake
fluid, washer fluid and other fluid levels
should be checked daily, weekly or at
fuel stops.
.When towing a trailer, refer to“Trai-
ler hitch (dealer option)”F8-14
Starting and operating/Preparing to drive
7-8