2018 SUBARU CROSSTREK fold seats
[x] Cancel search: fold seatsPage 35 of 474

(36,1)
北米Model "A1320BE-C" EDITED: 2017/ 10/ 10
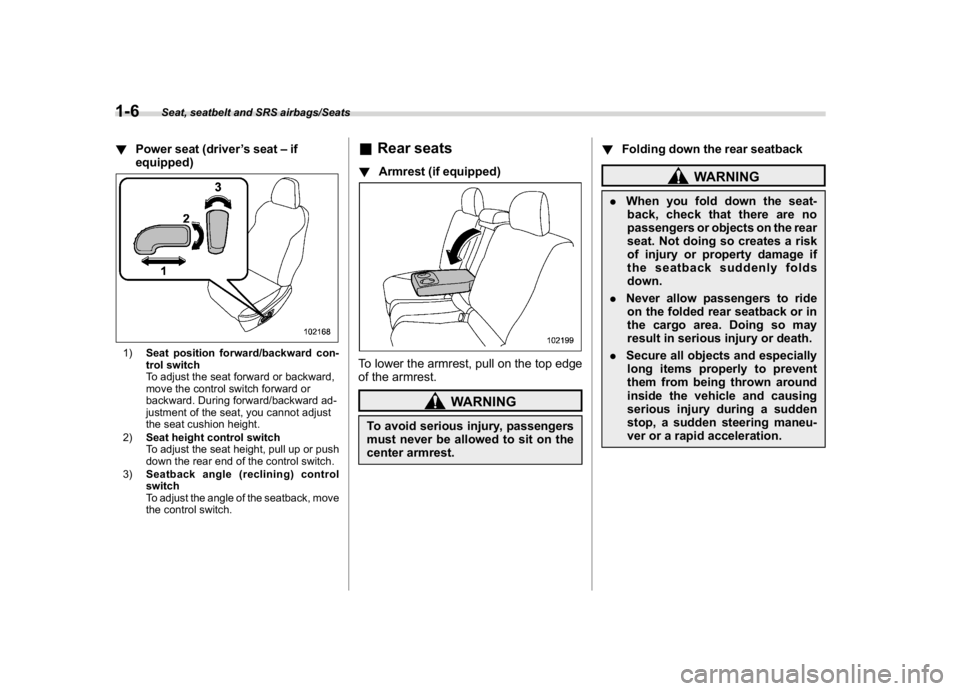
!Power seat (driver’s seat–if
equipped)1)Seat position forward/backward con-
trol switch
To adjust the seat forward or backward,
move the control switch forward or
backward. During forward/backward ad-
justment of the seat, you cannot adjust
the seat cushion height.
2)Seat height control switch
To adjust the seat height, pull up or push
down the rear end of the control switch.
3)Seatback angle (reclining) control
switch
To adjust the angle of the seatback, move
the control switch.
&Rear seats!Armrest (if equipped)To lower the armrest, pull on the top edge
of the armrest.
WARNING
To avoid serious injury, passengers
must never be allowed to sit on the
center armrest.!Folding down the rear seatback
WARNING
.When you fold down the seat-
back, check that there are no
passengers or objects on the rear
seat. Not doing so creates a risk
of injury or property damage if
the seatback suddenly folds
down.
.Never allow passengers to ride
on the folded rear seatback or in
the cargo area. Doing so may
result in serious injury or death.
.Secure all objects and especially
long items properly to prevent
them from being thrown around
inside the vehicle and causing
serious injury during a sudden
stop, a sudden steering maneu-
ver or a rapid acceleration.
Seat, seatbelt and SRS airbags/Seats
1-6
Page 36 of 474

(37,1)
北米Model "A1320BE-C" EDITED: 2017/ 10/ 10
Unlock the seatback by pulling the lock
release knob and then fold the seatback
down.
!Return the rear seatback
WARNING
When returning the seatback to its
original position, observe the fol-
lowing precaution.
Failure to observe the precaution
may damage the seatbelt, impairing
its effectiveness, and possibly re-
sult in a serious injury.
.When returning the seatback to
its original position, pull the
seatbelt out towards the vehicle
exterior so that it will not be
caught between the seatback
and the trim.
Lock release knob
1) Unlocked
2) Locked
A) Unlocking marker in redTo return the seatback to its original
position, raise the seatback until it locks
into place and make sure that the unlock-
ing marker on the lock release knob is no
longer visible.
WARNING
When you return the seatback to its
original position, check that the
unlocking marker on the lock re-
lease knob is not visible. Also, shake
the seatback slightly to confirm that
it is securely fixed in place. If the
seatback is not securely fixed in
place, the seatback may suddenly
–CONTINUED–
Seat, seatbelt and SRS airbags/Seats
1-7
1
Page 37 of 474

(38,1)
北米Model "A1320BE-C" EDITED: 2017/ 10/ 10
fold down in the event of sudden
braking, or objects may move out
from the cargo area, which could
cause serious injury or death.&Head restraints
WARNING
The front seat head restraints are
designed to be installed into the
front seats only. The rear seat head
restraints are designed to be in-
stalled into the rear seats only. Do
not attempt to install the front seat
head restraints into the rear seats, or
the rear seat head restraints into the
front seats.NOTEIt is possible to adjust the angle of the
front seat head restraints only. When
installing the front seat head restraints,
make sure that the angle of the head
restraints can be adjusted.!Front seats
Both the driver’s seat and the front
passenger’s seat are equipped with head
restraints. Both head restraints are adjus-
table in the following ways.
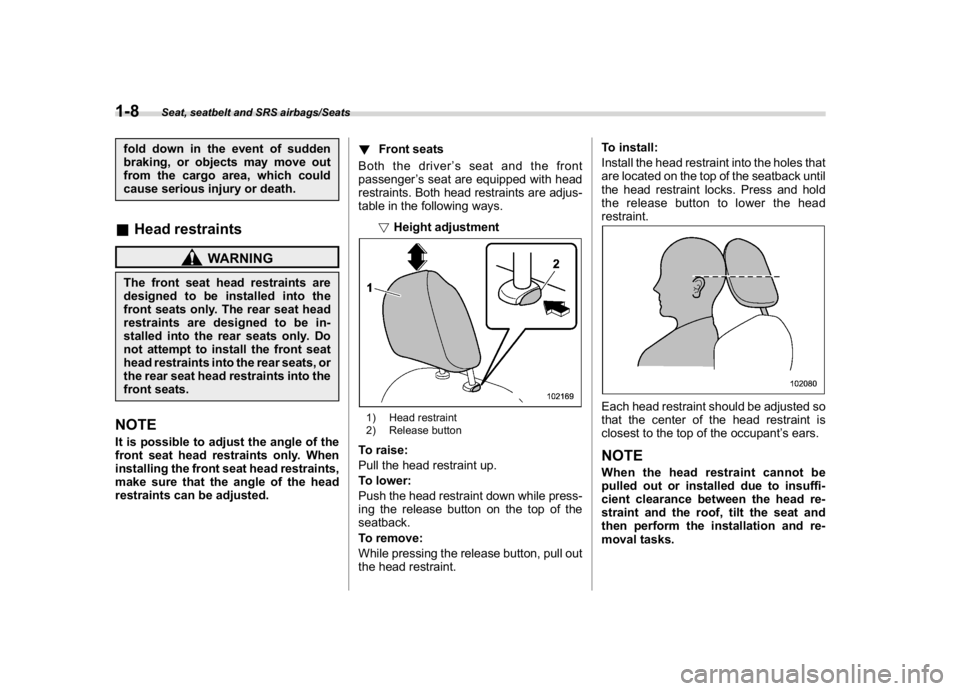
!Height adjustment
1) Head restraint
2) Release buttonTo raise:
Pull the head restraint up.
To lower:
Push the head restraint down while press-
ing the release button on the top of the
seatback.
To remove:
While pressing the release button, pull out
the head restraint.To install:
Install the head restraint into the holes that
are located on the top of the seatback until
the head restraint locks. Press and hold
the release button to lower the head
restraint.
Each head restraint should be adjusted so
that the center of the head restraint is
closest to the top of the occupant’s ears.NOTEWhen the head restraint cannot be
pulled out or installed due to insuffi-
cient clearance between the head re-
straint and the roof, tilt the seat and
then perform the installation and re-
moval tasks.
Seat, seatbelt and SRS airbags/Seats
1-8
Page 59 of 474

(60,1)
北米Model "A1320BE-C" EDITED: 2017/ 10/ 10
!Installing forward facing child re-
straint
WARNING
Before installing a child restraint
system, be sure to confirm that the
seatback is securely locked into
place. Otherwise, in an accident,
serious injury or death could result.
1. Shake the seatback slightly to confirm
that it is securely locked into place.
–Check the red colored unlocking
marker which is attached to the bottom
of the lock release knob is invisible. For
details, refer to“Folding down the rear
seatback”F1-6.
2. Prepare the rear seat head restraint
where a child restraint system is intended
to be installed in the following way.
–When a child restraint system is
installed on thewindow-side seating
position, remove the rear seat head
restraint. For details, refer to“Rear
seats”F1-9.
Store the head restraint in the cargo
area. Avoid placing the head restraint
in the passenger compartment to pre-
vent it from being thrown around in the
passenger compartment in a sudden
stop or a sharp turn.–When a child restraint system is
installed on therear center seating
position, raise the rear seat head
restraint to the extended position. Do
not remove the head restraint. For
details, refer to“Rear seats”F1-9.
3. Place the child restraint system in the
rear seating position.
WARNING
When you intend to install a child
restraint system on the rear center
seating position, if the child restraint
system does not fit snugly against
the contours of the rear center seat
cushion, install the child restraint
system on the window-side seating
position to be safe. For details, refer
to“Where to place a child restraint
system”F1-26.
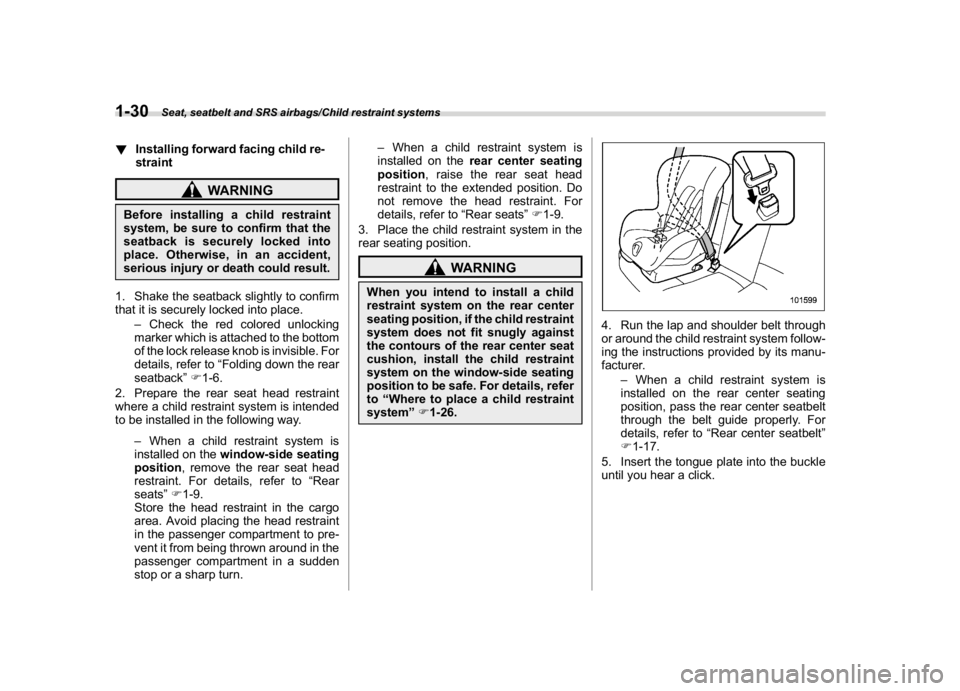
4. Run the lap and shoulder belt through
or around the child restraint system follow-
ing the instructions provided by its manu-
facturer.
–When a child restraint system is
installed on the rear center seating
position, pass the rear center seatbelt
through the belt guide properly. For
details, refer to“Rear center seatbelt”
F1-17.
5. Insert the tongue plate into the buckle
until you hear a click.
Seat, seatbelt and SRS airbags/Child restraint systems
1-30
Page 379 of 474

(392,1)
北米Model "A1320BE-C" EDITED: 2017/ 10/ 10
make sure it does not affect the fabric
adversely. Use the cleaner according to its
instructions.
CAUTION
When cleaning the seat, do not use
benzine, paint thinner, or any similar
materials. Doing so could damage
the surface and cause the color to
deteriorate.&Leather seat materialsThe leather used by SUBARU is a high
quality natural product which will retain its
distinctive appearance and feel for many
years with proper care.
Allowing dust or road dirt to build up on the
surface can cause the material to become
brittle and to wear prematurely. Regular
cleaning with a soft, moist, natural fiber
cloth should be performed monthly, taking
care not to soak the leather or allow water
to penetrate the stitched seams.
A mild detergent suitable for cleaning
woolen fabrics may be used to remove
difficult dirt spots, rubbing with a soft, dry
cloth afterwards to restore the luster. If
your SUBARU is to be parked for a long
time in bright sunlight, it is recommended
that the seats and head restraints becovered, or the windows shaded, to pre-
vent fading or shrinkage.
Minor surface blemishes or bald patches
may be treated with a commercial leather
spray lacquer. You will discover that each
leather seat section will develop soft folds
or wrinkles, which is characteristic of
genuine leather.
&Synthetic leather upholsteryThe synthetic leather material used on the
SUBARU may be cleaned using mild soap
or detergent and water, after first vacuum-
ing or brushing away loose dirt. Allow the
soap to soak in for a few minutes and wipe
off with a clean, damp cloth. Commercial
foam-type cleaners suitable for synthetic
leather materials may be used when
necessary.
CAUTION
Strong cleaning agents such as
solvents, paint thinners, window
cleaner or fuel must never be used
on leather or synthetic interior ma-
terials. Doing so could damage the
surface and cause the color to
deteriorate.
&SeatbeltFor details about how to clean the seatbelt,
refer to“Seatbelt maintenance”F1-20.&Climate control panel, audio
panel, instrument panel, con-
sole panel, and switchesUse a soft, damp cloth to clean the climate
control panel, audio equipment, instru-
ment panel, center console, combination
meter panel, and switches.
CAUTION
.Do not use organic solvents such
as paint thinners or fuel, or
strong cleaning agents that con-
tain those solvents. Doing so
could damage the surface and
cause the color to deteriorate.
.Do not use chemical solvents that
contain silicone on the vehicle
audio system, electrical compo-
nents of the air-conditioner or
any switches. If silicone adheres
to these parts, it may cause
damage to electrical compo-
nents.
Appearance care/Cleaning the interior
10-6