2018 SUBARU CROSSTREK head
[x] Cancel search: headPage 361 of 474

(372,1)
北米Model "A1320BE-C" EDITED: 2017/ 10/ 10
on the wrench because you may exceed
the specified torque. Have the wheel nut
torque checked at the nearest automotive
service facility.1) Support holder15. Store the flat tire in the spare tire
compartment. Install with the support
holder facing upward and secure the flat
tire by firmly tightening the attaching bolt.NOTEIf you cannot fix the flat tire firmly, try
turning the support holder upside
down.
16. Store the jack, jack handle and wheel
nut wrench in their storage locations.
WARNING
Never place a tire or tire changing
tools in the passenger compartment
after changing wheels. In a sudden
stop or collision, loose equipment
could strike occupants and cause
injury. Store the tire and all tools in
the proper place.&Tire pressure monitoring
system (TPMS) (U.S.-spec.
models)The tire pressure monitoring system pro-
vides the driver with the warning message
indicated by sending a signal from a
sensor that is installed in each wheel when
tire pressure is severely low.The tire pressure monitoring system will
activate only when the vehicle is driven.
Also, this system may not react immedi-
ately to a sudden drop in tire pressure (for
example, a blow-out caused running over
a sharp object).
WARNING
.If the low tire pressure warning
light illuminates while driving,
never brake suddenly. Instead,
perform the following procedure.
(1) Keep driving straight ahead
while gradually reducing
speed.
(2) Slowly pull off the road to a
safe place. Otherwise an acci-
dent involving serious vehicle
damage and serious personal
injury could occur.
(3) Check the pressure for all four
tires and adjust the pressure
to the COLD tire pressure
shown on the vehicle placard
on the door pillar on the
driver’s side.
If this light still illuminates while
driving after adjusting the tire
pressure, a tire may have signifi-
cant damage and a fast leak that
causes the tire to lose air rapidly.
In case of emergency/Flat tires
9-8
Page 366 of 474

(377,1)
北米Model "A1320BE-C" EDITED: 2017/ 10/ 10
TowingIf towing is necessary, it is best done by
your SUBARU dealer or a commercial
towing service. Observe the following
procedures for safety.
WARNING
Never tow AWD models with the
front wheels raised off the ground
while the rear wheels are on the
ground, or with the rear wheels
raised off the ground while the front
wheels are on the ground. This will
cause the vehicle to spin away due
to the operation or deterioration of
the center differential.
&Towing hooks and tie-down
hooks/holesThe towing hooks should be used only in
an emergency (e.g., to free a stuck vehicle
from mud, sand or snow).
CAUTION
.Use only the specified towing
hooks and tie-down hooks/holes.
Never use suspension parts or
other parts of the body for towing
or tie-down purposes.
.To prevent deformation to the
front bumper and the towing
hook, do not apply excessive
lateral load to the towing hooks.
!Front towing hook
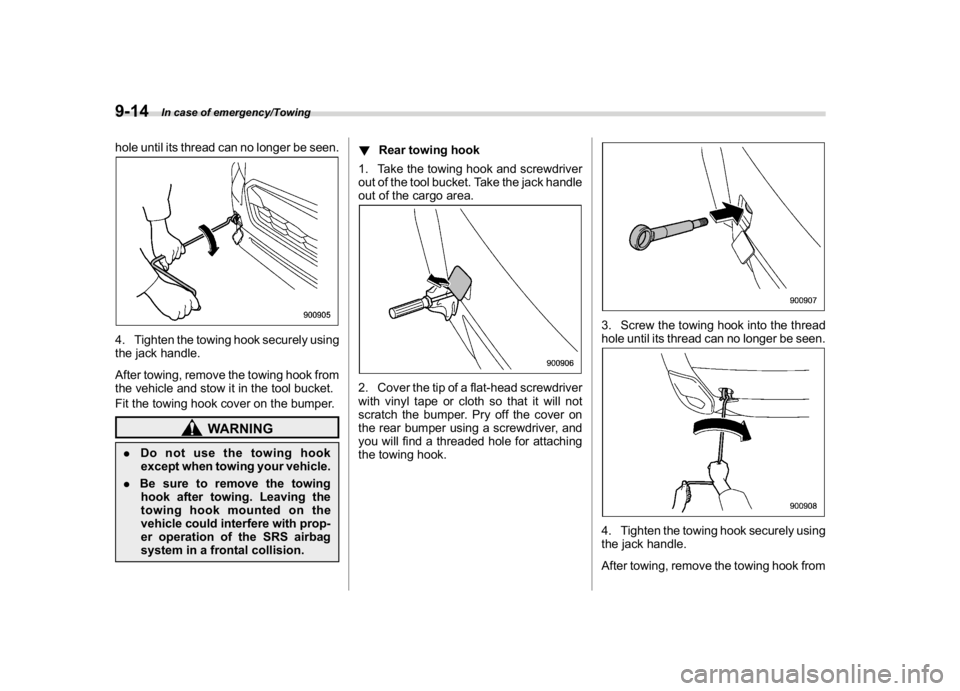
1. Take the towing hook and screwdriver
out of the tool bucket. Take the jack handle
out of the cargo area.
2. Cover the tip of a flat-head screwdriver
with vinyl tape or cloth so that it will not
scratch the bumper. Insert the flat-head
screwdriver into the cutout of the cover and
pry open the cover.3. Screw the towing hook into the thread
–CONTINUED–
In case of emergency/Towing
9-13
9
Page 367 of 474
(378,1)
北米Model "A1320BE-C" EDITED: 2017/ 10/ 10
hole until its thread can no longer be seen.4. Tighten the towing hook securely using
the jack handle.
After towing, remove the towing hook from
the vehicle and stow it in the tool bucket.
Fit the towing hook cover on the bumper.
WARNING
.Do not use the towing hook
except when towing your vehicle.
.Be sure to remove the towing
hook after towing. Leaving the
towing hook mounted on the
vehicle could interfere with prop-
er operation of the SRS airbag
system in a frontal collision.!Rear towing hook
1. Take the towing hook and screwdriver
out of the tool bucket. Take the jack handle
out of the cargo area.
2. Cover the tip of a flat-head screwdriver
with vinyl tape or cloth so that it will not
scratch the bumper. Pry off the cover on
the rear bumper using a screwdriver, and
you will find a threaded hole for attaching
the towing hook.
3. Screw the towing hook into the thread
hole until its thread can no longer be seen.4. Tighten the towing hook securely using
the jack handle.
After towing, remove the towing hook from
In case of emergency/Towing
9-14
Page 372 of 474
(383,1)
北米Model "A1320BE-C" EDITED: 2017/ 10/ 10
Rear gate–if the rear gate
cannot be openedIn the event that you cannot open the rear
gate by operating the rear gate opener
button, you can open it from inside the
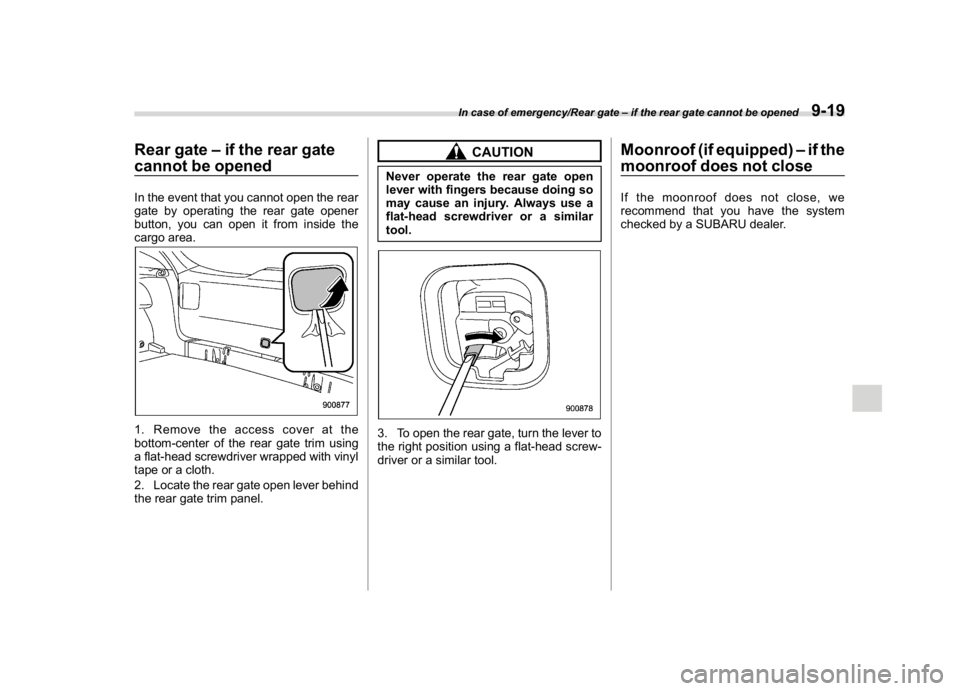
cargo area.1. Remove the access cover at the
bottom-center of the rear gate trim using
a flat-head screwdriver wrapped with vinyl
tape or a cloth.
2. Locate the rear gate open lever behind
the rear gate trim panel.
CAUTION
Never operate the rear gate open
lever with fingers because doing so
may cause an injury. Always use a
flat-head screwdriver or a similar
tool.3. To open the rear gate, turn the lever to
the right position using a flat-head screw-
driver or a similar tool.
Moonroof (if equipped)–if the
moonroof does not closeIf the moonroof does not close, we
recommend that you have the system
checked by a SUBARU dealer.
In case of emergency/Rear gate–if the rear gate cannot be opened
9-19
9
Page 379 of 474
(392,1)
北米Model "A1320BE-C" EDITED: 2017/ 10/ 10
make sure it does not affect the fabric
adversely. Use the cleaner according to its
instructions.
CAUTION
When cleaning the seat, do not use
benzine, paint thinner, or any similar
materials. Doing so could damage
the surface and cause the color to
deteriorate.&Leather seat materialsThe leather used by SUBARU is a high
quality natural product which will retain its
distinctive appearance and feel for many
years with proper care.
Allowing dust or road dirt to build up on the
surface can cause the material to become
brittle and to wear prematurely. Regular
cleaning with a soft, moist, natural fiber
cloth should be performed monthly, taking
care not to soak the leather or allow water
to penetrate the stitched seams.
A mild detergent suitable for cleaning
woolen fabrics may be used to remove
difficult dirt spots, rubbing with a soft, dry
cloth afterwards to restore the luster. If
your SUBARU is to be parked for a long
time in bright sunlight, it is recommended
that the seats and head restraints becovered, or the windows shaded, to pre-
vent fading or shrinkage.
Minor surface blemishes or bald patches
may be treated with a commercial leather
spray lacquer. You will discover that each
leather seat section will develop soft folds
or wrinkles, which is characteristic of
genuine leather.
&Synthetic leather upholsteryThe synthetic leather material used on the
SUBARU may be cleaned using mild soap
or detergent and water, after first vacuum-
ing or brushing away loose dirt. Allow the
soap to soak in for a few minutes and wipe
off with a clean, damp cloth. Commercial
foam-type cleaners suitable for synthetic
leather materials may be used when
necessary.
CAUTION
Strong cleaning agents such as
solvents, paint thinners, window
cleaner or fuel must never be used
on leather or synthetic interior ma-
terials. Doing so could damage the
surface and cause the color to
deteriorate.
&SeatbeltFor details about how to clean the seatbelt,
refer to“Seatbelt maintenance”F1-20.&Climate control panel, audio
panel, instrument panel, con-
sole panel, and switchesUse a soft, damp cloth to clean the climate
control panel, audio equipment, instru-
ment panel, center console, combination
meter panel, and switches.
CAUTION
.Do not use organic solvents such
as paint thinners or fuel, or
strong cleaning agents that con-
tain those solvents. Doing so
could damage the surface and
cause the color to deteriorate.
.Do not use chemical solvents that
contain silicone on the vehicle
audio system, electrical compo-
nents of the air-conditioner or
any switches. If silicone adheres
to these parts, it may cause
damage to electrical compo-
nents.
Appearance care/Cleaning the interior
10-6
Page 383 of 474
(396,1)
北米Model "A1320BE-C" EDITED: 2017/ 10/ 10
Rotational direction of tires................................. 11-25
Tire rotation........................................................ 11-25
Tire replacement................................................. 11-26
Wheel replacement............................................. 11-27
Alloy wheels........................................................ 11-27
Windshield washer fluid..................................... 11-28
Adding the windshield washer fluid..................... 11-28
Windshield washer fluid...................................... 11-28
Replacement of wiper blades............................ 11-29
Windshield wiper blade assembly........................ 11-29
Window wiper blade rubber................................. 11-30
Rear window wiper blade assembly..................... 11-31
Rear window wiper blade rubber......................... 11-32
Battery................................................................. 11-33
Fuses................................................................... 11-34
Installation of accessories................................. 11-35Replacing bulbs...................................................11-36
Headlights (models with LED headlights)............ 11-36
Headlights (models with halogen headlights) ...... 11-36
Front turn signal light......................................... 11-38
Parking light....................................................... 11-38
Front fog light (if equipped)................................ 11-38
Rear combination lights...................................... 11-38
Backup light....................................................... 11-40
License plate light.............................................. 11-40
Map light............................................................ 11-41
Vanity mirror light (if equipped)........................... 11-41
Dome light and cargo area light.......................... 11-41
Other bulbs........................................................ 11-42
Replacing key battery.........................................11-42
Safety precautions.............................................. 11-42
Replacing battery of access key fob................... 11-43
Replacing transmitter battery.............................. 11-44
Maintenance and service
Page 403 of 474

(416,1)
北米Model "A1320BE-C" EDITED: 2017/ 10/ 10
the tire pressure monitoring system may
not be functioning normally. In this event,
gotoaSUBARUdealertohavethe
system inspected as soon as possible.
While the vehicle is driven, friction be-
tween tires and the road surface causes
the tires to warm up. After illumination of
the low tire pressure warning light, any
increase in the tire pressures caused by an
increase in the outside air temperature or
by an increase in the temperature in the
tires can cause the low tire pressure
warning light to turn off.
System resetting is necessary when the
wheels are changed (for example, a switch
to snow tires) and new TPMS valves are
installed on the newly fitted wheels. Have
this work performed by a SUBARU dealer
following wheel replacement.
It may not be possible to install TPMS
valves on certain wheels that are on the
market. Therefore, if you change the
wheels (for example, a switch to snow
tires), use wheels that have the same part
number as the standard-equipment
wheels. Without four operational TPMS
valve/sensors on the wheels, the TPMS
will not fully function and the warning light
on the combination meter will illuminate
steadily after blinking for approximately
one minute.When a tire is replaced, adjustments are
necessary to ensure continued normal
operation of the tire pressure monitoring
system. As with wheel replacement, there-
fore, you should have the work performed
by a SUBARU dealer.
WARNING
If the low tire pressure warning light
does not illuminate briefly after the
ignition switch is turned ON or the
light illuminates steadily after blink-
ing for approximately one minute,
you should have your Tire Pressure
Monitoring System checked at a
SUBARU dealer as soon as possi-
ble.
If this light illuminates while driving,
never brake suddenly and keep
driving straight ahead while gradu-
ally reducing speed. Then slowly
pull off the road to a safe place.
Otherwise an accident involving
serious vehicle damage and serious
personal injury could occur.
If this light still illuminates while
driving after adjusting the tire pres-
sure, a tire may have significant
damage and a fast leak that causes
the tire to lose air rapidly. If you have
a flat tire, replace it with a spare tireas soon as possible.
When a spare tire is mounted or a
wheel rim is replaced without the
original pressure sensor/transmitter
being transferred, the low tire pres-
sure warning light will illuminate
steadily after blinking for approxi-
mately one minute. This indicates
the TPMS is unable to monitor all
four road wheels. Contact your
SUBARU dealer as soon as possible
for tire and sensor replacement and/
or system resetting. If the light
illuminates steadily after blinking
for approximately one minute,
promptly contact a SUBARU dealer
to have the system inspected.
&Tire inspectionCheck on a daily basis that the tires are
free from serious damage, nails, and
stones. At the same time, check the tires
for abnormal wear.
Contact your SUBARU dealer immediately
if you find any problem.NOTE.When the wheels and tires strike
curbs or are subjected to harsh treat-
ment as when the vehicle is driven on a
rough surface, they can suffer damage
Maintenance and service/Tires and wheels
11-22
Page 417 of 474
(430,1)
北米Model "A1320BE-C" EDITED: 2017/ 10/ 10
Replacing bulbs
WARNING
Bulbs may become very hot while
illuminated. Before replacing bulbs,
turn off the lights and wait until the
bulbs cool down. Otherwise, there is
a risk of sustaining a burn injury.
CAUTION
Replace any bulb only with a new
bulb of the specified wattage. Using
a bulb of different wattage could
result in a fire. For the specified
wattage of each bulb, refer to“Bulb
chart”F12-14.NOTEFor models with type B combination
meter, if SRH is malfunctioning, the
SRH OFF indicator appears on the
combination meter when the ignition
switch is in the“ON”position. It
indicates that SRH has been deacti-
vated. Contact a SUBARU dealer for an
inspection.
&Headlights (models with LED
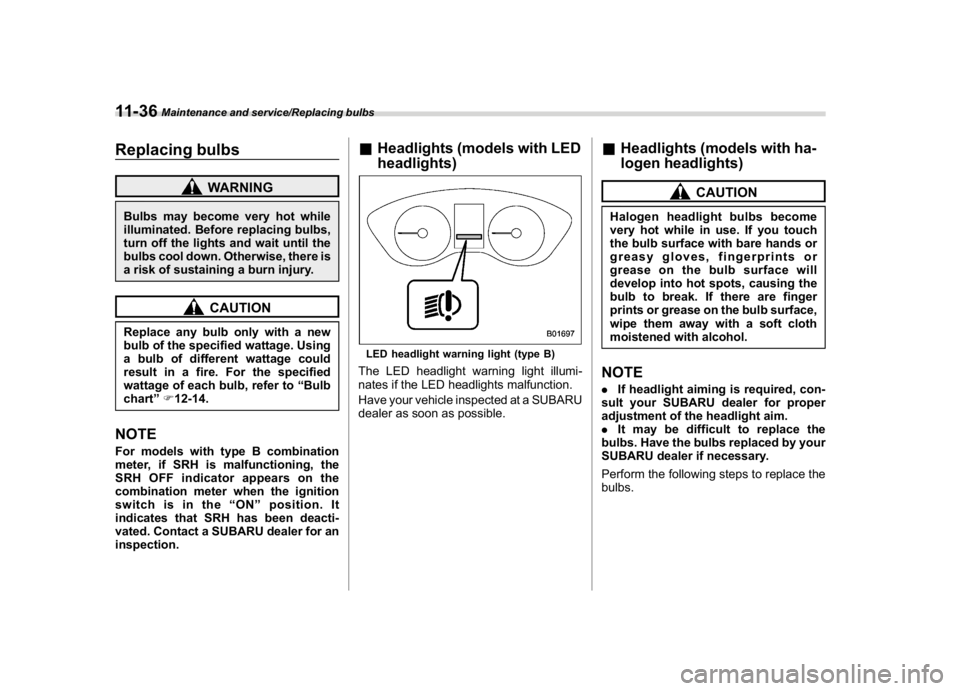
headlights)LED headlight warning light (type B)The LED headlight warning light illumi-
nates if the LED headlights malfunction.
Have your vehicle inspected at a SUBARU
dealer as soon as possible.
&Headlights (models with ha-
logen headlights)
CAUTION
Halogen headlight bulbs become
very hot while in use. If you touch
the bulb surface with bare hands or
greasy gloves, fingerprints or
grease on the bulb surface will
develop into hot spots, causing the
bulb to break. If there are finger
prints or grease on the bulb surface,
wipe them away with a soft cloth
moistened with alcohol.NOTE.If headlight aiming is required, con-
sult your SUBARU dealer for proper
adjustment of the headlight aim.
.It may be difficult to replace the
bulbs. Have the bulbs replaced by your
SUBARU dealer if necessary.
Perform the following steps to replace the
bulbs.
Maintenance and service/Replacing bulbs
11-36