2018 SUBARU CROSSTREK remote control
[x] Cancel search: remote controlPage 28 of 474

(27,1)
北米Model "A1320BE-C" EDITED: 2017/ 10/ 10
Function settingsA SUBARU dealer can change the settings of the functions shown in the following table to meet your personal requirements. Contact the
nearest SUBARU dealer for details. If your vehicle is equipped with a combination meter display (color LCD)*, audio unit or navigation
unit*, the settings for some of these functions can be changed using the display. For details, refer to“Combination meter display (color
LCD)”F3-33.
*: if equippedItem Function Possible settings Default setting
Alarm system Alarm system Operation/Non-operation Operation
Monitoring start delay time (after
closure of doors)0 seconds/30 seconds 30 seconds
Dome light, cargo area light, and
map lights illuminationON/OFF OFF
Keyless Access (if equipped) Hazard warning flasher Operation/Non-operation Operation
Audible signal Operation/Non-operation Operation
Audible signal volume Level 1 to 7 Level 5
Door unlock selection function (dri-
ver’s door unlock)Driver’s door only/All doors Driver’s door only
Door unlock selection function (rear
gate unlock)Rear gate only/All doors Rear gate only
Remote keyless entry system Hazard warning flasher Operation/Non-operation Operation
Audible signal Operation/Non-operation Operation
Audible signal volume Level 1 to 7 Level 5
Key lock-in prevention Key lock-in prevention Operation/Non-operation Operation
Defogger and deicer system for
models with the automatic climate
control systemRear window defogger, outside mir-
ror defogger and windshield wiper
deicerOperation for 15 minutes/
Continuous operationOperation for 15 minutes
–CONTINUED–
25
0
Page 117 of 474

(120,1)
北米Model "A1320BE-C" EDITED: 2017/ 10/ 10
Transmitter
1) Lock/arm button
2) Unlock/disarm button
3) Rear gate unlock button
4) PANIC buttonThe remote keyless entry system has the
following functions.
.Locking and unlocking the doors (and
rear gate)
.Unlocking the rear gate
.Sounding a panic alarm
.Arming and disarming the alarm sys-
tem. For detailed information, refer to
“Alarm system”F2-24.
The operable distance of the remote key-
less entry system is approximately 30 feet
(10 meters). However, this distance will
vary depending on environmental condi-tions. The system’s operable distance will
be shorter in areas near a facility or
electronic equipment emitting strong radio
waves such as a power plant, broadcast
station, TV tower, or remote controller of
home electronic appliances.
NOTE.For models with“keyless access
with push-button start system”,the
remote keyless entry system will not
be activated when the push-button
ignition switch is in any position other
than the“OFF”position.
.For models without“keyless access
with push-button start system”,the
remote keyless entry system will not
be activated when the key is inserted in
the ignition switch.
.The hazard warning flashers will
flash once or twice when the access
key fob/transmitter button is pressed in
the following cases.
–When locking the doors
–When unlocking the doors
–When unlocking the rear gate
Operation of the hazard warning
flashers in the above cases can be set
to“On”or“Off”by a SUBARU dealer.
Consult your SUBARU dealer for de-
tails.
&Locking the doorsPress the lock/arm button to lock all doors
and rear gate. An electronic chirp will
sound once and the hazard warning
flashers will flash once.
If any of the doors (or the rear gate) are not
fully closed, the following will occur to alert
you that the doors (or the rear gate) are not
properly closed.
.an electronic chirp sounds five times.
.the hazard warning flashers flash five
times.
When you close the door, it will automati-
cally lock and then the following will occur.
.an electronic chirp sounds once.
.the hazard warning flashers flash once.&Unlocking the doorsPress the unlock/disarm button to unlock
the driver’s door. An electronic chirp will
sound twice and the hazard warning
flashers will flash twice. To unlock all doors
and the rear gate, briefly press the unlock/
disarm button a second time within 5
seconds.NOTEIf the interval between the first and
second presses of the unlock/disarm
button (for unlocking of all of the doors
Keys and doors/Remote keyless entry system
2-18
Page 138 of 474
(143,1)
北米Model "A1320BE-C" EDITED: 2017/ 10/ 10
CAUTION
Do not turn the ignition switch to the
“START”position while the engine
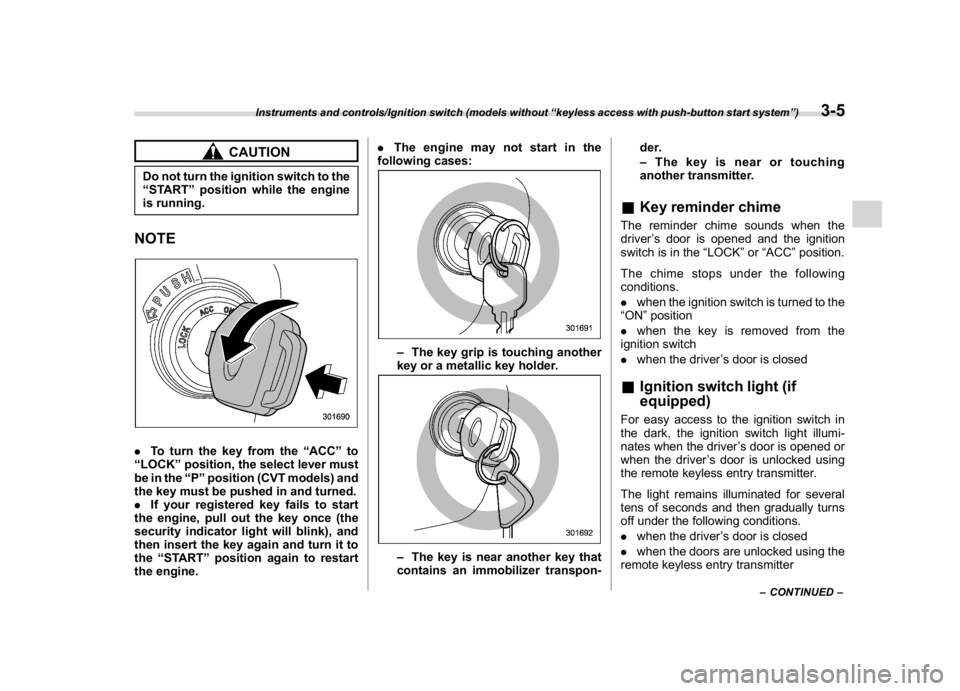
is running.NOTE.To turn the key from the“ACC”to
“LOCK”position, the select lever must
be in the“P”position (CVT models) and
the key must be pushed in and turned.
.If your registered key fails to start
the engine, pull out the key once (the
security indicator light will blink), and
then insert the key again and turn it to
the“START”position again to restart
the engine..The engine may not start in the
following cases:
–The key grip is touching another
key or a metallic key holder.–The key is near another key that
contains an immobilizer transpon-der.
–The key is near or touching
another transmitter.
&Key reminder chimeThe reminder chime sounds when the
driver’s door is opened and the ignition
switch is in the“LOCK”or“ACC”position.
The chime stops under the following
conditions.
.when the ignition switch is turned to the
“ON”position
.when the key is removed from the
ignition switch
.when the driver’s door is closed&Ignition switch light (if
equipped)For easy access to the ignition switch in
the dark, the ignition switch light illumi-
nates when the driver’s door is opened or
when the driver’s door is unlocked using
the remote keyless entry transmitter.
The light remains illuminated for several
tens of seconds and then gradually turns
off under the following conditions.
.when the driver’s door is closed
.when the doors are unlocked using the
remote keyless entry transmitter
–CONTINUED–
Instruments and controls/Ignition switch (models without“keyless access with push-button start system”)
3-5
3
Page 139 of 474
(144,1)
北米Model "A1320BE-C" EDITED: 2017/ 10/ 10
The light turns off immediately under the
following conditions.
.when the ignition switch is turned to the
“ON”position
.when all doors and the rear gate are
locked using the remote keyless entry
transmitter
Push-button ignition switch
(models with“keyless access
with push-button start sys-
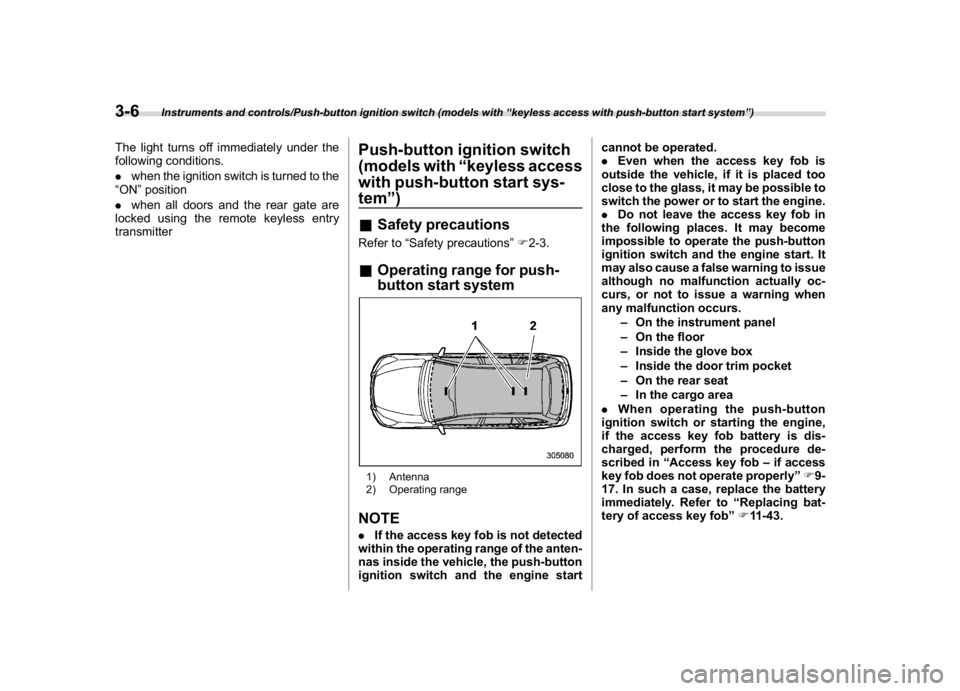
tem”)&Safety precautionsRefer to“Safety precautions”F2-3.&Operating range for push-
button start system1) Antenna
2) Operating rangeNOTE.If the access key fob is not detected
within the operating range of the anten-
nas inside the vehicle, the push-button
ignition switch and the engine startcannot be operated.
.Even when the access key fob is
outside the vehicle, if it is placed too
close to the glass, it may be possible to
switch the power or to start the engine.
.Do not leave the access key fob in
the following places. It may become
impossible to operate the push-button
ignition switch and the engine start. It
may also cause a false warning to issue
although no malfunction actually oc-
curs, or not to issue a warning when
any malfunction occurs.
–On the instrument panel
–On the floor
–Inside the glove box
–Inside the door trim pocket
–On the rear seat
–In the cargo area
.When operating the push-button
ignition switch or starting the engine,
if the access key fob battery is dis-
charged, perform the procedure de-
scribed in“Access key fob–if access
key fob does not operate properly”F9-
17. In such a case, replace the battery
immediately. Refer to“Replacing bat-
tery of access key fob”F11-43.
Instruments and controls/Push-button ignition switch (models with“keyless access with push-button start system”)
3-6
Page 167 of 474

(172,1)
北米Model "A1320BE-C" EDITED: 2017/ 10/ 10
&Basic operationControl switch
1)
(Up)
2)/SET (enter)
3)(Down)
By operating“
”or“
”of the control
switch, the screens and selection items
can be switched. When the“
/SET”
switch is pulled toward you, the item can
be selected and set.
If there are some useful messages, such
as vehicle information, warning informa-
tion, etc., they will interrupt the current
screen, and appear on the display accom-
panied by a beep. If such a screen is
displayed, take proper action according to
the message shown on the screen.
The warning screen will return to theoriginal screen after a few seconds. While
the“
”information reminder is shown on
the display, it may be possible to display
the warning screen again. To recall the
message marked with“
”on the display,
pull the“
/SET”switch on the steering
wheel toward you.
NOTEWhen the multi-function display (color
LCD) is set to the setting screen, the
combination meter display (color LCD)
cannot be controlled pressing on the
“
”,“
”and“
/SET”on the control
switch.
&Welcome screen and Good-
bye screenWhen the driver’s door is opened and
closed after unlocking the door, the wel-
come screen will appear on the combina-
tion meter display (color LCD) for approxi-
mately 20 seconds.
When the ignition switch is turned to the
“LOCK”/“OFF”position, the combination
meter display (color LCD) gradually turns
off (Good-bye screen).
NOTE.Once the welcome screen appears, it
takes a certain period of time to display
it again.
.If the ignition switch is operated
after unlocking the driver’s door, the
welcome screen will not appear even
when the driver’s door is opened and
closed.
.The welcome screen will disappear
when you lock the driver’s door by
using the remote keyless entry system
(all models) or the keyless access
function (if equipped) while the wel-
come screen is displayed.
.The welcome screen including the
multi-function display (color LCD) (if
equipped) and the audio/navigation
unit can be set to on or off. For details,
refer to“Welcome Screen”F3-41.
Instruments and controls/Combination meter display (color LCD)
3-34
Page 200 of 474
(205,1)
北米Model "A1320BE-C" EDITED: 2017/ 10/ 10
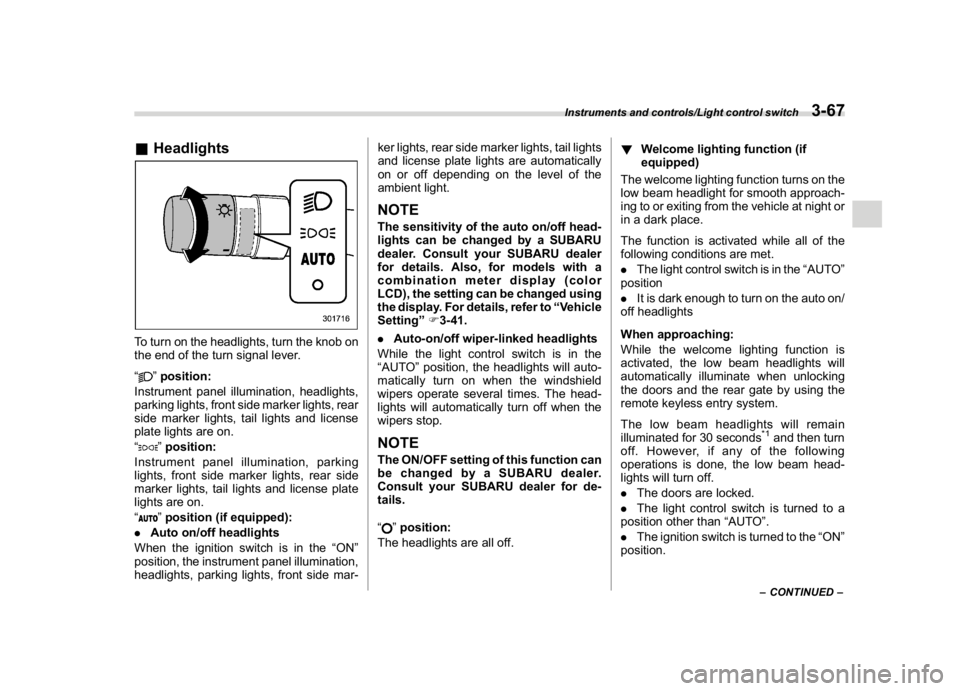
&HeadlightsTo turn on the headlights, turn the knob on
the end of the turn signal lever.
“
”position:
Instrument panel illumination, headlights,
parking lights, front side marker lights, rear
side marker lights, tail lights and license
plate lights are on.
“”position:
Instrument panel illumination, parking
lights, front side marker lights, rear side
marker lights, tail lights and license plate
lights are on.
“”position (if equipped):
.Auto on/off headlights
When the ignition switch is in the“ON”
position, the instrument panel illumination,
headlights, parking lights, front side mar-ker lights, rear side marker lights, tail lights
and license plate lights are automatically
on or off depending on the level of the
ambient light.
NOTEThe sensitivity of the auto on/off head-
lights can be changed by a SUBARU
dealer. Consult your SUBARU dealer
for details. Also, for models with a
combination meter display (color
LCD), the setting can be changed using
the display. For details, refer to“Vehicle
Setting”F3-41.
.Auto-on/off wiper-linked headlights
While the light control switch is in the
“AUTO”position, the headlights will auto-
matically turn on when the windshield
wipers operate several times. The head-
lights will automatically turn off when the
wipers stop.NOTEThe ON/OFF setting of this function can
be changed by a SUBARU dealer.
Consult your SUBARU dealer for de-
tails.
“
”position:
The headlights are all off.!Welcome lighting function (if
equipped)
The welcome lighting function turns on the
low beam headlight for smooth approach-
ing to or exiting from the vehicle at night or
in a dark place.
The function is activated while all of the
following conditions are met.
.The light control switch is in the“AUTO”
position
.It is dark enough to turn on the auto on/
off headlights
When approaching:
While the welcome lighting function is
activated, the low beam headlights will
automatically illuminate when unlocking
the doors and the rear gate by using the
remote keyless entry system.
The low beam headlights will remain
illuminated for 30 seconds
*1and then turn
off. However, if any of the following
operations is done, the low beam head-
lights will turn off.
.The doors are locked.
.The light control switch is turned to a
position other than“AUTO”.
.The ignition switch is turned to the“ON”
position.
–CONTINUED–
Instruments and controls/Light control switch
3-67
3
Page 215 of 474
(220,1)
北米Model "A1320BE-C" EDITED: 2017/ 10/ 10
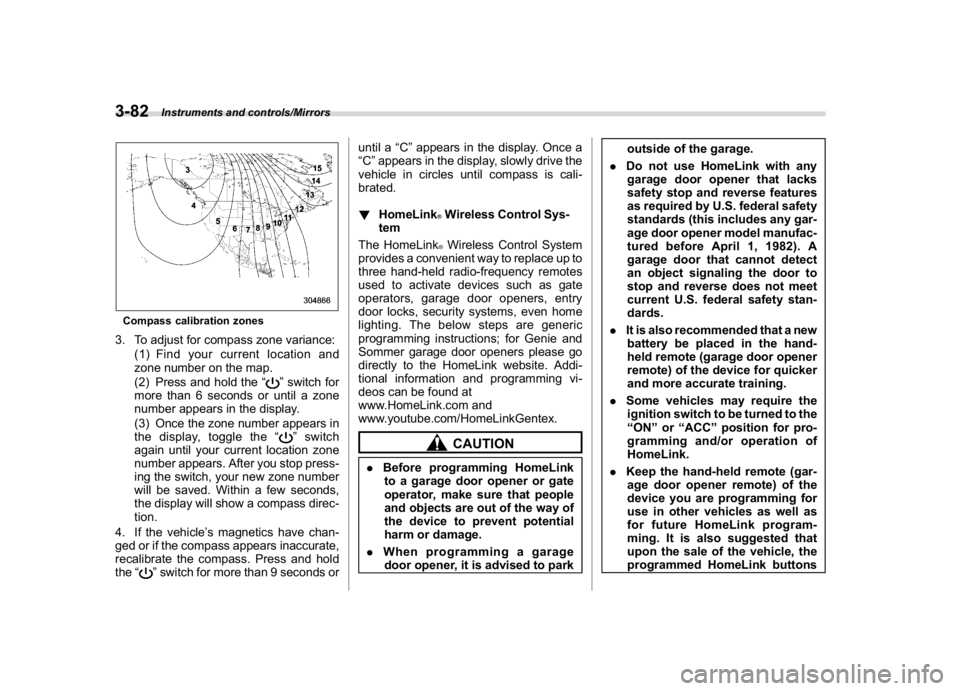
Compass calibration zones3. To adjust for compass zone variance:
(1) Find your current location and
zone number on the map.
(2) Press and hold the“
”switch for
more than 6 seconds or until a zone
number appears in the display.
(3) Once the zone number appears in
the display, toggle the“”switch
again until your current location zone
number appears. After you stop press-
ing the switch, your new zone number
will be saved. Within a few seconds,
the display will show a compass direc-
tion.
4. If the vehicle’s magnetics have chan-
ged or if the compass appears inaccurate,
recalibrate the compass. Press and hold
the“
”switch for more than 9 seconds oruntil a“C”appears in the display. Once a
“C”appears in the display, slowly drive the
vehicle in circles until compass is cali-
brated.
!HomeLink
®Wireless Control Sys-
tem
The HomeLink®Wireless Control System
provides a convenient way to replace up to
three hand-held radio-frequency remotes
used to activate devices such as gate
operators, garage door openers, entry
door locks, security systems, even home
lighting. The below steps are generic
programming instructions; for Genie and
Sommer garage door openers please go
directly to the HomeLink website. Addi-
tional information and programming vi-
deos can be found at
www.HomeLink.com and
www.youtube.com/HomeLinkGentex.CAUTION
.Before programming HomeLink
to a garage door opener or gate
operator, make sure that people
and objects are out of the way of
the device to prevent potential
harm or damage.
.When programming a garage
door opener, it is advised to parkoutside of the garage.
.Do not use HomeLink with any
garage door opener that lacks
safety stop and reverse features
as required by U.S. federal safety
standards (this includes any gar-
age door opener model manufac-
tured before April 1, 1982). A
garage door that cannot detect
an object signaling the door to
stop and reverse does not meet
current U.S. federal safety stan-
dards.
.It is also recommended that a new
battery be placed in the hand-
held remote (garage door opener
remote) of the device for quicker
and more accurate training.
.Some vehicles may require the
ignition switch to be turned to the
“ON”or“ACC”position for pro-
gramming and/or operation of
HomeLink.
.Keep the hand-held remote (gar-
age door opener remote) of the
device you are programming for
use in other vehicles as well as
for future HomeLink program-
ming. It is also suggested that
upon the sale of the vehicle, the
programmed HomeLink buttons
Instruments and controls/Mirrors
3-82
Page 216 of 474
(221,1)
北米Model "A1320BE-C" EDITED: 2017/ 10/ 10
be erased for security purposes.
Refer to“Erasing HomeLink But-
tons”F3-85.
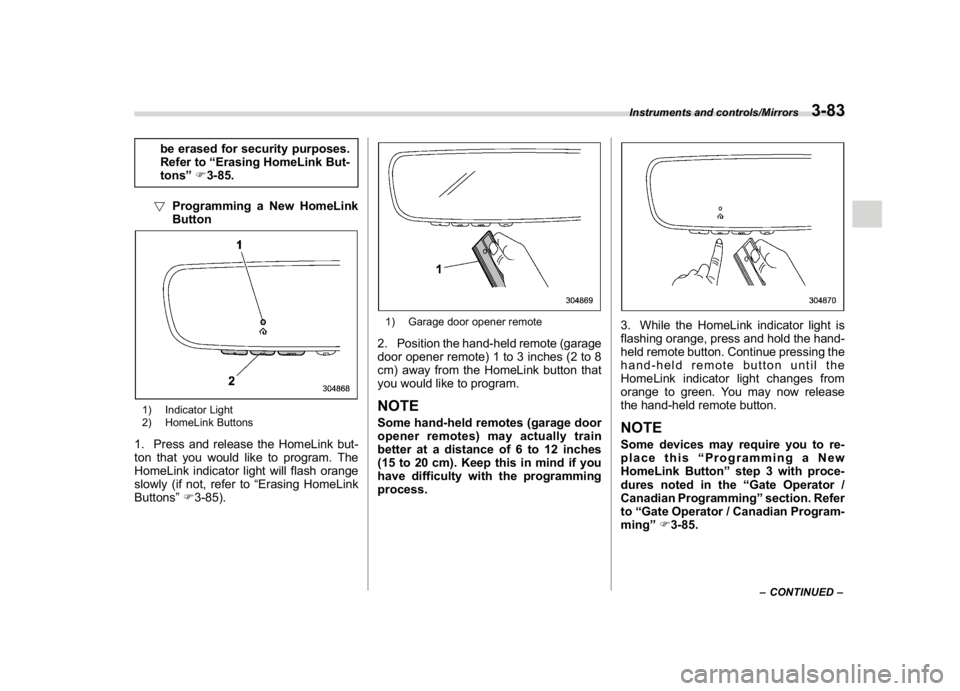
!Programming a New HomeLink
Button
1) Indicator Light
2) HomeLink Buttons1. Press and release the HomeLink but-
ton that you would like to program. The
HomeLink indicator light will flash orange
slowly (if not, refer to“Erasing HomeLink
Buttons”F3-85).
1) Garage door opener remote2. Position the hand-held remote (garage
door opener remote) 1 to 3 inches (2 to 8
cm) away from the HomeLink button that
you would like to program.NOTESome hand-held remotes (garage door
opener remotes) may actually train
better at a distance of 6 to 12 inches
(15 to 20 cm). Keep this in mind if you
have difficulty with the programming
process.
3. While the HomeLink indicator light is
flashing orange, press and hold the hand-
held remote button. Continue pressing the
hand-held remote button until the
HomeLink indicator light changes from
orange to green. You may now release
the hand-held remote button.NOTESome devices may require you to re-
place this“Programming a New
HomeLink Button”step 3 with proce-
dures noted in the“Gate Operator /
Canadian Programming”section. Refer
to“Gate Operator / Canadian Program-
ming”F3-85.
–CONTINUED–
Instruments and controls/Mirrors
3-83
3