2018 SUBARU CROSSTREK head
[x] Cancel search: headPage 286 of 474
(295,1)
北米Model "A1320BE-C" EDITED: 2017/ 10/ 10
!Shift lock release
If the select lever cannot be operated, turn
the ignition switch back to the“ON”
position then move the select lever to the
“P”position with the select lever button
pressed and brake pedal depressed.
If the select lever does not move after
performing the above procedure, perform
the following steps.
.When the select lever cannot be
shifted from“P”to“N”:
Refer to“Shift lock release using the shift
lock release button”F7-29.
.When the select lever cannot be
shifted from“N”to“R”,“P”:
Within 60 seconds after placing the ignition
switch in the“ACC”position, move the
select lever to the“P”position with the
select lever button pressed and brake
pedal depressed.
If you must perform the above procedure,
the shift lock system (or the vehicle control
system) may be malfunctioning. Contact a
SUBARU dealer for an inspection as soon
as possible.
If the select lever does not move after
performing the above procedure, refer to
“Shift lock release using the shift lock
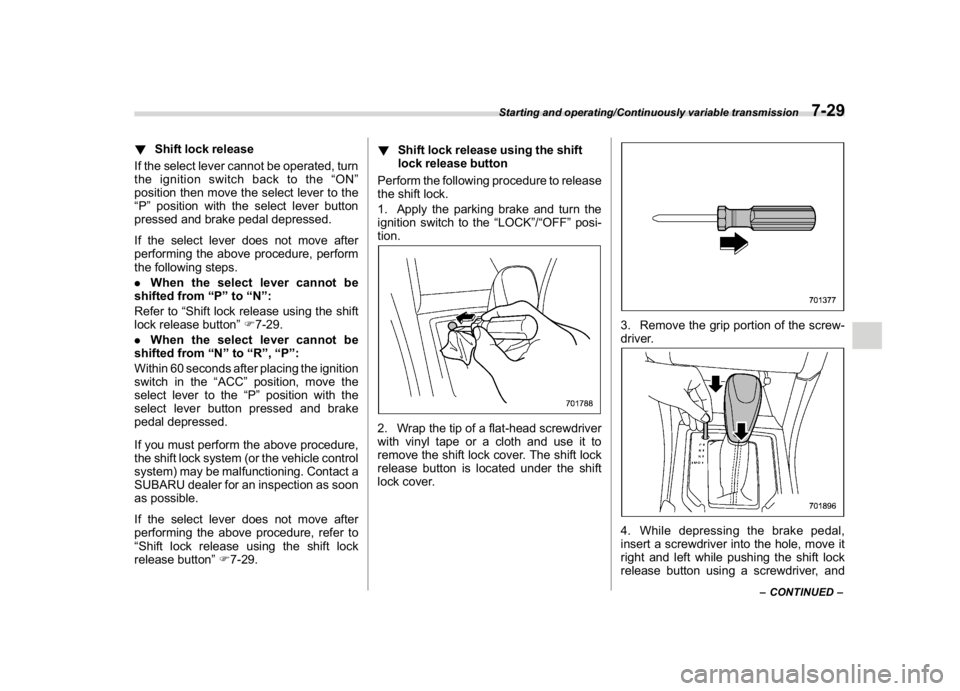
release button”F7-29.!Shift lock release using the shift
lock release button
Perform the following procedure to release
the shift lock.
1. Apply the parking brake and turn the
ignition switch to the“LOCK”/“OFF”posi-
tion.
2. Wrap the tip of a flat-head screwdriver
with vinyl tape or a cloth and use it to
remove the shift lock cover. The shift lock
release button is located under the shift
lock cover.
3. Remove the grip portion of the screw-
driver.4. While depressing the brake pedal,
insert a screwdriver into the hole, move it
right and left while pushing the shift lock
release button using a screwdriver, and
–CONTINUED–
Starting and operating/Continuously variable transmission
7-29
7
Page 288 of 474
(297,1)
北米Model "A1320BE-C" EDITED: 2017/ 10/ 10
wheel is not operated for a while and
the power steering control system has
an opportunity to cool down. However,
if the power steering is operated in a
non-standard way which causes power
assist limitation to occur too frequently,
this may result in a malfunction of the
power steering control system.
Braking&Braking tips
WARNING
Never rest your foot on the brake
pedal while driving. This can cause
dangerous overheating of the
brakes and needless wear on the
brake pads and linings.
!When the brakes get wet
When driving in rain or after washing the
vehicle, the brakes may get wet. As a
result, brake stopping distance will be
longer. To dry the brakes, drive the vehicle
at a safe speed while lightly depressing the
brake pedal to heat up the brakes.
!Use of engine braking
Remember to make use of engine braking
in addition to foot braking. When descend-
ing a grade, if only the foot brake is used,
the brakes may start working improperly
because of brake fluid overheating,
caused by overheated brake pads. To help
prevent this, shift into a lower gear to get
stronger engine braking.
!Braking when a tire is punctured
Do not depress the brake pedal suddenly
when a tire is punctured. This could causea loss of control of the vehicle. Keep
driving straight ahead while gradually
reducing speed. Then slowly pull off the
road to a safe location.
&Brake system!Two separate circuits
Your vehicle has two separate circuit brake
systems. Each circuit works diagonally
across the vehicle. If one circuit of the
brake system should fail, the other half of
the system still works. If one circuit fails,
the brake pedal will go down much closer
to the floor than usual and you will need to
press it down much harder. And a much
longer distance will be needed to stop the
vehicle.
!Brake booster
The brake booster uses engine manifold
vacuum to assist braking force. Do not turn
off the engine while driving because that
will turn off the brake booster, resulting in
poor braking power.
The brakes will continue to work even
when the brake booster completely stops
functioning. If this happens, you will have
to depress the pedal much harder than
during normal braking, and the braking
distance will increase.
–CONTINUED–
Starting and operating/Braking
7-31
7
Page 299 of 474

(308,1)
北米Model "A1320BE-C" EDITED: 2017/ 10/ 10
never brake suddenly. Instead,
perform the following procedure.
Otherwise, an accident involving
serious vehicle damage and ser-
ious personal injury could occur.
(1) Keep driving straight ahead
while gradually reducing
speed.
(2) Slowly pull off the road to a
safe location.
(3) Check the pressure for all four
tires and adjust the pressure
to the COLD tire pressure
shown on the tire placard.
The tire placard is located on
the door pillar on the driver’s
side.
Even when the vehicle is driven a
very short distance, the tires get
warm and their pressures in-
crease accordingly. Be sure to
let the tires cool thoroughly be-
fore adjusting their pressures to
the standard values shown on the
tire placard. Refer to“Tires and
wheels”F11-21. The tire pres-
sure monitoring system does not
function when the vehicle is sta-
tionary. After adjusting the tire
pressures, increase the vehicle
speed to at least 20 mph (32 km/h)to start the TPMS rechecking of
the tire inflation pressures. If the
tire pressures are now above the
severe low pressure threshold,
the low tire pressure warning
light should turn off a few min-
utes later.
If this light still illuminates while
driving after adjusting the tire
pressure, a tire may have signifi-
cant damage and a fast leak that
causes the tire to lose air rapidly.
If you have a flat tire, replace it
with a spare tire as soon as
possible.
.When a spare tire is mounted or a
wheel rim is replaced without the
original pressure sensor/trans-
mitter being transferred, the low
tire pressure warning light will
illuminate steadily after blinking
for approximately one minute.
This indicates the TPMS is unable
to monitor all four road wheels.
Contact your SUBARU dealer as
soon as possible for tire and
sensor replacement and/or sys-
tem resetting.
.When a tire is repaired with liquid
sealant, the tire pressure warning
valve and transmitter may not
operate properly. If a liquid sea-lant is used, contact your nearest
SUBARU dealer or other qualified
service shop as soon as possi-
ble. Make sure to replace the tire
pressure warning valve and
transmitter when replacing the
tire. You may reuse the wheel if
there is no damage to it and if the
sealant residue is properly
cleaned off. Do not inject any tire
liquid or aerosol tire sealant into
the tires, as this may cause a
malfunction of the tire pressure
sensors. If the light illuminates
steadily after blinking for ap-
proximately one minute,
promptly contact a SUBARU
dealer to have the system in-
spected.
CAUTION
Do not place metal film or any metal
parts in the cargo area. This may
cause poor reception of the signals
from the tire pressure sensors, and
the tire pressure monitoring system
will not function properly.
Starting and operating/Tire pressure monitoring system (TPMS) (U.S.-spec. models)
7-42
Page 301 of 474
(310,1)
北米Model "A1320BE-C" EDITED: 2017/ 10/ 10
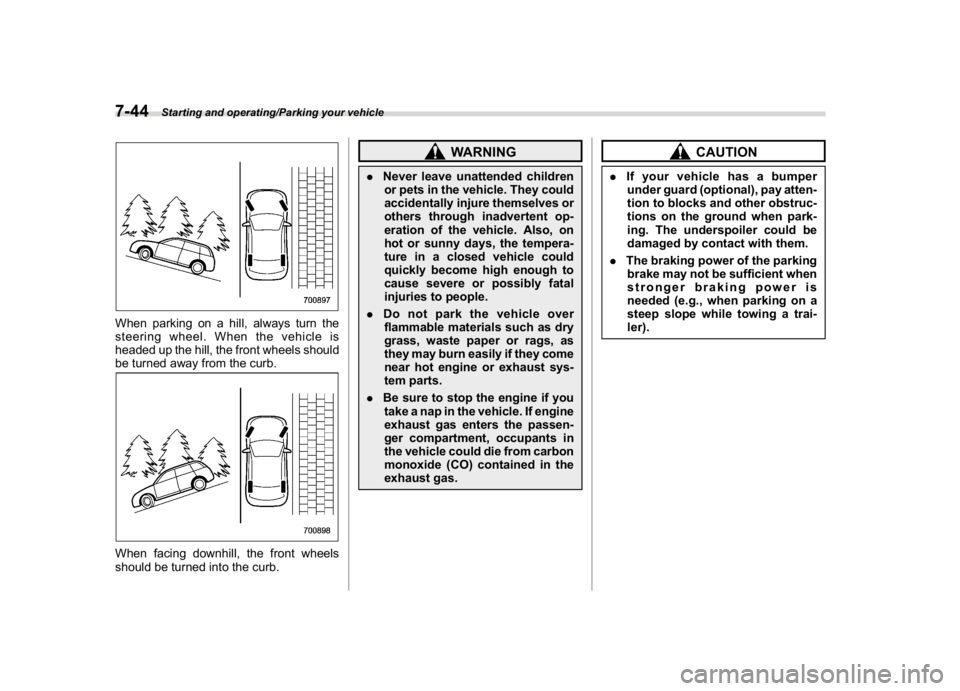
When parking on a hill, always turn the
steering wheel. When the vehicle is
headed up the hill, the front wheels should
be turned away from the curb.When facing downhill, the front wheels
should be turned into the curb.
WARNING
.Never leave unattended children
or pets in the vehicle. They could
accidentally injure themselves or
others through inadvertent op-
eration of the vehicle. Also, on
hot or sunny days, the tempera-
ture in a closed vehicle could
quickly become high enough to
cause severe or possibly fatal
injuries to people.
.Do not park the vehicle over
flammable materials such as dry
grass, waste paper or rags, as
they may burn easily if they come
near hot engine or exhaust sys-
tem parts.
.Be sure to stop the engine if you
take a nap in the vehicle. If engine
exhaust gas enters the passen-
ger compartment, occupants in
the vehicle could die from carbon
monoxide (CO) contained in the
exhaust gas.
CAUTION
.If your vehicle has a bumper
under guard (optional), pay atten-
tion to blocks and other obstruc-
tions on the ground when park-
ing. The underspoiler could be
damaged by contact with them.
.The braking power of the parking
brake may not be sufficient when
stronger braking power is
needed (e.g., when parking on a
steep slope while towing a trai-
ler).
Starting and operating/Parking your vehicle
7-44
Page 313 of 474

(322,1)
北米Model "A1320BE-C" EDITED: 2017/ 10/ 10
with a low body height such as
sports cars or a trailer with no
cargo)
–Vehicles that are not approaching
your vehicle even though they are in
the detection area (either on a
neighboring lane to the rear or be-
side your vehicle when reversing)
(The system determines the pre-
sence of approaching vehicles
based on data detected by the radar
sensors.)
–Vehicles traveling at significantly
different speeds
–Vehicles driving in parallel at al-
most the same speed as your vehi-
cle for a prolonged time
–Oncoming vehicles
–Vehicles in a lane beyond the
neighboring lane
–Vehicles travelling at a signifi-
cantly lower speed that you are
trying to overtake
.On a road with extremely narrow
lanes, the system may detect vehicles
driving in a lane next to the neighboring
lane.
.When the 8-inch audio/navigation
system is performing a software up-
date, the RCTA warning icons may not
be displayed on the audio/navigation
screen until the update is complete.
&BSD/RCTA approach indica-
tor light/warning buzzerWhen the BSD/RCTA is active, the BSD/
RCTA approach indicator light will operate
to alert the driver when there are vehicles
in the neighboring lanes. When reversing
the vehicle, the BSD/RCTA approach
indicator light and warning buzzer will
operate to alert the driver that a vehicle is
approaching from the left or right side.
!BSD/RCTA approach indicator lightBSD/RCTA approach indicator lightIt is mounted in each side of the outside
mirrors.
The indicator light will illuminate when a
vehicle approaching from behind is de-
tected.
The indicator light will flash to warn thedriver of dangers under the following
conditions.
.While the indicator light illuminates, if
you operate the turn signal lever toward
the side in which this light turned on.
.When reversing the vehicle while the
system detects a vehicle approaching
from either side.
!BSD/RCTA approach indicator
light dimming function
When the headlights are turned on, the
brightness of the BSD/RCTA approach
indicator light will be reduced.
NOTE.You may have difficulty recognizing
the BSD/RCTA approach indicator light
under the following conditions.
–When affected by direct sunlight
–When affected by the headlight
beams from the vehicles behind
.While the illumination brightness
control dial is in the fully upward
position, even if the headlights are
turned on, the brightness of the BSD/
RCTA approach indicator light will not
be reduced. For details about the
illumination brightness control dial,
refer to“Illumination brightness con-
trol”F3-12.
Starting and operating/BSD/RCTA
7-56
Page 336 of 474
(347,1)
北米Model "A1320BE-C" EDITED: 2017/ 10/ 10
icing may develop on the brake
system, which could cause poor
braking action. Check for snow or
ice buildup on the suspension,
disc brakes and brake hoses
underneath the vehicle. If there
is caked snow or ice, remove it,
being careful not to damage the
disc brakes and brake hoses and
ABS harness.
When parking for long periods in cold
weather, you should observe the following
tips.
1. For MT models, place the shift lever in
the“1”or“R”position. For CVT models,
place the select lever in the“P”position.
2. Use tire stops under the tires to prevent
the vehicle from moving.
!Refueling in cold weather
To help prevent moisture from forming in
the fuel system and the risk of its freezing,
use of an antifreeze additive in the fuel
tank is recommended during cold weather.
Use only additives that are specifically
designed for this purpose. When an anti-
freeze additive is used, its effect lasts
longer if the tank is refilled whenever the
fuel level reaches half empty.
If your SUBARU is not going to be used foran extended period, it is best to have the
fuel tank filled to capacity.
&Driving on snowy and icy
roadsTo prevent skidding and slipping, avoid
sudden braking, abrupt acceleration, high-
speed driving, and sharp turning when
driving on snowy or icy roads.
Always maintain ample distance between
your vehicle and the vehicle ahead of you
to avoid the need for sudden braking.
To supplement the foot brake, use the
engine brake effectively to control the
vehicle speed. (Shift into a lower gear
when necessary.)
Avoid shifting down abruptly. Such beha-
vior can cause the wheels to lock, possibly
leading to loss of vehicle control.
An anti-lock brake system (ABS) en-
hances your vehicle’s braking perfor-
mance on snowy and icy roads. For
information on braking on slippery sur-
faces, refer to“ABS (Anti-lock Brake
System)”F7-33 and“Vehicle Dynamics
Control system”F7-35.
WARNING
For models with cruise control:
Do not use the cruise control on
slippery roads such as snowy or icyroads. This may cause loss of vehi-
cle control.
CAUTION
Avoid prolonged continuous driving
in snowstorms. Snow will enter the
engine’s intake system and may
hinder the airflow, which could re-
sult in engine shutdown or even
breakdown.
!Wiper operation when snowing
Before driving in cold weather, make sure
the wiper blade rubbers are not frozen to
the windshield or rear window.
If the wiper blade rubbers are frozen to the
windshield or rear window, perform the
following procedure.
.To thaw the windshield wiper blade
rubbers, use the defroster with the airflow
selection in“
”and the temperature set
for maximum warmth until the wiper blade
rubbers are completely thawed. Refer to
“Climate control”F4-1.
.If your vehicle is equipped with a wiper
deicer, use it. It is helpful to thaw the
windshield wiper blade rubbers. Refer to
“Defogger and deicer”F3-89.
.To thaw the rear wiper blade rubbers,
–CONTINUED–
Driving tips/Winter driving
8-9
8
Page 358 of 474

(369,1)
北米Model "A1320BE-C" EDITED: 2017/ 10/ 10
Jack-up points6. Place the jack under the side sill at the
front or rear jack-up point closest to the tire
that you are going to replace.Turn the jackscrew by hand until the jack
head engages firmly into the jack-up point.
7. Insert the jack handle into the jack-
screw, and turn the handle until the tire
clears the ground. Do not raise the vehicle
higher than necessary.
Flat tiresIf you have a flat tire while driving, never
brake suddenly; keep driving straight
ahead while gradually reducing speed.
Then slowly pull off the road to a safe
place.&Changing a flat tire
WARNING
.Do not jack up the vehicle on an
incline or a loose road surface.
The jack can come out of the
jacking point or sink into the
ground and this can result in a
severe accident.
.Use only the jack provided with
your vehicle. The jack supplied
with the vehicle is designed only
for changing a tire. Never get
under the vehicle while support-
ing the vehicle with this jack.
.Always turn off the engine before
raising the flat tire off the ground
using the jack. Never swing or
push the vehicle supported with
the jack. The jack can come out of
the jacking point due to a jolt and
this can result in a severe acci-
–CONTINUED–
In case of emergency/Flat tires
9-5
9
Page 360 of 474
(371,1)
北米Model "A1320BE-C" EDITED: 2017/ 10/ 10
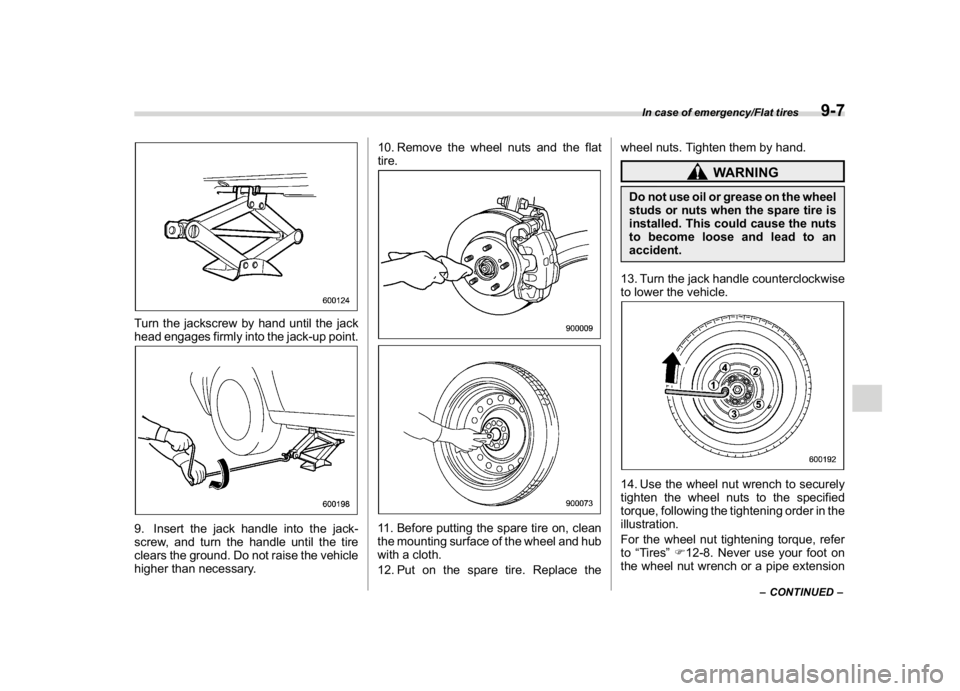
Turn the jackscrew by hand until the jack
head engages firmly into the jack-up point.9. Insert the jack handle into the jack-
screw, and turn the handle until the tire
clears the ground. Do not raise the vehicle
higher than necessary.10. Remove the wheel nuts and the flat
tire.
11. Before putting the spare tire on, clean
the mounting surface of the wheel and hub
with a cloth.
12. Put on the spare tire. Replace thewheel nuts. Tighten them by hand.
WARNING
Do not use oil or grease on the wheel
studs or nuts when the spare tire is
installed. This could cause the nuts
to become loose and lead to an
accident.
13. Turn the jack handle counterclockwise
to lower the vehicle.14. Use the wheel nut wrench to securely
tighten the wheel nuts to the specified
torque, following the tightening order in the
illustration.
For the wheel nut tightening torque, refer
to“Tires”F12-8. Never use your foot on
the wheel nut wrench or a pipe extension
–CONTINUED–
In case of emergency/Flat tires
9-7
9