2018 SUBARU CROSSTREK ignition
[x] Cancel search: ignitionPage 245 of 474
(252,1)
北米Model "A1320BE-C" EDITED: 2017/ 10/ 10
Interior lights
CAUTION
When leaving your vehicle, make
sure the lights are turned off to
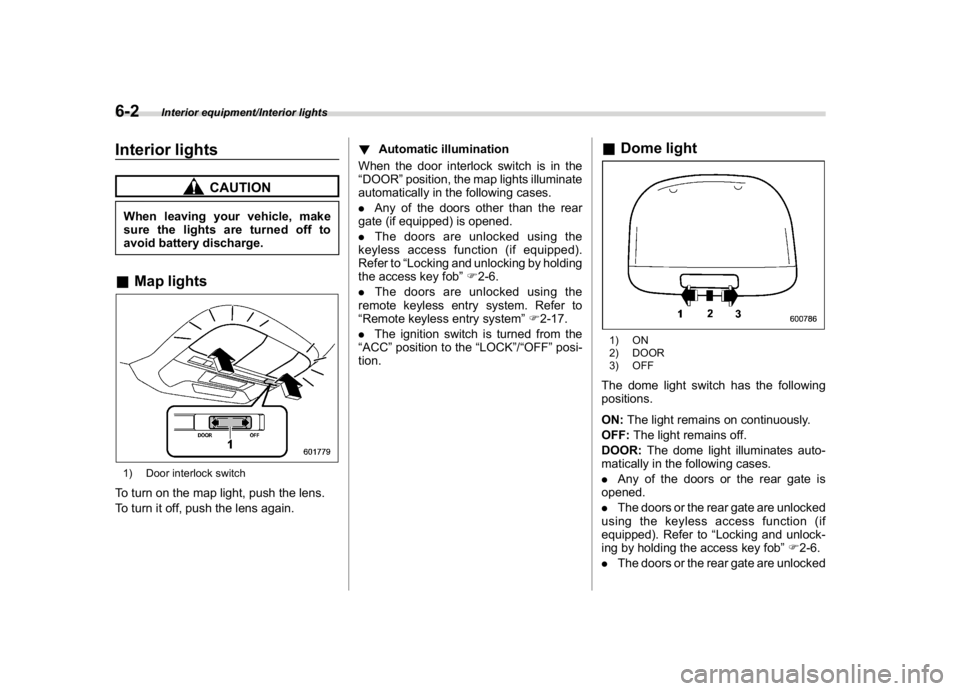
avoid battery discharge.&Map lights1) Door interlock switchTo turn on the map light, push the lens.
To turn it off, push the lens again.!Automatic illumination
When the door interlock switch is in the
“DOOR”position, the map lights illuminate
automatically in the following cases.
.Any of the doors other than the rear
gate (if equipped) is opened.
.The doors are unlocked using the
keyless access function (if equipped).
Refer to“Locking and unlocking by holding
the access key fob”F2-6.
.The doors are unlocked using the
remote keyless entry system. Refer to
“Remote keyless entry system”F2-17.
.The ignition switch is turned from the
“ACC”position to the“LOCK”/“OFF”posi-
tion.
&Dome light1) ON
2) DOOR
3) OFFThe dome light switch has the following
positions.
ON:The light remains on continuously.
OFF:The light remains off.
DOOR:The dome light illuminates auto-
matically in the following cases.
.Any of the doors or the rear gate is
opened.
.The doors or the rear gate are unlocked
using the keyless access function (if
equipped). Refer to“Locking and unlock-
ing by holding the access key fob”F2-6.
.The doors or the rear gate are unlocked
Interior equipment/Interior lights
6-2
Page 246 of 474
(253,1)
北米Model "A1320BE-C" EDITED: 2017/ 10/ 10
using the remote keyless entry transmitter.
Refer to“Remote keyless entry system”
F2-17.
.The ignition switch is turned from the
“ACC”position to the“LOCK”/“OFF”posi-
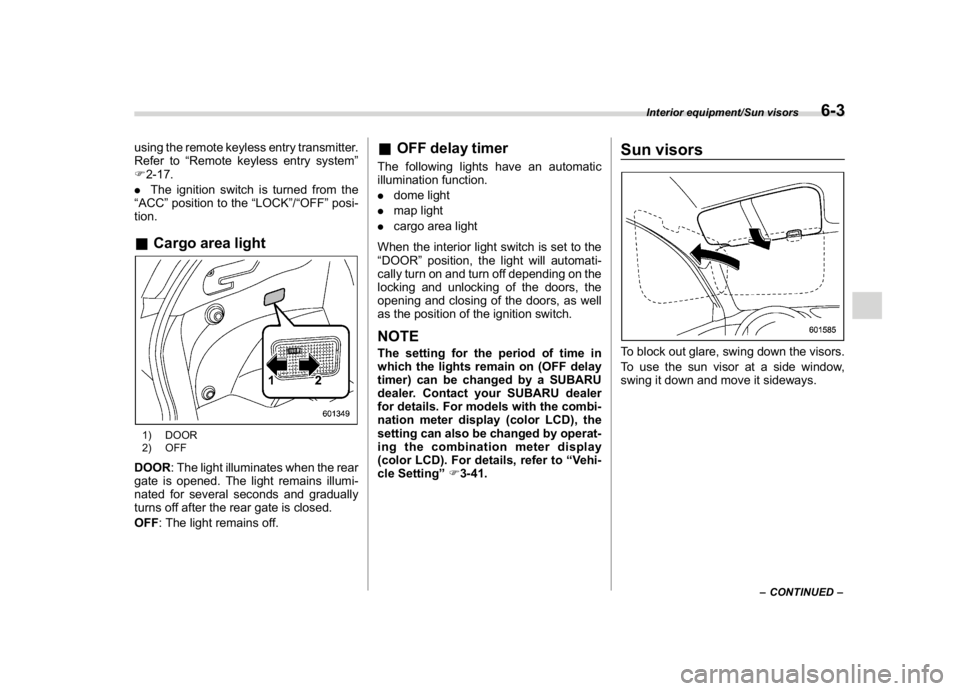
tion.&Cargo area light1) DOOR
2) OFFDOOR: The light illuminates when the rear
gate is opened. The light remains illumi-
nated for several seconds and gradually
turns off after the rear gate is closed.
OFF: The light remains off.
&OFF delay timerThe following lights have an automatic
illumination function.
.dome light
.map light
.cargo area light
When the interior light switch is set to the
“DOOR”position, the light will automati-
cally turn on and turn off depending on the
locking and unlocking of the doors, the
opening and closing of the doors, as well
as the position of the ignition switch.NOTEThe setting for the period of time in
which the lights remain on (OFF delay
timer) can be changed by a SUBARU
dealer. Contact your SUBARU dealer
for details. For models with the combi-
nation meter display (color LCD), the
setting can also be changed by operat-
ing the combination meter display
(color LCD). For details, refer to“Vehi-
cle Setting”F3-41.
Sun visorsTo block out glare, swing down the visors.
To use the sun visor at a side window,
swing it down and move it sideways.
–CONTINUED–
Interior equipment/Sun visors
6-3
6
Page 250 of 474
(257,1)
北米Model "A1320BE-C" EDITED: 2017/ 10/ 10
The bottle holder equipped on each door
trim can be used to hold beverage bottles
and other items.
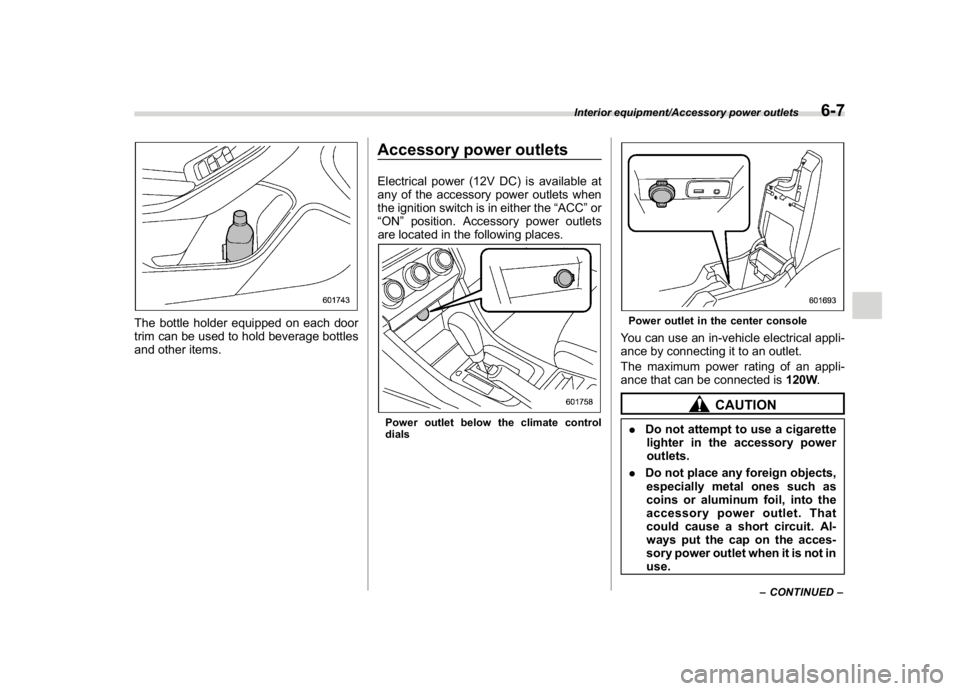
Accessory power outletsElectrical power (12V DC) is available at
any of the accessory power outlets when
the ignition switch is in either the“ACC”or
“ON”position. Accessory power outlets
are located in the following places.Power outlet below the climate control
dials
Power outlet in the center consoleYou can use an in-vehicle electrical appli-
ance by connecting it to an outlet.
The maximum power rating of an appli-
ance that can be connected is120W.
CAUTION
.Do not attempt to use a cigarette
lighter in the accessory power
outlets.
.Do not place any foreign objects,
especially metal ones such as
coins or aluminum foil, into the
accessory power outlet. That
could cause a short circuit. Al-
ways put the cap on the acces-
sory power outlet when it is not in
use.
–CONTINUED–
Interior equipment/Accessory power outlets
6-7
6
Page 251 of 474
(258,1)
北米Model "A1320BE-C" EDITED: 2017/ 10/ 10
.Use only electrical appliances
which are designed for 12V DC.
The maximum power rating of an
appliance that can be connected
is 120W. Do not use an appliance
which exceeds the indicated wat-
tage for each outlet.
.When using appliances con-
nected to two outlets simulta-
neously, the total power con-
sumed by them must not exceed
120W. Overloading the accessory
power outlet can cause a short
circuit. Do not use double adap-
ters or more than one electrical
appliance.
.If the plug on your electric appli-
ance is either too loose or too
tight for the accessory power
outlet, this can result in a poor
contact or cause the plug to get
stuck. Only use plugs that fit
properly.
.Use of an electric appliance in the
accessory power outlet for a long
period of time while the engine is
not running can cause battery
discharge.
.Before driving your vehicle, make
sure that the plug and the cord on
your electrical appliance will notinterfere with your shifting gears
and operating the accelerator
and brake pedals. If they do, do
not use the electrical appliance
while driving.
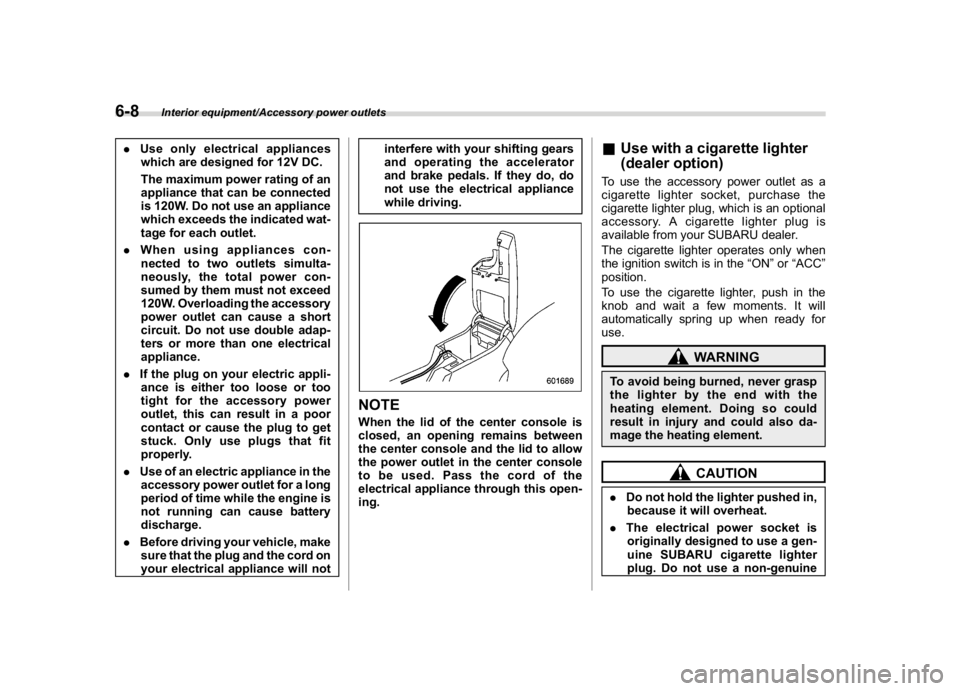
NOTEWhen the lid of the center console is
closed, an opening remains between
the center console and the lid to allow
the power outlet in the center console
to be used. Pass the cord of the
electrical appliance through this open-
ing.
&Use with a cigarette lighter
(dealer option)To use the accessory power outlet as a
cigarette lighter socket, purchase the
cigarette lighter plug, which is an optional
accessory. A cigarette lighter plug is
available from your SUBARU dealer.
The cigarette lighter operates only when
the ignition switch is in the“ON”or“ACC”
position.
To use the cigarette lighter, push in the
knob and wait a few moments. It will
automatically spring up when ready for
use.
WARNING
To avoid being burned, never grasp
the lighter by the end with the
heating element. Doing so could
result in injury and could also da-
mage the heating element.
CAUTION
.Do not hold the lighter pushed in,
because it will overheat.
.The electrical power socket is
originally designed to use a gen-
uine SUBARU cigarette lighter
plug. Do not use a non-genuine
Interior equipment/Accessory power outlets
6-8
Page 262 of 474
(271,1)
北米Model "A1320BE-C" EDITED: 2017/ 10/ 10
!Refueling
Only one person should be involved in
refueling. Do not allow others to approach
the area of the vehicle near the fuel filler
pipe while refueling is in progress.
Be sure to observe any other precautions
that are posted at the service station.
1. Stop the vehicle and turn the ignition
switch to the“LOCK”/“OFF”position and
turn off all the other electrical components.
2. To open the fuel filler lid, pull the lid
release lever up. The lever is on the floor at
the left of the driver’s seat.
WARNING
Before opening the fuel filler cap,
first touch the vehicle body or a
metal portion of the fuel pump or
similar object to discharge any sta-
tic electricity that may be present on
your body. If your body is carrying
an electrostatic charge, there is a
possibility that an electric spark
could ignite the fuel, which could
burn you. To avoid acquiring a new
static electric charge, do not get
back into the vehicle while refueling
is in progress.
1) Open
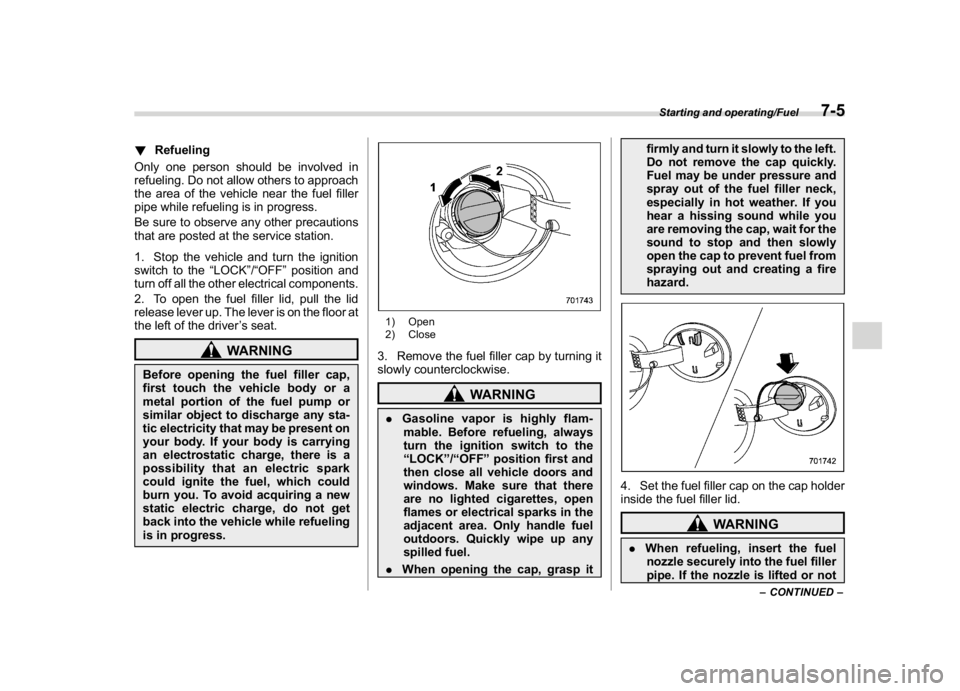
2) Close3. Remove the fuel filler cap by turning it
slowly counterclockwise.
WARNING
.Gasoline vapor is highly flam-
mable. Before refueling, always
turn the ignition switch to the
“LOCK”/“OFF”position first and
then close all vehicle doors and
windows. Make sure that there
are no lighted cigarettes, open
flames or electrical sparks in the
adjacent area. Only handle fuel
outdoors. Quickly wipe up any
spilled fuel.
.When opening the cap, grasp itfirmly and turn it slowly to the left.
Do not remove the cap quickly.
Fuel may be under pressure and
spray out of the fuel filler neck,
especially in hot weather. If you
hear a hissing sound while you
are removing the cap, wait for the
sound to stop and then slowly
open the cap to prevent fuel from
spraying out and creating a fire
hazard.
4. Set the fuel filler cap on the cap holder
inside the fuel filler lid.
WARNING
.When refueling, insert the fuel
nozzle securely into the fuel filler
pipe. If the nozzle is lifted or not
–CONTINUED–
Starting and operating/Fuel
7-5
7
Page 265 of 474
(274,1)
北米Model "A1320BE-C" EDITED: 2017/ 10/ 10
on a dynamometer, tell your emission
inspector not to place your SUBARU
AWD vehicle on a two-wheel dynam-
ometer.Otherwise, serious transmis-
sion damage will result.
The U.S. Environmental Protection
Agency (EPA) and states using two-wheel
dynamometers in their emission testing
program have EXEMPTED SUBARU
AWD vehicles from the portion of the
testing program that involves a two-wheel
dynamometer. There are some states that
use four-wheel dynamometers in their
testing program. When properly used, this
equipment should not damage a SUBARU
AWD vehicle.
Under no circumstances should the rear
wheels be jacked off the ground, nor
should the driveshaft be disconnected in
an attempt to bypass AWD for state
emission testing. An AWD vehicle must
be tested using an AWD dynamometer
with all 4 wheels driven and loaded.
Preparing to driveYou should perform the following checks
and adjustments every day before you
start driving.
1. Check that all windows, mirrors, and
lights are clean and unobstructed.
2. Check the appearance and condition
of the tires. Also check tires for proper
inflation.
3. Look under the vehicle for any sign of
leaks.
4. Check that no small animals enter the
engine compartment.
5. Check that the hood and rear gate are
fully closed.
6. Check the adjustment of the seat.
7. Check the adjustment of the inside and
outside mirrors.
8. Fasten your seatbelt. Check that your
passengers have fastened their seatbelts.
9. Check the operation of the warning
and indicator lights when the ignition
switch is turned to the“ON”position.
10. Check the gauges, indicator and warn-
ing lights after starting the engine.
CAUTION
Trapping small animals in the cool-
ing fan and belts of the engine may
result in a malfunction. Check that
no small animal enters the engine
compartment and under the vehicle
before starting the engine.NOTE.Engine oil, engine coolant, brake
fluid, washer fluid and other fluid levels
should be checked daily, weekly or at
fuel stops.
.When towing a trailer, refer to“Trai-
ler hitch (dealer option)”F8-14
Starting and operating/Preparing to drive
7-8
Page 266 of 474
(275,1)
北米Model "A1320BE-C" EDITED: 2017/ 10/ 10
Starting and stopping the en-
gine (models without push-
button start system)
CAUTION
Do not operate the starter motor
continuously for more than 10 sec-
onds. If the engine fails to start after
operating the starter for 5 to 10
seconds, wait for 10 seconds or
more before trying again.NOTEIt may be difficult to start the engine
when the battery has been discon-
nected and reconnected (for mainte-
nance or other purposes). This diffi-
culty is caused by the electronically
controlled throttle’s self-diagnosis
function. To overcome it, keep the
ignition switch in the“ON”position
for approximately 10 seconds before
starting the engine.
&Starting engine!General precautions when starting
engine
WARNING
.Never start the engine from out-
side the vehicle (except when
using the remote engine start
system). It may result in an acci-
dent.
.Do not leave the engine running
in locations with poor ventilation,
such as a garage and indoors.
The exhaust gas may enter the
vehicle or indoors, and it may
result in carbon monoxide poi-
soning.
.Do not start the engine near dry
foliage, paper, or other flammable
substances. The exhaust pipe
and exhaust emissions can cre-
ate a fire hazard at high tempera-
tures.
CAUTION
.If the engine is stopped during
driving, the catalyst may over-
heat and burn..When starting the engine, be sure
to sit in the driver’s seat (except
when using the remote engine
start system).
NOTE.Avoid rapid racing and rapid accel-
eration immediately after the engine
has started.
.For a short time after the engine has
started, the engine speed is kept high.
When the warm-up is completed, the
engine speed lowers automatically.
.On rare occasions, it may be difficult
to start the engine depending on the
fuel and the usage condition (repeated
driving of a distance in which the
engine has not warmed up sufficiently).
In such a case, it is recommended that
you change to a different brand of fuel.
.On rare occasions, transient knock-
ing may be heard from the engine when
the accelerator is operated rapidly such
as a rapid start-up and a rapid accel-
eration. This is not a malfunction.
.The engine starts more easily when
the headlights, air conditioner and rear
window defogger are turned off.
.Do not shift the select lever (CVT
models) or shift lever (MT models)
while the starter is cranking.
–CONTINUED–
Starting and operating/Starting and stopping the engine (models without push-button start system)
7-9
7
Page 267 of 474
(276,1)
北米Model "A1320BE-C" EDITED: 2017/ 10/ 10
!MT models
1. Apply the parking brake.
2. Turn off unnecessary lights and acces-
sories.
3. Depress the clutch pedal to the floor
and shift the shift lever into neutral. Hold
the clutch pedal to the floor while starting
the engine.
The starter motor will only operate when
the clutch pedal is depressed fully to the
floor.
4. Turn the ignition switch to the“ON”
position and check the operation of the
warning and indicator lights. Refer to
“Warning and indicator”F3-12.
5. Turn the ignition switch to the“START”
positionwithoutdepressing the accelera-
tor pedal. Release the key immediately
after the engine has started.
If the engine does not start, try the
following procedure.
(1) Turn the ignition switch to the
“LOCK”/“OFF”position and wait for at
least 10 seconds. After checking that
the parking brake is firmly set, turn the
ignition switch to the“START”position
while depressing the accelerator pedal
slightly (approximately a quarter of the
full stroke). Release the accelerator
pedal as soon as the engine starts.
(2) If this fails to start the engine, turnthe ignition switch back to the“LOCK”/
“OFF”position and wait for at least 10
seconds. Then fully depress the accel-
erator pedal and turn the ignition
switch to the“START”position. If the
engine starts, quickly release the ac-
celerator pedal.
(3) If this fails to start the engine, turn
the ignition switch again to the“LOCK”/
“OFF”position. After waiting for 10
seconds or longer, turn the ignition
switch to the“START”position without
depressing the accelerator pedal.
(4) If the engine still fails to start,
contact your nearest SUBARU dealer
for assistance.
6. Confirm that all warning and indicator
lights have turned off after the engine has
started. The fuel injection system auto-
matically lowers the idle speed as the
engine warms up.
!CVT models
1. Apply the parking brake.
2. Turn off unnecessary lights and acces-
sories.
3. Shift the select lever to the“P”or“N”
position (preferably the“P”position).
The starter motor will only operate when
the select lever is at the“
P”or“N”position.
4. Turn the ignition switch to the“ON”position and check the operation of the
warning and indicator lights. Refer to
“Warning and indicator”F3-12.
5. Turn the ignition switch to the“START”
positionwithoutdepressing the accelera-
tor pedal. Release the key immediately
after the engine has started.
If the engine does not start, try the
following procedure.
(1) Turn the ignition switch to the
“LOCK”/“OFF”position and wait for at
least 10 seconds. After checking that
the parking brake is firmly set, turn the
ignition switch to the“START”position
while depressing the accelerator pedal
slightly (approximately a quarter of the
full stroke). Release the accelerator
pedal as soon as the engine starts.
(2) If this fails to start the engine, turn
the ignition switch back to the“LOCK”/
“OFF”position and wait for at least 10
seconds. Then fully depress the accel-
erator pedal and turn the ignition
switch to the“START”position. If the
engine starts, quickly release the ac-
celerator pedal.
(3) If this fails to start the engine, turn
the ignition switch again to the“LOCK”/
“OFF”position. After waiting for 10
seconds or longer, turn the ignition
switch to the“START”position without
depressing the accelerator pedal.
Starting and operating/Starting and stopping the engine (models without push-button start system)
7-10