Page 65 of 230
1.59
CHILD SAFETY: deactivating, activating the front passenger airbag (2/3)
3
The marking on the dashboard and
label A on each side of the passenger
sun visor 3 (example of label shown
above) remind you of these instruc-
tions.
A
A
DANGER
Since operation of the front
passenger airbag is not
compatible with the po-
sition of a rear-facing child seat,
NEVER fit a rear-facing child re-
straint system in a seat protected
by an ACTIVATED front AIRBAG .
This can lead to the DEATH of the
CHILD or SERIOUS INJURY.
Page 66 of 230

1.60
The passenger airbag must
only be deactivated or acti-
vated when the vehicle is
stationary.
If it is interfered with when the ve-
hicle is being driven, indicator lights
å and © will come on.
Switch the ignition off then on again
to reset the airbag in accordance
with the lock position.
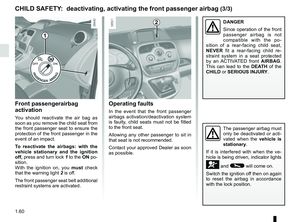
Operating faults
In the event that the front passenger
airbags activation/deactivation system
is faulty, child seats must not be fitted
to the front seat.
Allowing any other passenger to sit in
that seat is not recommended.
Contact your approved Dealer as soon
as possible.
Front passengerairbag
activation
You should reactivate the air bag as
soon as you remove the child seat from
the front passenger seat to ensure the
protection of the front passenger in the
event of an impact.
To reactivate the airbags: with the
vehicle stationary and the ignition
off, press and turn lock 1 to the ON po-
sition.
With the ignition on, you must check
that the warning light 2 is off.
The front passenger seat belt additional
restraint systems are activated.
2
CHILD SAFETY: deactivating, activating the front passenger airbag (3/3)
1
DANGER
Since operation of the front
passenger airbag is not
compatible with the po-
sition of a rear-facing child seat,
NEVER fit a rear-facing child re-
straint system in a seat protected
by an ACTIVATED front AIRBAG. This can lead to the DEATH of the
CHILD or SERIOUS INJURY.
Page 67 of 230

1.61
STEERING WHEEL/POWER-ASSISTED STEERING
Steering wheel height
adjustment
Pull lever 1 and move the steering
wheel to the required position; push
lever to lock the steering wheel.
Make sure that the steering wheel is
correctly locked.
For safety reasons, only
adjust the steering wheel
when the vehicle is station-
ary.
1
Never switch off the igni-
tion when travelling down-
hill, and avoid doing so in
normal driving (assistance
is not provided).
Power-assisted steering
The variable power-assisted steering
system is equipped with an electronic
control system which alters the level of
assistance to suit the vehicle speed.
Steering is made easier during parking
manoeuvres (for added comfort) while
the force needed to steer increases
progressively as the speed rises (for
enhanced safety at high speeds).
Never leave the steering wheel on
full lock when the vehicle is station-
ary.
With the engine switched off, or if
there is a system fault, it is still pos-
sible to turn the steering wheel. The
force required will be greater.
A noise may be heard when the
steering wheel is moved quickly.
This is normal.
Page 68 of 230
1.62
DRIVING POSITION, LEFT-HAND DRIVE (1/2)
4613
21
20
312
16
111
1724
2781095
231526222514
18
19
Page 69 of 230

1.63
21 Gear lever.
22 Remote control/location for radio,
navigation system.
23 Cruise control/speed limiter con-
trols.
24 Bonnet release control.
25 Controls for:
– Vertical headlight adjustment;
– Parking distance control.
26 Controls for:
– Cruise control/speed limiter;
– Activating/deactivating the pe-destrian horn;
– additional heating.
1 Stalk for:
– direction indicator lights;
– exterior lights;
– front fog lights;
– rear fog lights.
2 – Horn,
– location for driver’s air bag.
3 Instrument panel.
4 Stalk for:
– windscreen wipers;
– windscreen washer;
– trip computer and warning system.
5 Ignition switch.
6 Multimedia display or touchscreen:
– seat belt reminder warning light;
– airbag deactivation warning light;
– navigation;
– clock;
– exterior temperature.
7 Centre air vent.
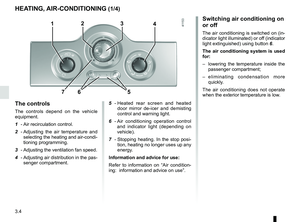
8 Controls for ventilation, heating
and de-icing. 9 Windscreen demister outlet.
10 Location for passenger air bag.
11 Speaker.
12 Side air vent.
13 Side window demister outlet.
14 Glove box.
15 Storage space or accessories
socket.
16 Hazard warning lights switch.
17 Central door locking/unlocking
switch.
18 ECO mode switch.
19 Cigarette lighter or accessories
socket.
20 Handbrake.
DRIVING POSITION, LEFT-HAND DRIVER (2/2)
The equipment fitted, described below, DEPENDS ON THE VERSION AND COUNTRY.
Page 70 of 230
1.64
DRIVING POSITION: RIGHT-HAND DRIVE (1/2)
46
23
312
1520
111
1821
2
25
78109
261416
5
1719272829
2224
13
Page 71 of 230

1.65
DRIVING POSITION: RIGHT-HAND DRIVE (2/2)
20 Location for radio, navigation
system.
21 Gearstick
22 Handbrake.
23 ECO mode switch.
24 Cigarette lighter or accessories
socket.
25 Door electric locking/unlocking
switch.
26 Hazard warning lights switch.
27 Storage space or accessories
socket.
28 Glovebox.
29 Bonnet release control.
10 – Horn.
– Location for driver’s air bag.
11 Instrument panel.
12 Stalk for:
– windscreen wipers;
– windscreen washer;
– trip computer and warning system.
13 Ignition switch.
14 Cruise control/speed limiter main
control.
15 Additional heating switch.
16 Activation/deactivation control for
the horn.
17 Parking distance control switch.
18 Headlight adjustment control.
19 Cruise control/speed limiter con-
trols.
1 Side window demister outlet.
2 Side air vent.
3 Speaker.
4 Location for passenger air bag.
5 Windscreen demister outlet.
6 Controls for ventilation, heating
and de-icing.
7 Centre air vent.
8 Multimedia display or touchscreen:
– seat belt reminder warning light;
– airbag deactivation warning light;
– navigation;
– clock;
– exterior temperature.
9 Stalk for:
– direction indicator lights,
– exterior lights;
– front fog lights;
–
rear fog lights.
The equipment fitted, described below, DEPENDS ON THE VERSION AND COUNTRY.
Page 72 of 230

1.66
Ú12V battery charge warning
light
If it comes on when you are driving, it
indicates that the circuit is overcharged
or has discharged. Stop and consult an
approved Dealer as soon as possible.
Instrument panel A
In some cases, the appearance of a
warning light is accompanied by a mes-
sage.
WARNING LIGHTS (1/3)
If no lights or sounds are apparent, this indicates a fault in the instr\
ument
panel. This indicates that it is essential to stop immediately (as soon as
traffic conditions allow). Ensure that the vehicle is correctly immobilised\
and contact an approved Dealer.
A
Warning light ® re-
quires you to stop immedi-
ately, for your own safety,
as soon as traffic conditions
allow. Switch off the engine and do
not restart it. Contact an approved
Dealer.
The presence and operation of the warning lights DEPEND ON THE EQUIPMENT\
AND COUNTRY.
The © warning light means
you should drive very carefully to
an approved Dealer as soon as pos-
sible. If you fail to follow this recom-
mendation, you risk damaging your
vehicle.
áMain beam headlight tell-tale
light
kDipped beam headlight tell-
tale
gFront fog light tell-tale light
Rear fog light tell-tale
cLeft-hand direction indicator
tell-tale light
bRight-hand direction indica-
tor tell-tale light
Vehicle ready for driving
warning light
This comes on when the engine is
started.
Charging cord plugged in
warning light
This comes on when the charging cord
is plugged into the vehicle.