Page 145 of 230

3.17
Electric windows
With the ignition on:
– press the switch for the window concerned to lower it to the desired
height;
– lift the switch for the window con- cerned to raise it to the desired
height.
From the driver’s seat
Operate the switches as follows:
– 1 for the driver’s side;
– 2 for the front passenger side.
ELECTRIC WINDOWS
From the front passenger seat
Operate switch 3.
1
23
Driver’s responsibility
Never leave your vehicle with the key inside, and with a child, adult wh\
o
is not self-sufficient or a pet, even for a short while. They may pose a risk
to themselves or to others by starting the engine or activating equipmen\
t
(such as the gear lever or electric windows). If any part of the body \
becomes
trapped, reverse the direction of the window immediately by pressing the\
relevant
switch.
Risk of serious injury.
One-touch electric window(depending on vehicle)
The one-touch mode works in addition
to the operation of the electric windows
described previously.
It is fitted to the driver’s window and
is used for lowering only.
Briefly press switch 1: the window will
open completely.
Pressing the switch again while the
window is moving will stop its move-
ment.
Avoid resting any objects against
a half-open window: there is a risk
that the electric window could be
damaged.
Page 146 of 230
3.18
Removable ashtray 1
This is a removable ashtray which can
be placed in the cup holders.
Lift the cover to open.
To empty it, pull the assembly. The ash-
tray will come out of its housing.
ASHTRAYS, CIGARETTE LIGHTER, ACCESSORIES SOCKETS
1
Cigarette lighter 2
With the ignition on, press it in. It will
spring back with a click when it is ready.
Pull it out to use.
After use, replace it without pushing it
all the way in.
Accessories sockets
You can use the cigarette lighter
socket2. It is provided for connecting
accessories approved by the Technical
Department with a maximum power of
120 Watts (voltage 12 V).
Depending on the 12V battery charge,
the accessories socket may stop work-
ing.
2
Connect accessories
with a maximum power of
120 Watts only.
When several accessory
sockets are used at the same time,
the total power of the connected
accessories must not exceed
180 watts.
Fire hazard.
Page 147 of 230
3.19
Dashboard storage
compartment 2
Centre console storage
compartment 3
To open, lift cover 4. It will store a
1.5 litre bottle.
Glovebox
To open the glovebox, lift catch 1.
PASSENGER COMPARTMENT STORAGE, FITTINGS (1/3)
1
2
4
3
When turning corners,
accelerating or braking,
ensure that the recepta-
cle being held by the cup
holder is not dislodged.
There is a risk of burning if hot liquid
escapes.
Page 148 of 230
3.20
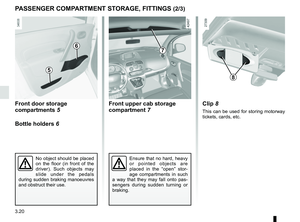
Front upper cab storage
compartment 7
Front door storage
compartments 5
Bottle holders
6
PASSENGER COMPARTMENT STORAGE, FITTINGS (2/3)
No object should be placed
on the floor (in front of the
driver). Such objects may
slide under the pedals
during sudden braking manoeuvres
and obstruct their use.
Clip 8
This can be used for storing motorway
tickets, cards, etc.
Ensure that no hard, heavy
or pointed objects are
placed in the “open” stor-
age compartments in such
a way that they may fall onto pas-
sengers during sudden turning or
braking.
5
67
8
Page 149 of 230
3.21
PASSENGER COMPARTMENT STORAGE, FITTINGS (3/3)
Clothes hook 9
Depending on the vehicle, a hook may
be located on the partition behind the
front passenger seat.
For safety reasons, this hook may only
be used to hang clothes.
NB: the maximum permitted load is
4 kg.
9
9
Page 150 of 230
3.22
The headrest is a safety
component; check that it is
fitted and in the correct po-
sition.
Storage position 2Pull it towards you and lower it com-
pletely.
The fully lowered headrest position
is a storage position: it should not be
in this position when a seat is occupied.To raise itSlide it to the required height.
To lower itPull it towards you and slide it to the re-
quired height.
To remove itRaise the headrest then press tabs 1 to
release it.
To refit itPress tab 1 and insert the rods into the holes, with the notches facing forwards.
REAR HEADRESTS
Child’s convertible headrest
If fitted to the vehicle, the child head-
rest and booster cushion can only be
installed on the rear side seats.
For fitting and use, refer to the equip-
ment instructions.
12
Page 151 of 230

3.23
To fold down the seatback
Before moving the bench seat, make
sure the front seats are pushed forward
enough, that the rear seat belts are un-
fastened and that nothing will obstruct
the manoeuvre.
Lower the rear headrests to storage po-
sition.
Pull lever 1 of the seatback you wish to
fold down (on the right or left-hand side
of the bench seat), and bring the seat-
back down.
REAR BENCH SEAT: functions (1/2)
For safety reasons, carry
out any adjustments when
the vehicle is not being
driven.
When moving the rear
bench seat, make sure
the bench seat anchor-
age points are clean (they
should be free from grit, cloths etc.).
1
Before folding down any rear seat,
fasten the seat belt buckle of the seat
concerned into its corresponding catch.
This will prevent the seat belt becoming
trapped when the seat is returned to its
position for use.
In all cases, check that the seat belts
are operating correctly.
The configuration of the
two-seat bench with the
small seatback A pulled
down, does not allow the
central seat to be used as it would
be impossible to buckle the seat belt
(belt buckles inaccessible).
A
Page 152 of 230
3.24
REAR BENCH SEAT: functions (2/2)Use restriction
It is forbidden to drive with a seatback
or a front seat folded down when there
is a passenger occupying a rear seat.
For safety reasons, carry
out any adjustments when
the vehicle is not being
driven.
To raise the seatback
Before raising the seatback, make sure
there are no objects (water bottle, tool
box etc.) which will prevent it from lock-
ing properly.
Raise the seatback and click it into po-
sition. Check that it is correctly locked.
When refitting the seatback,
make sure it is correctly
locked.
If using seat covers, make
sure they do not prevent the seat-
back and seat base latches from
locking in. Ensure that the seat belts
and seat belt fasteners are correctly
positioned.
Reposition the headrests.
Max. weight: 300 kg, evenly distrib-
uted.