2018 PEUGEOT 5008 change time
[x] Cancel search: change timePage 118 of 364
116
Welcome lighting
Availability of this function depends on version.F
M
ake a short press on this
remote control button.
Pressing again before the end of the timed
period switches off the lighting immediately.
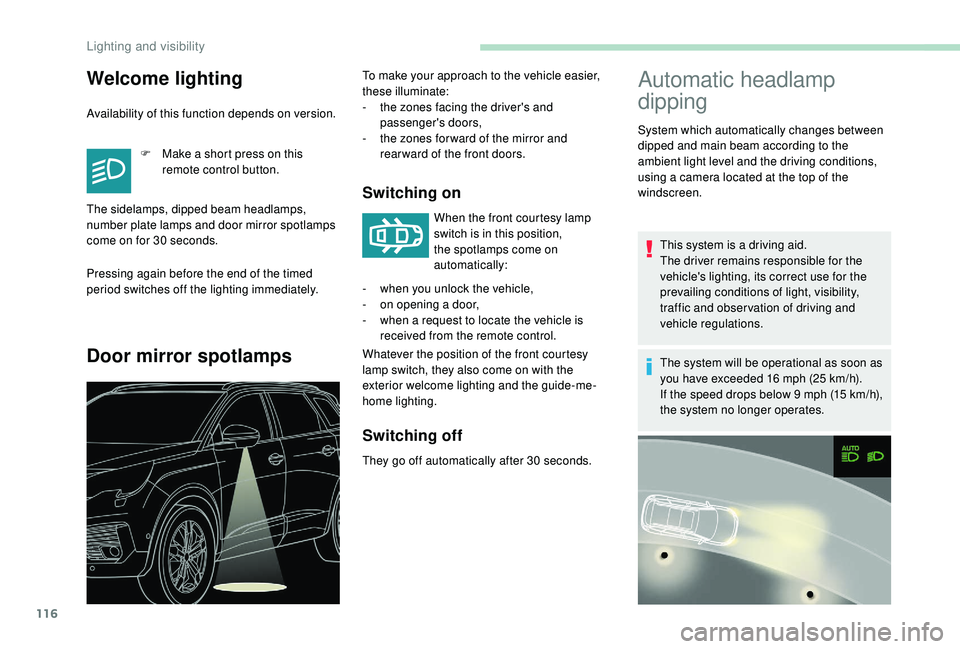
Door mirror spotlamps
Switching on
When the front courtesy lamp
switch is in this position,
the spotlamps come on
automatically:
Whatever the position of the front courtesy
lamp switch, they also come on with the
exterior welcome lighting and the guide-me-
home lighting.
Switching off
They go off automatically after 30 seconds.
Automatic headlamp
dipping
This system is a driving aid.
T he driver remains responsible for the
vehicle's lighting, its correct use for the
prevailing conditions of light, visibility,
traffic and obser vation of driving and
vehicle regulations.
The system will be operational as soon as
you have exceeded 16
mph (25 km/h).
If the speed drops below 9
mph (15 km/h),
the system no longer operates.
The sidelamps, dipped beam headlamps,
number plate lamps and door mirror spotlamps
come on for 30
seconds. To make your approach to the vehicle easier,
these illuminate:
-
t
he zones facing the driver's and
passenger's doors,
-
t
he zones for ward of the mirror and
rear ward of the front doors.
-
w
hen you unlock the vehicle,
-
o
n opening a
door,
-
w
hen a
request to locate the vehicle is
received from the remote control. System which automatically changes between
dipped and main beam according to the
ambient light level and the driving conditions,
using a
camera located at the top of the
windscreen.
Lighting and visibility
Page 119 of 364
117
Activation/Deactivation
F Turn the lighting control stalk ring to the "AUTO " position.
The system state remains in memory when the
ignition is switched off.
Operation Pause
F In the Vehicle/Driving
menu,
select the " Driving functions "
tab, then " Automatic headlamp
dip ".
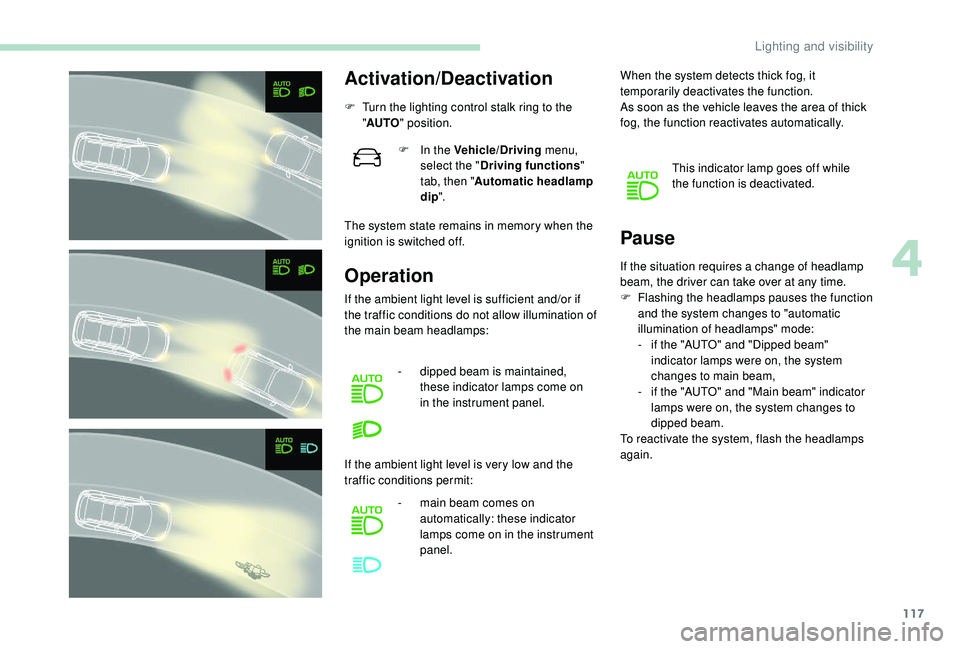
If the ambient light level is sufficient and/or if
the traffic conditions do not allow illumination of
the main beam headlamps: -
d
ipped beam is maintained,
these indicator lamps come on
in the instrument panel.
If the ambient light level is very low and the
traffic conditions permit: -
m
ain beam comes on
automatically: these indicator
lamps come on in the instrument
panel. When the system detects thick fog, it
temporarily deactivates the function.
As soon as the vehicle leaves the area of thick
fog, the function reactivates automatically.
This indicator lamp goes off while
the function is deactivated.
If the situation requires a
change of headlamp
beam, the driver can take over at any time.
F
F
lashing the headlamps pauses the function
and the system changes to "automatic
illumination of headlamps" mode:
-
i
f the "AUTO" and "Dipped beam"
indicator lamps were on, the system
changes to main beam,
-
i
f the "AUTO" and "Main beam" indicator
lamps were on, the system changes to
dipped beam.
To reactivate the system, flash the headlamps
again.
4
Lighting and visibility
Page 131 of 364
129
You can deactivate the ASR
and DSC systems by turning
the knob to the "OFF" position.
Recommendations
Your vehicle is designed principally to
drive on tarmac roads but it allows you to
occasionally drive on other less passable
terrain.
However, it does not permit off-road
driving such as:
-
c
rossing and driving on terrain which
could damage the underbody or strip
away components (fuel pipe, fuel
cooler, etc.) due to obstacles or stones
in particular,
-
d
riving on terrain with steep gradients
and poor grip,
-
c
rossing a stream.
The ASR and DSC systems will no longer
act on the engine operation or the brakes
in the event of an involuntary change of
trajectory.
These systems are reactivated
automatically from 31
mph (50 km/h) or
every time the ignition is switched on.Hill Assist Descent
Control
System that provides assistance when
descending on loose or soft sur faces (gravel,
mud, etc.) or a
steep gradient.
This system reduces the risk of slip or loss
of control of the vehicle when descending,
whether going forward or in reverse.
During a
descent, it assists the driver in
maintaining a
constant speed, depending
on the gear engaged, while progressively
releasing the brakes.
For the system to activate, the slope must
be greater than 5%.
The system can be used with the gearbox
in neutral.
Otherwise engage a
gear corresponding
to the speed to prevent the engine stalling.
With an automatic gearbox, the system
can be used with the selector at N , D or R.
When the system is regulating, the Active
Safety Brake system is automatically
deactivated. The system is not available:
-
i
f the speed of the vehicle is above
43 mph (70 km/h),
- i f the speed of the vehicle is being
controlled by the Adaptive cruise
control with Stop function, depending
on the type of gearbox.
Switching on
By default, the system is not selected.
The system's status is not saved when the
ignition is switched off.
The driver can select the system when
the engine is running, when the vehicle is
stationary or moving at speeds up to approx.
31
mph (50 km/h).
F
T
o select the system, at a speed
below 31
mph (50 km/h),
press this button until its green
indicator lamp comes on; this
warning lamp comes on in grey
in the instrument panel.
5
Safety
Page 135 of 364
133
Advice
The driver must ensure that passengers use
the seat belts correctly and that they are all
fastened before setting off.
Wherever you are seated in the vehicle,
always fasten your seat belt, even for short
journeys.
Do not interchange the seat belt buckles as
they will not fulfil their role fully.
The seat belts are fitted with an inertia reel
permitting automatic adjustment of the length
of the strap to your size. The seat belt is
stowed automatically when not in use.
Before and after use, ensure that the seat belt
is reeled in correctly.
The lower part of the strap must be positioned
as low as possible on the pelvis.
The upper part must be positioned in the
hollow of the shoulder.
The inertia reels have an automatic locking
device at the time of a collision, during
sudden braking or if the vehicle turns over.
You can release the device by pulling the
strap firmly and then releasing it so that it
reels in slightly. In order to be effective, a seat belt must:
-
b e tightened as close to the body as
possible,
-
b
e pulled in front of you with a smooth
movement, checking that it does not twist,
-
b
e used to restrain only one person,
-
n
ot show any signs of cuts or fraying,
-
n
ot be converted or modified to avoid
affecting its performance.
In accordance with current safety regulations,
for all repairs on your vehicle's seat belts, go
to a
qualified workshop with the skills and
equipment needed, which a
PEUGEOT dealer
is able to provide.
Have your seat belts checked regularly by
a
PEUGEOT dealer or a qualified workshop,
particularly if the straps show signs of
damage.
Clean the seat belt straps with soapy water or
a
textile cleaning product, sold by PEUGEOT
dealers.
After folding or moving a
seat or rear bench
seat, ensure that the seat belt is positioned
and reeled in correctly. Recommendations for children
Use a
suitable child seat if the passenger is
less than 12
years old or shorter than one and
a
half metres.
Never use the same seat belt to secure more
than one person.
Never allow a
child to travel on your lap.
For more information on Child seats , refer to
the corresponding section.
In the event of an impact
Depending on the nature and seriousness
of the impact , the pyrotechnic pretensioner
device may be deployed before and
independently of the airbags. Deployment of
the pretensioners is accompanied by a
slight
discharge of harmless smoke and a
noise,
due to the activation of the pyrotechnic
cartridge incorporated in the system.
In all cases, the airbag warning lamp comes
on.
Following an impact, have the seat belts
system checked and, if necessary, replaced,
by a
PEUGEOT dealer or a qualified
workshop.
5
Safety
Page 169 of 364
167
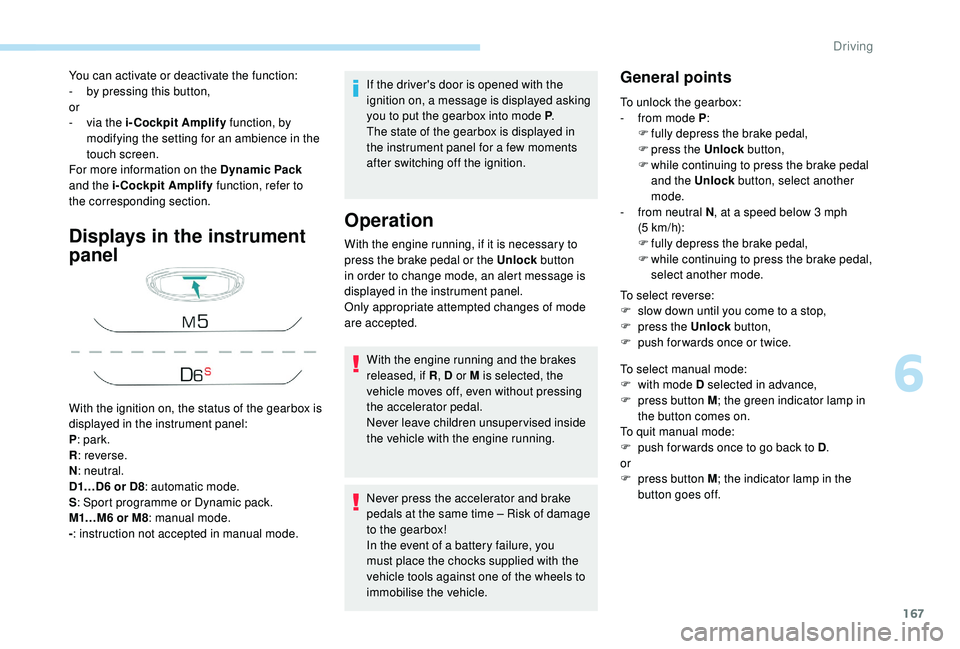
Displays in the instrument
panel
If the driver's door is opened with the
ignition on, a message is displayed asking
you to put the gearbox into mode P.
The state of the gearbox is displayed in
the instrument panel for a
few moments
after switching off the ignition.
Operation
You can activate or deactivate the function:
- b y pressing this button,
or
-
v
ia the i-Cockpit Amplify function, by
modifying the setting for an ambience in the
touch screen.
For more information on the Dynamic Pack
and the i-Cockpit Amplify function, refer to
the corresponding section.
With the ignition on, the status of the gearbox is
displayed in the instrument panel:
P : park.
R : reverse.
N : neutral.
D1…D6
or D8: automatic mode.
S : Sport programme or Dynamic pack.
M1…M6
or M8: manual mode.
- : instruction not accepted in manual mode. With the engine running, if it is necessary to
press the brake pedal or the Unlock
button
in order to change mode, an alert message is
displayed in the instrument panel.
Only appropriate attempted changes of mode
are accepted.
With the engine running and the brakes
released, if R , D or M is selected, the
vehicle moves off, even without pressing
the accelerator pedal.
Never leave children unsuper vised inside
the vehicle with the engine running.
Never press the accelerator and brake
pedals at the same time – Risk of damage
to the gearbox!
In the event of a
battery failure, you
must place the chocks supplied with the
vehicle tools against one of the wheels to
immobilise the vehicle.General points
To unlock the gearbox:
- f rom mode P :
F
f
ully depress the brake pedal,
F
press the Unlock button,
F
w
hile continuing to press the brake pedal
and the Unlock button, select another
mode.
-
f
rom neutral N , at a
speed below 3 mph
(5
km/h):
F
f
ully depress the brake pedal,
F
w
hile continuing to press the brake pedal,
select another mode.
To select reverse:
F
s
low down until you come to a stop,
F
p
ress the Unlock button,
F
p
ush forwards once or twice.
To select manual mode:
F
w
ith mode D selected in advance,
F
p
ress button M ; the green indicator lamp in
the button comes on.
To quit manual mode:
F
p
ush for wards once to go back to D .
or
F
p
ress button M ; the indicator lamp in the
button goes off.
6
Driving
Page 170 of 364
168
To switch off the ignition, the vehicle must be
stationary.
To put the vehicle in free-wheeling mode,
engine off:
F
w
ith the vehicle stationary, engine running,
select N ,
F
s
witch off the engine,
F
w
ithin five seconds, switch the ignition on
again,
F
w
ith your foot on the brake pedal, push the
selector for wards or backwards once to
confirm N and manually release the electric
parking brake,
F
s
witch off the ignition.
If you exceed the time limit of five seconds,
the gearbox engages mode P ; you must then
restart the procedure.
If you open the driver's door when mode N
is engaged, an audible signal will sound. It
will stop when you close the driver's door
again.
Special aspects of automatic
mode
For maximum acceleration without touching
the selector, press the accelerator fully down
(kick-down). The gearbox changes down
automatically or holds the gear selected until
the maximum engine speed is reached.
When braking, the gearbox changes down
automatically to provide effective engine
braking.
The steering mounted controls allow the driver
to temporarily select a
gear, if the road and
engine speed permit.
Special aspects of manual mode
The change from one gear to another takes
place only if the road speed and engine speed
permit.
If the engine speed is too high or too low, the
gear selected flashes for a
few seconds, then
the gear actually engaged is displayed.
Moving off
From mode P:
F P ress the brake pedal firmly.
F
S
tart the engine.
F
M
aintaining pressure on the brake pedal,
press the Unlock button.
F
P
ush once or twice rear ward to select the
automatic mode D, or for ward to engage
reverse R . In severe wintry conditions (temperature
below -23°C), it is recommended that the
engine be allowed to run for a
few minutes
before moving off, to ensure the correct
operation and durability of the engine and
gearbox.
Stopping the vehicle
Whatever the state of the gearbox when the
ignition is switched off, mode P is engaged
automatically, with the exception of N , in which
case mode P will be engaged after a
delay of
5
seconds (allowing the change to free-wheel).
The gearbox selects the gear that offers
optimum per formance, taking account of the
exterior temperature, the profile of the road, the
load on the vehicle and the style of driving. From neutral N
:
F
P
ress the brake pedal firmly.
F
S
tart the engine.
F
M
aintaining pressure on the brake pedal,
push rear ward to select the automatic mode
D, or for ward, while pressing the Unlock
button to engage reverse R .
Then, from P or N :
F
R
elease the brake pedal.
F
A
ccelerate progressively to automatically
release the electric parking brake.
F
W
ith the parking brake released, the vehicle
then moves off.
Driving
Page 176 of 364
174
Under-inflation detection
System which automatically checks the
pressures of the tyres while driving.
The system monitors the pressures in the four
tyres, once the vehicle is moving.
It compares the information given by the wheel
speed sensors with reference values, which
must be reinitialised ever y time the tyre
pressures are adjusted or a wheel changed.
The system triggers an alert as soon as it
detects a
drop in the inflation pressure of one
or more tyres.
The under-inflation detection system does
not replace the need for vigilance on the
part of the driver.
This system does not avoid the need to
check the tyre pressures (including the
spare wheel) every month as well as
before a
long journey.
Driving with under-inflated tyres worsens
road-holding, lengthens braking distances,
causes premature wear of the tyres,
particularly in adverse conditions (heavy
loads, high speeds, long journeys). Driving with under-inflated tyres
increases fuel consumption.
The inflation pressures defined for your
vehicle can be found on the tyre pressure
label.
For more information on the
Identification markings , refer to the
corresponding section.
Checking tyre pressures
This check should be done when the tyres
are "cold" (vehicle stopped for 1
hour or
after a
journey of less than 6 miles (10 km)
at moderate speeds).
Other wise, add 0.3
bar to the pressures
shown on the label.
Snow chains
The system does not have to be
reinitialised after fitting or removing snow
chains.
Under-inflation alert
This warning is indicated by
continuous illumination of this lamp,
an audible signal and, depending on
the equipment installed, a message
displayed on the screen.
F
R
educe speed immediately, avoid excessive
steering movements and sudden braking.
F
S
top the vehicle as soon as it is safe to do
so.
The loss of pressure detected does not
always cause visible bulging of the tyre.
Do not satisfy yourself with just a
visual
check.
F
I
f you have a compressor, such as the one
in the temporary puncture repair kit, check
the pressures of the four tyres when cold.
F
I
f it is not possible to make this check
immediately, drive carefully at reduced
speed.
or
F
I
n case of a puncture, use the temporary
puncture repair kit or the spare wheel
(depending on equipment).
The alert is kept active until the system is
reinitialised.
Driving
Page 210 of 364
208
The display is immediately updated with the
type of view selected.
The state of the system is not kept in memory
when the ignition is switched off.
Principle of operation
Using one or two cameras, the close
surroundings of the vehicle are recorded whilst
manoeuvring at low speed.
An image from above your vehicle in its close
surroundings is created in real time, as the
vehicle manoeuvre progresses.
This representation facilitates the alignment of
your vehicle when parking and allows obstacles
close to the vehicle to be seen.
This image is automatically deleted if the
vehicle remains stationary for too long.When the function is activated, it is possible
that the central view is not displayed. If the
system is activated after the vehicle has
already been driven, the central view may be
completely displayed.
This system is a visual aid that cannot in
any circumstances replace the need for
vigilance on the part of the driver.
The images provided by the camera(s)
may be distorted by the relief.
In the presence of areas in shade, or in
conditions of bright sunlight or inadequate
lighting, the image may be darkened and
with lower contrast.
Recommendations on care
In bad or wintry weather, ensure that the
sensors and camera lenses are not covered
with mud, ice or snow.
Check the cleanliness of the camera lenses
regularly.
If necessary, clean the cameras with a
soft, dry
cloth.
When washing your vehicle at high pressure,
direct the lance at least 30
cm away from the
cameras and parking aid sensors.
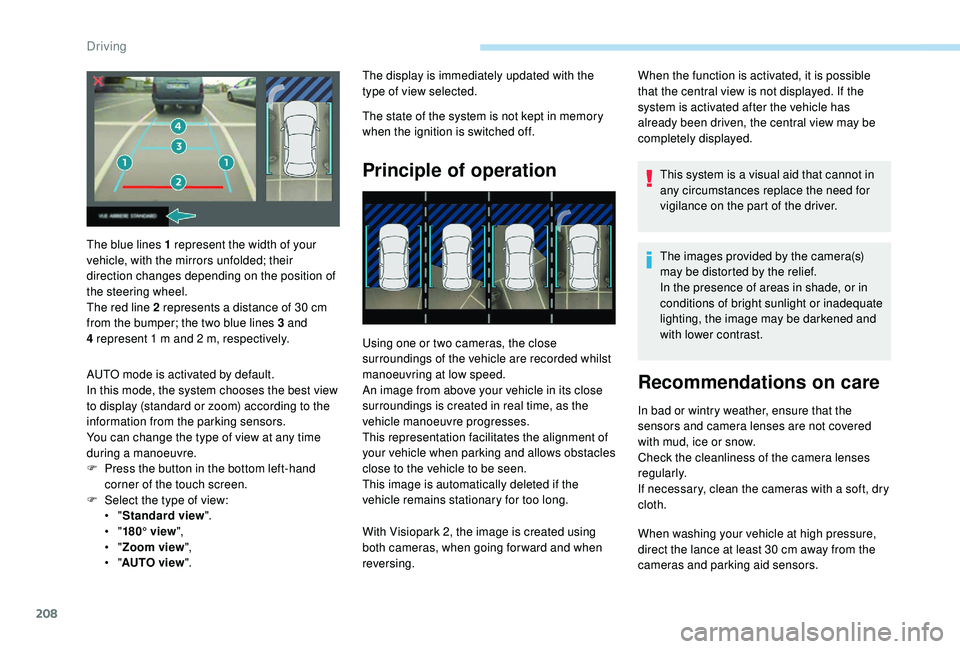
The blue lines 1
represent the width of your
vehicle, with the mirrors unfolded; their
direction changes depending on the position of
the steering wheel.
The red line 2
represents a
distance of 30
cm
from the bumper; the two blue lines 3
and
4
represent 1
m and 2
m, respectively.
AUTO mode is activated by default.
In this mode, the system chooses the best view
to display (standard or zoom) according to the
information from the parking sensors.
You can change the type of view at any time
during a
manoeuvre.
F
P
ress the button in the bottom left-hand
corner of the touch screen.
F
Sel
ect the type of view:
•
" Standard view ".
•
" 180° view ",
•
" Zoom view ",
•
" AUTO view ". With Visiopark 2, the image is created using
both cameras, when going for ward and when
reversing.
Driving