2018 PEUGEOT 5008 open bonnet
[x] Cancel search: open bonnetPage 34 of 364

32
If the low oil level is confirmed by a check using
t he dipstick, the level must be topped up to
avoid damage to the engine.
For more information on Checking levels ,
refer to the corresponding section.
Oil level indicator fault
This is signalled by the display of the message
"Oil level measurement invalid" in the
instrument panel.
Contact a
PEUGEOT dealer or a qualified
workshop.
In the event of a
fault with the electric
indicator, the oil level is no longer
monitored.
If the system is faulty, you must check the
engine oil level using the manual dipstick
located under the bonnet.
For more information on Checking levels ,
refer to the corresponding section.
Engine coolant temperature
gauge
With the engine running:
- i n zone A , the temperature is correct,
-
i
n zone B , the temperature is too high; this
warning lamp and the central STOP warning
lamp come on in the instrument panel,
accompanied by the display of a
message
and an audible signal.
You MUST stop as soon as it is safe to do
so.
Wait a
few minutes before switching off the
engine.
After first switching off the ignition, open
the bonnet cautiously and check the
coolant level. For more information on Checking levels
,
refer to the corresponding section.
AdBlue® range indicators
These range indicators are present only on
BlueHDi Diesel versions.
Once the AdBlue
® tank is on reser ve or after
detection of a
fault with the SCR emissions
control system, when the ignition is switched
on, an indicator displays an estimate of the
distance that can be covered, (the range)
before engine starting is prevented.
In the event of the risk of non-
starting related to a lack of
AdBlue
®
The engine starting prevention system
required by regulations is activated
automatically once the AdBlue
® tank is
e m pt y.
Range greater than 1,500
miles (2,400 km)
When switching on the ignition, there is no
automatic display of range in the instrument
panel.
Instruments
Page 58 of 364
56
Anti-intrusion security
This system allows automatic simultaneous
locking of the doors and boot as soon as the
speed of the vehicle exceeds 6 mph (10 km/h).
Operation
If one of the doors or the boot is open, the
automatic central locking does not take place.
Carrying long or voluminous objects
If you want to drive with the boot open, you
should press the central locking button
to lock the doors. Other wise, every time
the speed of the vehicle exceeds 6
mph
(10
km/h), the locks will rebound and the
alerts mentioned above will appear.
Pressing the central locking button
unlocks the vehicle.
Above 6
mph (10 km/h), this unlocking is
te m p o r a r y.
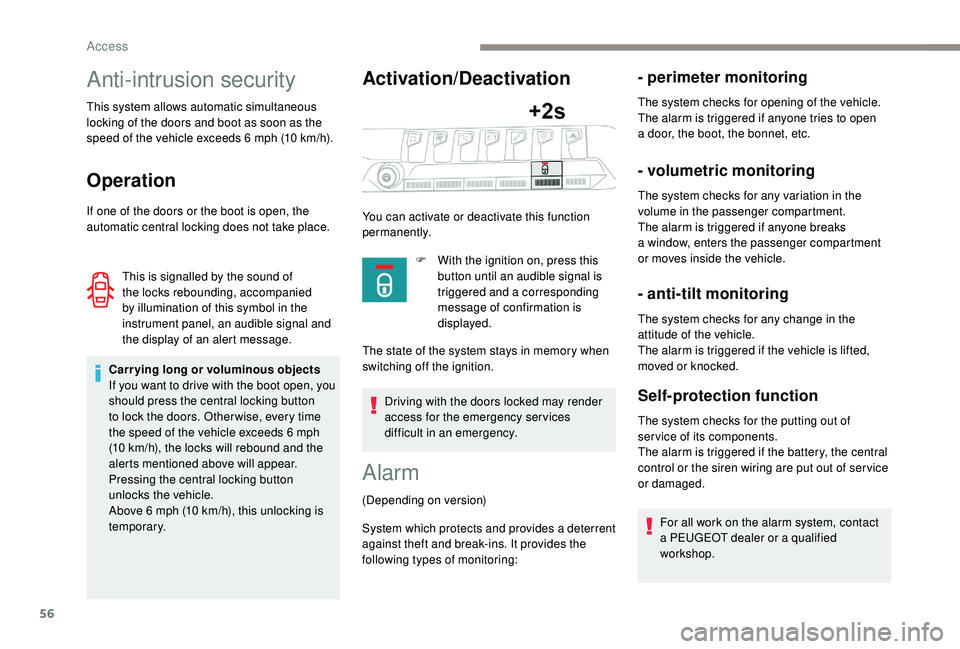
Activation/Deactivation
Driving with the doors locked may render
access for the emergency services
difficult in an emergency.
This is signalled by the sound of
the locks rebounding, accompanied
by illumination of this symbol in the
instrument panel, an audible signal and
the display of an alert message.
You can activate or deactivate this function
permanently.
F
W
ith the ignition on, press this
button until an audible signal is
triggered and a corresponding
message of confirmation is
displayed.
The state of the system stays in memory when
switching off the ignition.
Alarm
(Depending on version)
System which protects and provides a
deterrent
against theft and break-ins. It provides the
following types of monitoring:
- perimeter monitoring
The system checks for opening of the vehicle.
The alarm is triggered if anyone tries to open
a
door, the boot, the bonnet, etc.
- volumetric monitoring
The system checks for any variation in the
volume in the passenger compartment.
The alarm is triggered if anyone breaks
a
window, enters the passenger compartment
or moves inside the vehicle.
- anti-tilt monitoring
The system checks for any change in the
attitude of the vehicle.
The alarm is triggered if the vehicle is lifted,
moved or knocked.
Self-protection function
The system checks for the putting out of
ser vice of its components.
The alarm is triggered if the battery, the central
control or the siren wiring are put out of ser vice
or damaged.
For all work on the alarm system, contact
a
PEUGEOT dealer or a qualified
workshop.
Access
Page 59 of 364
57
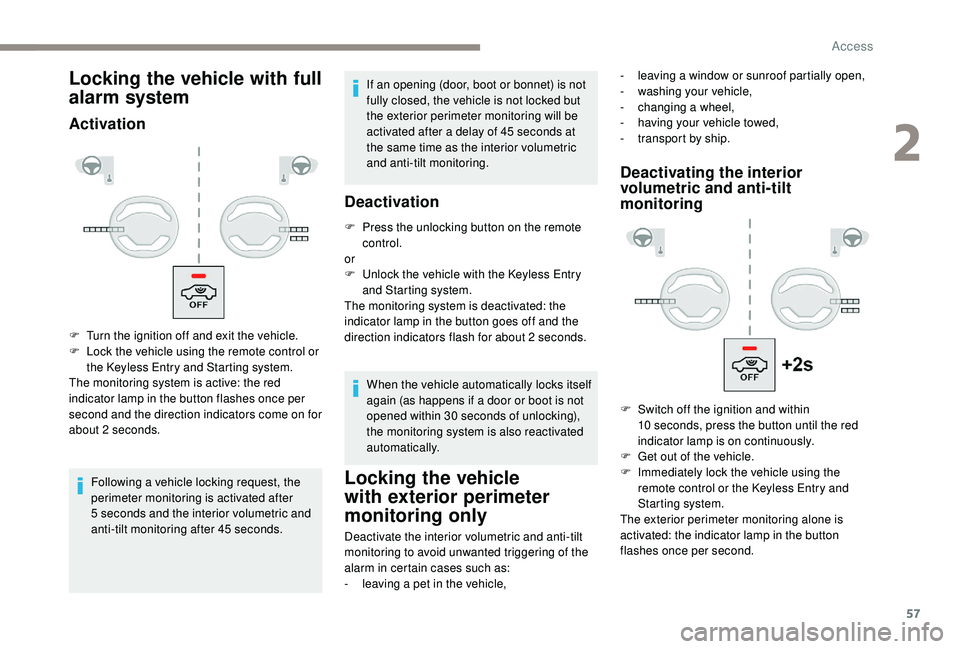
Locking the vehicle with full
alarm system
Activation
Following a vehicle locking request, the
p erimeter monitoring is activated after
5
seconds and the interior volumetric and
anti-tilt monitoring after 45
seconds.If an opening (door, boot or bonnet) is not
fully closed, the vehicle is not locked but
the exterior perimeter monitoring will be
activated after a
delay of 45 seconds at
the same time as the interior volumetric
and anti-tilt monitoring.
Deactivation
F Press the unlocking button on the remote control.
or
F
U
nlock the vehicle with the Keyless Entry
and Starting system.
The monitoring system is deactivated: the
indicator lamp in the button goes off and the
direction indicators flash for about 2
seconds.
When the vehicle automatically locks itself
again (as happens if a
door or boot is not
opened within 30
seconds of unlocking),
the monitoring system is also reactivated
automatically.
Locking the vehicle
with exterior perimeter
monitoring only
Deactivate the interior volumetric and anti-tilt
monitoring to avoid unwanted triggering of the
alarm in certain cases such as:
-
l
eaving a pet in the vehicle,
Deactivating the interior
volumetric and anti-tilt
monitoring
F Turn the ignition off and exit the vehicle.
F L ock the vehicle using the remote control or
the Keyless Entry and Starting system.
The monitoring system is active: the red
indicator lamp in the button flashes once per
second and the direction indicators come on for
about 2
seconds. -
l
eaving a window or sunroof partially open,
-
w
ashing your vehicle,
-
c
hanging a
wheel,
-
h
aving your vehicle towed,
-
t
ransport by ship.
F
S
witch off the ignition and within
10
seconds, press the button until the red
indicator lamp is on continuously.
F
G
et out of the vehicle.
F
I
mmediately lock the vehicle using the
remote control or the Keyless Entry and
Starting system.
The exterior perimeter monitoring alone is
activated: the indicator lamp in the button
flashes once per second.
2
Access
Page 175 of 364
173
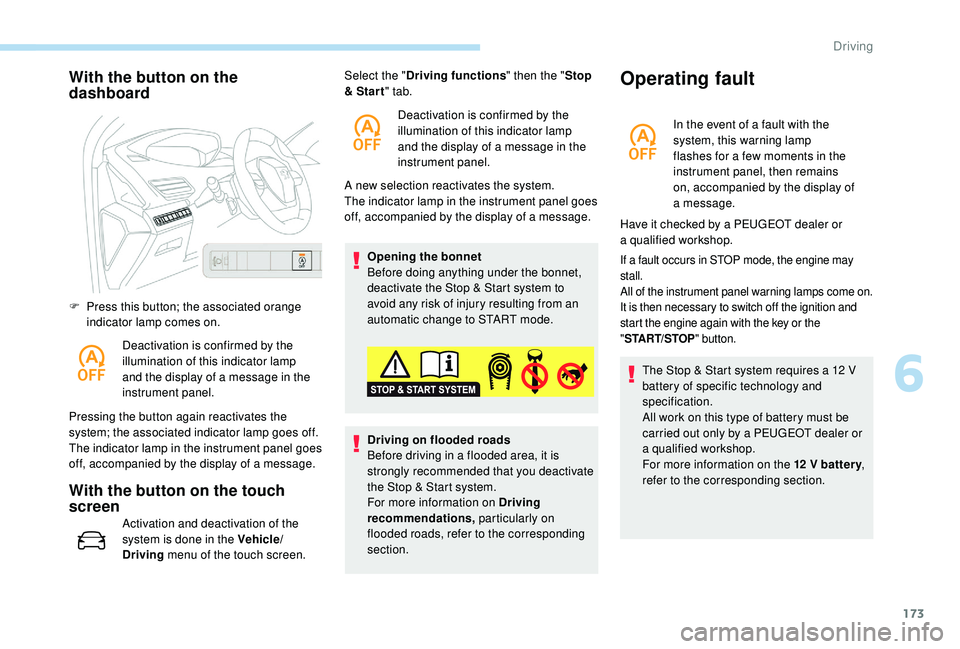
With the button on the
dashboard
F Press this button; the associated orange indicator lamp comes on.
Deactivation is confirmed by the
illumination of this indicator lamp
and the display of a
message in the
instrument panel.
Pressing the button again reactivates the
system; the associated indicator lamp goes off.
The indicator lamp in the instrument panel goes
off, accompanied by the display of a
message.
With the button on the touch
screen
Activation and deactivation of the
system is done in the Vehicle/
Driving menu of the touch screen. A new selection reactivates the system.
The indicator lamp in the instrument panel goes
off, accompanied by the display of a
message.
Opening the bonnet
Before doing anything under the bonnet,
deactivate the Stop & Start system to
avoid any risk of injury resulting from an
automatic change to START mode.
Select the "
Driving functions " then the "Stop
& Star t " tab.
Deactivation is confirmed by the
illumination of this indicator lamp
and the display of a message in the
instrument panel.
Driving on flooded roads
Before driving in a flooded area, it is
strongly recommended that you deactivate
the Stop & Start system.
For more information on Driving
recommendations, particularly on
flooded roads, refer to the corresponding
section.
Operating fault
In the event of a fault with the
s ystem, this warning lamp
flashes for a
few moments in the
instrument panel, then remains
on, accompanied by the display of
a
message.
If a fault occurs in STOP mode, the engine may
s tall.
All of the instrument panel warning lamps come on.
It is then necessary to switch off the ignition and
start the engine again with the key or the
" ST
ART/STOP " button.
The Stop & Start system requires a 12 V
b attery of specific technology and
specification.
All work on this type of battery must be
carried out only by a
PEUGEOT dealer or
a
qualified workshop.
For more information on the 12
V batter y,
refer to the corresponding section.
Have it checked by a
PEUGEOT dealer or
a
qualified workshop.
6
Driving
Page 232 of 364
230
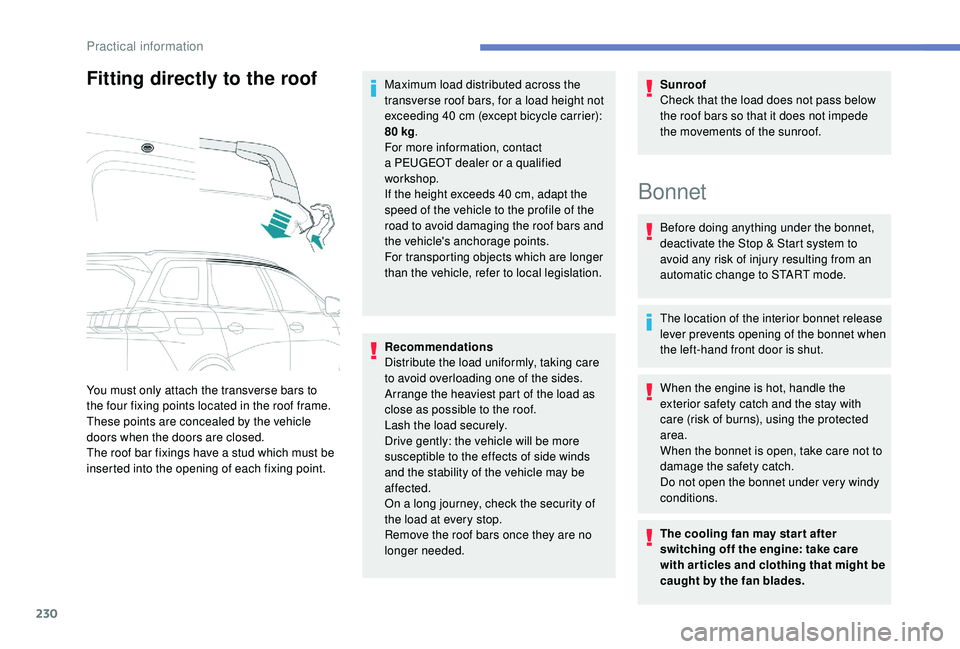
Fitting directly to the roof
You must only attach the transverse bars to
the four fixing points located in the roof frame.
These points are concealed by the vehicle
doors when the doors are closed.
The roof bar fixings have a stud which must be
inserted into the opening of each fixing point.Maximum load distributed across the
transverse roof bars, for a
load height not
exceeding 40 cm (except bicycle carrier):
80 kg
.
For more information, contact
a PEUGEOT dealer or a qualified
workshop.
If the height exceeds 40 cm, adapt the
speed of the vehicle to the profile of the
road to avoid damaging the roof bars and
the vehicle's anchorage points.
For transporting objects which are longer
than the vehicle, refer to local legislation.
Recommendations
Distribute the load uniformly, taking care
to avoid overloading one of the sides.
Arrange the heaviest part of the load as
close as possible to the roof.
Lash the load securely.
Drive gently: the vehicle will be more
susceptible to the effects of side winds
and the stability of the vehicle may be
affected.
On a
long journey, check the security of
the load at every stop.
Remove the roof bars once they are no
longer needed. Sunroof
Check that the load does not pass below
the roof bars so that it does not impede
the movements of the sunroof.
Bonnet
Before doing anything under the bonnet,
deactivate the Stop & Start system to
avoid any risk of injury resulting from an
automatic change to START mode.
The location of the interior bonnet release
lever prevents opening of the bonnet when
the left-hand front door is shut.
When the engine is hot, handle the
exterior safety catch and the stay with
care (risk of burns), using the protected
area.
When the bonnet is open, take care not to
damage the safety catch.
Do not open the bonnet under very windy
conditions.
The cooling fan may star t after
switching off the engine: take care
with articles and clothing that might be
caught by the fan blades.
Practical information
Page 233 of 364
231
Opening
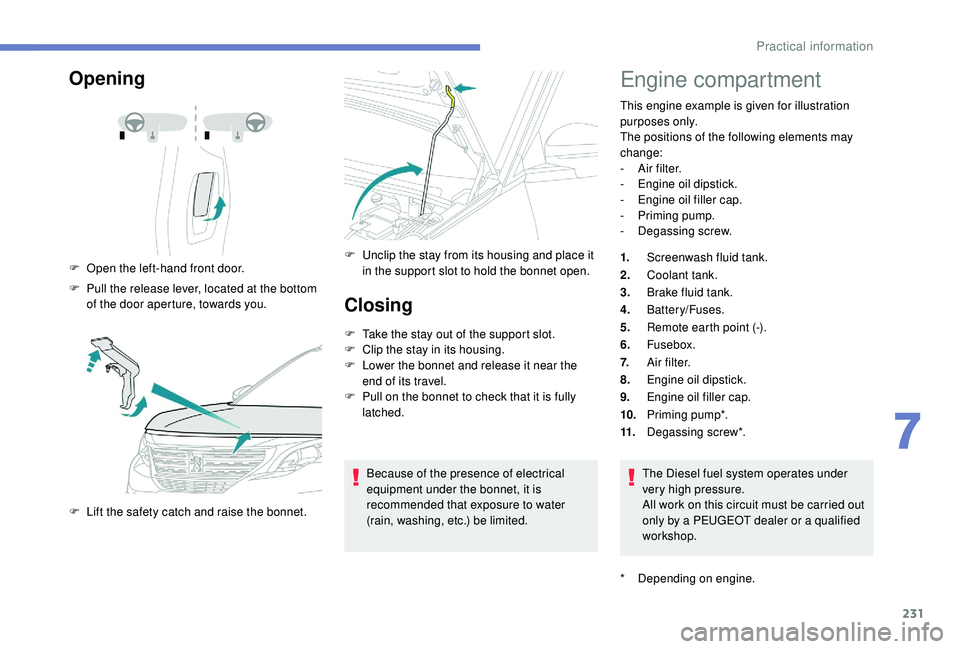
F Open the left-hand front door.
F
P
ull the release lever, located at the bottom
of the door aperture, towards you.
F
L
ift the safety catch and raise the bonnet. F
U nclip the stay from its housing and place it
in the support slot to hold the bonnet open.
Closing
F Take the stay out of the support slot.
F C lip the stay in its housing.
F
L
ower the bonnet and release it near the
end of its travel.
F
P
ull on the bonnet to check that it is fully
latched.
Because of the presence of electrical
equipment under the bonnet, it is
recommended that exposure to water
(rain, washing, etc.) be limited.
Engine compartment
This engine example is given for illustration
purposes only.
The positions of the following elements may
change:
-
A
ir filter.
-
E
ngine oil dipstick.
-
E
ngine oil filler cap.
-
P
riming pump.
-
D
egassing screw.
1. Screenwash fluid tank.
2. Coolant tank.
3. Brake fluid tank.
4. Battery/Fuses.
5. Remote earth point (-).
6. Fusebox.
7. A i r f i l t e r.
8. Engine oil dipstick.
9. Engine oil filler cap.
10. Priming pump*.
11. Degassing screw*.
The Diesel fuel system operates under
very high pressure.
All work on this circuit must be carried out
only by a
PEUGEOT dealer or a qualified
workshop.
*
D
epending on engine.
7
Practical information
Page 235 of 364

233
Do not discard used oil or fluids into
sewers or onto the ground.
Take used oil to a PEUGEOT dealer or
a
qualified workshop and dispose of it in
the containers reser ved for this purpose.
Engine oil level
The check is carried out either when
the ignition is switched on using the
oil level indicator in the instrument
panel for vehicles equipped with an
electric gauge, or using the dipstick.
To ensure that the reading is correct, your
vehicle must be parked on a
level sur face
with the engine stopped for more than
30
minutes.
It is normal to top up the oil level between
two ser vices (or oil changes). PEUGEOT
recommends that you check the level, and top
up if necessary, every 3,000
miles (5,000 km).
Checking using the dipstick
F Take the dipstick by its coloured grip and pull it out completely.
F
W
ipe the end of the dipstick using a clean
non-fluffy cloth.
F
R
efit the dipstick and push fully down, then
pull it out again to make the visual check:
the correct level is between marks A and B .
A = MA X
B = MIN
If you find that the level is above the A mark or
below the B mark, do not star t the engine.
-
I
f the level is above the MAX mark (risk of
damage to the engine), contact a
PEUGEOT
dealer or a
qualified workshop.
-
I
f the level is below the MIN mark, you must
top up the engine oil.Oil grade
Before topping up the oil or changing the oil,
check that the oil is the correct grade for your
engine and conforms to the manufacturer's
recommendations.
Topping up the engine oil level
The location of the oil filler cap is shown in the
corresponding underbonnet layout view.
F
U
nscrew the oil filler cap to access the filler
opening.
F
A
dd oil in small quantities, avoiding any
spills on engine components (risk of fire).
F
W
ait a few minutes before checking the
level again using the dipstick.
F
A
dd more oil if necessary.
F
A
fter checking the level, carefully refit the oil
filler cap and the dipstick in its tube.
After topping up the oil, the check
when switching on the ignition with the
oil level indicator in the instrument panel
is not valid during the 30
minutes after
topping up.
The location of the dipstick is shown in the
corresponding underbonnet layout view.
7
Practical information
Page 255 of 364
253
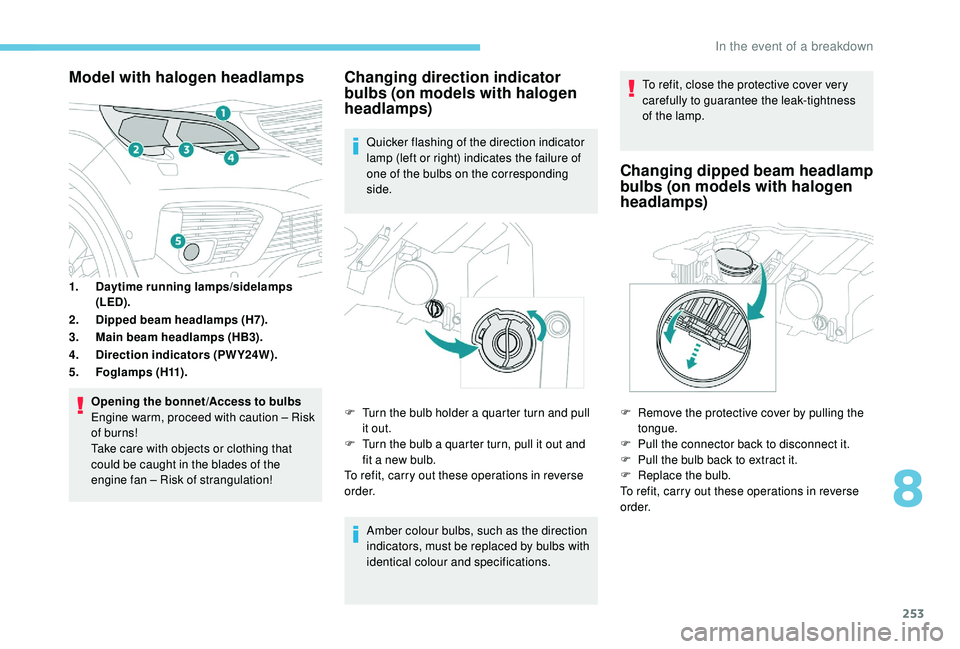
Model with halogen headlamps
1.Daytime running lamps/sidelamps
(LED).
2. Dipped beam headlamps (H7).
3. Main beam headlamps (HB3).
4. Direction indicators (PWY24W).
5. Fo g l a m p s ( H11) .
Opening the bonnet /Access to bulbs
Engine warm, proceed with caution – Risk
of burns!
Take care with objects or clothing that
could be caught in the blades of the
engine fan – Risk of strangulation!
Changing direction indicator
bulbs (on models with halogen
headlamps)
Quicker flashing of the direction indicator
lamp (left or right) indicates the failure of
one of the bulbs on the corresponding
side.
Amber colour bulbs, such as the direction
indicators, must be replaced by bulbs with
identical colour and specifications. To refit, close the protective cover very
carefully to guarantee the leak-tightness
of the lamp.
Changing dipped beam headlamp
bulbs (on models with halogen
headlamps)
F Remove the protective cover by pulling the
tongue.
F
P
ull the connector back to disconnect it.
F
P
ull the bulb back to extract it.
F
R
eplace the bulb.
To refit, carry out these operations in reverse
o r d e r.
F
T
urn the bulb holder a
quarter turn and pull
it out.
F
T
urn the bulb a
quarter turn, pull it out and
fit a
new bulb.
To refit, carry out these operations in reverse
o r d e r.
8
In the event of a breakdown