2018 Peugeot 308 remove seats
[x] Cancel search: remove seatsPage 9 of 324
7
Limit the causes of excess
consumption
Spread loads throughout the vehicle; place
the heaviest items in the bottom of the boot,
as close as possible to the rear seats.
Limit the loads carried in the vehicle and
reduce wind resistance (roof bars, roof rack,
bicycle carrier, trailer, etc.). Preferably, use a
roof box.
Remove roof bars and roof racks after use.
At the end of winter, remove snow tyres and
refit your summer tyres.
Observe the recommendations
on maintenance
Check the tyre pressures regularly, when cold,
referring to the label in the door aperture,
driver's side.
Carry out this check in particular:
-
b
efore a long journey,
-
a
t each change of season,
-
a
fter a long period out of use.
Do not forget the spare wheel and the tyres on
any trailer or caravan. Have your vehicle ser viced regularly (engine
oil, oil filter, air filter, cabin filter, etc.) and
obser ve the schedule of operations in the
manufacturer's service schedule.
When filling the tank, do not continue after the
3
rd cut-off of the nozzle to avoid over flow.
At the wheel of your new vehicle, it is only
after the first 1,900
miles (3,000 kilometres)
that you will see the fuel consumption settle
down to a consistent average. With a BlueHDi Diesel engine, if the SCR
system is faulty, your vehicle becomes
polluting. Visit a PEUGEOT dealer or a
qualified workshop as soon as possible to
bring your vehicle’s nitrogen oxides emissions
back in line with the regulations.
For vehicles fitted with it, avoid using the
Dynamic Pack for too long, in order to limit
your fuel consumption.
.
Eco-driving
Page 53 of 324
51
PEUGEOT i-Cockpit
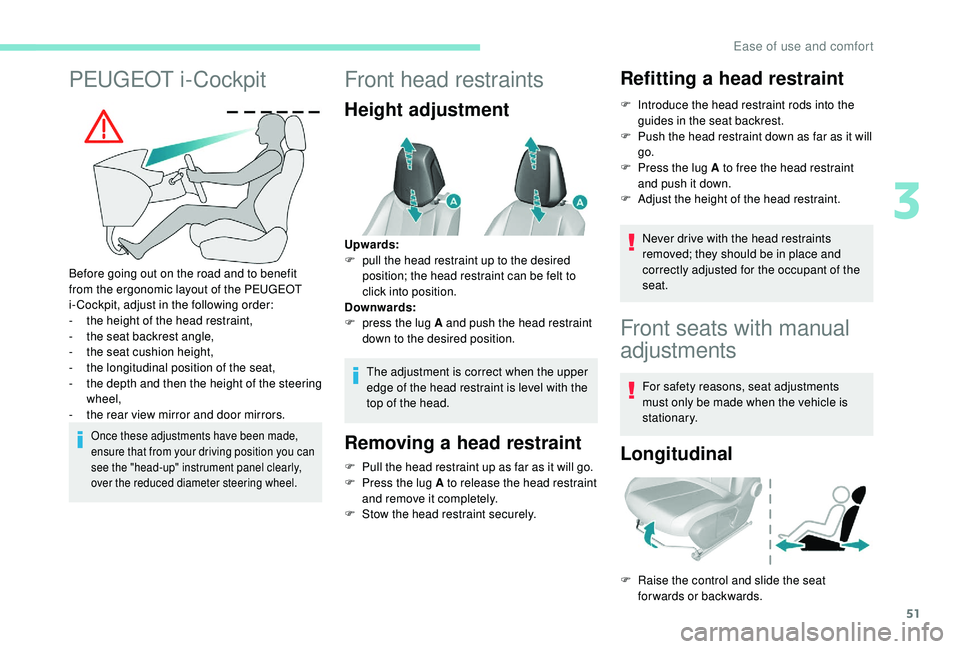
Before going out on the road and to benefit
from the ergonomic layout of the PEUGEOT
i-Cockpit, adjust in the following order:
-
t
he height of the head restraint,
-
t
he seat backrest angle,
-
t
he seat cushion height,
-
t
he longitudinal position of the seat,
-
t
he depth and then the height of the steering
wheel,
-
t
he rear view mirror and door mirrors.
Once these adjustments have been made,
ensure that from your driving position you can
see the "head-up" instrument panel clearly,
over the reduced diameter steering wheel.
Front head restraints
Height adjustment
The adjustment is correct when the upper
edge of the head restraint is level with the
top of the head.
Removing a head restraint
F Pull the head restraint up as far as it will go.
F P ress the lug A to release the head restraint
and remove it completely.
F
S
tow the head restraint securely.
Refitting a head restraint
F Introduce the head restraint rods into the guides in the seat backrest.
F
P
ush the head restraint down as far as it will
go.
F
P
ress the lug A to free the head restraint
and push it down.
F
A
djust the height of the head restraint.
Never drive with the head restraints
removed; they should be in place and
correctly adjusted for the occupant of the
seat.
Upwards:
F
p
ull the head restraint up to the desired
position; the head restraint can be felt to
click into position.
Downwards:
F
p
ress the lug A and push the head restraint
down to the desired position.
Front seats with manual
adjustments
For safety reasons, seat adjustments
must only be made when the vehicle is
stationary.
Longitudinal
F Raise the control and slide the seat forwards or backwards.
3
Ease of use and comfort
Page 66 of 324
64
High load (SW)
Luggage retaining net
This allows the use of the entire loading
capacity, up to the roof:
-
b
ehind the front seats (1
st row) when the
rear seats are folded down,
-
b
ehind the rear seats (2
nd row).
1st row 2
nd row
F Remove the covers, on each side, in the
upper section in the roof.
F
P
osition the net's upper hooks in the roof.
F
A
ttach the bottom of the net to the rings
located either side of the boot carpet or on
the boot rails (depending on trim level).
F
P
ull on the straps to stretch the net.
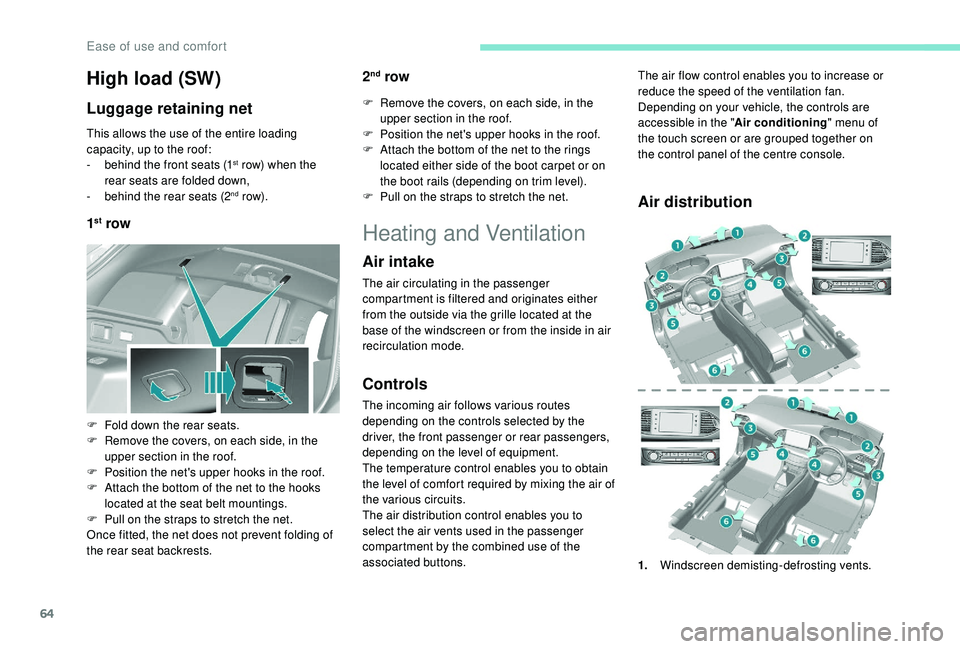
F
F
old down the rear seats.
F
R
emove the covers, on each side, in the
upper section in the roof.
F
P
osition the net's upper hooks in the roof.
F
A
ttach the bottom of the net to the hooks
located at the seat belt mountings.
F
P
ull on the straps to stretch the net.
Once fitted, the net does not prevent folding of
the rear seat backrests.
Heating and Ventilation
Air intake
The air circulating in the passenger
compartment is filtered and originates either
from the outside via the grille located at the
base of the windscreen or from the inside in air
recirculation mode.
Controls
The incoming air follows various routes
depending on the controls selected by the
driver, the front passenger or rear passengers,
depending on the level of equipment.
The temperature control enables you to obtain
the level of comfort required by mixing the air of
the various circuits.
The air distribution control enables you to
select the air vents used in the passenger
compartment by the combined use of the
associated buttons.
Air distribution
The air flow control enables you to increase or
reduce the speed of the ventilation fan.
Depending on your vehicle, the controls are
accessible in the " Air conditioning" menu of
the touch screen or are grouped together on
the control panel of the centre console.
1. Windscreen demisting-defrosting vents.
Ease of use and comfort
Page 97 of 324
95
Lateral airbags
Use only approved covers on the seats,
compatible with the deployment of the
lateral airbags. For information on the
product range of seat covers suitable for
your vehicle, contact a PEUGEOT dealer.
Do not fix or attach anything to the seat
backrests (clothes, etc.) as this could
cause injuries to the thorax or arm when
the lateral airbag is deployed.
Do not sit with the upper part of the body
any nearer to the door than necessary.
The vehicle's front door panels include
side impact sensors.
A damaged door or any unauthorised or
incorrectly executed work (modification or
repair) on the front doors or their interior
trim could compromise the operation of
these sensors – risk of malfunction of the
lateral airbags!
Such work must only be done by a
PEUGEOT dealer or a qualified workshop.General points relating to
child seats
The regulations on carrying children are
specific to each country. Refer to the
legislation in force in your country.
For maximum safety, please obser ve the
following recommendations:
-
I
n accordance with European regulations,
all children under the age of 12 or less
than one and a half metres tall must
travel in approved child seats suited to
their weight , on seats fitted with a seat belt
or ISOFIX mountings.
-
S
tatistically, the safest seats in your
vehicle for carr ying children are the rear
seats.
-
A c
hild weighing less than 9 kg must
travel in the rear ward facing position
both in the front and in the rear.
It is recommended that children travel on
the rear seats of your vehicle:
-
"rearward facing " up to the age of 3,
-
"forward facing " over the age of 3. Ensure that the seat belt is positioned and
tightened correctly.
For child seats with a support leg, ensure
that the support leg is in firm and steady
contact with the floor.
In the front: if necessary, adjust the
passenger seat.
At the rear: if necessary, adjust the
relevant front seat.
Remove and stow the head restraint
before installing a child seat with backrest
on a passenger seat.
Refit the head restraint once the child seat
has been removed.
Child seat at the rear
"Rearward facing"
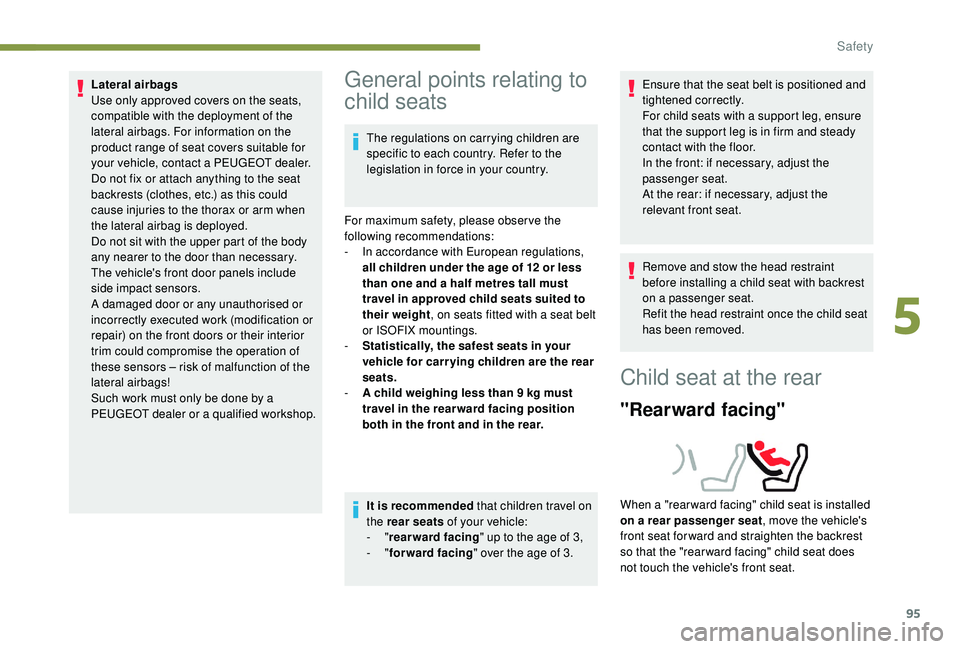
When a "rear ward facing" child seat is installed
on a rear passenger seat
, move the vehicle's
front seat for ward and straighten the backrest
so that the "rear ward facing" child seat does
not touch the vehicle's front seat.
5
Safety
Page 104 of 324
102
(e)To install a child seat at the rear, rear ward
or for ward facing, move the front seat
for ward, then straighten the backrest to
allow enough room for the child seat and
the child's legs.
(f )A child seat with a support leg must
never be installed on the centre rear
passenger seat.
Remove and stow the head restraint
before installing a child seat with backrest
on a passenger seat.
Refit the head restraint when the child
seat is removed.
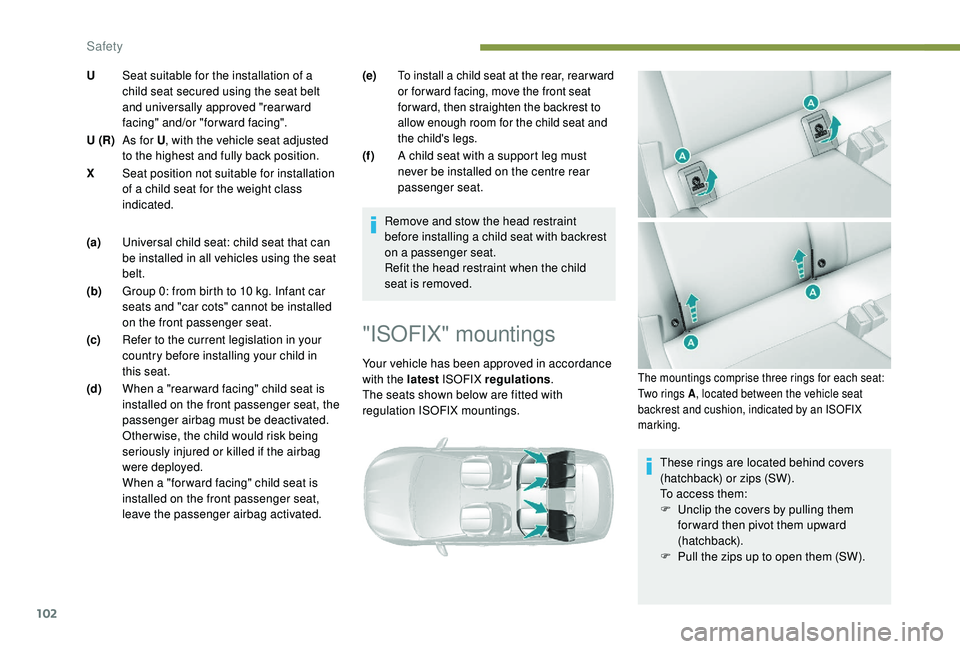
"ISOFIX" mountings
Your vehicle has been approved in accordance
with the latest ISOFIX regulations .
The seats shown below are fitted with
regulation ISOFIX mountings.
These rings are located behind covers
(hatchback) or zips (SW).
To access them:
F
U
nclip the covers by pulling them
forward then pivot them upward
(hatchback).
F
P
ull the zips up to open them (SW).
U
Seat suitable for the installation of a
child seat secured using the seat belt
and universally approved "rearward
facing" and/or "forward facing".
U (R) As for U , with the vehicle seat adjusted
to the highest and fully back position.
X Seat position not suitable for installation
of a child seat for the weight class
indicated.
(a) Universal child seat: child seat that can
be installed in all vehicles using the seat
belt.
(b) Group 0: from birth to 10
kg. Infant car
seats and "car cots" cannot be installed
on the front passenger seat.
(c) Refer to the current legislation in your
country before installing your child in
this seat.
(d) When a "rear ward facing" child seat is
installed on the front passenger seat, the
passenger airbag must be deactivated.
Otherwise, the child would risk being
seriously injured or killed if the airbag
were deployed.
When a "for ward facing" child seat is
installed on the front passenger seat,
leave the passenger airbag activated.The mountings comprise three rings for each seat:
Two rings A , located between the vehicle seat
backrest and cushion, indicated by an ISOFIX
marking.
Safety
Page 105 of 324
103
Do not use the luggage net rings
(hatchback) or stowing rings (SW), located
at the edges of the boot floor.
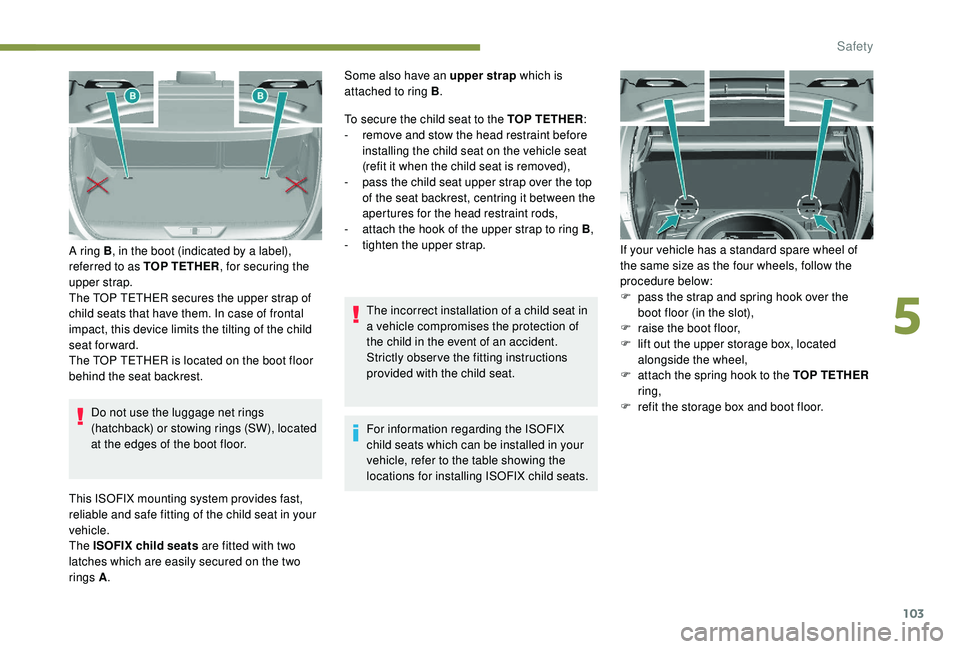
A ring B
, in the boot (indicated by a label),
referred to as TOP TETHER , for securing the
upper strap.
The TOP TETHER secures the upper strap of
child seats that have them. In case of frontal
impact, this device limits the tilting of the child
seat forward.
The TOP TETHER is located on the boot floor
behind the seat backrest.
This ISOFIX mounting system provides fast,
reliable and safe fitting of the child seat in your
vehicle.
The ISOFIX child seats are fitted with two
latches which are easily secured on the two
rings A . To secure the child seat to the TOP TETHER
:
-
r
emove and stow the head restraint before
installing the child seat on the vehicle seat
(refit it when the child seat is removed),
-
p
ass the child seat upper strap over the top
of the seat backrest, centring it between the
apertures for the head restraint rods,
-
a
ttach the hook of the upper strap to ring B
,
-
t
ighten the upper strap.
The incorrect installation of a child seat in
a vehicle compromises the protection of
the child in the event of an accident.
Strictly obser ve the fitting instructions
provided with the child seat.
For information regarding the ISOFIX
child seats which can be installed in your
vehicle, refer to the table showing the
locations for installing ISOFIX child seats. If your vehicle has a standard spare wheel of
the same size as the four wheels, follow the
procedure below:
F
p
ass the strap and spring hook over the
boot floor (in the slot),
F
r
aise the boot floor,
F
l
ift out the upper storage box, located
alongside the wheel,
F
a
ttach the spring hook to the TOP TETHER
ring,
F r efit the storage box and boot floor.
Some also have an upper strap
which is
attached to ring B .
5
Safety
Page 106 of 324
104
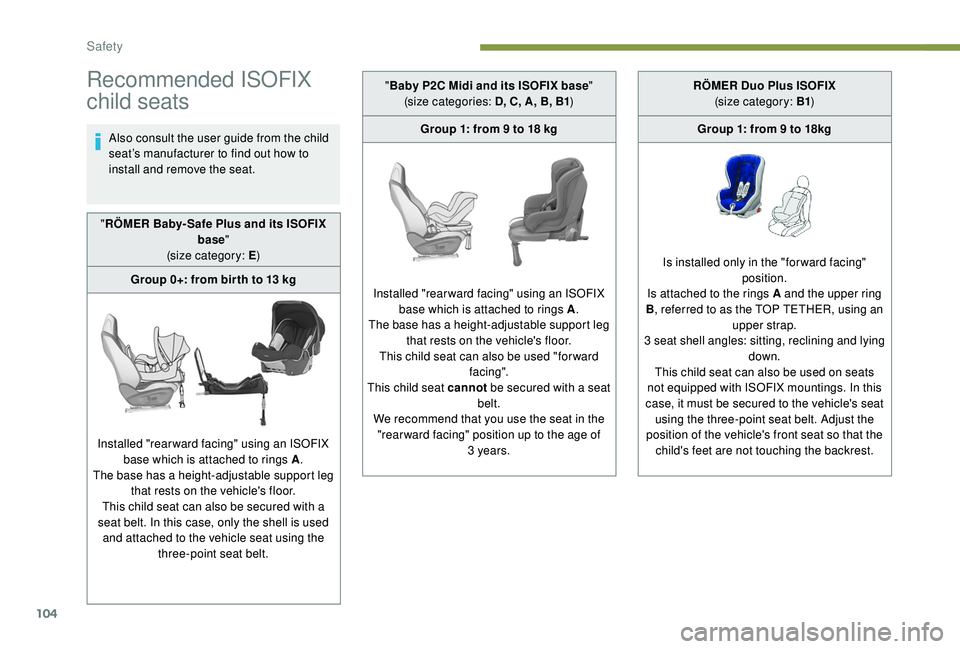
Recommended ISOFIX
child seats
Also consult the user guide from the child
seat’s manufacturer to find out how to
install and remove the seat.
" RÖMER Baby- Safe Plus and its ISOFIX
base"
(size category: E )
Group 0+: from bir th to 13
kg
Installed "rearward facing" using an ISOFIX base which is attached to rings A .
The base has a height-adjustable support leg that rests on the vehicle's floor.
This child seat can also be secured with a
seat belt. In this case, only the shell is used and attached to the vehicle seat using the three-point seat belt. "
Baby P2C Midi and its ISOFIX base "
(size categories: D, C, A, B, B1 )
Group 1: from 9 to 18 kg
Installed "rearward facing" using an ISOFIX base which is attached to rings A .
The base has a height-adjustable support leg that rests on the vehicle's floor.
This child seat can also be used "for ward fac ing".
This child seat cannot be secured with a seat
belt.
We recommend that you use the seat in the "rear ward facing" position up to the age of 3
years.RÖMER Duo Plus ISOFIX
(size category: B1 )
Group 1: from 9 to 18kg
Is installed only in the "forward facing" position.
Is attached to the rings A and the upper ring
B , referred to as the TOP TETHER, using an
upper strap.
3 seat shell angles: sitting, reclining and lying down.
This child seat can also be used on seats
not equipped with ISOFIX mountings. In this
case, it must be secured to the vehicle's seat using the three-point seat belt. Adjust the
position of the vehicle's front seat so that the child's feet are not touching the backrest.
Safety
Page 108 of 324
106
For more information on ISOFIX
mountings and child seats and the
upper strap in particular, refer to the
corresponding section.
Remove and stow the head restraint
before installing a child seat with backrest
on a passenger seat.
Refit the head restraint when the child
seat is removed.
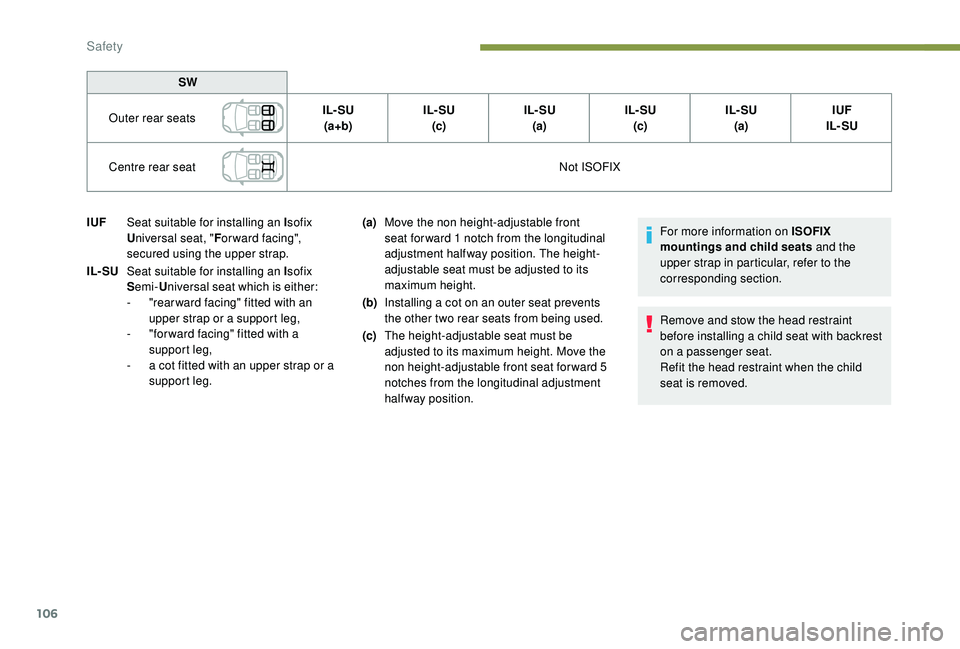
IUF
Seat suitable for installing an I sofix
U niversal seat, " For ward facing",
secured using the upper strap.
IL- SU Seat suitable for installing an I sofix
S emi- Universal seat which is either:
-
"
rear ward facing" fitted with an
upper strap or a support leg,
-
"
for ward facing" fitted with a
support leg,
-
a c
ot fitted with an upper strap or a
support leg. (a)
Move the non height-adjustable front
seat for ward 1 notch from the longitudinal
adjustment halfway position. The height-
adjustable seat must be adjusted to its
maximum height.
(b) Installing a cot on an outer seat prevents
the other two rear seats from being used.
(c) The height-adjustable seat must be
adjusted to its maximum height. Move the
non height-adjustable front seat for ward 5
notches from the longitudinal adjustment
halfway position.
SW
Outer rear seats IL- SU
(a+b) IL- SU
(c) IL- SU
(a) IL- SU
(c) IL- SU
(a) IUF
IL- SU
Centre rear seat Not ISOFIX
Safety