2018 Peugeot 308 height
[x] Cancel search: heightPage 7 of 324
5
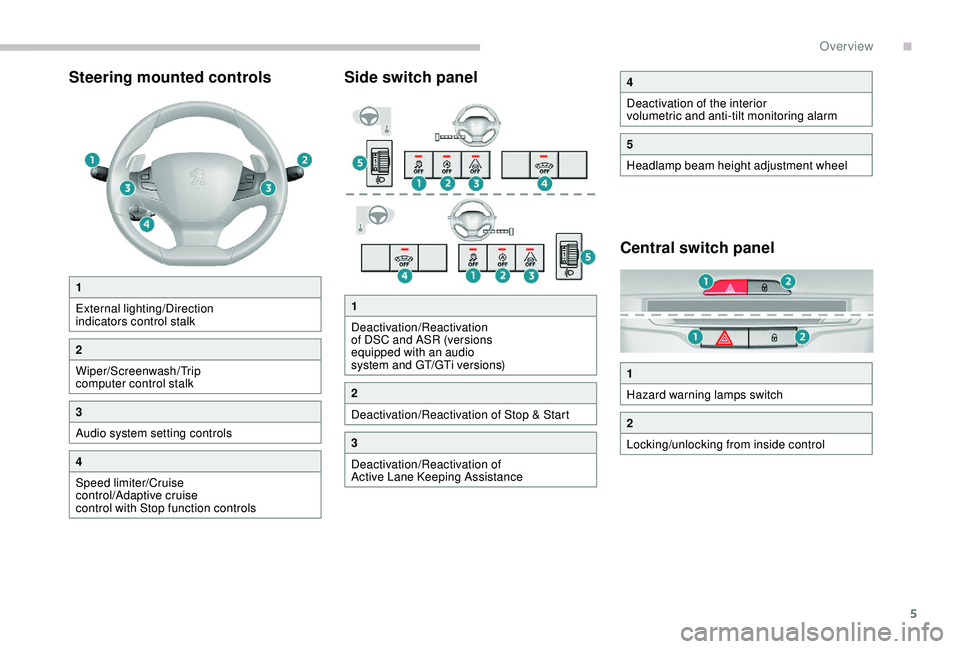
Steering mounted controlsSide switch panel
Central switch panel
1
External lighting/Direction
indicators control stalk
2
Wiper/Screenwash/Trip
computer control stalk
3
Audio system setting controls
4
Speed limiter/Cruise
control/Adaptive cruise
control with Stop function controls
4
Deactivation of the interior
volumetric and anti-tilt monitoring alarm
5
Headlamp beam height adjustment wheel
1
Hazard warning lamps switch
2
Locking/unlocking from inside control
1
Deactivation/Reactivation
of DSC and ASR (versions
equipped with an audio
system and GT/GTi versions)
2
Deactivation/Reactivation of Stop & Start
3
Deactivation/Reactivation of
Active Lane Keeping Assistance
.
Over view
Page 53 of 324
51
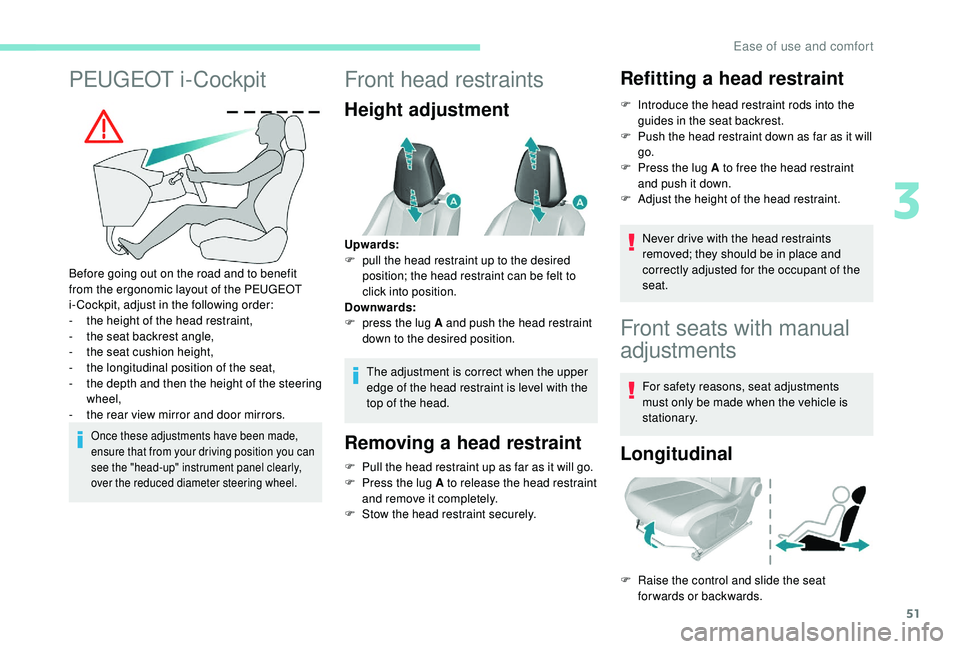
PEUGEOT i-Cockpit
Before going out on the road and to benefit
from the ergonomic layout of the PEUGEOT
i-Cockpit, adjust in the following order:
-
t
he height of the head restraint,
-
t
he seat backrest angle,
-
t
he seat cushion height,
-
t
he longitudinal position of the seat,
-
t
he depth and then the height of the steering
wheel,
-
t
he rear view mirror and door mirrors.
Once these adjustments have been made,
ensure that from your driving position you can
see the "head-up" instrument panel clearly,
over the reduced diameter steering wheel.
Front head restraints
Height adjustment
The adjustment is correct when the upper
edge of the head restraint is level with the
top of the head.
Removing a head restraint
F Pull the head restraint up as far as it will go.
F P ress the lug A to release the head restraint
and remove it completely.
F
S
tow the head restraint securely.
Refitting a head restraint
F Introduce the head restraint rods into the guides in the seat backrest.
F
P
ush the head restraint down as far as it will
go.
F
P
ress the lug A to free the head restraint
and push it down.
F
A
djust the height of the head restraint.
Never drive with the head restraints
removed; they should be in place and
correctly adjusted for the occupant of the
seat.
Upwards:
F
p
ull the head restraint up to the desired
position; the head restraint can be felt to
click into position.
Downwards:
F
p
ress the lug A and push the head restraint
down to the desired position.
Front seats with manual
adjustments
For safety reasons, seat adjustments
must only be made when the vehicle is
stationary.
Longitudinal
F Raise the control and slide the seat forwards or backwards.
3
Ease of use and comfort
Page 54 of 324
52
Before moving the seat backwards,
ensure that there is nothing that might
prevent the full travel of the seat.
There is a risk of trapping or pinching
passengers if present in the rear seats
or jamming the seat if large objects are
placed on the floor behind the seat.
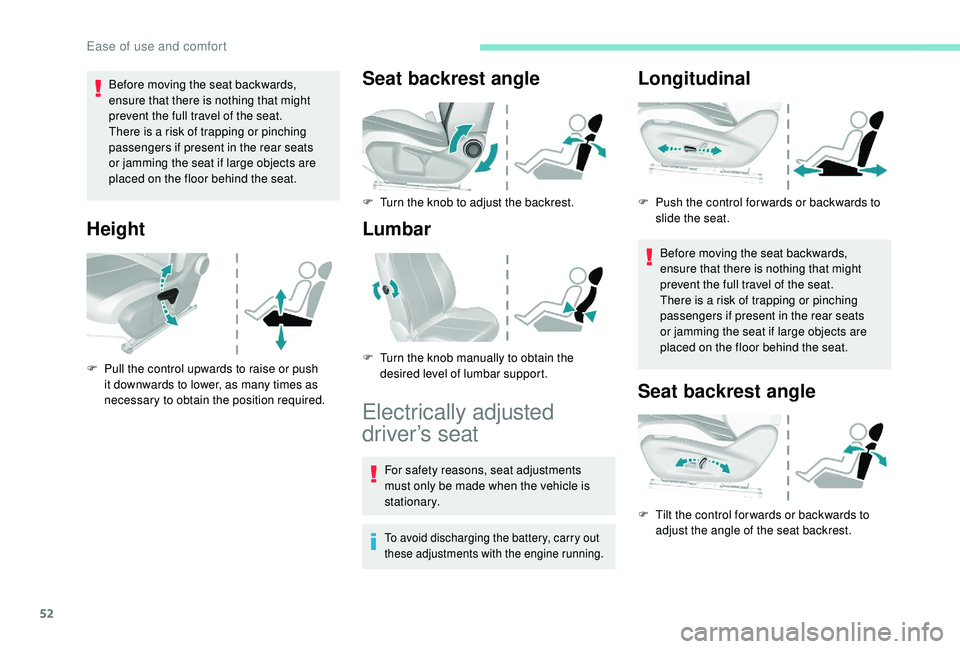
Height
F Pull the control upwards to raise or push it downwards to lower, as many times as
necessary to obtain the position required.
Seat backrest angle
F Turn the knob to adjust the backrest.
Lumbar
Electrically adjusted
driver’s seat
For safety reasons, seat adjustments
must only be made when the vehicle is
stationary.
To avoid discharging the battery, carry out
these adjustments with the engine running.
Longitudinal
Before moving the seat backwards,
ensure that there is nothing that might
prevent the full travel of the seat.
There is a risk of trapping or pinching
passengers if present in the rear seats
or jamming the seat if large objects are
placed on the floor behind the seat.
Seat backrest angle
F Tilt the control for wards or backwards to adjust the angle of the seat backrest.
F
P
ush the control for wards or backwards to
slide the seat.
F
T
urn the knob manually to obtain the
desired level of lumbar support.
Ease of use and comfort
Page 55 of 324
53
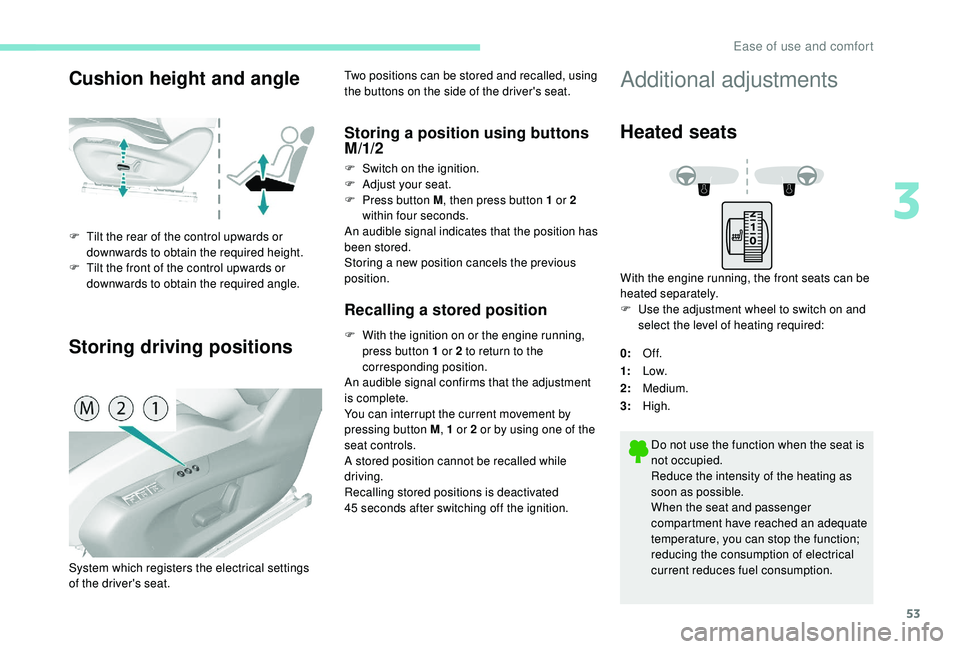
Cushion height and angle
Storing driving positions
F Tilt the rear of the control upwards or downwards to obtain the required height.
F
T
ilt the front of the control upwards or
downwards to obtain the required angle. Two positions can be stored and recalled, using
the buttons on the side of the driver's seat.
Storing a position using buttons
M/1/2
F Switch on the ignition.
F
Adj ust your seat.
F
P
ress button M , then press button 1 or 2
within four seconds.
An audible signal indicates that the position has
been stored.
Storing a new position cancels the previous
position.
Recalling a stored position
F With the ignition on or the engine running, press button 1 or 2 to return to the
corresponding position.
An audible signal confirms that the adjustment
is complete.
You can interrupt the current movement by
pressing button M , 1 or 2 or by using one of the
seat controls.
A stored position cannot be recalled while
driving.
Recalling stored positions is deactivated
45
seconds after switching off the ignition.
System which registers the electrical settings
of the driver's seat.
Additional adjustments
Heated seats
With the engine running, the front seats can be
heated separately.
F
U
se the adjustment wheel to switch on and
select the level of heating required:
0: Of f.
1: Low.
2: Medium.
3: High.
Do not use the function when the seat is
not occupied.
Reduce the intensity of the heating as
soon as possible.
When the seat and passenger
compartment have reached an adequate
temperature, you can stop the function;
reducing the consumption of electrical
current reduces fuel consumption.
3
Ease of use and comfort
Page 57 of 324
55
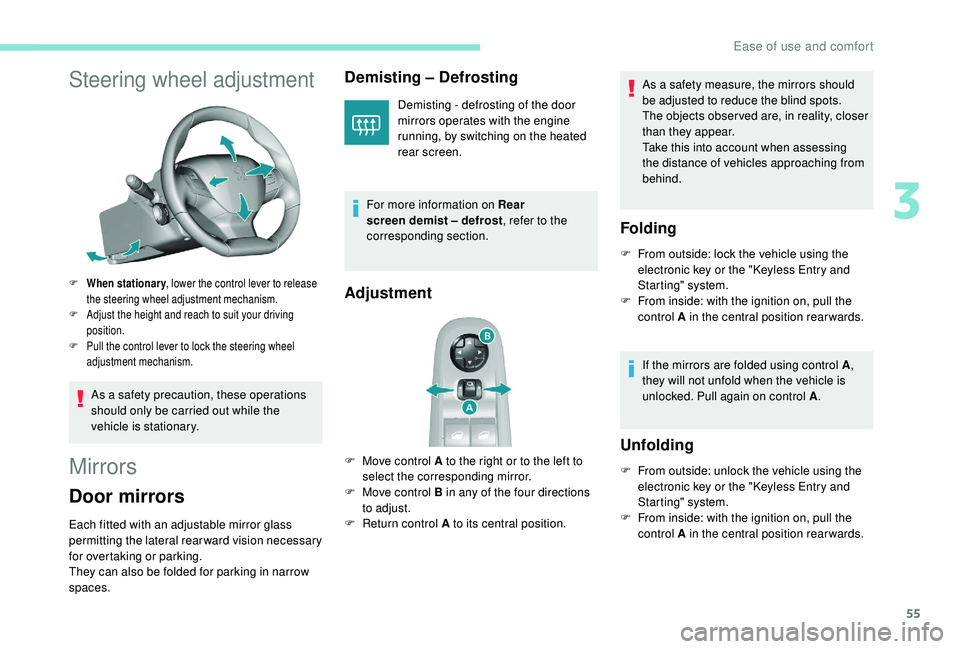
Steering wheel adjustment
F When stationary, lower the control lever to release
the steering wheel adjustment mechanism.
F
A
djust the height and reach to suit your driving
position.
F
P
ull the control lever to lock the steering wheel
adjustment mechanism.
As a safety precaution, these operations
should only be carried out while the
vehicle is stationary.
Mirrors
Door mirrors
Each fitted with an adjustable mirror glass
permitting the lateral rearward vision necessary
for overtaking or parking.
They can also be folded for parking in narrow
spaces.
Demisting – Defrosting
Demisting - defrosting of the door
mirrors operates with the engine
running, by switching on the heated
rear screen.
For more information on Rear
screen demist – defrost , refer to the
corresponding section.
Adjustment
F Move control A to the right or to the left to select the corresponding mirror.
F
M
ove control B in any of the four directions
to adjust.
F
R
eturn control A to its central position. As a safety measure, the mirrors should
be adjusted to reduce the blind spots.
The objects obser ved are, in reality, closer
than they appear.
Take this into account when assessing
the distance of vehicles approaching from
behind.
Folding
F From outside: lock the vehicle using the
electronic key or the " K eyless Entry and
Starting" system.
F
F
rom inside: with the ignition on, pull the
control A in the central position rearwards.
If the mirrors are folded using control A ,
they will not unfold when the vehicle is
unlocked. Pull again on control A .
Unfolding
F From outside: unlock the vehicle using the
electronic key or the " K eyless Entry and
Starting" system.
F
F
rom inside: with the ignition on, pull the
control A in the central position rearwards.
3
Ease of use and comfort
Page 61 of 324
59
2.12 V accessory socket (120 W)
O bser ve the maximum power rating to avoid
damaging your accessory.
3.USB port
4.Cup holder/can holder (depending on
ve r s i o n)
5.Storage (depending on version)
6.Storage – Removable cup holder/can holder
Turn the carrier over for access to the cup
holder/can holder.
7.Front armrest
8.220 V socket (120 W) or USB port
( depending on version)
Obser ve the maximum power rating to avoid
damaging your accessory.
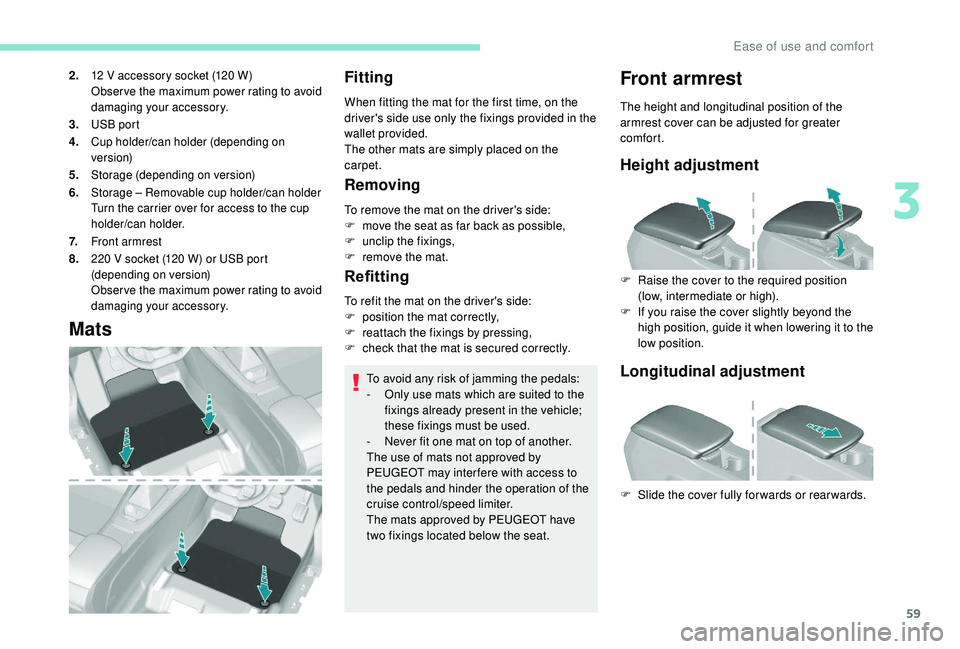
Mats
Fitting
When fitting the mat for the first time, on the
driver's side use only the fixings provided in the
wallet provided.
The other mats are simply placed on the
carpet.
Removing
To remove the mat on the driver's side:
F m ove the seat as far back as possible,
F
un
clip the fixings,
F
r
emove the mat.
Refitting
To avoid any risk of jamming the pedals:
- O nly use mats which are suited to the
fixings already present in the vehicle;
these fixings must be used.
-
N
ever fit one mat on top of another.
The use of mats not approved by
PEUGEOT may inter fere with access to
the pedals and hinder the operation of the
cruise control/speed limiter.
The mats approved by PEUGEOT have
two fixings located below the seat.
Front armrest
The height and longitudinal position of the
armrest cover can be adjusted for greater
comfort.
Height adjustment
F Raise the cover to the required position (low, intermediate or high).
F
I
f you raise the cover slightly beyond the
high position, guide it when lowering it to the
low position.
To refit the mat on the driver's side:
F
p
osition the mat correctly,
F
r
eattach the fixings by pressing,
F
c
heck that the mat is secured correctly.
Longitudinal adjustment
F Slide the cover fully for wards or rear wards.
3
Ease of use and comfort
Page 81 of 324
79
Switching off
The exterior welcome lighting switches off
automatically after a set time, when the ignition
is switched on or on locking the vehicle.
Programming
The activation, deactivation and
choice of welcome lighting duration
are done in the Vehicle/Driving menu,
then Guide-me-home lighting and
Welcome lighting .
The dipped beam headlamps and the
sidelamps come on; your vehicle is also
unlocked.
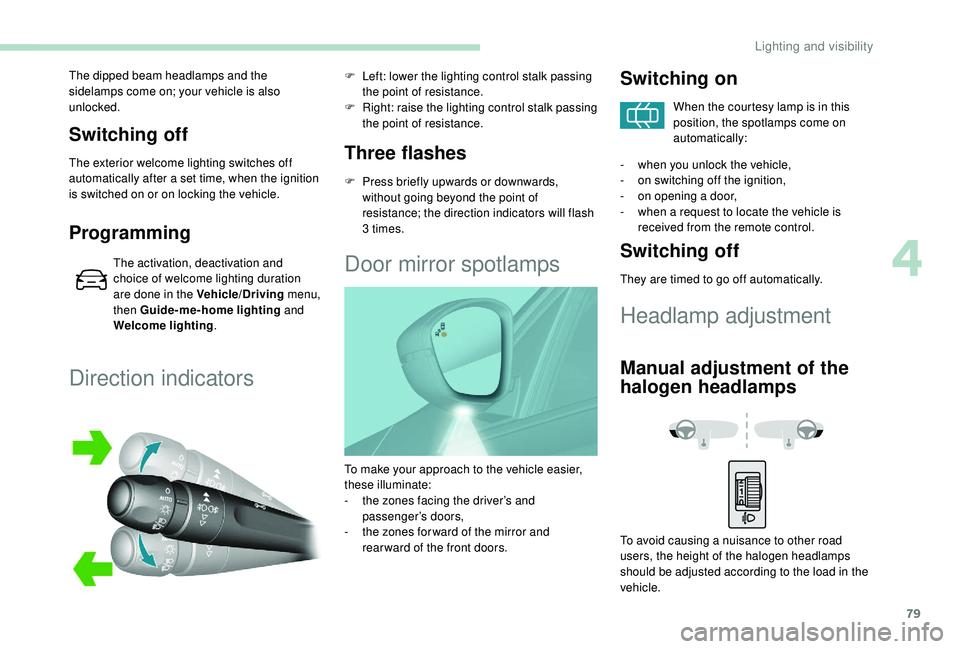
Direction indicators
Three flashes
F Press briefly upwards or downwards,
without going beyond the point of
resistance; the direction indicators will flash
3 times.
F
L
eft: lower the lighting control stalk passing
the point of resistance.
F
R
ight: raise the lighting control stalk passing
the point of resistance.
Door mirror spotlamps
Switching on
When the courtesy lamp is in this
position, the spotlamps come on
automatically:
-
w
hen you unlock the vehicle,
-
o
n switching off the ignition,
-
o
n opening a door,
-
w
hen a request to locate the vehicle is
received from the remote control.
Switching off
They are timed to go off automatically.
Headlamp adjustment
Manual adjustment of the
halogen headlamps
To avoid causing a nuisance to other road
users, the height of the halogen headlamps
should be adjusted according to the load in the
vehicle.
To make your approach to the vehicle easier,
these illuminate:
-
t
he zones facing the driver’s and
passenger’s doors,
-
t
he zones for ward of the mirror and
rear ward of the front doors.
4
Lighting and visibility
Page 82 of 324
80
Automatic adjustment of
"Full LED" technology
headlamps
This system automatically adjusts the height
of the beams from this type of headlamp,
according to the load in the vehicle, to avoid
causing a nuisance to other road users.If a fault occurs, this warning lamp
comes on in the instrument panel,
accompanied by a message and an
audible signal.
Do not touch the "Full LED" technology
headlamps. Risk of electrocution!
The system then places the headlamp beams
in the lowest position.
Have the system checked by a PEUGEOT
dealer or a qualified workshop.
Wiper control stalk
Programming
Your vehicle may also include some functions
that can be configured:
-
a
utomatic windscreen wipers,
-
r
ear wiping on engaging reverse gear.
In wintry conditions, remove snow, ice or
frost present on the windscreen, around
the wiper arms and blades and the
windscreen seal, before operating the
wipers.
Do not operate the wipers on a dry
windscreen. Under extremely hot or cold
conditions, ensure that the wiper blades
are not stuck to the windscreen before
operating the wipers.
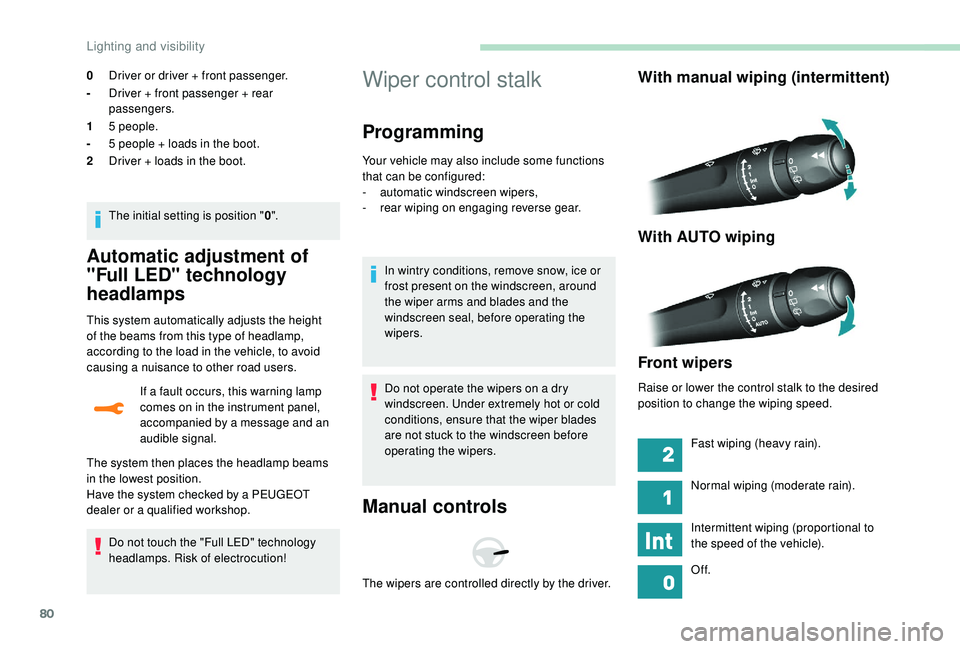
Manual controls
With manual wiping (intermittent)
With AUTO wiping
Front wipers
Raise or lower the control stalk to the desired
position to change the wiping speed.
The wipers are controlled directly by the driver. Fast wiping (heavy rain).
Normal wiping (moderate rain).
Intermittent wiping (proportional to
the speed of the vehicle).
Of f.
0
Driver or driver + front passenger.
- Driver + front passenger + rear
passengers.
1 5 people.
- 5 people + loads in the boot.
2 Driver + loads in the boot.
The initial setting is position " 0".
Lighting and visibility