2018 Peugeot 308 lock
[x] Cancel search: lockPage 180 of 324

178
Maintenance
Correct operation is only possible if the towball
and its carrier are kept clean.
Before cleaning the vehicle with a high-
pressure jet wash, the towball must be removed
and the protective plug fitted to the carrier.Apply the label provided to a clearly visible
area, close to the carrier or in the boot.
Go to a PEUGEOT dealer or a qualified
workshop for any work on the towing
device system.
Towing device with
quickly detachable towball
(SW)
Presentation
F Extract the towball from the bottom of its carrier 1 .
F
R
elease the locking wheel; this
automatically stops in the unlocked position
(position B ).
F
R
efit protective plug 2 to carrier 1 .
F
C
arefully stow the towball in its bag away
from knocks and dirt. No tools are required to install or remove the
towball on this genuine towing device. 1.
Carrier.
2. Protective plug.
3. Safety eye.
4. Connection socket.
5. Detachable towball.
6. Locking/unlocking latch.
7. Locking/unlocking trigger.
8. Safety key lock.
9. Safety lock protective cap.
10. Stowing bag.
Practical information
Page 181 of 324

179
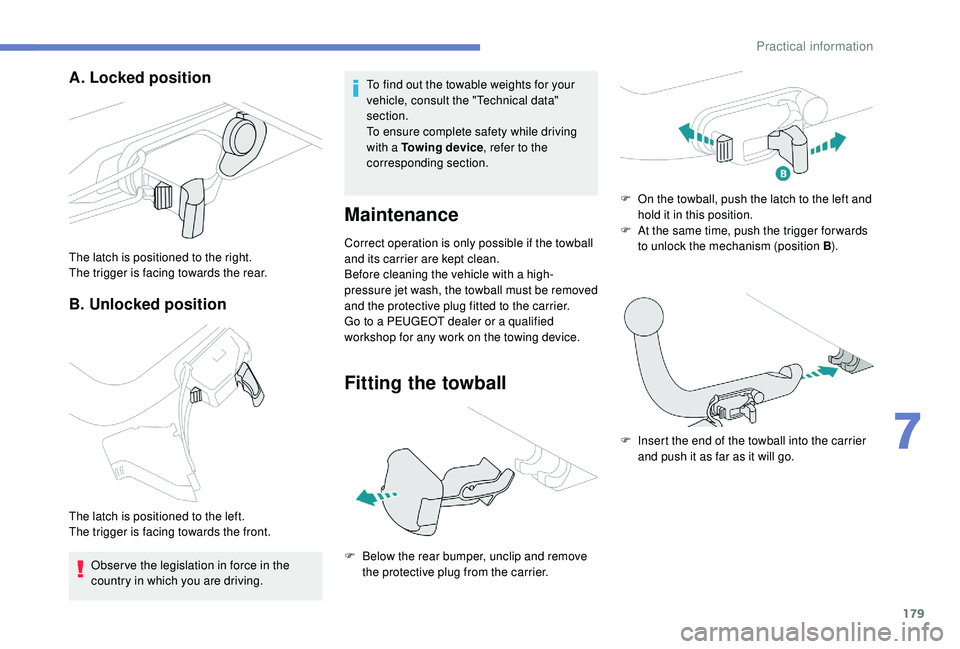
A. Locked position
B. Unlocked position
The latch is positioned to the right.
The trigger is facing towards the rear.
The latch is positioned to the left.
The trigger is facing towards the front. Obser ve the legislation in force in the
country in which you are driving. To find out the towable weights for your
vehicle, consult the "Technical data"
section.
To ensure complete safety while driving
with a Towing device
, refer to the
corresponding section.
Maintenance
Correct operation is only possible if the towball
and its carrier are kept clean.
Before cleaning the vehicle with a high-
pressure jet wash, the towball must be removed
and the protective plug fitted to the carrier.
Go to a PEUGEOT dealer or a qualified
workshop for any work on the towing device.
Fitting the towball
F Below the rear bumper, unclip and remove the protective plug from the carrier. F
O
n the towball, push the latch to the left and
hold it in this position.
F
A
t the same time, push the trigger for wards
to unlock the mechanism (position B ).
F
I
nsert the end of the towball into the carrier
and push it as far as it will go.
7
Practical information
Page 182 of 324

180
Removing the towball
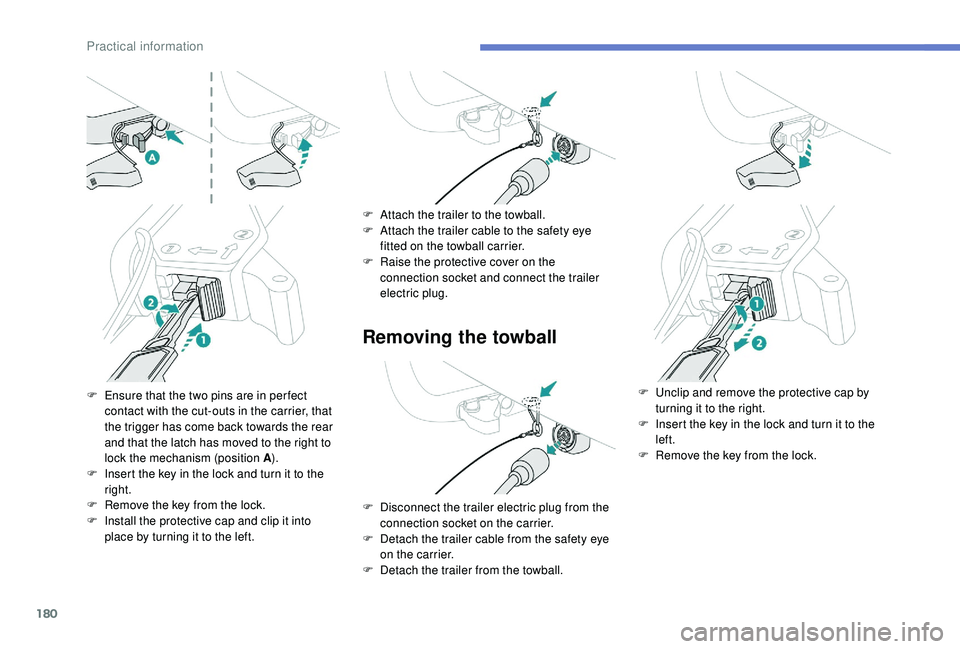
F Ensure that the two pins are in per fect contact with the cut-outs in the carrier, that
the trigger has come back towards the rear
and that the latch has moved to the right to
lock the mechanism (position A ).
F
I
nsert the key in the lock and turn it to the
right.
F
R
emove the key from the lock.
F
I
nstall the protective cap and clip it into
place by turning it to the left. F
A
ttach the trailer to the towball.
F
A
ttach the trailer cable to the safety eye
fitted on the towball carrier.
F
R
aise the protective cover on the
connection socket and connect the trailer
electric plug.
F
D
isconnect the trailer electric plug from the
connection socket on the carrier.
F
D
etach the trailer cable from the safety eye
on the carrier.
F
D
etach the trailer from the towball.F
U nclip and remove the protective cap by
turning it to the right.
F
I
nsert the key in the lock and turn it to the
left.
F
R
emove the key from the lock.
Practical information
Page 183 of 324

181
F Press the trigger fully in and remove the towball by pulling it toward you.
F
O
n the towball, push the latch to the left and
hold it in this position.
F
A
t the same time, push the trigger for wards
to unlock the mechanism (position B ).
F
I
nstall and clip the protective plug in the
carrier located below the rear bumper.
F
S
tow the towball in its bag.
Energy economy mode
System which manages the duration of use of
certain functions to conser ve a sufficient level
of charge in the battery.
After the engine has stopped, you can still use
functions such as the audio and telematics
system, windscreen wipers, dipped beam
headlamps,
courtesy lamps, etc. for a
maximum combined duration of about forty
minutes.
Switching to this mode
A message appears in the instrument panel
screen indicating that the vehicle has switched
to economy mode and the active functions are
put on standby.
If a telephone call is being made at this
time, it will be maintained for around
10
minutes with the Bluetooth hands-free
kit of your audio system.
Exiting the mode
These functions will be automatically restored
the next time the vehicle is used.
In order to restore the use of these functions
immediately, start the engine and let it run:
-
f
or less than ten minutes, to use the
equipment for approximately five minutes, A flat battery prevents the engine from
starting.
For more information on the 12
V batter y
,
refer to the corresponding section.
Load reduction mode
System which manages the use of certain
functions according to the level of charge
remaining in the battery.
When the vehicle is being driven, the load
reduction function temporarily deactivates
certain functions, such as air conditioning,
heated rear screen, etc.
The deactivated functions are reactivated
automatically as soon as conditions permit. -
f
or more than ten minutes, to use the
equipment for up to approximately thirty
minutes.
Let the engine run for the duration specified to
ensure that the battery charge is sufficient.
Do not repeatedly and continuously restart the
engine in order to charge the battery.
7
Practical information
Page 192 of 324

190
In the event of contact with the skin, wash the
affected area with soap and water. In the event
of contact with the eyes, wash (irrigate) the
eyes with large amounts of water or with an eye
wash solution for at least 15 minutes. If you feel
a persistent burning sensation or irritation, get
medical attention.
If swallowed, immediately wash out the mouth
with clean water and then drink plenty of water.
In certain conditions (at high temperature,
for example), the risk of release of ammonia
cannot be excluded: do not inhale the vapour.
Ammonia has an irritant effect on mucous
membranes (eyes, nose and throat).
Keep AdBlue
® in its original container and
out of the reach of children.
Procedure
Before starting the top up procedure, ensure
that the vehicle is parked on a flat and level
sur face.
In winter, check that the temperature of the
vehicle is above -11°C. If not, due to freezing,
the AdBlue
® cannot be poured into the tank.
Park your vehicle somewhere warmer for a few
hours before topping up. In the event of an AdBlue
® breakdown,
confirmed by the message "Add AdBlue:
Starting impossible", you must top up with
at least 5
litres.
Never pour AdBlue
® into the Diesel fuel
tank.
For the specifics associated with the
access configuration for the AdBlue
® tank
(via the boot or via the fuel filler flap), refer
to the descriptions given in detail further
on.
If any AdBlue
® is splashed, or if there are
any spillages on the side of the body, rinse
immediately with cold water or wipe with a
damp cloth.
If the fluid has crystallised, clean it off
using a sponge and hot water.
Important: in the event of a top-up after a
breakdown because of a lack of AdBlue,
you must wait around 5
minutes before
switching on the ignition, without opening
the driver’s door, locking the vehicle,
introducing the key into the ignition
switch, or introducing the key of the
K
eyless Entr y and Star ting system into
the passenger compartment.
Switch on the ignition, then wait for
10
seconds before starting the engine.
Practical information
Page 193 of 324

191
Access to the AdBlue® tank
via the boot
Filling the AdBlue® tank is an operation
included in every routine ser vice on your
vehicle by a PEUGEOT dealer or a qualified
workshop.
Nevertheless, given the capacity of the tank, it
may be necessary to top up the fluid between
ser vices, as soon as an alert (warning lamps
and a message) indicates it.
You can go to a PEUGEOT dealer or a qualified
workshop.
If you intend to do the topping-up yourself,
read the following procedure carefully.
The supply in a non-drip bottle simplifies
topping up.
F
S
witch off the ignition and remove the key. F
W
orking inside the boot, lift the carpet and
then, depending on the equipment, lift out
the spare wheel and/or the storage well.
F
W
ithout pressing, turn the black cap a
quarter turn anti-clockwise and lift it off.
F
T
urn the blue cap anti-clockwise.
F
O
btain non-drip bottles of AdBlue
®. After
first checking the use-by date, carefully
read the instructions for use on the label
before pouring the contents of the bottle into
your vehicle's AdBlue
® tank.
F
A
fter filling, per form the same operations in
reverse order.
With subwoofer
- Carefully disengage the wiring harness from its housing to give a little more free cable
length.
-
U
ndo the central nut and remove the
fastener (nut and bolt).
F
P
lace the subwoofer to the side of the boot.
7
Practical information
Page 194 of 324

192
Read the following procedure carefully to
be able to top up properly.
F
S
witch off the ignition and remove the key.
F
W
ith the vehicle unlocked and the fuel filler
flap open, turn the AdBlue
® blue filler cap
anti-clockwise.
F
O
btain a AdBlue
® container. After first
checking the use-by date, read the
instructions on the label carefully before
pouring the contents of the container into
your vehicle's AdBlue
® tank.
Or
F
I
nsert the AdBlue
® pump nozzle and refill
the tank until the nozzle stops automatically.
Important:
To avoid over flowing the AdBlue
® tank, it
i
s recommended:
F
T
o top up between 10 and 13
litres
using AdBlue
® containers.
Or
F
I
f filling in a ser vice station, stop after
the third automatic shut-off of the
nozzle.
F
A
fter refilling, carry out these same
operations in reverse order.
Access to the AdBlue® tank
via the fuel filler flap
A blue cap behind the fuel filler flap indicates
access to the AdBlue® tank.
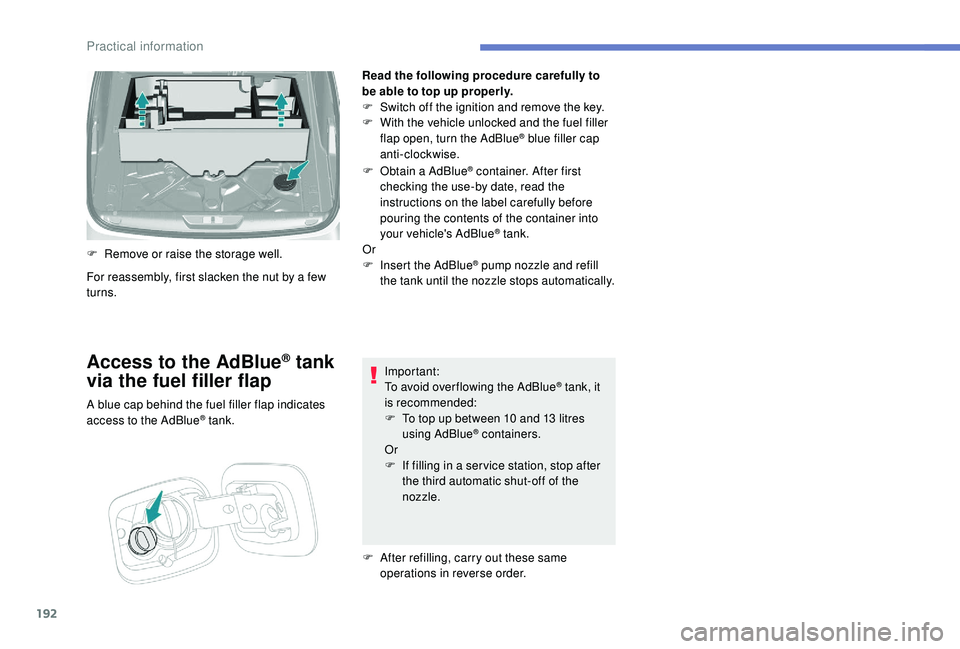
For reassembly, first slacken the nut by a few
turns. F
R
emove or raise the storage well.
Practical information
Page 202 of 324

200
Removing the pipe and
cartridge
Be careful of fluid discharge.
The expiry date of the fluid is indicated on
the cartridge.
The sealant cartridge is designed for
single use; it must be replaced even if only
partly used.
After use, do not discard the cartridge into
the environment, take it to an authorised
waste disposal site or a PEUGEOT dealer.
Do not forget to obtain a new sealant
cartridge, available from PEUGEOT
dealers or from a qualified workshop.
Checking/adjusting tyre
pressures
You can also use the compressor,
without injecting sealant, to check and, if
necessary, adjust the tyre pressures.F
T
urn selector A to the "Air"
position.
F
U
ncoil the white pipe G fully.
F
C
onnect the pipe to the tyre
valve.
F
C
onnect the compressor's electric plug to
the vehicle's 12 V socket.
Only the 12 V socket located at the front
of the vehicle can be used.
F
S
tart the vehicle and leave the engine
running.
F
T
urn the pipe assembly 2 to the left until it
comes into contact with the unit.
F
D
isconnect the connector 1 from the
cartridge by turning it a quarter turn anti-
clockwise.
F
P
ull the pipe assembly 2 out slightly, then
disconnect the connector 3 from the air
intake pipe by turning it a quarter turn anti-
clockwise. F
R
emove the pipe assembly 2
.
F
K
eep the compressor vertical.
F
U
nscrew the cartridge 4 from the bottom.
To fit the new cartridge and new pipe, carry out
these operations in reverse order.
The tyre inflation pressures are given on
this label.
In the event of a breakdown