2018 Peugeot 308 lock
[x] Cancel search: lockPage 127 of 324
125
Starting the vehicle
From mode P:
F P ress the brake pedal down fully.
F
S
tart the engine.
F
M
aintaining pressure on the brake pedal,
press the Unlock button.
F
P
ush once or twice rear ward to select the
automatic mode D , or for ward to engage
reverse R .
From neutral N :
F
P
ress the brake pedal down fully.
F
S
tart the engine.
F
M
aintaining pressure on the brake pedal,
push rear ward to select the automatic
mode D , or for ward, while pressing the
Unlock
button to engage reverse R .
Then, from D or R :
F
R
elease the brake pedal.
F
A
ccelerate progressively to automatically
release the electric parking brake.
F
W
ith the parking brake released, the vehicle
then moves off.
In severe wintry conditions (temperature
below -23°C), it is recommended that the
engine be allowed to run for a few minutes
before moving off, to ensure the correct
operation and durability of the engine and
gearbox. If your vehicle has an automatic gearbox,
never try to start the engine by pushing
the vehicle.
Stopping the vehicle
Whatever the state of the gearbox when the
ignition is switched off, mode P is engaged
automatically, with the exception of mode N
,
in which case mode P will be engaged after
a delay of 5
seconds (allowing the change to
free-wheel).
Check that mode P has been engaged and that
the electric parking brake has been applied
automatically; if not, apply it manually.
The corresponding indicator lamps for
the selector and the electric parking
brake control lever must be on, as well
as the ones in the instrument panel.
SPORT/ECO control
Driver Sport Pack
With the engine running, when the Driver
Spor t Pack is activated, the gearbox delays
changing up for a more dynamic driving style.
The programme is automatically deactivated
when the ignition is switched off.Eco mode
Activating this mode reduces fuel consumption
by optimising the operation of the heating and
air conditioning and, depending on version, the
pedals, the automatic gearbox and the gear
shift indicator. Activating the Driver Spor t Pack is not
recommended in the following situations:
-
A
SR system deactivated,
-
l
ow fuel level reached,
-
l
ow AdBlue level reached.
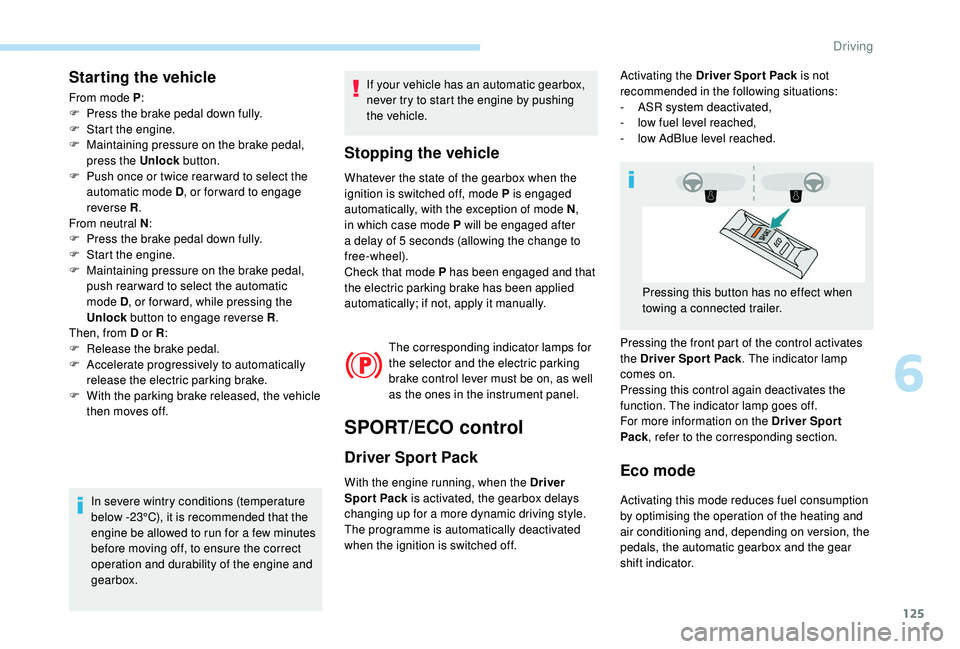
Pressing the front part of the control activates
the Driver Spor t Pack . The indicator lamp
comes on.
Pressing this control again deactivates the
function. The indicator lamp goes off.
For more information on the Driver Spor t
Pack , refer to the corresponding section.
Pressing this button has no effect when
towing a connected trailer.
6
Driving
Page 128 of 324
126
Operating faults
Malfunction of the gearbox
This is signalled by the illumination of
this warning lamp, accompanied by the
display of a message and an audible
signal, when the ignition is switched
on.control paddles are inoperative, mode M is no
longer available. You may feel a pronounced
jolt when engaging reverse. This does not
present any risk for the gearbox.
Malfunction of the selector
In the event of a minor fault
You are alerted by this warning lamp
lighting up, accompanied by the display
of a message and an audible signal.
Drive cautiously and go to a PEUGEOT dealer
or a qualified workshop.
In certain cases, the selector indicator lamps
may not come on, but the state of the gearbox
is still displayed in the instrument panel.
In the event of a serious fault
Stop as soon as it is safe to do so, away
from the traffic, and call a PEUGEOT
dealer or a qualified workshop.
When the ignition is switched off, the
gearbox goes into mode P automatically. You are alerted by the illumination of
this warning lamp.
Activation/Deactivation
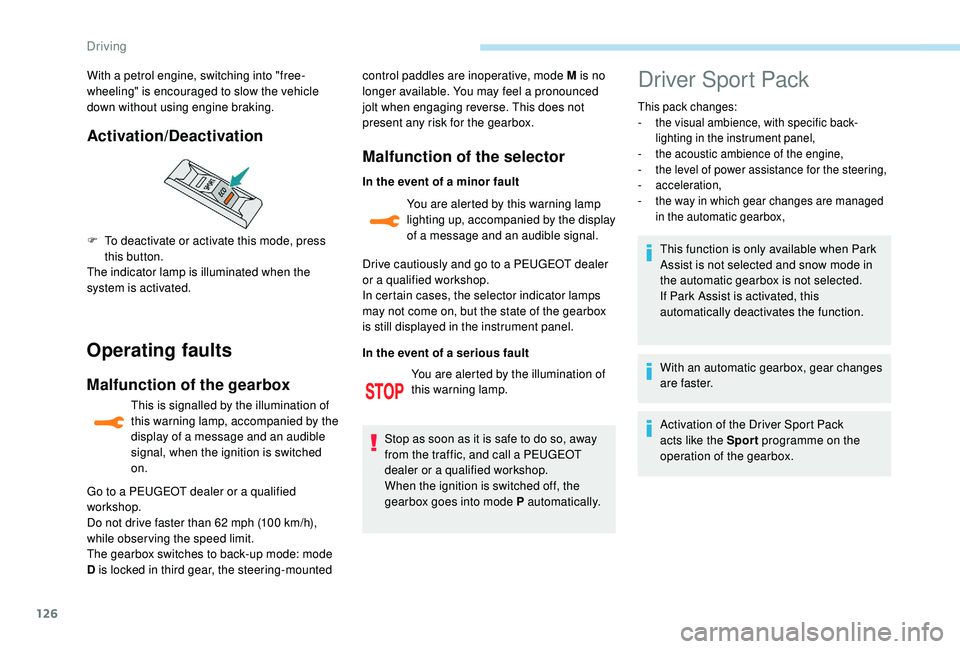
F To deactivate or activate this mode, press
this button.
The indicator lamp is illuminated when the
system is activated. With a petrol engine, switching into "free-
wheeling" is encouraged to slow the vehicle
down without using engine braking.
Go to a PEUGEOT dealer or a qualified
workshop.
Do not drive faster than 62
mph (100 km/h),
while obser ving the speed limit.
The gearbox switches to back-up mode: mode
D is locked in third gear, the steering-mounted
Driver Sport Pack
This pack changes:
- t he visual ambience, with specific back-
lighting in the instrument panel,
-
t
he acoustic ambience of the engine,
-
t
he level of power assistance for the steering,
-
acceleration,
-
t
he way in which gear changes are managed
in the automatic gearbox,
This function is only available when Park
Assist is not selected and snow mode in
the automatic gearbox is not selected.
If Park Assist is activated, this
automatically deactivates the function.
With an automatic gearbox, gear changes
a r e f a s t e r.
Activation of the Driver Sport Pack
acts like the Spor t programme on the
operation of the gearbox.
Driving
Page 164 of 324

162
A.Parallel parking.
B. Exit from a parallel parking space.
C. Bay parking.
During manoeuvring phases, the steering
wheel per forms rapid turns: do not hold
the steering wheel, do not put your hands
between the spokes of the steering wheel.
Watch out for any object that could block
the manoeuvre (loose clothing, scar ves,
ties, etc.) - injury risk!
When the Park Assist is active, it prevents
the Stop & Start going into STOP mode.
In STOP mode, activating Park Assist
restarts the engine. The Park Assist system takes control
of the assistance for a maximum of
4
manoeuvre cycles. The function is
deactivated after these 4 cycles. If you
think that your vehicle is not positioned
correctly, you should then take control of
the steering to carry out the manoeuvre.
The sequence of manoeuvres and the
driving instructions are displayed on the
touch screen.
You should always check the surroundings
of your vehicle before starting a
manoeuvre. The parking sensors function is
not available during parking space
measurement. It intervenes later when
manoeuvring to warn you that your vehicle
is approaching an obstacle: the audible
signal becomes continuous when the
obstacle is less than thirty centimetres
away.
If you have deactivated the parking
sensors, they are automatically
reactivated during assisted parking
manoeuvres.
Activation of Park Assist deactivates the
Blind Spot Detection.
Operation
Assistance with parallel parking
manoeuvres
When you have identified a parking space:
F
Sel
ect "Park Assist " in the
Vehicle/Driving menu, then
the Driving functions tab of
the touch screen to activate the
function.
The Park Assist system provides assistance for
the following manoeuvres:
The assistance is activated:
the display of this symbol and
a speed limit indicate that
the steering manoeuvres are
controlled by the system: do not
touch the steering wheel.
The assistance is deactivated:
the display of this symbol
indicates that the steering
manoeuvres are no longer
controlled by the system: you
must take control of the steering.
Driving
Page 172 of 324
170
Fuel tank
Tank capacity: about 53 litres (or 45 litres
depending on the version).
Opening
Refilling
At least 6 litres of fuel must be added, in order
t o be registered by the fuel gauge.
Opening the filler cap may create a noise
caused by an inrush of air. This is entirely
normal and results from the sealing of the fuel
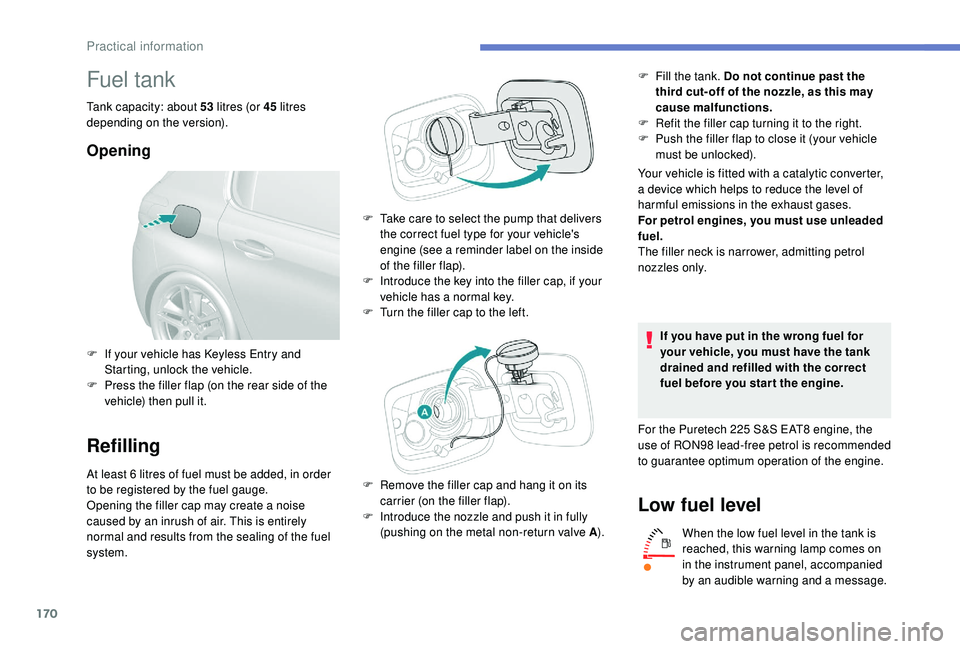
system. F
T
ake care to select the pump that delivers
the correct fuel type for your vehicle's
engine (see a reminder label on the inside
of the filler flap).
F
I
ntroduce the key into the filler cap, if your
vehicle has a normal key.
F
T
urn the filler cap to the left.
Your vehicle is fitted with a catalytic converter,
a device which helps to reduce the level of
harmful emissions in the exhaust gases.
For petrol engines, you must use unleaded
fuel.
The filler neck is narrower, admitting petrol
nozzles only.
If you have put in the wrong fuel for
your vehicle, you must have the tank
drained and refilled with the correct
fuel before you star t the engine.
For the Puretech 225 S&S EAT8 engine, the
use of RON98 lead-free petrol is recommended
to guarantee optimum operation of the engine.
Low fuel level
When the low fuel level in the tank is
reached, this warning lamp comes on
in the instrument panel, accompanied
by an audible warning and a message.
F
I
f your vehicle has
K
eyless Entry and
Starting, unlock the vehicle.
F
P
ress the filler flap (on the rear side of the
vehicle) then pull it.
F
R
emove the filler cap and hang it on its
carrier (on the filler flap).
F
I
ntroduce the nozzle and push it in fully
(pushing on the metal non-return valve A ).F
F
ill the tank. Do not continue past the
third cut- off of the nozzle, as this may
cause malfunctions.
F
R
efit the filler cap turning it to the right.
F
P
ush the filler flap to close it (your vehicle
must be unlocked).
Practical information
Page 176 of 324
174
Removing
F Use a screwdriver as a lever to release each fixing clip.
Do not forget to remove the very cold
climate screen:
-
w
hen the external temperature is greater
than 10°C (example: in summer, etc.),
-
i
n the event of towing,
-
a
t speeds above 75 mph (120 km/h).
Towing device
Load distribution
F D istribute the load in the trailer so that the
heaviest items are as close as possible to
the axle and the nose weight approaches
the maximum permitted without
exceeding it.
Air density decreases with altitude, thus
reducing engine performance. The maximum
load which can be towed must be reduced by
10% per 1,000
metres of altitude. Use towing devices and their genuine
harnesses approved by PEUGEOT. It
is recommended that the installation be
per formed by a PEUGEOT dealer or a
qualified workshop.
If the towing device is not fitted by
a PEUGEOT dealer, it must still be
fitted in accordance with the vehicle
manufacturer's instructions.
Certain driving assistance or manoeuvring
assistance functions are automatically
disabled if an approved towing device is
used.
Obser ve the maximum authorised towable
weight, indicated on your vehicle's
registration certificate, the manufacturer's
label as well as in the Technical data
section of this guide.
Complying with the maximum
authorised nose weight (towball)
also includes the use of accessories
(bicycle carriers, tow boxes, etc.).
Obser ve the legislation in force in the
country in which you are driving.
GTi towing
Your vehicle cannot be fitted with a towing
device.
Towing device with towball
Before each use
Check that the towball is correctly fitted,
verifying the follow points:
Hatchback:
-
t
he green mark on the locking wheel
is in line with the green mark on the
towball,
-
t
he locking wheel is in contact with the
towball (position A ).
-
t
he safety lock is on and the key
removed; the locking wheel can no
longer be operated,
-
t
he towball must not be able to move in
its carrier; test by shaking it with your
hand.
SW:
-
t
he towball is correctly engaged
(position A ),
-
t
he safety lock is on and the key
removed; the trigger can no longer be
operated,
-
t
he towball must not be able to move in
its carrier; test by shaking it with your
hand.
If the towball is not locked, the trailer can
detach – accident risk!
Practical information
Page 177 of 324
175
During use
Never release the device with a trailer or
load carrier on the towball.
Never exceed the maximum authorised
weight for the vehicle – the Gross Train
Weight or GTW.
It is essential that the maximum
authorised load be complied with on the
towing device: if it is exceeded, this device
may detach from the vehicle, which is a
serious accident risk.
Check that the trailer lamps work
c o r r e c t l y.
Before setting off, check the adjustment of
the headlamp beam height.
For more information on Headlamp
adjustment, refer to the corresponding
section.
Following use
When travelling without a trailer or load
carrier, the towball must be removed and
the blanking plug inserted in the carrier.
This measure applies particularly where
the towball might obscure visibility of the
number plate or its lighting.Blanking plug
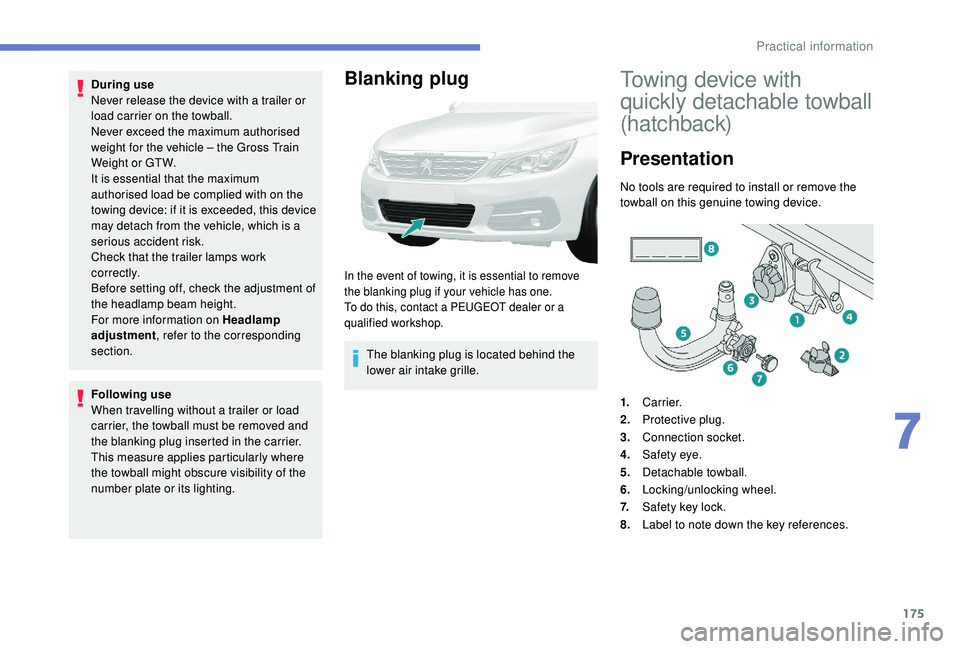
In the event of towing, it is essential to remove
the blanking plug if your vehicle has one.
To do this, contact a PEUGEOT dealer or a
qualified workshop.
The blanking plug is located behind the
lower air intake grille.
Towing device with
quickly detachable towball
(hatchback)
Presentation
No tools are required to install or remove the
towball on this genuine towing device.
1. Carrier.
2. Protective plug.
3. Connection socket.
4. Safety eye.
5. Detachable towball.
6. Locking/unlocking wheel.
7. Safety key lock.
8. Label to note down the key references.
7
Practical information
Page 178 of 324
176
Trailers with LED lamps are not
compatible with the wiring harness of this
device.
To know the Technical data , and, in
particular, the towable weights for your
vehicle, refer to the corresponding section.
To ensure complete safety while driving
with a To w b a r d e v i c e , refer to the
corresponding section.
Fitting the towball
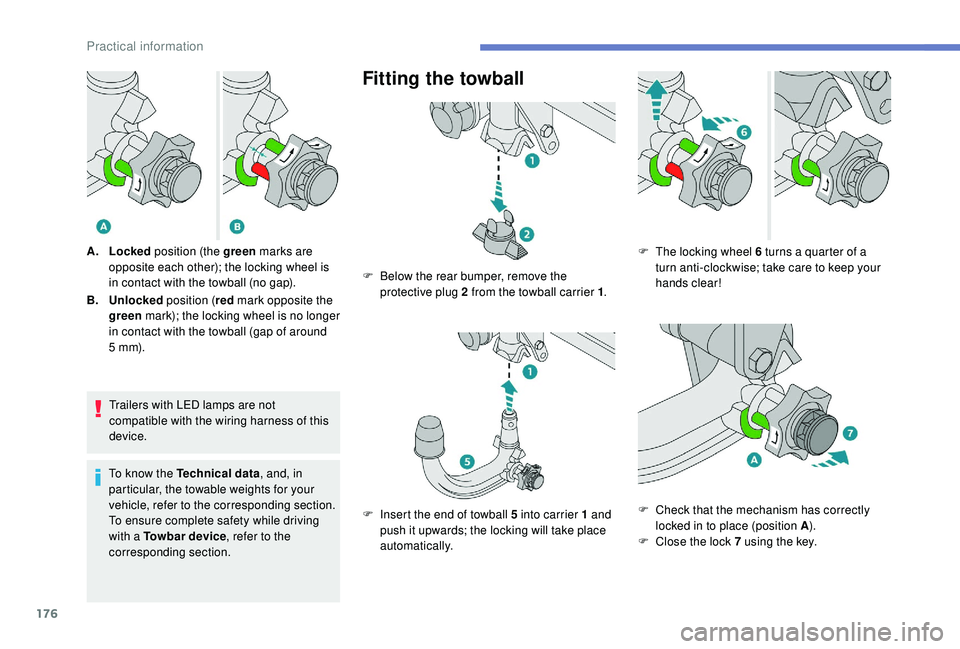
A. Locked position (the green marks are
opposite each other); the locking wheel is
in contact with the towball (no gap).
B. Unlocked position (red mark opposite the
green mark); the locking wheel is no longer
in contact with the towball (gap of around
5
m m). F
B
elow the rear bumper, remove the
protective plug 2 from the towball carrier 1 .
F
I
nsert the end of towball 5 into carrier 1 and
push it upwards; the locking will take place
automatically. F
T he locking wheel 6 turns a quarter of a
turn anti-clockwise; take care to keep your
hands clear!
F
C
heck that the mechanism has correctly
locked in to place (position A ).
F
C
lose the lock 7 using the key.
Practical information
Page 179 of 324
177
Removing the towball
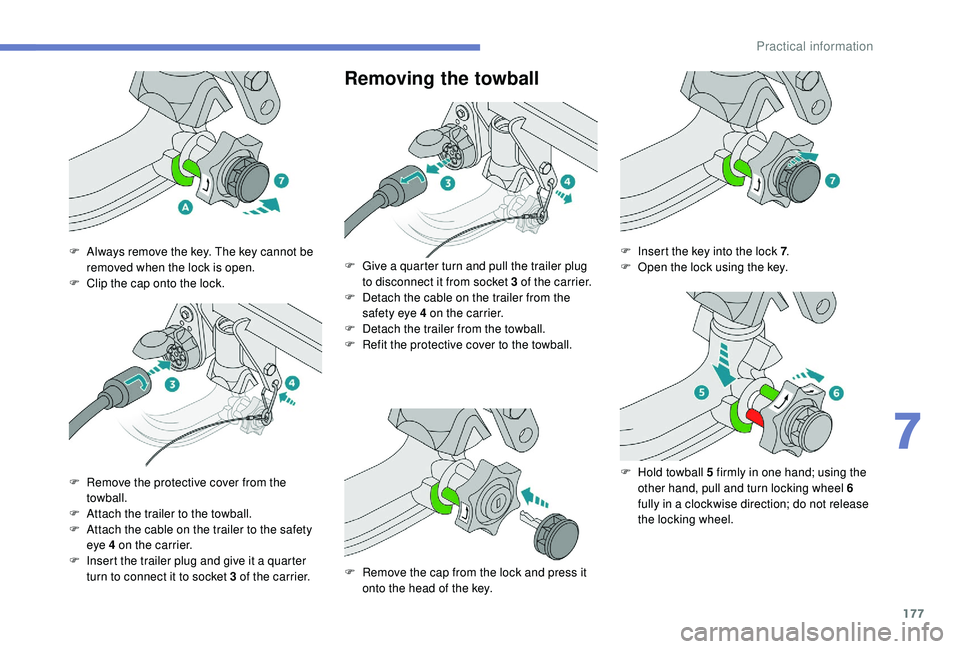
F Always remove the key. The key cannot be removed when the lock is open.
F
C
lip the cap onto the lock.
F
R
emove the protective cover from the
towball.
F
A
ttach the trailer to the towball.
F
A
ttach the cable on the trailer to the safety
eye 4 on the carrier.
F
I
nsert the trailer plug and give it a quarter
turn to connect it to socket 3 of the carrier. F
G ive a quarter turn and pull the trailer plug
to disconnect it from socket 3 of the carrier.
F
D
etach the cable on the trailer from the
safety eye 4 on the carrier.
F
D
etach the trailer from the towball.
F
R
efit the protective cover to the towball.
F
R
emove the cap from the lock and press it
onto the head of the key. F
I nsert the key into the lock 7
.
F O pen the lock using the key.
F
H
old towball 5 firmly in one hand; using the
other hand, pull and turn locking wheel 6
fully in a clockwise direction; do not release
the locking wheel.
7
Practical information