2018 Peugeot 308 ignition
[x] Cancel search: ignitionPage 52 of 324
50
Electric windows
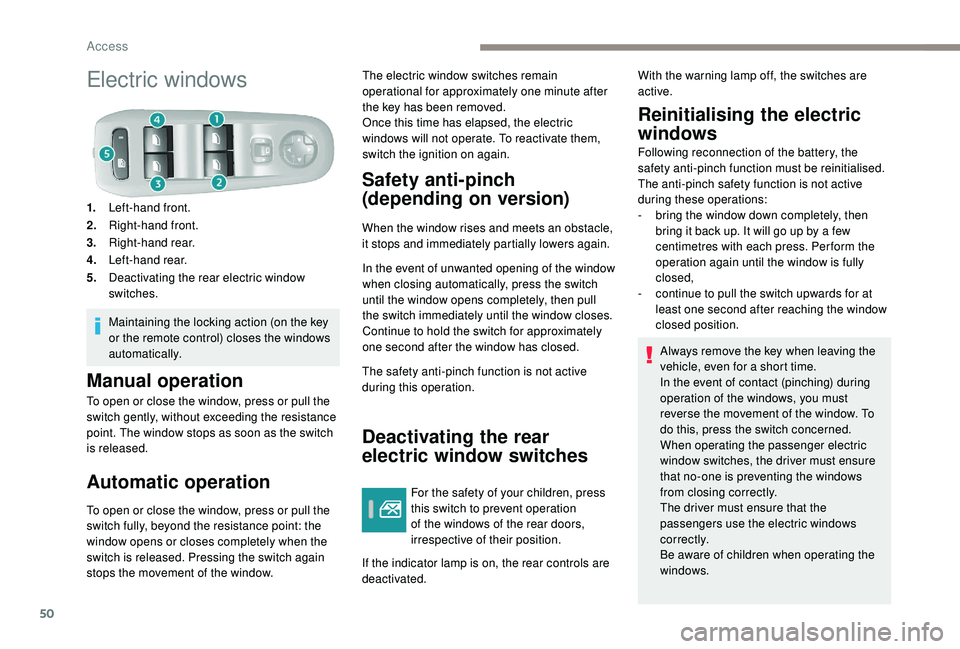
1.Left-hand front.
2. Right-hand front.
3. Right-hand rear.
4. Left-hand rear.
5. Deactivating the rear electric window
switches.
Maintaining the locking action (on the key
or the remote control) closes the windows
automatically.
Manual operation
To open or close the window, press or pull the
switch gently, without exceeding the resistance
point. The window stops as soon as the switch
is released.
Automatic operation
To open or close the window, press or pull the
switch fully, beyond the resistance point: the
window opens or closes completely when the
switch is released. Pressing the switch again
stops the movement of the window. The electric window switches remain
operational for approximately one minute after
the key has been removed.
Once this time has elapsed, the electric
windows will not operate. To reactivate them,
switch the ignition on again.
Safety anti-pinch
(depending on version)
When the window rises and meets an obstacle,
it stops and immediately partially lowers again.
In the event of unwanted opening of the window
when closing automatically, press the switch
until the window opens completely, then pull
the switch immediately until the window closes.
Continue to hold the switch for approximately
one second after the window has closed.
The safety anti-pinch function is not active
during this operation.
Deactivating the rear
electric window switches
For the safety of your children, press
this switch to prevent operation
of the windows of the rear doors,
irrespective of their position.
If the indicator lamp is on, the rear controls are
deactivated.
Reinitialising the electric
windows
Following reconnection of the battery, the
safety anti-pinch function must be reinitialised.
The anti-pinch safety function is not active
during these operations:
-
b
ring the window down completely, then
bring it back up. It will go up by a few
centimetres with each press. Per form the
operation again until the window is fully
closed,
-
c
ontinue to pull the switch upwards for at
least one second after reaching the window
closed position.
Always remove the key when leaving the
vehicle, even for a short time.
In the event of contact (pinching) during
operation of the windows, you must
reverse the movement of the window. To
do this, press the switch concerned.
When operating the passenger electric
window switches, the driver must ensure
that no-one is preventing the windows
from closing correctly.
The driver must ensure that the
passengers use the electric windows
c o r r e c t l y.
Be aware of children when operating the
windows.
With the warning lamp off, the switches are
active.
Access
Page 55 of 324
53
Cushion height and angle
Storing driving positions
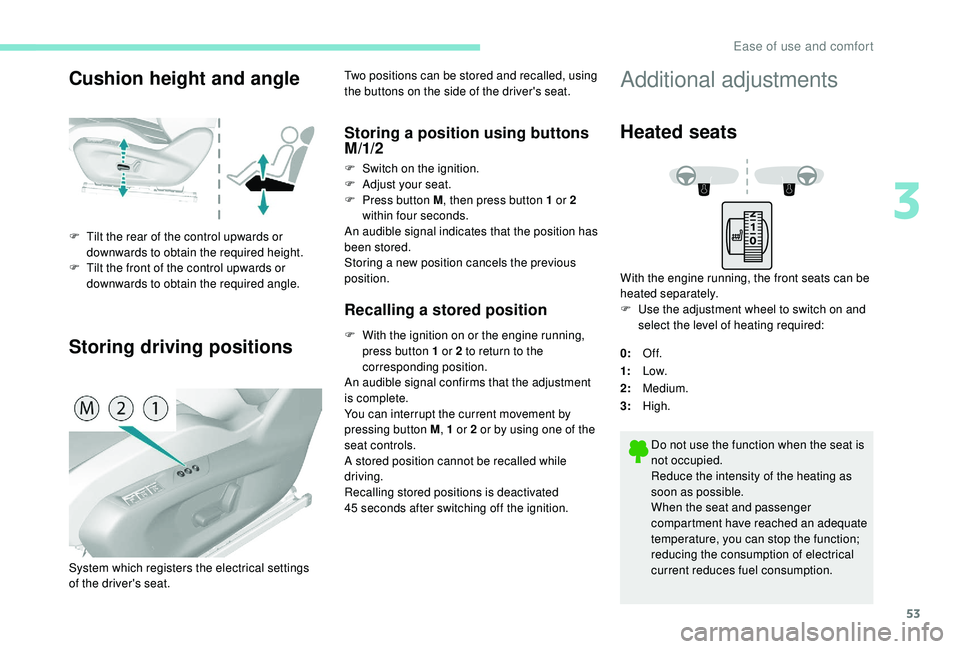
F Tilt the rear of the control upwards or downwards to obtain the required height.
F
T
ilt the front of the control upwards or
downwards to obtain the required angle. Two positions can be stored and recalled, using
the buttons on the side of the driver's seat.
Storing a position using buttons
M/1/2
F Switch on the ignition.
F
Adj ust your seat.
F
P
ress button M , then press button 1 or 2
within four seconds.
An audible signal indicates that the position has
been stored.
Storing a new position cancels the previous
position.
Recalling a stored position
F With the ignition on or the engine running, press button 1 or 2 to return to the
corresponding position.
An audible signal confirms that the adjustment
is complete.
You can interrupt the current movement by
pressing button M , 1 or 2 or by using one of the
seat controls.
A stored position cannot be recalled while
driving.
Recalling stored positions is deactivated
45
seconds after switching off the ignition.
System which registers the electrical settings
of the driver's seat.
Additional adjustments
Heated seats
With the engine running, the front seats can be
heated separately.
F
U
se the adjustment wheel to switch on and
select the level of heating required:
0: Of f.
1: Low.
2: Medium.
3: High.
Do not use the function when the seat is
not occupied.
Reduce the intensity of the heating as
soon as possible.
When the seat and passenger
compartment have reached an adequate
temperature, you can stop the function;
reducing the consumption of electrical
current reduces fuel consumption.
3
Ease of use and comfort
Page 57 of 324
55
Steering wheel adjustment
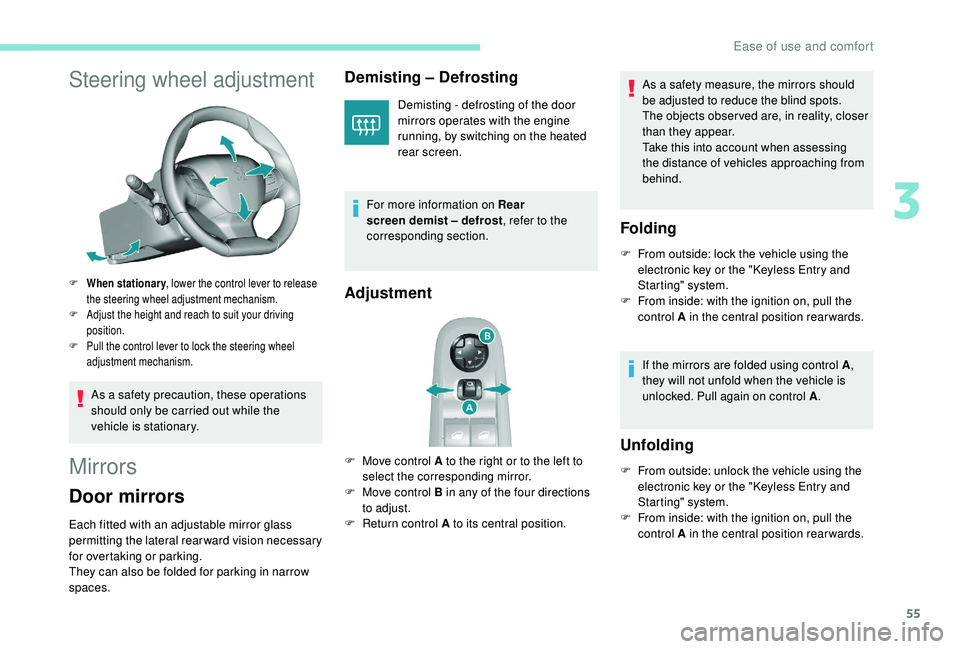
F When stationary, lower the control lever to release
the steering wheel adjustment mechanism.
F
A
djust the height and reach to suit your driving
position.
F
P
ull the control lever to lock the steering wheel
adjustment mechanism.
As a safety precaution, these operations
should only be carried out while the
vehicle is stationary.
Mirrors
Door mirrors
Each fitted with an adjustable mirror glass
permitting the lateral rearward vision necessary
for overtaking or parking.
They can also be folded for parking in narrow
spaces.
Demisting – Defrosting
Demisting - defrosting of the door
mirrors operates with the engine
running, by switching on the heated
rear screen.
For more information on Rear
screen demist – defrost , refer to the
corresponding section.
Adjustment
F Move control A to the right or to the left to select the corresponding mirror.
F
M
ove control B in any of the four directions
to adjust.
F
R
eturn control A to its central position. As a safety measure, the mirrors should
be adjusted to reduce the blind spots.
The objects obser ved are, in reality, closer
than they appear.
Take this into account when assessing
the distance of vehicles approaching from
behind.
Folding
F From outside: lock the vehicle using the
electronic key or the " K eyless Entry and
Starting" system.
F
F
rom inside: with the ignition on, pull the
control A in the central position rearwards.
If the mirrors are folded using control A ,
they will not unfold when the vehicle is
unlocked. Pull again on control A .
Unfolding
F From outside: unlock the vehicle using the
electronic key or the " K eyless Entry and
Starting" system.
F
F
rom inside: with the ignition on, pull the
control A in the central position rearwards.
3
Ease of use and comfort
Page 69 of 324
67
Temperature adjustment
F Press one of the buttons 1 to decrease or increase the value.
Air flow adjustment
F Press one of the buttons 2 to increase or decrease the speed of the air booster fan.
The symbol for air flow (a fan) fills progressively
according to the air flow setting made.
By reducing the air flow to a minimum, you are
stopping ventilation.
Avoid driving for too long with the
ventilation off (risk of misting and
deterioration of air quality).
Air distribution adjustment
These buttons are used to arrange
the distribution of air in the passenger
compartment by combining several air outlets. Windscreen.
Central and side air vents. Footwells.
The air distribution can be adapted by using
several buttons: illumination of the indicator
lamp confirms the presence of fan boosted air
in the direction indicated, the indicator lamp
being off indicates the absence of fan boosted
air in the direction indicated.
For a uniform distribution of air in the
passenger compartment, the three buttons can
be activated simultaneously.
Air conditioning on/off
The air conditioning is designed to operate
effectively in all seasons, with the windows
closed.
It enables you to:
-
l
ower the temperature, in summer,
-
i
ncrease the effectiveness of the demisting
in winter, above 3°C.
F
P
ress button 4 to activate/deactivate the air
conditioning system.
When the indicator lamp is on, the function is
activated.
The air conditioning does not operate
when the air flow adjustment is inhibited. Switching off the air conditioning may result in
some discomfort (humidity, condensation).
To obtain cool air sooner, you can use
recirculation of the interior air for a few
moments. Then return to the intake of exterior
a i r.
Dual-zone automatic
air conditioning (Touch
screen)
This air conditioning system operates with
the engine running, but the ventilation and its
controls are available with the ignition on.
Operation of the air conditioning and regulation
of temperature, air flow and air distribution in
the passenger compartment are automatic
according to the temperature in the passenger
compartment and the temperature setting.
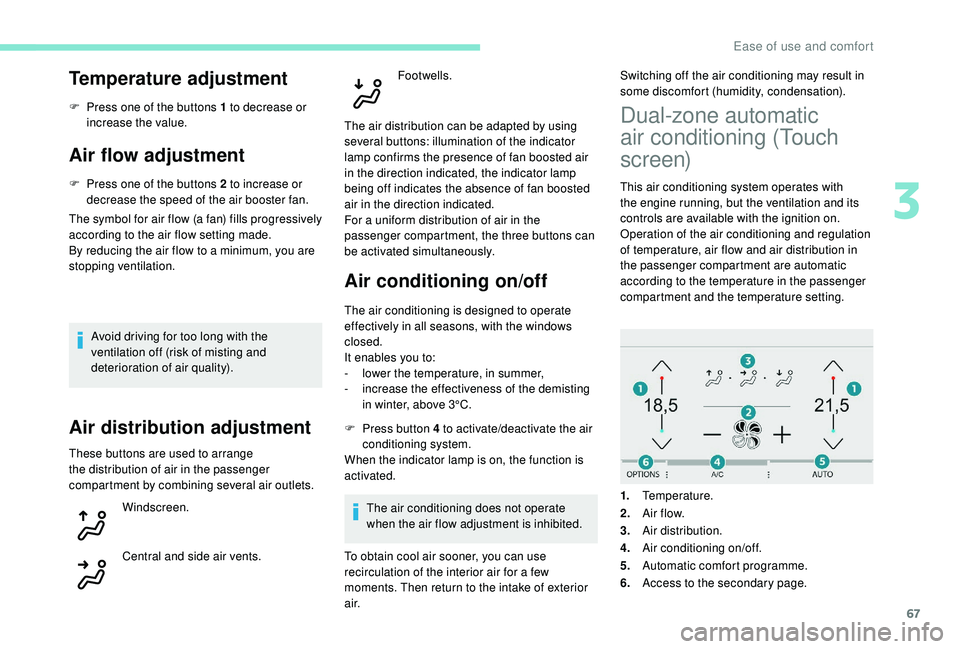
1. Temperature.
2. A ir f low.
3. Air distribution.
4. Air conditioning on/off.
5. Automatic comfort programme.
6. Access to the secondary page.
3
Ease of use and comfort
Page 71 of 324

69
F Press the AUTO button again to activate the automatic comfort
programme again.
Air flow adjustment
F Press one of the buttons 2 to increase or decrease the speed of the fan.
The air flow symbol (a fan) is filled in
progressively as the speed of the fan is
increased.
By reducing the air flow to minimum, you are
stopping ventilation.
" OFF " is displayed alongside the fan.
Avoid driving for too long with the
ventilation off (risk of misting and
deterioration of air quality).
Air distribution adjustment
You can modulate the distribution of air in the
passenger compartment using these three buttons.
Windscreen.
Central and side air vents.
Footwells. Each press on a button activates or deactivates
the function. The indicator lamp is on when the
button is activated. For a uniform distribution in
the passenger compartment, all three buttons
can be pressed simultaneously.
In AUTO mode, the indicator lamps in all three
buttons are off.
Air conditioning on/off
The air conditioning is designed to operate
effectively in all seasons, with the windows
closed.
It enables you to:
-
l
ower the temperature, in summer,
-
i
ncrease the effectiveness of the demisting
in winter, above 3°C.
F
P
ress button 4 to activate/deactivate the air
conditioning system.
When the indicator lamp under the button is on,
the air conditioning function is activated.
The air conditioning does not operate when the
air flow adjustment is set to off.
Ventilation function with the
ignition on
When the ignition is switched on, you can use
the ventilation system to adjust the air flow
and air distribution settings in the passenger
compartment for a duration that depends on
the battery charge. This function does not operate the air
conditioning.
"Mono" function
The comfort setting for the passenger's side
can be indexed to the driver's comfort setting
(mono-zone).
From the secondary page of the "
Air
conditioning " menu:
F
P
ress this button to activate/
deactivate the "Mono" function.
The indicator lamp in the button
is on when the function is
activated.
The function is deactivated automatically when
the passenger uses their temperature setting
buttons.
Recirculation of interior air
The intake of exterior air prevents the formation
of mist on the windscreen and side windows.
3
Ease of use and comfort
Page 73 of 324
71
On/Off
F Press this button to demist /defrost the rear screen and, depending on version, the door
mirrors. The indicator lamp in the button
comes on.
Demisting/defrosting switches off automatically
to prevent excessive electrical consumption.
F
I
t is possible to stop the demisting/
defrosting operation before it is switched off
automatically by pressing this button again.
The indicator lamp in the button goes off.
Switch off the demisting/defrosting of
the rear screen and door mirrors as
soon as appropriate, as lower current
consumption results in reduced fuel
consumption.
Rear screen demisting – defrosting can
only be operated when the engine is
running.
Panoramic roof
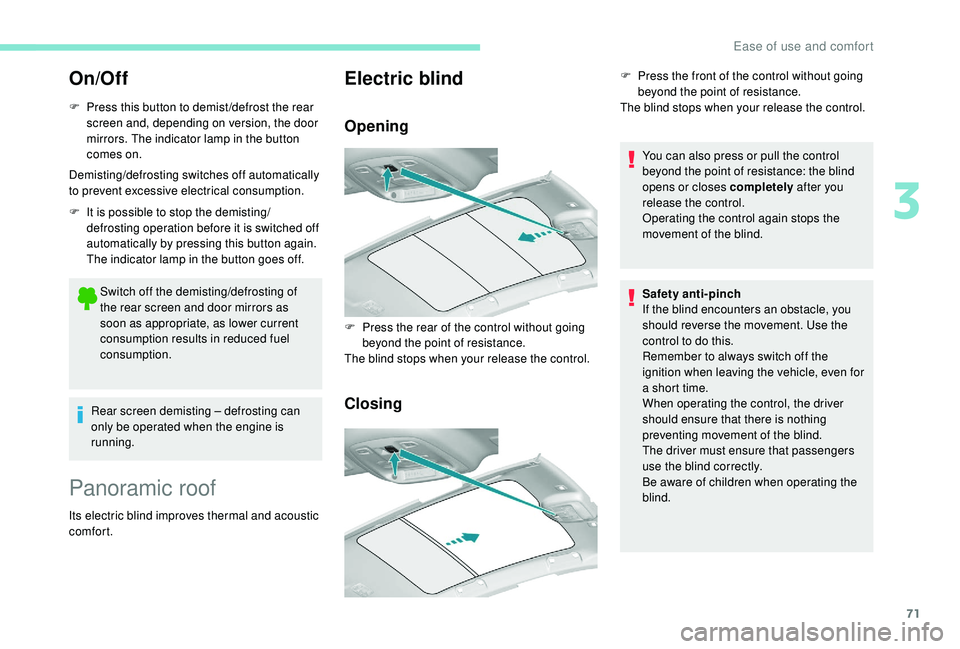
Its electric blind improves thermal and acoustic
comfort.
Electric blind
Opening
Closing
You can also press or pull the control
beyond the point of resistance: the blind
opens or closes completely after you
release the control.
Operating the control again stops the
movement of the blind.
F
P
ress the rear of the control without going
beyond the point of resistance.
The blind stops when your release the control. F
P
ress the front of the control without going
beyond the point of resistance.
The blind stops when your release the control.
Safety anti-pinch
If the blind encounters an obstacle, you
should reverse the movement. Use the
control to do this.
Remember to always switch off the
ignition when leaving the vehicle, even for
a short time.
When operating the control, the driver
should ensure that there is nothing
preventing movement of the blind.
The driver must ensure that passengers
use the blind correctly.
Be aware of children when operating the
blind.
3
Ease of use and comfort
Page 74 of 324

72
Courtesy lamps
1.Front courtesy lamp
2. Front map reading lamps
3. Rear courtesy lamp
4. Rear map reading lamps
Front – rear courtesy lamps
In this position, the courtesy lamp
comes on gradually:
-
w
hen you unlock the vehicle,
-
w
hen the electronic key is removed from the
reader,
-
o
n opening a door,
-
w
hen the remote control locking button is
activated, in order to locate your vehicle.
It switches off gradually:
-
w
hen the vehicle is locked,
-
w
hen the ignition is switched on,
-
3
0
seconds after the last door is closed. Permanently off.
Permanent lighting.
Depending on version, you can also
switch the courtesy lamp on or off by
pressing this button.
Front – rear map reading
lamps
F With the ignition on, operate the corresponding switch.
Take care not to put anything in contact
with the courtesy lamps.
In "permanent lighting" mode, the lighting
time varies according to the circumstances:
-
w
hen the ignition is off, approximately
ten minutes,
-
i
n energy saving mode, approximately
thirty seconds,
-
w
ith the engine running, unlimited.
Ease of use and comfort
Page 76 of 324

74
Exterior lighting control
stalk
Main lighting
Selection of main lighting mode
Without AUTO lighting
With AUTO lighting
Lighting off (ignition off)/Front daytime
running lamps (engine running).
Sidelamps only. Automatic illumination of headlamps.
Dipping the headlamps
Pull the lever to switch the lighting between
dipped and main beam headlamps.
In Lighting off or Sidelamps only modes, the
driver can switch on the main beam headlamps
directly by keeping the lever pulled.
Display
Illumination of the corresponding indicator
lamp in the instrument panel confirms that the
lighting selected is on.
Foglamps
In good or rainy weather, by both day
and night, the front foglamps and the
rear foglamps are prohibited. In these
situations, the power of their beams may
dazzle other drivers. They should only be
used in fog or falling snow.
In these weather conditions, it is your
responsibility to switch on the foglamps
and dipped headlamps manually as the
sunshine sensor may detect sufficient
light.
Switch off the front and rear foglamps
when they are no longer necessary.
Rear foglamp only
Turn the ring to align the desired symbol with
the marking.
Dipped or main beam headlamps.
The main or dipped beam headlamps must be
on.
F
T
o switch it on, turn the ring for wards.
Lighting and visibility