2018 Peugeot 308 warning
[x] Cancel search: warningPage 196 of 324
194
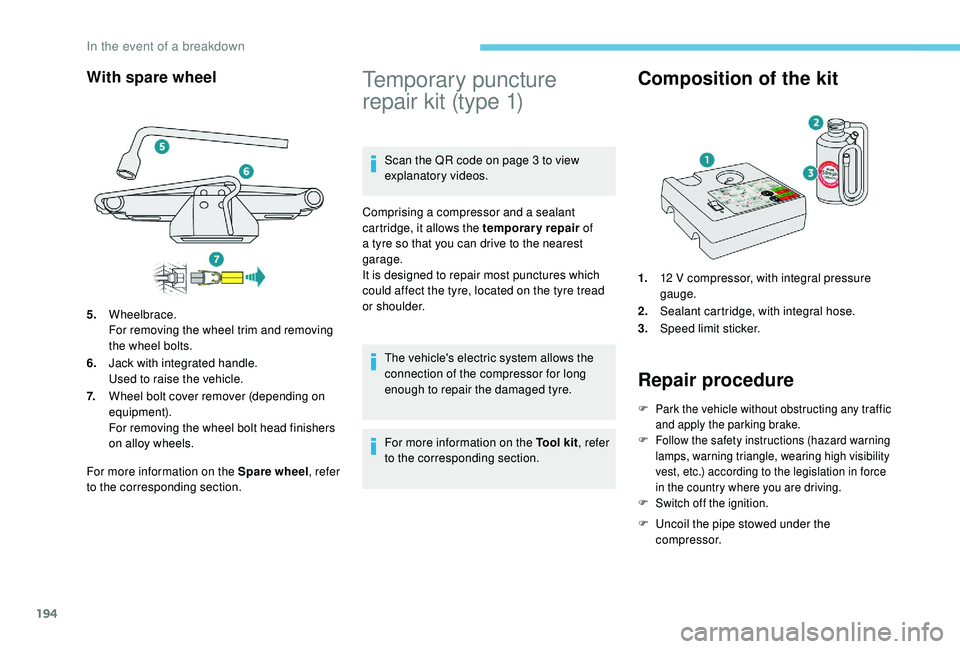
With spare wheel
For more information on the Spare wheel, refer
to the corresponding section.
Temporary puncture
repair kit (type 1)
Scan the QR code on page 3 to view
explanatory videos.
Comprising a compressor and a sealant
cartridge, it allows the temporary repair of
a tyre so that you can drive to the nearest
garage.
It is designed to repair most punctures which
could affect the tyre, located on the tyre tread
or shoulder.
The vehicle's electric system allows the
connection of the compressor for long
enough to repair the damaged tyre.
For more information on the Tool kit , refer
to the corresponding section.
Composition of the kit
1. 12 V compressor, with integral pressure
gauge.
2. Sealant cartridge, with integral hose.
3. Speed limit sticker.
Repair procedure
F Park the vehicle without obstructing any traffic
and apply the parking brake.
F
F
ollow the safety instructions (hazard warning
lamps, warning triangle, wearing high visibility
vest, etc.) according to the legislation in force
in the country where you are driving.
F
S
witch off the ignition.
F Uncoil the pipe stowed under the compressor.
5.
Wheelbrace.
For removing the wheel trim and removing
the wheel bolts.
6. Jack with integrated handle.
Used to raise the vehicle.
7. Wheel bolt cover remover (depending on
equipment).
For removing the wheel bolt head finishers
on alloy wheels.
In the event of a breakdown
Page 200 of 324
198
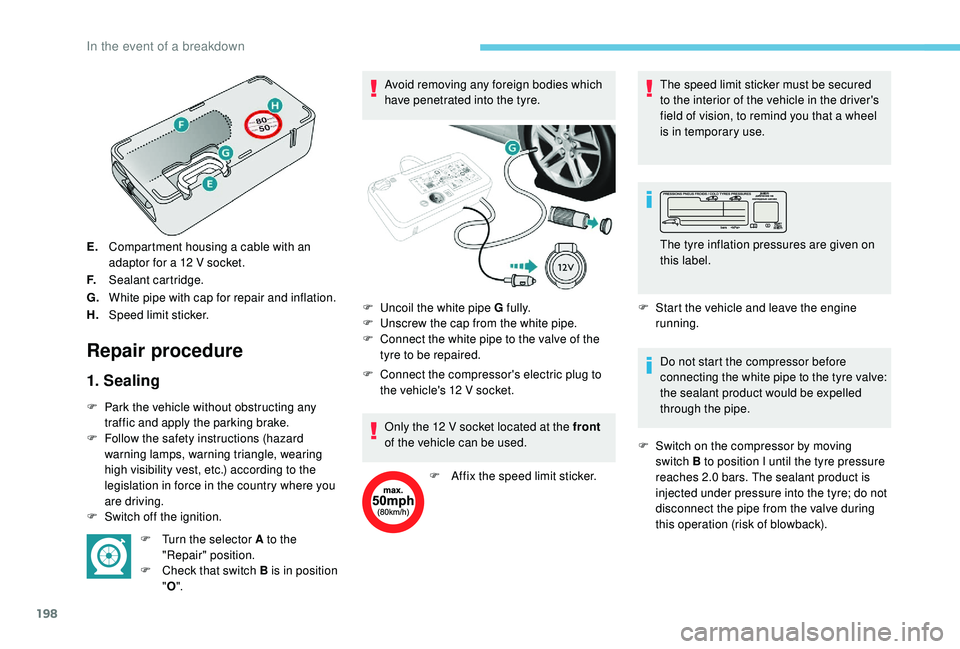
E.Compartment housing a cable with an
adaptor for a 12
V socket.
F. Sealant cartridge.
G. White pipe with cap for repair and inflation.
H. Speed limit sticker.
Repair procedure
1. Sealing
F Park the vehicle without obstructing any
traffic and apply the parking brake.
F
F
ollow the safety instructions (hazard
warning lamps, warning triangle, wearing
high visibility vest, etc.) according to the
legislation in force in the country where you
are driving.
F
S
witch off the ignition. F
T
urn the selector A to the
"Repair" position.
F
C
heck that switch B is in position
" O ". Avoid removing any foreign bodies which
have penetrated into the tyre.
F
C
onnect the compressor's electric plug to
the vehicle's 12 V socket.
Only the 12 V socket located at the front
of the vehicle can be used.
F
A
ffix the speed limit sticker.The speed limit sticker must be secured
to the interior of the vehicle in the driver's
field of vision, to remind you that a wheel
is in temporary use.
F
S
tart the vehicle and leave the engine
running.
Do not start the compressor before
connecting the white pipe to the tyre valve:
the sealant product would be expelled
through the pipe.
F
S
witch on the compressor by moving
switch B to position I until the tyre pressure
reaches 2.0
bars. The sealant product is
injected under pressure into the tyre; do not
disconnect the pipe from the valve during
this operation (risk of blowback).
F
U
ncoil the white pipe G fully.
F
U
nscrew the cap from the white pipe.
F
C
onnect the white pipe to the valve of the
tyre to be repaired. The tyre inflation pressures are given on
this label.
In the event of a breakdown
Page 203 of 324
201
F Adjust the pressure using the compressor (to inflate: switch B in position " I"; to deflate:
switch B in position " O" and press button
C ), according to the vehicle's tyre pressure
label.
If after approximately seven minutes this
pressure is not reached, this indicates
that the tyre is not repairable; contact a
PEUGEOT dealer or a qualified workshop
for assistance.
F
R
emove the kit then stow it.
Do not drive more than 125
miles (200 km)
with the repaired tyre; see a PEUGEOT
dealer or a qualified workshop to change
the tyre.
Should the pressure of one or more tyres
be adjusted, it is necessary to reinitialise
the under-inflation detection system.
For more information on Tyre under-
inflation detection , refer to the
corresponding section.Spare wheel
Scan the QR code on page 3 to view
explanatory videos.
Procedure for changing a damaged wheel with
the spare wheel using the tools provided with
the vehicle. For more information on the Tool kit , refer
to the corresponding section.
The jack must only be used to change
a wheel with a damaged or punctured tyre.
The jack does not require any
maintenance.
The jack meets European standards,
as defined in the Machinery Directive
2006/42/EC.
Wheel with wheel trim
When refitting the wheel , refit the wheel
trim, starting by placing its aperture in
line with the valve and then pushing it into
place all round its edge with the palm of
your hand. F
P
ark the vehicle without obstructing any
traffic and apply the parking brake.
F F ollow the safety instructions (hazard
warning lamps, warning triangle, wearing
high visibility vest, etc.) according to the
legislation in force in the country where you
are driving.
F
S
witch off the ignition.
Access to the spare wheel
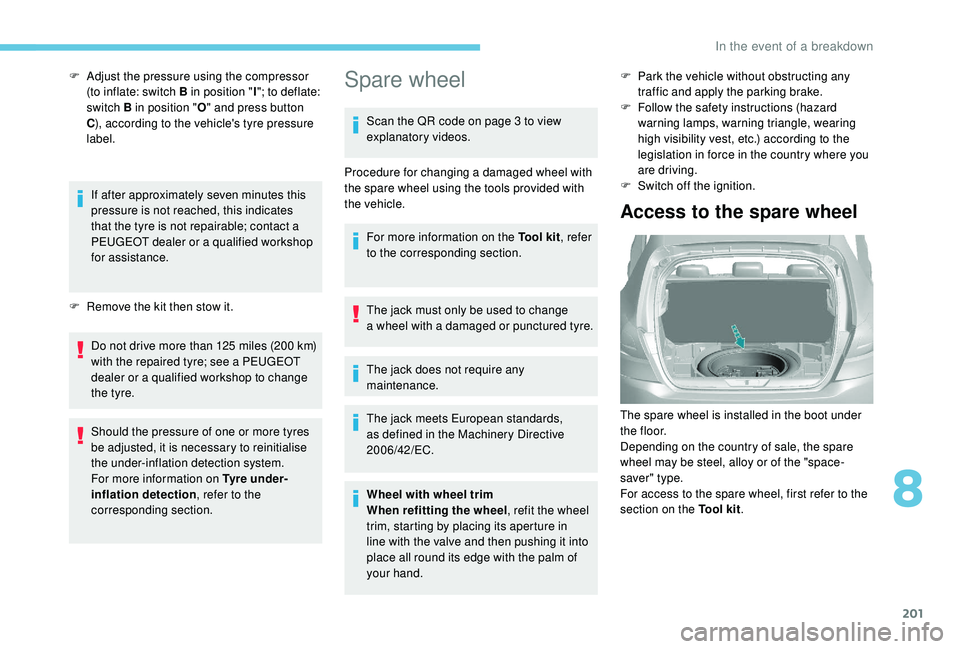
The spare wheel is installed in the boot under
t h e f l o o r.
Depending on the country of sale, the spare
wheel may be steel, alloy or of the "space-
saver" type.
For access to the spare wheel, first refer to the
section on the Tool kit.
8
In the event of a breakdown
Page 204 of 324
202
Removing the wheel
Putting the wheel back in place
F Put the wheel back in its housing.
F G ive the (coloured) nut on the bolt a few
turns to loosen it.
F
P
osition the fastener (nut and bolt) in the
middle of the wheel.
F
T
ighten fully until the central nut clicks to
retain the wheel correctly.
Removing a wheel
Parking the vehicle
Immobilise the vehicle where it does not
block traffic: the ground must be level,
stable and non-slippery.
With a manual parking brake, apply the
parking brake and check that the brake
warning lamp is on.
With an electric parking brake, if not
programmed in automatic mode, apply the
parking brake and check that the brake
warning lamp and the P indicator lamp in
the parking brake control lever are on.
Switch off the ignition.
With a manual gearbox, engage first gear
to block the wheels.
With an automatic gearbox, place the
selector at position P to block the wheels.
The occupants must get out of the vehicle
and wait where they are safe.
Never go underneath a vehicle raised
using a jack; use an axle stand.
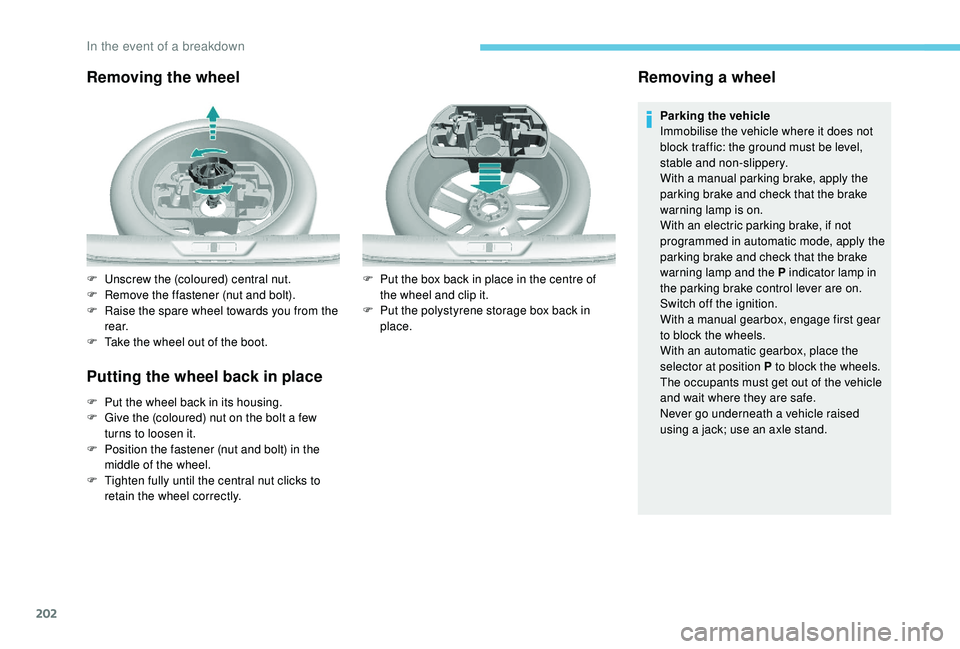
F
U
nscrew the (coloured) central nut.
F
R
emove the ffastener (nut and bolt).
F
R
aise the spare wheel towards you from the
r e a r.
F
T
ake the wheel out of the boot. F
P
ut the box back in place in the centre of
the wheel and clip it.
F
P
ut the polystyrene storage box back in
place.
In the event of a breakdown
Page 221 of 324
219
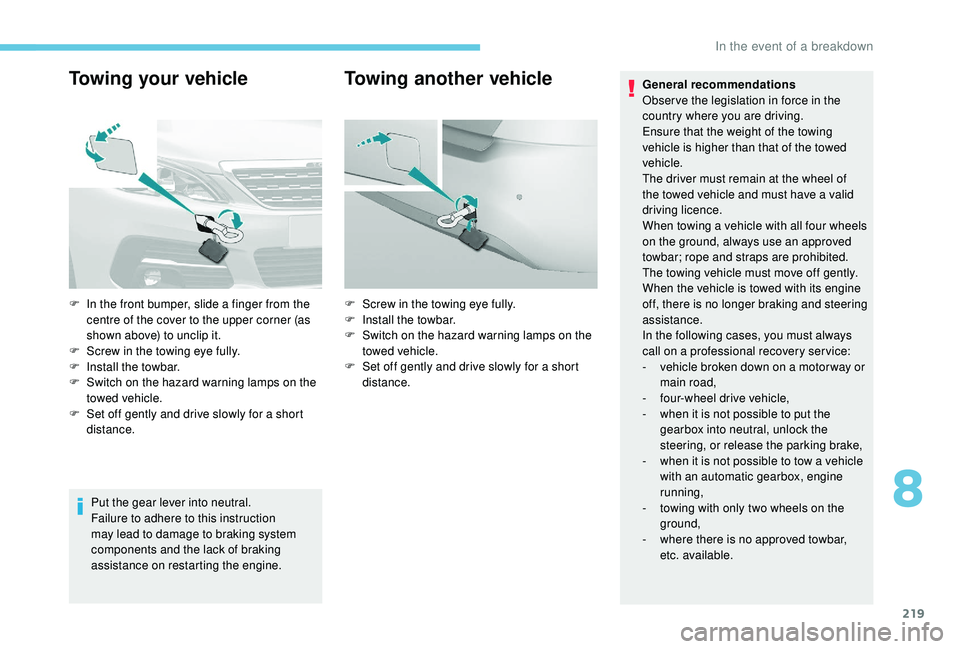
Towing your vehicle
Put the gear lever into neutral.
Failure to adhere to this instruction
may lead to damage to braking system
components and the lack of braking
assistance on restarting the engine.
Towing another vehicleGeneral recommendations
Obser ve the legislation in force in the
country where you are driving.
Ensure that the weight of the towing
vehicle is higher than that of the towed
vehicle.
The driver must remain at the wheel of
the towed vehicle and must have a valid
driving licence.
When towing a vehicle with all four wheels
on the ground, always use an approved
towbar; rope and straps are prohibited.
The towing vehicle must move off gently.
When the vehicle is towed with its engine
off, there is no longer braking and steering
assistance.
In the following cases, you must always
call on a professional recovery ser vice:
-
v
ehicle broken down on a motor way or
main road,
-
f
our-wheel drive vehicle,
-
w
hen it is not possible to put the
gearbox into neutral, unlock the
steering, or release the parking brake,
-
w
hen it is not possible to tow a vehicle
with an automatic gearbox, engine
running,
-
t
owing with only two wheels on the
ground,
-
w
here there is no approved towbar,
etc. available.
F
I
n the front bumper, slide a finger from the
centre of the cover to the upper corner (as
shown above) to unclip it.
F
S
crew in the towing eye fully.
F
I
nstall the towbar.
F
S
witch on the hazard warning lamps on the
towed vehicle.
F
S
et off gently and drive slowly for a short
distance. F
S
crew in the towing eye fully.
F
I
nstall the towbar.
F
S
witch on the hazard warning lamps on the
towed vehicle.
F
S
et off gently and drive slowly for a short
distance.
8
In the event of a breakdown
Page 240 of 324

4
Radio:
Select the previous/next preset radio
station.
Select the previous/next item in a
menu or a list.
Media:
Select the previous/next track.
Select the previous/next item in a
menu or a list.
Press the thumbwheel: confirm.
Menus
Depending on version."Multimedia ": Media settings, Radio
settings.
" Telephone ": Call, Directory
management, Telephone
management, Hang up.
" Trip computer ".
" Maintenance ": Diagnosis, Warning
log, etc. "
Connections ": Manage
connections, search for devices.
" Personalisation-configuration ":
Define the vehicle parameters,
Choice of language, Display
configuration, Choice of units, Date
and time adjustment.
Press the " MENU" button.
Move from one menu to another.
Enter a menu.
Radio
Selecting a station
Press the SOURCE button
repeatedly and select the radio.
Press this button to select a
waveband (FM/AM/DAB).
Press one of the buttons for an
automatic search for radio stations. Press one of the buttons to carry out
a manual search up/down for radio
frequencies.
Press this button to display the list of
stations received locally.
To update this list, press for more
than two seconds. The sound is cut
while updating.
RDS
The external environment (hills, buildings,
tunnels, basement car parks, etc.) may
block reception, including in RDS mode.
This is a normal effect of the way in
which radio waves are transmitted and
does not indicate any failure of the audio
equipment.
If RDS is not available, the RDS symbol
appears struck out in the screen.
Bluetooth® audio system
Page 289 of 324
15
Select "Settings ".
Select " Map".
Activate or deactivate:
-
"Allow declaration of danger
zones ".
-
"Guidance to final destination
on foot "
-
"Authorise sending
information "
These settings must be made
according to each profile.
Select " Alerts".
Activate or deactivate " Warn of
danger zones ".
Select this button.
Activate: Give an audible warning
For access to connected navigation, you
have to select the option: " Authorise
sending information ". The display of danger zones depends on
the legislation in force and subscription to
the service.
Declaration of "Danger
zones"
To distribute information on the
declaration of danger zones, you should
check the option: "
Allow declaration of
danger zones ".
or Press Navigation
to display the
primary page.
Press the " Declare a new danger
zone " button located in the upper
bar of the touch screen
Select the option " Ty p e" to choose
the type of "danger zone".
Select the " Speed" option and enter
it using the virtual keypad.
Press " OK" to save and distribute
the information.
"Danger zones" pack
updates
Press Settings to display the
primary page.
Press the " OPTIONS" button to go to the
secondary page.
Select "System settings ".
Select the " System info " tab.
Select " View" to display the versions
of the different modules installed in
the system.
Select " Update(s) due ".
You can download the system and map
updates from the Brand's website.
The update procedure can also be found
on the website.
.
PEUGEOT Connect Nav
Page 307 of 324
33
Navigation
QUESTIONRESPONSESOLUTION
The route calculation is not successful. The guidance criteria may be in conflict with
the current location (exclusion of toll roads on
a toll road).Check the route settings in the "Navigation"
menu.
The POIs do not appear. The POIs have not been selected.Select the POIs in the list of POIs.
The audible warning of "Danger zones" does
not work. The audible warning is not active or the volume
is too low.Activate the audible warning in the "Navigation"
menu and check the voice volume in the audio
settings.
The system does not suggest a detour around
an incident on the route. The guidance criteria do not take account of
TMC messages.Select the setting for the "Traffic info" function
in the list of route settings (Without, Manual or
Automatic).
I receive a "Danger zone" alert which is not on
my route. When not navigating, the system announces all
"Danger zones" positioned in a cone located in
front of the vehicle. It may provide an alert for
"Danger zones" located on nearby or parallel
roads.Zoom in on the map to see the exact position
of the "Danger zone". Select "On the route" to
no longer receive alerts other than navigation
instructions or to reduce the time for the
announcement.
Certain traffic jams along the route are not
indicated in real time. On starting, it is several minutes before the
system begins to receive the traffic information.Wait until the traffic information is being
received correctly (display of the traffic
information icons on the map).
In certain countries, only major routes
(motor ways, etc.) are listed for the traffic
information. This is per fectly normal. The system is
dependent on the traffic information available.
.
PEUGEOT Connect Nav