2018 PEUGEOT 108 boot
[x] Cancel search: bootPage 4 of 180

2
.
.
Instrument panels 8
D isplays 9
Warning and indicator lamps
9
I
ndic ators
18
Trip computer
1
8
Adjusting the time
2
0Keys
22
"
K
eyless Entry and Starting" system
2
3
Doors 26
Boot
27
Front electric windows
2
8
Quarter windows
2
9
Electric fabric roof
2
9
Advice on care
3
1
Front seats
3
2
Rear seats
3
4
Mirrors
35
Steering wheel adjustment
3
6
Ventilation
3
6
Heating
3
7
Manual air conditioning
3
7
Automatic air conditioning
3
8
Front demist – defrost
4
0
Rear screen demist – defrost
4
1
Courtesy lamp
4
1
Boot lighting
4
1
Interior fittings
4
2
Rear shelf
4
4
Boot fittings
4
5Lighting control stalk
4
6
Automatic headlamp illumination
4
8
Direction indicators
4
8
Headlamp adjustment
4
9
Wiper control stalk
4
9
Changing a
wiper blade
5
0
General safety recommendations 5 1
H o r n 51
Hazard warning lamps
5
2
ESC system
5
2
Seat belts
5
4
Airbags
56
Child seats
5
9
Deactivating the front passenger airbag
6
0
ISOFIX mountings and child seats
6
6
i-Size child seats
7
0
Child lock
7
1
InstrumentsAccess
Over view
Ease of use and comfort Lighting and visibility
Safety
Eco-driving
Instruments and controls 4
E co-driving
6
Contents
Page 9 of 180
7
Limit the causes of excess
consumption
Spread loads throughout the vehicle; place
the heaviest items in the bottom of the boot,
as close as possible to the rear seats.
Limit the loads carried in the vehicle and
reduce wind resistance (roof bars, roof rack,
…). Use a roof box in preference.
Remove roof bars and the roof rack after use.
At the end of winter, remove winter tyres and
refit your summer tyres.
Observe the recommendations
on maintenance
Check the tyre pressures regularly, when cold,
referring to the label in the door aperture,
driver's side.
Carry out this check in particular:
-
b
efore a long journey,
-
a
t each change of season,
-
a
fter a long period out of use. Have your vehicle ser viced regularly (engine
oil, oil filter, air filter, passenger compartment
filter…) and obser ve the schedule of
operations recommended in the warranty and
maintenance record. Do not forget the spare wheel and the tyres on
any trailer or caravan.
.
Eco-driving
Page 14 of 180

12
Warning/indicator lampStateCause Actions/Observations
Front seat belts Flashing,
accompanied by an
audible signal. The driver has not fastened or has
unfastened his/her seat belt.
The front passenger has unfastened
his/her seat belt.
Airbags Fixed. One of the airbags or seat belt
pretensioners is faulty. Carry out (3).
ETG gearbox Fixed. The ETG gearbox has a
fault. Quickly carry out (3).
Clutch Flashing,
accompanied by an
audible signal. The temperature of the clutch is too
high.
Carry out (1), place the selector of the ETG
gearbox in position N and wait 15
minutes until the
temperature of the clutch has dropped.
Power steering Flashing or fixed,
accompanied by an
audible signal. The power steering has a
fault. Drive carefully at moderate speed, then carry out (3).
Battery charge Fixed. The battery charging circuit has
a
fault (dirty terminals, slack or cut
alternator belt, etc.). Clean and retighten the lugs. If the warning
lamp does not go off when the engine is started,
carry out (2).
Door(s) open/
Boot open Fixed, accompanied
by an audible signal. A door or the boot is still open.
Close the access concerned.
Instruments
Page 24 of 180
22
Keys
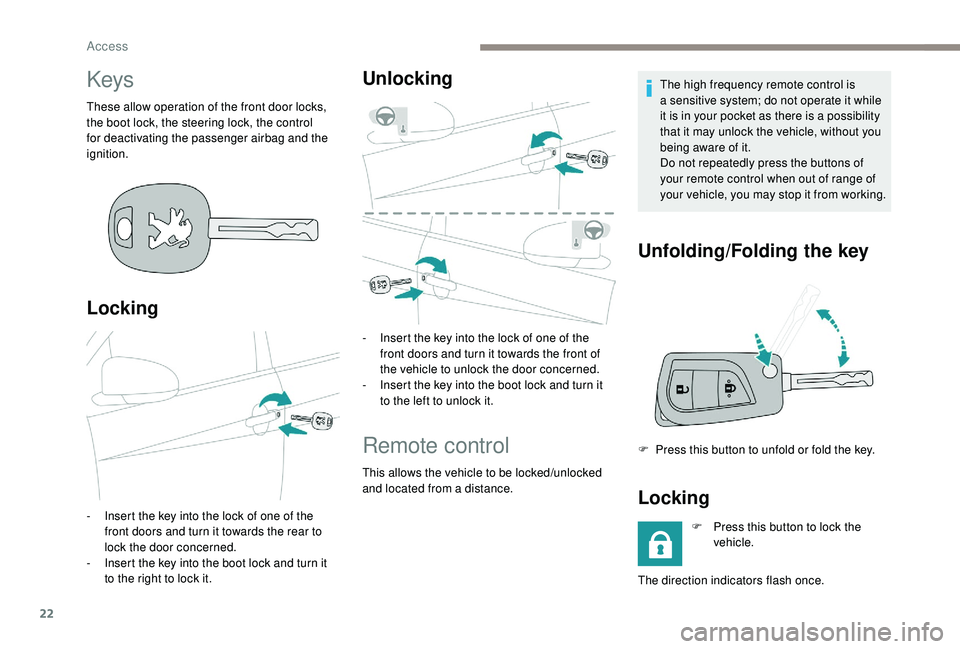
These allow operation of the front door locks,
the boot lock, the steering lock, the control
for deactivating the passenger airbag and the
ignition.
Locking
- Insert the key into the lock of one of the front doors and turn it towards the rear to
lock the door concerned.
-
I
nsert the key into the boot lock and turn it
to the right to lock it.
Unlocking
- Insert the key into the lock of one of the front doors and turn it towards the front of
the vehicle to unlock the door concerned.
-
I
nsert the key into the boot lock and turn it
to the left to unlock it.
Remote control
This allows the vehicle to be locked/unlocked
and located from a distance. The high frequency remote control is
a
sensitive system; do not operate it while
it is in your pocket as there is a possibility
that it may unlock the vehicle, without you
being aware of it.
Do not repeatedly press the buttons of
your remote control when out of range of
your vehicle, you may stop it from working.
Unfolding/Folding the key
F Press this button to unfold or fold the key.
Locking
F Press this button to lock the vehicle.
The direction indicators flash once.
Access
Page 26 of 180
24
Opening the vehicle
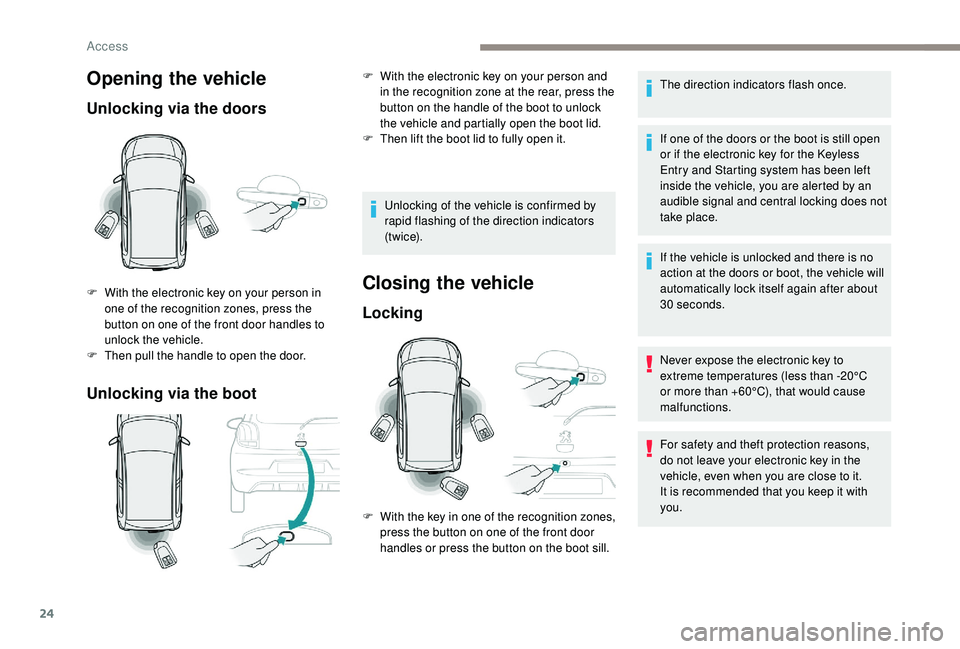
Unlocking via the doors
Unlocking via the boot
F With the electronic key on your person in one of the recognition zones, press the
button on one of the front door handles to
unlock the vehicle.
F
T
hen pull the handle to open the door. Unlocking of the vehicle is confirmed by
rapid flashing of the direction indicators
(t w i c e).Closing the vehicle
Locking
The direction indicators flash once.
If one of the doors or the boot is still open
or if the electronic key for the
K
eyless
Entry and Starting system has been left
inside the vehicle, you are alerted by an
audible signal and central locking does not
take place.
If the vehicle is unlocked and there is no
action at the doors or boot, the vehicle will
automatically lock itself again after about
30
seconds.
Never expose the electronic key to
extreme temperatures (less than -20°C
or more than +60°C), that would cause
malfunctions.
F
W
ith the electronic key on your person and
in the recognition zone at the rear, press the
button on the handle of the boot to unlock
the vehicle and partially open the boot lid.
F
T
hen lift the boot lid to fully open it.
F
W
ith the key in one of the recognition zones,
press the button on one of the front door
handles or press the button on the boot sill. For safety and theft protection reasons,
do not leave your electronic key in the
vehicle, even when you are close to it.
It is recommended that you keep it with
you.
Access
Page 29 of 180
27
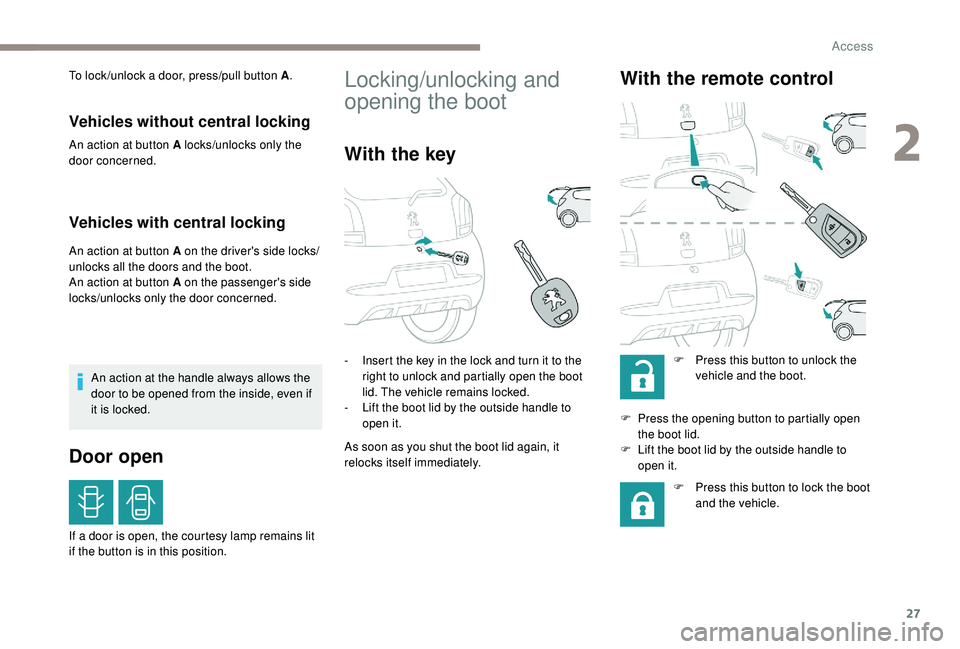
To lock /unlock a door, press/pull button A.
Vehicles without central locking
An action at button A locks/unlocks only the
door concerned.
Vehicles with central locking
An action at button A on the driver's side locks/
unlocks all the doors and the boot.
An action at button A on the passenger's side
locks/unlocks only the door concerned.
An action at the handle always allows the
door to be opened from the inside, even if
it is locked.
Door open
If a door is open, the courtesy lamp remains lit
i f the button is in this position.
Locking/unlocking and
opening the boot
With the key
- Insert the key in the lock and turn it to the right to unlock and partially open the boot
lid. The vehicle remains locked.
-
L
ift the boot lid by the outside handle to
open it.
As soon as you shut the boot lid again, it
relocks itself immediately.
With the remote control
F Press this button to unlock the vehicle and the boot.
F
P
ress the opening button to partially open
the boot lid.
F
L
ift the boot lid by the outside handle to
open it.
F
P
ress this button to lock the boot
and the vehicle.
2
Access
Page 30 of 180

28
With the " Keyless Entry and
Starting " system
If the vehicle had previously been unlocked
using the front doors, it is not necessary to
have the electronic key on your person to use
the button for opening the boot.
F
W
ith the electronic key on your person,
press the button on the boot sill to lock it.
or
Lock the vehicle using the front doors. When closing the boot, be careful not to
slam the boot lid: guide it as it closes and
release it towards the end of its travel.
Emergency control
Measures for mechanically unlocking the boot
in the event of a
battery or central locking fault.
Unlocking
F Fold the rear seat backrest to gain access to the lock from inside the boot.
F
U
sing a screwdriver protected by a cloth,
remove the 4
retaining clips then the boot
trim.
F
M
ove the catch to the right to unlock the
boot.
Front electric windows
(Depending on version).
1. Left-hand front.
2. Right-hand front.
After switching on the ignition, press one of the
controls to open or pull it to close. The window
stops as soon as the control is released.
The driver has access to the controls for
both front windows.
The window controls are inoperative with
the ignition switched off.
The operation of closing the windows
could cause serious injuries.
Make sure that nothing obstructs the
windows from being raised, and pay
special attention to children.
F
W
ith the electronic key on your person,
press the button for opening the boot, to
unlock and partially open it.
The vehicle is also unlocked.
F
L
ift the boot lid by the outside handle to
open it.
Access
Page 36 of 180
34
Rear seats
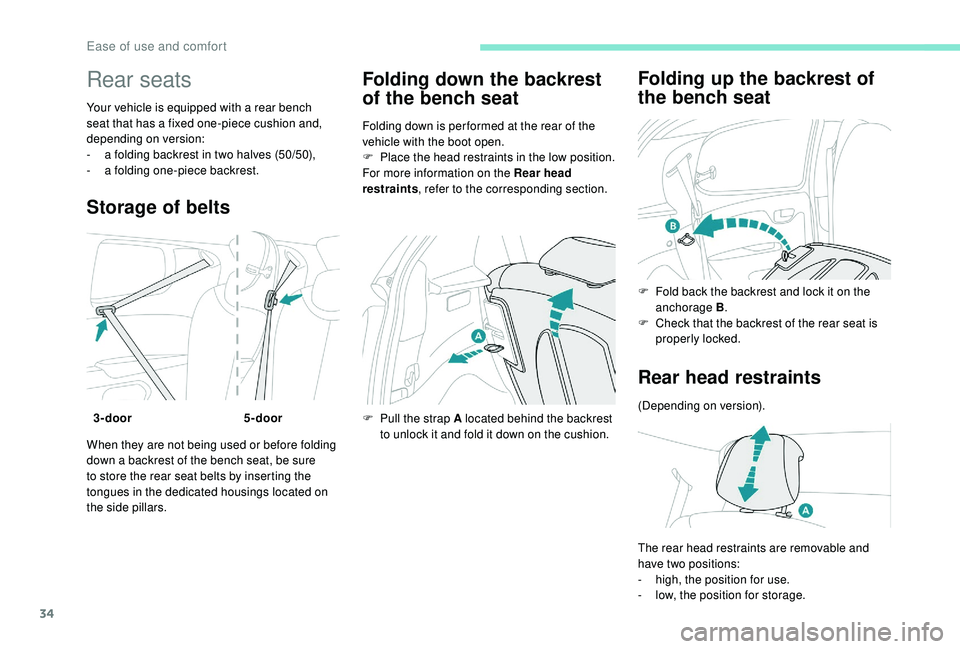
Your vehicle is equipped with a rear bench
s eat that has a fixed one-piece cushion and,
depending on version:
-
a f
olding backrest in two halves (50/50),
-
a f
olding one-piece backrest.
Storage of belts
When they are not being used or before folding
down a backrest of the bench seat, be sure
to store the rear seat belts by inserting the
tongues in the dedicated housings located on
the side pillars.
Folding down the backrest
of the bench seat
Folding down is per formed at the rear of the
vehicle with the boot open.
F
P
lace the head restraints in the low position.
For more information on the Rear head
restraints , refer to the corresponding section.
F
P
ull the strap A located behind the backrest
to unlock it and fold it down on the cushion.
Folding up the backrest of
the bench seat
3-door 5-door F
F
old back the backrest and lock it on the
anchorage B .
F
C
heck that the backrest of the rear seat is
properly locked.
Rear head restraints
(Depending on version).
The rear head restraints are removable and
have two positions:
-
h
igh, the position for use.
-
l
ow, the position for storage.
Ease of use and comfort