2018 PEUGEOT 108 fuel
[x] Cancel search: fuelPage 35 of 180
33
With the engine running, the front seats can be
heated separately.
F
P
ress the switch. The indicator lamp comes
on.
F
P
ressing a
second time stops operation.
The temperature is controlled automatically.
The heated seat function is deactivated
approximately two minutes after the ignition is
switched off. To reactivate the function, switch
on the ignition and press the control again.
Switch off the heated seats as soon as
you consider it necessary, as reducing
the consumption of electrical current
reduces fuel consumption.
Do not use the function when the seat is
not occupied.
Reduce the intensity of the heating as
soon as possible.
When the seat and passenger
compartment have reached an
adequate temperature, you can stop
the function; reducing the consumption
of electrical current reduces fuel
consumption. Prolonged use at the highest setting is
not recommended for those with sensitive
skin.
There is a
risk of burns for people whose
perception of heat is impaired (illness,
taking medication, for example).
There is a
risk of overheating the system if
material with insulating properties is used,
such as cushions or seat covers.
Do not use the function:
-
i
f wearing damp clothing,
-
i
f child seats are fitted.
To avoid breaking the heating element in
the seat:
-
d
o not place heavy objects on the seat,
-
d
o not kneel or stand on the seat,
-
d
o not place sharp objects on the seat,
-
d
o not spill liquids onto the seat.
To avoid the risk of short-circuit:
-
d
o not use liquid products for cleaning
the seat,
-
n
ever use the heating function when
the seat is damp.Access to rear seats
(3-door)
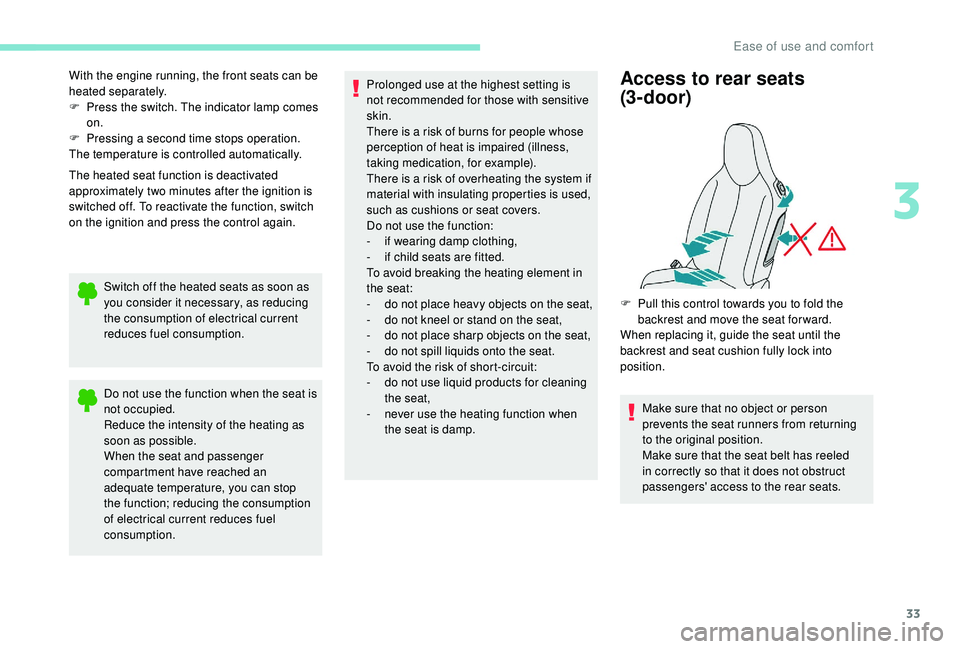
F Pull this control towards you to fold the backrest and move the seat for ward.
When replacing it, guide the seat until the
backrest and seat cushion fully lock into
position.
Make sure that no object or person
prevents the seat runners from returning
to the original position.
Make sure that the seat belt has reeled
in correctly so that it does not obstruct
passengers' access to the rear seats.
3
Ease of use and comfort
Page 43 of 180
41
With the automatic air
conditioning system
F Press the dedicated button, its indicator lamp comes on.
F
T
o switch it off, press this button again; its
indicator lamp goes off.
The other settings (air flow, air distribution,
etc.) are controlled automatically.
Rear screen demist –
defrost
The control button is located
on the heating/ventilation or air
conditioning system control panel.
Switching on
The rear screen demist – defrost can only
operate when the engine is running.
F
P
ress this button to demist /defrost the rear
screen and, depending on version, the door
mirrors. The indicator lamp associated with
the button comes on.
Switching off
F Press this button again to switch off the demisting/defrosting. The indicator lamp
associated with the button goes off.
Switch off the demisting/defrosting of
the rear screen and door mirrors, if
fitted, as soon as appropriate, as lower
current consumption results in reduced
fuel consumption.
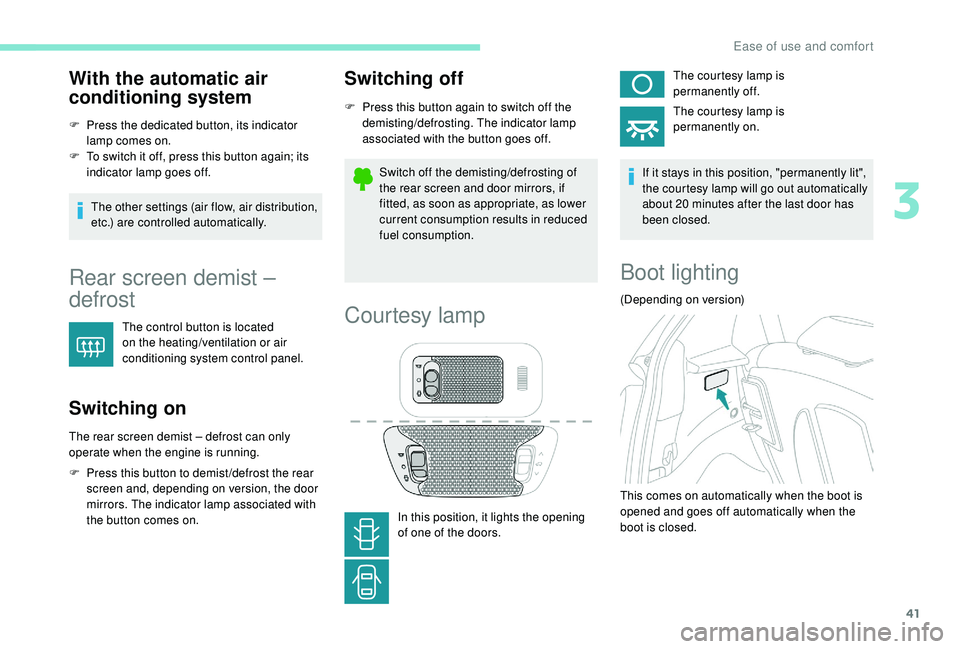
Courtesy lamp
In this position, it lights the opening
of one of the doors. The courtesy lamp is
permanently off.
The courtesy lamp is
permanently on.
If it stays in this position, "permanently lit",
the courtesy lamp will go out automatically
about 20 minutes after the last door has
been closed.
Boot lighting
(Depending on version)
This comes on automatically when the boot is
opened and goes off automatically when the
boot is closed.
3
Ease of use and comfort
Page 81 of 180
79
If you stop the vehicle but keep the engine
running, you must always move the gear
selector to the neutral position N.
A continuous audible signal sounds if you
turn the ignition switch to " OFF" while the
vehicle is in 2nd, 3rd, 4th or 5th gear.
If this happens, turn the ignition switch
to " ON ", move the gear selector to the
position N , return it to position E , M or R,
then turn the ignition switch to " OFF".
If the vehicle is on a
slope, use the brake
to stop the vehicle from moving and place
the gear selector to position N , E or R.
In all cases, you must apply the parking
brake to immobilise the vehicle.
Before doing anything in the engine
compartment, make sure that the gear
selector is in neutral N and the parking
brake is applied.Operating limits
When on a slope or when hill start assist is
a ctivated, never keep the vehicle stationary
using the accelerator: you could damage the
clutch.
In these situations, an audible signal sounds.
F
I
n that case, move the gear selector to
position N .
F
W
ait 15 minutes before moving off again, to
allow the clutch to cool down.
Operating faults
With the ignition on, lighting of this
warning lamp indicates a gearbox
fault.
Contact a
PEUGEOT dealer or
a
qualified workshop.
If N flashes in the instrument panel together
with an audible signal for a
long period of time:
-
m
ake sure that the ignition switch is
correctly set to the " ON" position,
-
m
ove the gear selector to N , then return it to
E , M or R .
If 1
flashes in the instrument panel:
-
m
ove the gear selector to E or M , then
return it to N .
If R flashes in the instrument panel:
-
m ove the gear selector to R , then return it to N.
Gear shift indicator
System which reduces fuel consumption by
recommending the most appropriate gear.
Operation
Depending on the driving situation and the
equipment of your vehicle, the system can
recommend you to change gear.
Gear shift recommendations are for information
only. In fact, the road layout, the traffic density
and safety remain the deciding factors when
choosing the best gear. The driver therefore
remains responsible for deciding whether or not
to follow the indications issued by the system.
This function cannot be deactivated.
Example:
-
Y
ou are in third gear.
-
Y
ou press the accelerator pedal.
-
T
he system may suggest that you engage
a
higher gear.
6
Driving
Page 83 of 180
81
Operation
Going into engine STOP mode
This indicator lamp comes on in the
instrument panel and the engine
goes into standby automatically:
-
w
hen the vehicle is stationary, you put the
gearbox into neutral and release the clutch
pedal.
Stop & Starttime counters
A partial time counter counts the periods in
STOP mode during a journey. For your convenience during parking
manoeuvres, STOP mode is not available
for a
few seconds after coming out of
reverse gear.
Stop & Start does not change features
of the vehicle such as braking, power
steering…
Never refuel with the engine in STOP
mode; you must switch off the ignition.
Special cases: STOP mode not
available
Stop & Start
The Stop & Start system puts the engine
temporarily into standby – STOP mode – during
traffic stops (red lights, traffic jams, etc.). The
engine restarts automatically – START mode
– as soon as you want to move off. Restarting
occurs instantly, quickly and silently.
Per fect for urban use, the Stop & Start system
reduces fuel consumption and exhaust
emissions as well as the noise level when
stationary. -
t
he engine is needed to maintain
a comfortable temperature in the passenger
compartment,
-
d
emisting is active,
-
s
ome special conditions (battery charge,
engine temperature, braking assistance,
vehicle stopped on a
steep slope, high
altitude…) where the engine is needed to
assure control of a
system.
Going into engine START mode
This indicator lamp goes off and the
engine restarts automatically:
-
w
hen you fully depress the clutch pedal.
Special case: START invoked
automatically
START mode is invoked automatically if:
- y
ou open the driver's door,
-
y
ou open the bonnet,
-
y
ou unfasten the driver's seat belt,
-
s
ome temporary conditions apply (battery
charge, engine temperature, braking
assistance, vehicle on a
steep slope,
adjustment of the air conditioning, …) where
it is necessary for control of a
system or of
the vehicle.
It is displayed in the trip computer as soon as
the Stop & Start acts.
Press one of the "
DISP" buttons to return to the
previous display.
A global time counter counts the periods in
STOP mode since the last reset to zero.
When it is displayed, press for more than two
seconds on one of the " DISP" buttons to reset
to zero.
STOP mode does not activate, mainly when:
-
t
he driver's door is open,
-
t
he driver's seat belt is not fastened,
6
Driving
Page 94 of 180

92
Under-inflation detection
The system monitors the pressure in all four
tyres, once the vehicle is moving.
It compares the information given by the
wheel speed sensors with reference values,
which must be reinitialised after ever y tyre
pressure adjustment or wheel change.
The system triggers an alert as soon as it
detects a
drop in the pressure of one or more
tyres. The tyre under-inflation detection system
does not replace the need for vigilance on
the part of the driver.
This system still requires you to check the
tyre inflation pressure (including the spare
wheel) every month as well as before
a
long journey.
Driving with under-inflated tyres impairs
handling, extends braking distances and
causes early tyre wear, particularly in
adverse conditions (heavy loads, high
speeds, long journeys).
Driving with under-inflated tyres
increases fuel consumption. The tyre pressure specifications for your
vehicle can be found on the tyre pressure
label.
For more information on the
Identification markings
, refer to the
corresponding section.
Tyre pressures should be checked when
the tyres are "cold" (vehicle stopped for
1 hour or after a journey of less than
6 miles (10 km) at moderate speeds).
Other wise (when hot), add 0.3 bar to the
pressures shown on the label.Under-inflation alert
This is shown by the warning lamp
coming on, fixed, accompanied by
an audible signal.
F
R
educe speed immediately, avoid excessive
steering movements and sudden braking.
F
S
top as soon as it is safe to do so.
This system automatically monitors the tyre
pressure while driving.
Detection of loss of pressure does not
always bring about a visible deformation
of the tyre. Do not make do with just
a
visual check.
Driving
Page 98 of 180

96
Fuel tank
The capacity of the tank is about 35 litres.
Low fuel level
When the fuel in the tank reaches
a low level, this warning lamp
comes on in the instrument panel,
accompanied by an audible warning.
The message "LO FUEL" is displayed instead
of the range.
You have about 5
litres of fuel left.
In certain driving conditions and depending on
the engine in your vehicle, your range may be
less than 30
miles (50 km).
If you run out of fuel, the emission
control warning lamp may come on
in the instrument panel. It will go out
automatically after several engine starts.
Refuelling
Refuelling must be done with the engine and
ignition off (ignition switch to " LOCK" or
" OFF "). Opening the filler cap may create a
noise
caused by an inrush of air. This is entirely
normal and results from the sealing of the fuel
system.
To refuel in complete safety:
F
Y
ou must stop the engine and turn off
the ignition (switch to LOCK or OFF
mode) .
F
P
ull the control on the lower part of the
dashboard, driver's side, to unlock the fuel
filler flap.
F
O
pen the fuel filler flap.
A label inside the fuel flap reminds you of the
type of fuel to use.
Additions of fuel must be of at least 5 litres, in
order to be registered by the fuel gauge. F
U
nscrew the cap and place it on its support
(on the flap).
F
I
ntroduce the filler nozzle and push it in as
far as possible before starting to refuel (risk
of blowback).
F
K
eep it in this position during the whole
filling operation.
Once you have finished refuelling:
F
S
crew the cap back on again until you hear
a click. When you release the cap, it will
turn slightly in the opposite direction.
F
P
ush the fuel flap to close it.
When filling the tank, do not continue
beyond the 3
rd cut off of the nozzle; this
could cause malfunctions.
Your vehicle is fitted with a
catalytic converter,
which helps to reduce the level of harmful
emissions in the exhaust gases.
The filler neck is narrower, allowing only
unleaded petrol nozzles to be introduced.
Practical information
Page 99 of 180

97
Compatibility of fuels
Fuel used for petrol engines
The petrol engines are compatible with biofuels
that conform to current and future European
standards and which can be obtained from
filling stations:
Petrol that meets standard EN228,
mixed with a biofuel that meets
standard EN15376.
The only petrol additives authorised
for use are those that meet the
B715001
standard.
Travelling abroad
Cer tain fuels could damage the engine of
your vehicle.
In cer tain countries, the use of a par ticular
fuel may be required (specific octane
rating, specific trade name, etc.) to ensure
correct operation of the engine.
For any additional information, contact a
dealer.
Snow chains
In wintry conditions, snow chains
improve traction as well as the
behaviour of the vehicle when
braking.
Snow chains must be fitted only to the
front wheels. They must never be fitted to
"space-saver" type spare wheels.
Take account of the legislation in force in
your country on the use of snow chains
and the maximum authorised speed.
Installation tips
It is strongly recommended that before
you leave, you practise fitting the snow
chains on a level and dry sur face.
Avoid driving with snow chains on roads
that have been cleared of snow to avoid
damaging your vehicle's tyres and the
road sur face. If your vehicle is fitted with
alloy wheels, check that no part of the
chain or its fixings is in contact with the
wheel rim.
Only use the chains designed to be fitted to the
type of wheels fitted to your vehicle:
Original tyre size Maximum link size
165/65
R14 9
mm
165/60
R15
F
I
f you have to fit the chains during a
journey,
stop the vehicle on a
flat sur face on the side
of the road.
F
A
pply the parking brake and position any
wheel chocks under the wheels to prevent
movement of your vehicle.
F
F
it the chains following the instructions
provided by the manufacturer.
F
M
ove off gently and drive for a
few
moments, without exceeding 31
mph
(50
km/h).
F
S
top your vehicle and check that the snow
chains are correctly tightened. For more information on snow chains,
contact a
PEUGEOT dealer or a qualified
workshop.
When you drive with snow chains, you
should deactivate the lane departure
warning system.
7
Practical information
Page 105 of 180
103
Brake pads
Brake wear depends on the style
of driving, particularly in the case
of vehicles used in town, over short
distances. It may be necessary to
have the condition of the brakes
checked, even between vehicle
services.
Unless there is a
leak in the circuit, a drop in
the brake fluid level indicates that the brake
pads are worn.
Brake disc/drum wear
For information on checking
brake disc/drum wear, contact
a
PEUGEOT dealer or a qualified
workshop.
Parking brake
If excessive travel or a loss of
e ffectiveness of this system is
noticed, the parking brake must
be checked, even between two
services.
This system must be checked by a
PEUGEOT
dealer or a
qualified workshop.
Wheels and tyres
The pressure must be checked on
all tyres, including the spare wheel,
when the tyres are "cold", at least
once a month and before a long
j o u r n ey. Driving with worn or damaged tyres reduces
braking efficiency and control of the vehicle's
steering. Regular inspections of the condition
of tyres (tread and sides) and rims are
recommended as well as making sure that
valves are fitted.
Using different size wheels and tyres from
those specified can affect the lifetime of tyres,
wheel rotation, ground clearance and the
speedometer reading and have an adverse
effect on road holding.
Fitting different tyres on the front and rear axles
can cause the ESC to mistime.
Only use products recommended by
PEUGEOT or products of equivalent
quality and specification.
In order to optimise the operation of
components as important as those in the
braking system, PEUGEOT selects and
offers very specific products.
After washing the vehicle, dampness, or
in wintry conditions, ice can form on the
brake discs and pads: braking efficiency
may be reduced. Make light brake
applications to dry and defrost the brakes.
ETG gearbox
The ETG gearbox does not require
any maintenance (no oil change).
The pressures given on the tyre pressure label
are valid for "cold" tyres. If you have driven for
more than 10
minutes or more than 6 miles
(10
kilometres) at more than 31 mph (50 km/h),
0.3
bar (30 kPa) should be added to the values
given on the label.
Under-inflation increases fuel consumption.
Non-compliant tyre pressure causes premature
wear on tyres and has an adverse effect on the
vehicle's road holding – Risk of an accident!
7
Practical information