2018 PEUGEOT 108 seats
[x] Cancel search: seatsPage 4 of 180

2
.
.
Instrument panels 8
D isplays 9
Warning and indicator lamps
9
I
ndic ators
18
Trip computer
1
8
Adjusting the time
2
0Keys
22
"
K
eyless Entry and Starting" system
2
3
Doors 26
Boot
27
Front electric windows
2
8
Quarter windows
2
9
Electric fabric roof
2
9
Advice on care
3
1
Front seats
3
2
Rear seats
3
4
Mirrors
35
Steering wheel adjustment
3
6
Ventilation
3
6
Heating
3
7
Manual air conditioning
3
7
Automatic air conditioning
3
8
Front demist – defrost
4
0
Rear screen demist – defrost
4
1
Courtesy lamp
4
1
Boot lighting
4
1
Interior fittings
4
2
Rear shelf
4
4
Boot fittings
4
5Lighting control stalk
4
6
Automatic headlamp illumination
4
8
Direction indicators
4
8
Headlamp adjustment
4
9
Wiper control stalk
4
9
Changing a
wiper blade
5
0
General safety recommendations 5 1
H o r n 51
Hazard warning lamps
5
2
ESC system
5
2
Seat belts
5
4
Airbags
56
Child seats
5
9
Deactivating the front passenger airbag
6
0
ISOFIX mountings and child seats
6
6
i-Size child seats
7
0
Child lock
7
1
InstrumentsAccess
Over view
Ease of use and comfort Lighting and visibility
Safety
Eco-driving
Instruments and controls 4
E co-driving
6
Contents
Page 9 of 180
7
Limit the causes of excess
consumption
Spread loads throughout the vehicle; place
the heaviest items in the bottom of the boot,
as close as possible to the rear seats.
Limit the loads carried in the vehicle and
reduce wind resistance (roof bars, roof rack,
…). Use a roof box in preference.
Remove roof bars and the roof rack after use.
At the end of winter, remove winter tyres and
refit your summer tyres.
Observe the recommendations
on maintenance
Check the tyre pressures regularly, when cold,
referring to the label in the door aperture,
driver's side.
Carry out this check in particular:
-
b
efore a long journey,
-
a
t each change of season,
-
a
fter a long period out of use. Have your vehicle ser viced regularly (engine
oil, oil filter, air filter, passenger compartment
filter…) and obser ve the schedule of
operations recommended in the warranty and
maintenance record. Do not forget the spare wheel and the tyres on
any trailer or caravan.
.
Eco-driving
Page 31 of 180
29
Quarter windows
On the 5 -door versions, device for providing
ventilation to the rear seats while limiting the
partial opening of the window.
Opening
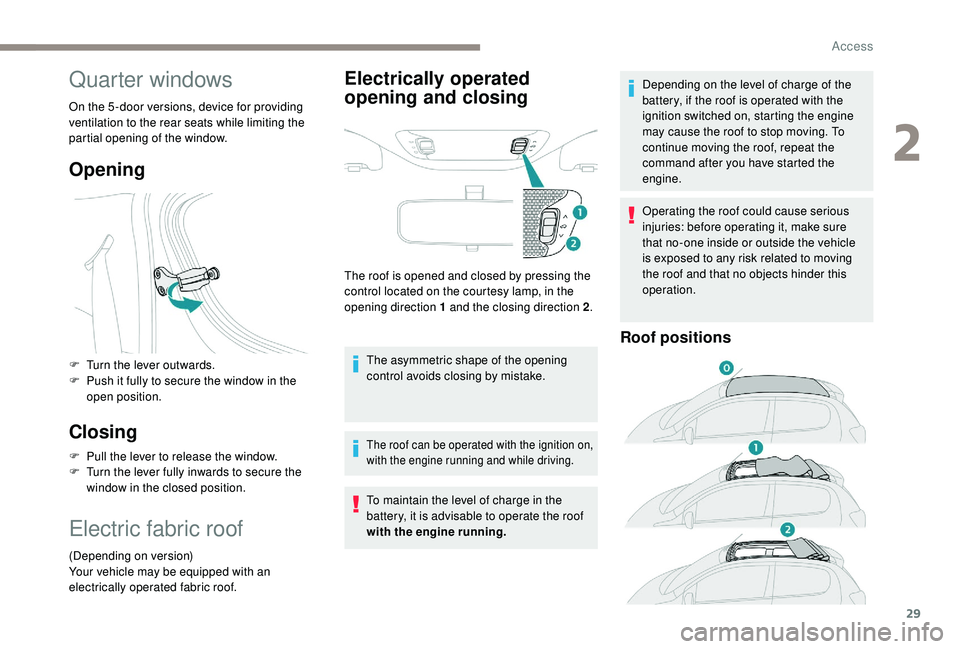
F Turn the lever outwards.
F P ush it fully to secure the window in the
open position.
Closing
F Pull the lever to release the window.
F T urn the lever fully inwards to secure the
window in the closed position.
Electric fabric roof
(Depending on version)
Your vehicle may be equipped with an
electrically operated fabric roof.
Electrically operated
opening and closing
The roof is opened and closed by pressing the
control located on the courtesy lamp, in the
opening direction 1
and the closing direction 2.
The asymmetric shape of the opening
control avoids closing by mistake.
The roof can be operated with the ignition on,
with the engine running and while driving.
To maintain the level of charge in the
battery, it is advisable to operate the roof
with the engine running. Depending on the level of charge of the
battery, if the roof is operated with the
ignition switched on, starting the engine
may cause the roof to stop moving. To
continue moving the roof, repeat the
command after you have started the
engine.
Operating the roof could cause serious
injuries: before operating it, make sure
that no-one inside or outside the vehicle
is exposed to any risk related to moving
the roof and that no objects hinder this
operation.
Roof positions
2
Access
Page 34 of 180
32
Front seats
For safety reasons, only adjust seats
when the vehicle is stationary.
Before moving the seat backwards,
ensure that there is nothing that might
prevent the full travel of the seat.
There is a risk of trapping or pinching
passengers if present in the rear seats
or jamming the seat if large objects are
placed on the floor behind the seat.
Correct driving position
Before taking to the road and to make the most
of the ergonomic layout of the instruments and
controls, carry out these adjustments in the
following order:
-
t
he seat backrest angle,
-
t
he seat cushion height,
-
t
he longitudinal position of the seat,
-
t
he height of the steering wheel,
-
t
he rear view mirror and door mirrors. Once these adjustments have been made,
check the instrument panel can be viewed
correctly from your driving position.Forwards-backwards
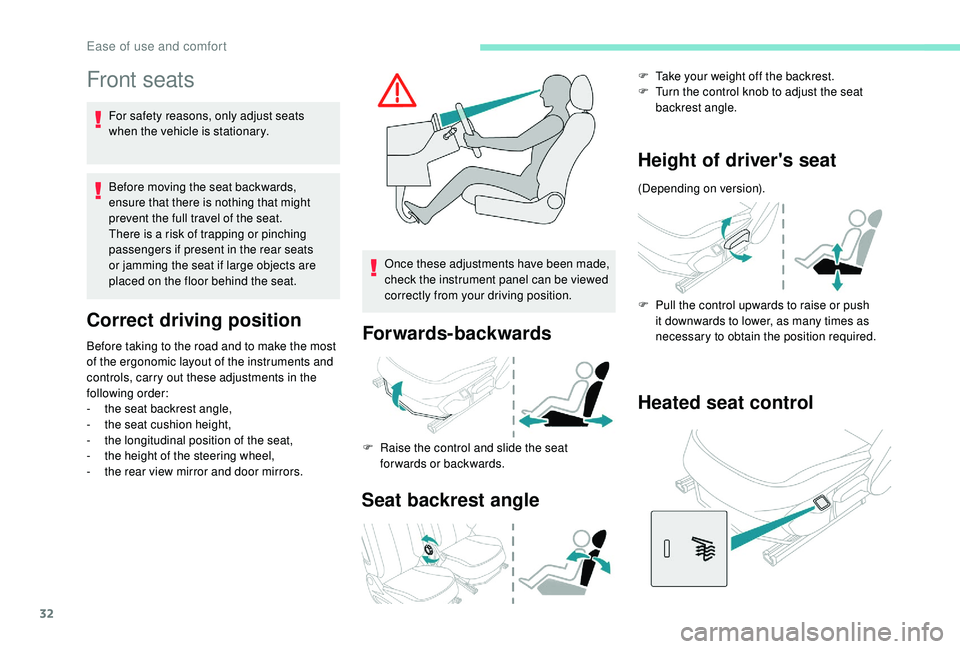
F Raise the control and slide the seat
forwards or backwards.
Seat backrest angle
F Take your weight off the backrest.
F T urn the control knob to adjust the seat
backrest angle.
Height of driver's seat
(Depending on version).
F
P
ull the control upwards to raise or push
it downwards to lower, as many times as
necessary to obtain the position required.
Heated seat control
Ease of use and comfort
Page 35 of 180
33
With the engine running, the front seats can be
heated separately.
F
P
ress the switch. The indicator lamp comes
on.
F
P
ressing a
second time stops operation.
The temperature is controlled automatically.
The heated seat function is deactivated
approximately two minutes after the ignition is
switched off. To reactivate the function, switch
on the ignition and press the control again.
Switch off the heated seats as soon as
you consider it necessary, as reducing
the consumption of electrical current
reduces fuel consumption.
Do not use the function when the seat is
not occupied.
Reduce the intensity of the heating as
soon as possible.
When the seat and passenger
compartment have reached an
adequate temperature, you can stop
the function; reducing the consumption
of electrical current reduces fuel
consumption. Prolonged use at the highest setting is
not recommended for those with sensitive
skin.
There is a
risk of burns for people whose
perception of heat is impaired (illness,
taking medication, for example).
There is a
risk of overheating the system if
material with insulating properties is used,
such as cushions or seat covers.
Do not use the function:
-
i
f wearing damp clothing,
-
i
f child seats are fitted.
To avoid breaking the heating element in
the seat:
-
d
o not place heavy objects on the seat,
-
d
o not kneel or stand on the seat,
-
d
o not place sharp objects on the seat,
-
d
o not spill liquids onto the seat.
To avoid the risk of short-circuit:
-
d
o not use liquid products for cleaning
the seat,
-
n
ever use the heating function when
the seat is damp.Access to rear seats
(3-door)
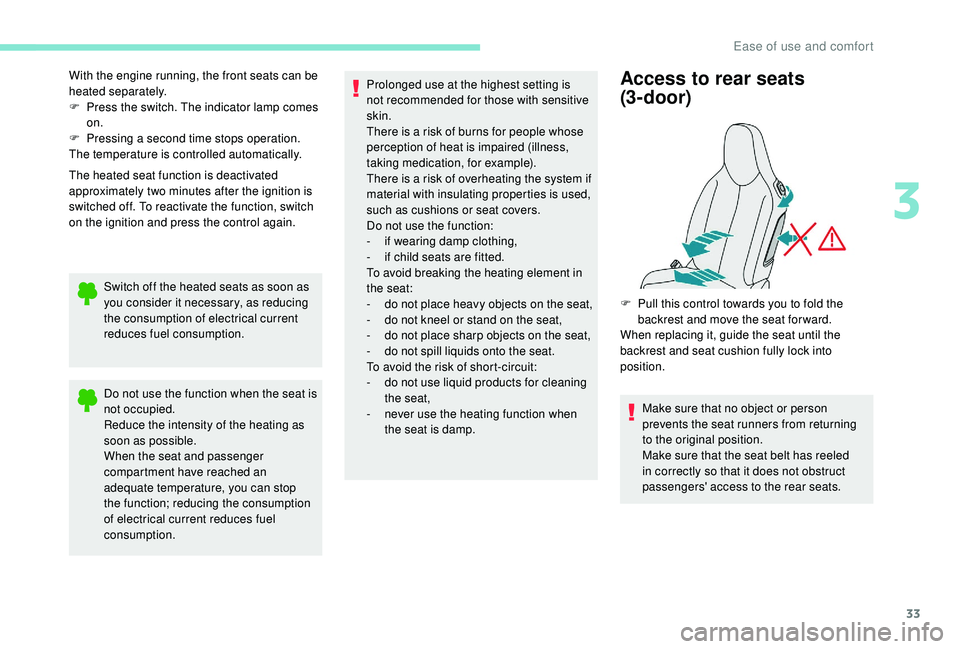
F Pull this control towards you to fold the backrest and move the seat for ward.
When replacing it, guide the seat until the
backrest and seat cushion fully lock into
position.
Make sure that no object or person
prevents the seat runners from returning
to the original position.
Make sure that the seat belt has reeled
in correctly so that it does not obstruct
passengers' access to the rear seats.
3
Ease of use and comfort
Page 36 of 180
34
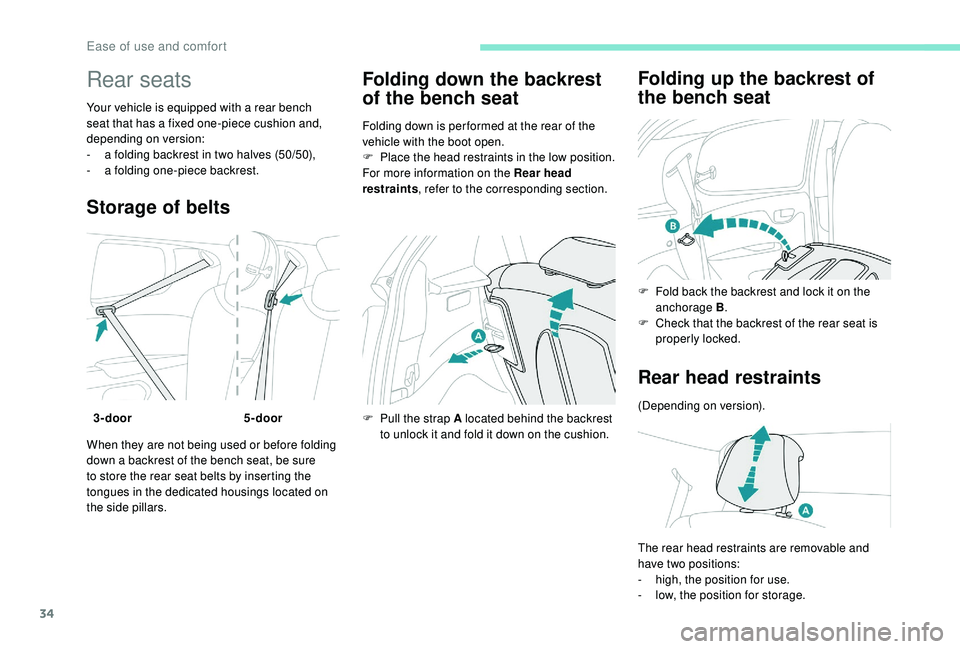
Rear seats
Your vehicle is equipped with a rear bench
s eat that has a fixed one-piece cushion and,
depending on version:
-
a f
olding backrest in two halves (50/50),
-
a f
olding one-piece backrest.
Storage of belts
When they are not being used or before folding
down a backrest of the bench seat, be sure
to store the rear seat belts by inserting the
tongues in the dedicated housings located on
the side pillars.
Folding down the backrest
of the bench seat
Folding down is per formed at the rear of the
vehicle with the boot open.
F
P
lace the head restraints in the low position.
For more information on the Rear head
restraints , refer to the corresponding section.
F
P
ull the strap A located behind the backrest
to unlock it and fold it down on the cushion.
Folding up the backrest of
the bench seat
3-door 5-door F
F
old back the backrest and lock it on the
anchorage B .
F
C
heck that the backrest of the rear seat is
properly locked.
Rear head restraints
(Depending on version).
The rear head restraints are removable and
have two positions:
-
h
igh, the position for use.
-
l
ow, the position for storage.
Ease of use and comfort
Page 46 of 180
44
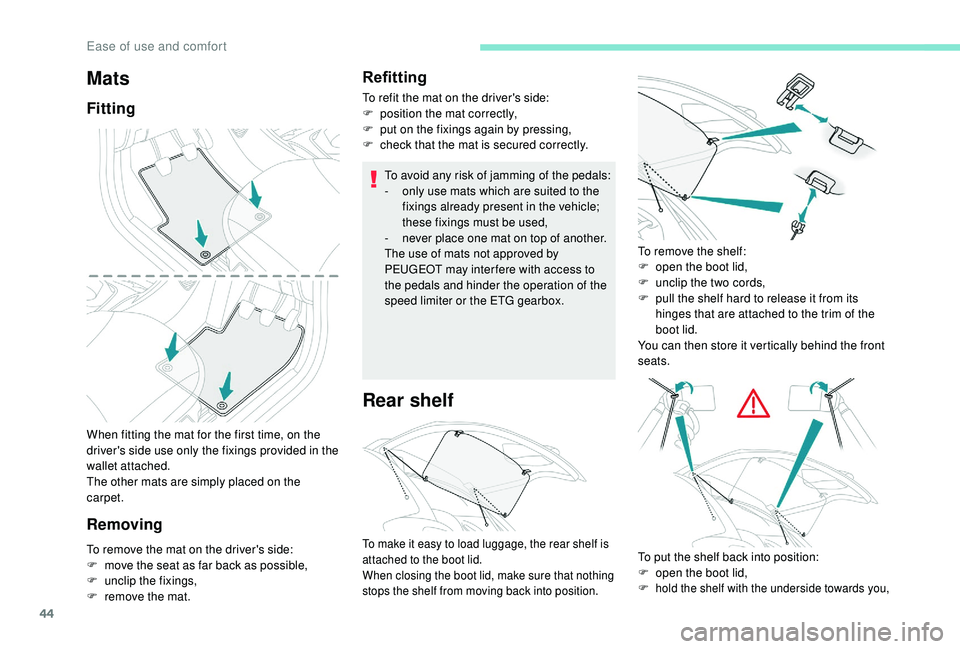
When fitting the mat for the first time, on the
driver's side use only the fixings provided in the
wallet attached.
The other mats are simply placed on the
carpet.
RemovingRefitting
To refit the mat on the driver's side:
F
p osition the mat correctly,
F
p
ut on the fixings again by pressing,
F
c
heck that the mat is secured correctly.
To avoid any risk of jamming of the pedals:
-
o
nly use mats which are suited to the
fixings already present in the vehicle;
these fixings must be used,
-
n
ever place one mat on top of another.
The use of mats not approved by
PEUGEOT may inter fere with access to
the pedals and hinder the operation of the
speed limiter or the ETG gearbox.
Rear shelf
Mats
Fitting
To remove the mat on the driver's side:
F
m ove the seat as far back as possible,
F
un
clip the fixings,
F
r
emove the mat. To remove the shelf:
F
o
pen the boot lid,
F
u
nclip the two cords,
F
p
ull the shelf hard to release it from its
hinges that are attached to the trim of the
boot lid.
You can then store it vertically behind the front
seats.To make it easy to load luggage, the rear shelf is
attached to the boot lid.
When closing the boot lid, make sure that nothing
stops the shelf from moving back into position.To put the shelf back into position:
F o pen the boot lid,
F
hold the shelf with the underside towards you,
Ease of use and comfort
Page 56 of 180
54
Drive carefully at a moderate speed and
c ontact a PEUGEOT dealer or a qualified
workshop for verification of the system.
The TRC and DSC systems offer
exceptional safety in normal driving, but
this should not encourage the driver to
take extra risks or drive at high speed.
The correct operation of the systems
depends on observing the manufacturer's
recommendations regarding wheels (tyres
and rims), braking system components,
electronic components as well as
assembly and repair procedures used by
the PEUGEOT dealer network.
After an impact, have the systems
checked by a
PEUGEOT dealer or
a
qualified workshop.Seat belts
Front seat belts
The front seat belts are fitted with
a pretensioning and force limiting system.
This system improves safety in the front
seats in the event of a
front or side impact.
Depending on the severity of the impact, the
pretensioning system instantly tightens the seat
belts against the body of the occupants.
The pretensioning seat belts are active when
the ignition is on.
The force limiter reduces the pressure of
the seat belt on the passenger's chest, thus
improving their protection.
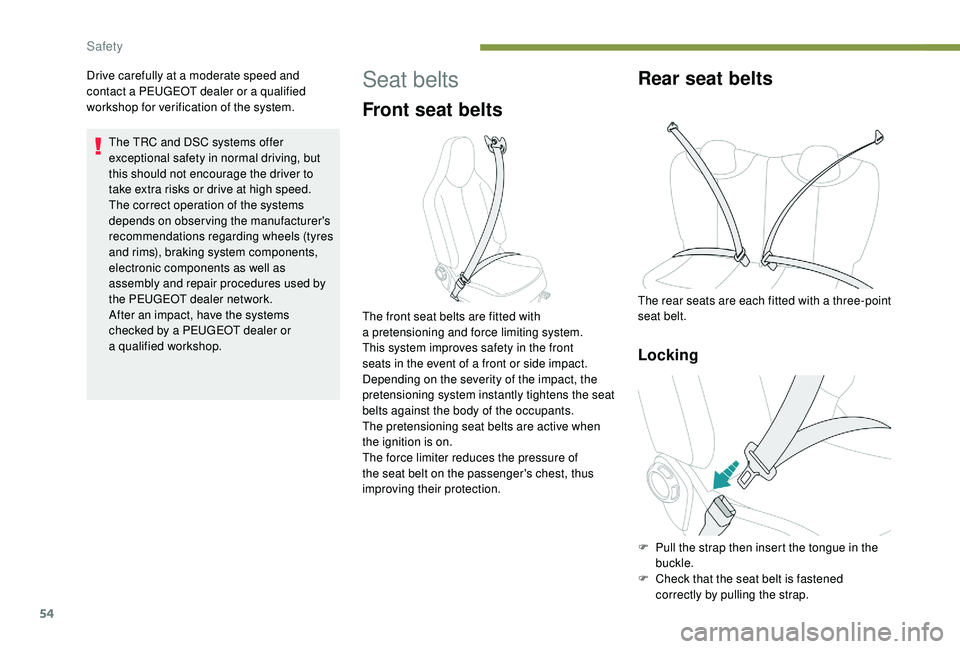
Rear seat belts
The rear seats are each fitted with a three-point
sea t belt.
Locking
F Pull the strap then insert the tongue in the buckle.
F
C
heck that the seat belt is fastened
correctly by pulling the strap.
Safety