Page 154 of 426

Press thebutton on the key fob again
within 5 seconds.
∙ All doors unlock.
∙ The hazard warning lights flash once if all doors are completely closed.
The interior lights can be turned off without
waiting by inserting the key into the ignition
switch and placing it in the ON or START
position, locking the doors with the key fob
or pushing the interior light switch to the
OFF position.
Auto relock (if so equipped)
When thebutton on the key fob is
pressed, all doors will lock automatically
within 1 minute unless one of the following
operations is performed:
∙ Any door is opened.
∙ A key is inserted into the ignition switch and the switch is cycled from OFF to ON.Using the panic alarm
If you are near your vehicle and feel threat-
ened, you may activate the panic alarm to
call attention by pressing and holding
the
button on the key fob for longer
than 0.5 seconds.
The panic alarm and headlights will stay on
for a period of time.
The panic alarm stops when:
∙ It has run for a period of time.
∙ Any button is pressed on the key fob.
Using the interior lights
Press thebutton on the key fob once
to turn on the interior lights.
For additional information, refer to “Interior
lights” in the “Instruments and controls”
section of this manual.
LPD2497
Pre-driving checks and adjustments3-11
Page 161 of 426

The inside mirror is designed so that it au-
tomatically dims during night time condi-
tions and according to the intensity of the
headlights of t")
AUTOMATIC ANTI-GLARE
REARVIEW MIRROR (if so equipped)
The inside mirror is designed so that it au-
tomatically dims during night time condi-
tions and according to the intensity of the
headlights of the vehicle following you. The
automatic anti-glare feature is activated
when the ignition switch is placed in the ON
position.
NOTE:
Do not hang any objects over the sen-
sors
�1or apply glass cleaner to the sen-
sors. Doing so will reduce the sensitivity
of the sensors, resulting in improper op-
eration. The indicator light
�2will illuminate when
the automatic anti-glare feature is operat-
ing.
With the ignition switch placed in the ON
position, press the
button as de-
scribed:
∙ To turn off the anti-glare feature, press and hold the
button for 8 sec-
onds. The indicator light will turn off.
∙ To turn on the anti-glare feature, press and hold the
button again for
8 seconds. The indicator light will turn
on. For information on the compass display
�3
(if so equipped), refer to “Compass display”
in the “Instruments and controls” section of
this manual.
LPD2315
3-18Pre-driving checks and adjustments
Page 163 of 426
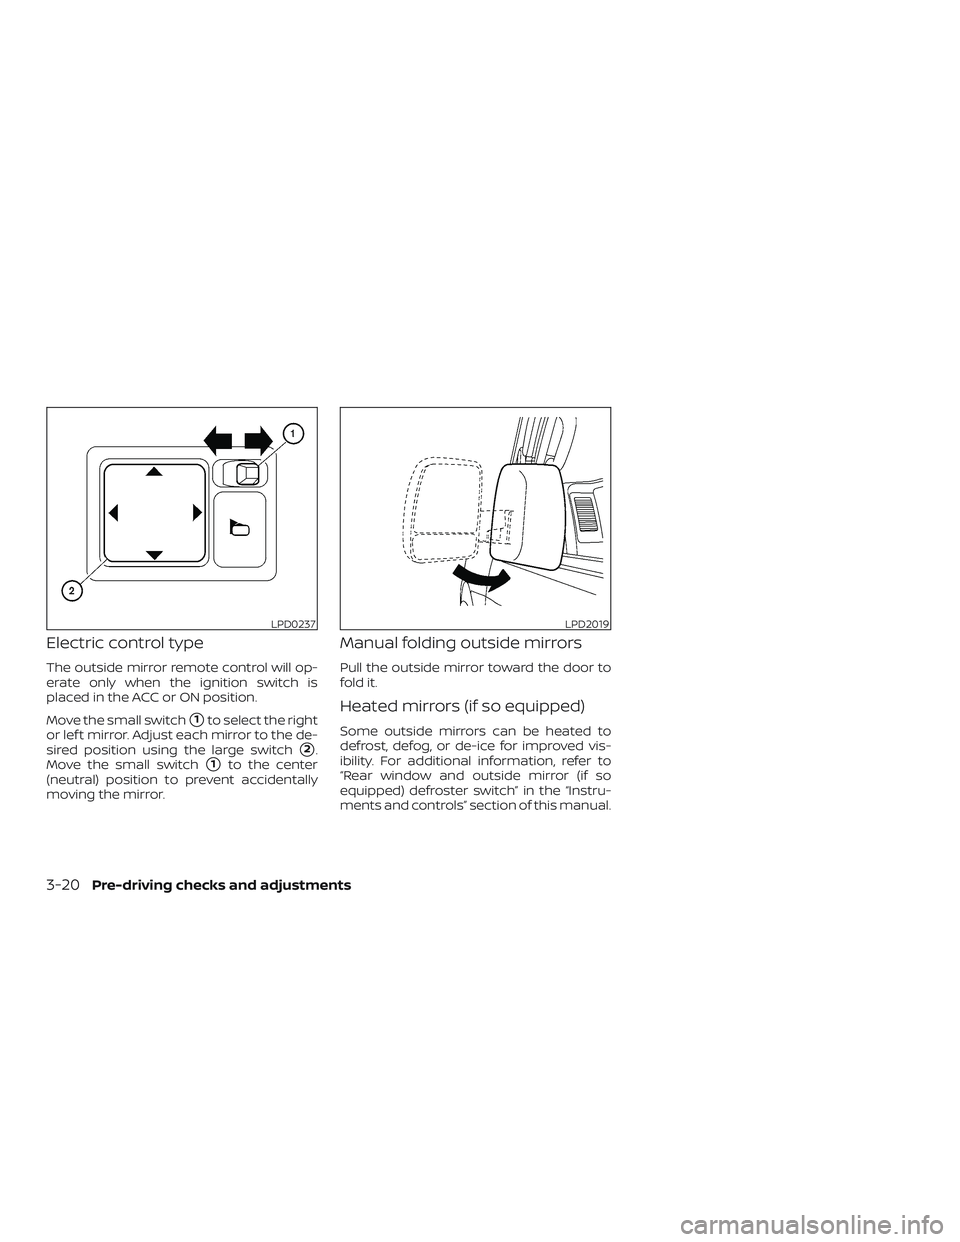
Electric control type
The outside mirror remote control will op-
erate only when the ignition switch is
placed in the ACC or ON position.
Move the small switch
�1to select the right
or lef t mirror. Adjust each mirror to the de-
sired position using the large switch
�2.
Move the small switch
�1to the center
(neutral) position to prevent accidentally
moving the mirror.
Manual folding outside mirrors
Pull the outside mirror toward the door to
fold it.
Heated mirrors (if so equipped)
Some outside mirrors can be heated to
defrost, defog, or de-ice for improved vis-
ibility. For additional information, refer to
“Rear window and outside mirror (if so
equipped) defroster switch” in the “Instru-
ments and controls” section of this manual.
LPD0237LPD2019
3-20Pre-driving checks and adjustments
Page 168 of 426

9. CAMERA button
10. NAV button*
*For additional information regarding the
navigation system control buttons, refer to
the separate NissanConnect® Owner’s
Manual.
**For additional information regarding the
Bluetooth® Hands-Free Phone System
control button, refer to “Bluetooth® Hands-
Free Phone System with Navigation Sys-
tem” in this section.
When you use this system, make sure the
engine is running.
If you use the system with the engine not
running (ignition ON or ACC) for a long
time, it will discharge the battery, and
the engine will not start.
Reference symbols:
“Example” — Words marked in quotes refer
to a key shown only on the display. These
keys can be selected by touching the
screen.HOW TO USE THE TOUCH-SCREEN
CAUTION
∙ The glass display screen may break if it is hit with a hard or sharp object. If
the glass screen breaks, do not touch
it. Doing so could result in an injury.
∙ To clean the display, never use a rough cloth, alcohol, benzine, thinner or any
kind of solvent or paper towel with a
chemical cleaning agent. They will
scratch or deteriorate the panel.
∙ Do not splash any liquid such as water or car fragrance on the display. Con-
tact with liquid will cause the system
to malfunction.
To help ensure safe driving, some functions
cannot be operated while driving.
The on-screen functions that are not avail-
able while driving will be grayed out or
muted.
Park the vehicle in a safe location and then
operate the navigation system.
WARNING
∙ ALWAYS give your full attention to driving.
∙ Avoid using vehicle features that could distract you. If distracted, you
could lose control of your vehicle and
cause an accident.
Monitor, climate, audio, phone and voice recognition systems4-5
Page 175 of 426

WARNING
Failure to follow the warnings and in-
structions for proper use of the Rear-
View Monitor system could result in se-
rious injury or death.
∙ RearView Monitor is a conveniencefeature and is not a substitute for
proper backing. Always turn and look
out the windows and check mirrors to
be sure that it is safe to move before
operating the vehicle. Always back up
slowly.
∙ The system is designed as an aid to the driver in showing large stationary
objects directly behind the vehicle, to
help avoid damaging the vehicle.
∙ The distance guide line and the ve- hicle width line should be used as a
reference only when the vehicle is on a
level paved surface. The distance
viewed on the monitor is for reference
only and may be different than the
actual distance between the vehicle
and displayed objects.
CAUTION
Do not scratch the camera lens when
cleaning dirt or snow from the front of
the camera.
The RearView Monitor system automati-
cally shows a rear view of the vehicle when
the shif t lever is shif ted into the R (Reverse)
position. While in R (Reverse), pressing the
CAMERA button (if so equipped) will cycle
through guideline options. The radio can
still be heard while the RearView Monitor is
active.
To display the rear view, the RearView Moni-
tor system uses a camera located just
above the vehicle’s license plate
�1.
REARVIEW MONITOR SYSTEM
OPERATION
With the ignition switch in the ON position,
move the shif t lever to the R (Reverse) po-
sition to operate the RearView Monitor.
LHA3686
4-12Monitor, climate, audio, phone and voice recognition systems
Page 195 of 426

When the temperature control dial is
turned all the way to the cold setting, the air
flows only from the ceiling vents. When the
temperature control dial is turned all the
way to the hot setting, the air flows only
from the floor vents beneath the second
and third row of seats. When the tempera-
ture control dial is turned to a point be-
tween the coldest and hottest settings, the
air flows from both the floor and ceiling
vents.The air conditioner system in your NISSAN
vehicle is charged with a refrigerant de-
signed with the environment in mind.
This refrigerant does not harm the
earth’s ozone layer.
Special charging equipment and lubricant
is required when servicing your NISSAN air
conditioner. Using improper refrigerants or
lubricants will cause severe damage to
your air conditioner system. For additional
information, refer to “Air conditioner sys-
tem refrigerant and oil recommendations”
in the “Technical and consumer informa-
tion” section of this manual.
It is recommended that you visit a NISSAN
dealer to service your “environmentally
friendly” air conditioner system.
WARNING
The air conditioner system contains
refrigerant under high pressure. To
avoid personal injury, any air condi-
tioner service should be done only by
an experienced technician with proper
equipment.
RADIO
With the ignition placed in the ACC or ON po-
sition, press the
(power) or ON•OFF but-
ton to turn the radio on. If you listen to the
radio with the engine not running, the ignition
should be placed in the ACC position.
Radio reception is affected by station sig-
nal strength, distance from radio transmit-
ter, buildings, bridges, mountains and other
external influences. Intermittent changes
in reception quality normally are caused by
these external influences.
Using a cellular phone in or near the vehicle
may influence radio reception quality.
Radio reception
Your NISSAN radio system is equipped with
state-of-the-art electronic circuits to en-
hance radio reception. These circuits are
designed to extend reception range, and to
enhance the quality of that reception.
However, there are some general charac-
teristics of both FM and AM radio signals
that can affect radio reception quality in a
moving vehicle, even when the finest
equipment is used. These characteristics
are completely normal in a given reception
area and do not indicate any malfunction
in your NISSAN radio system.
SERVICING AIR CONDITIONER AUDIO SYSTEM
4-32Monitor, climate, audio, phone and voice recognition systems
Page 205 of 426
FM/AM RADIO WITH COMPACT
DISC (CD) PLAYER (if so equipped)
For additional information, refer to “Audio
operation precautions” in this section.1.
CD eject button 2. FM•AM button
3. CD insert slot
4. Display screen
5. SCAN button 6.
SEEK/TRACK buttons
7. iPod MENU button
8.
BACK button
9. ENTER/SETTING button and TUNE/FOLDER control knob
10. Station select (1–6) buttons
11. RDM button
12. RPT button
13. VOL (volume) knob /
(power) button
14. DISP button
15. MEDIA button
16. CD button
Audio main operation
(power) button / VOL (volume) control knob
Place the ignition switch in the ACC or ON
position and press the
(power) but-
ton while the system is off to call up the
mode (radio, CD, AUX, Bluetooth® audio,
USB or iPod®) that was playing immediately
before the system was turned off.
LHA3026
4-42Monitor, climate, audio, phone and voice recognition systems
Page 211 of 426
Audio main operation
(power) button / VOL (volume)control knob
Place the ignition switch in the ACC or ON
position and press the
(power) but-
ton while the system is off to call up the
mode (radio, CD, AUX, Bluetooth® audio,
USB or iPod®) that was playing immediately
before the system was turned off. To turn the system off, press the
(power) button.
Turn the VOL (volume) control knob to ad-
just the volume.
This vehicle may be equipped with Speed
Sensitive Volume. When this feature is ac-
tive, the audio volume changes as the driv-
ing speed changes.
ENTER/SETTING button
Press the ENTER/SETTING button to show
the Settings screen on the display. Turn the
TUNE/SCROLL knob to navigate the op-
tions and then press the ENTER/SETTING
button to make a selection.
4-48Monitor, climate, audio, phone and voice recognition systems
 PLAYER (if so equipped)
For additional information, refer to “Audio
operation precautions” in this section.1.
CD eject button 2. FM•AM button
3. CD insert slot")
 button / VOL (volume)control knob
Place the ignition switch in the ACC or ON
position and press the
(power) but-
ton while the system is off to call up the
mode (radio, CD")