2018 MERCEDES-BENZ SLC ROADSTER trunk
[x] Cancel search: trunkPage 246 of 298
Where willIfind...?
Warning triangle
Removing the warning triangle
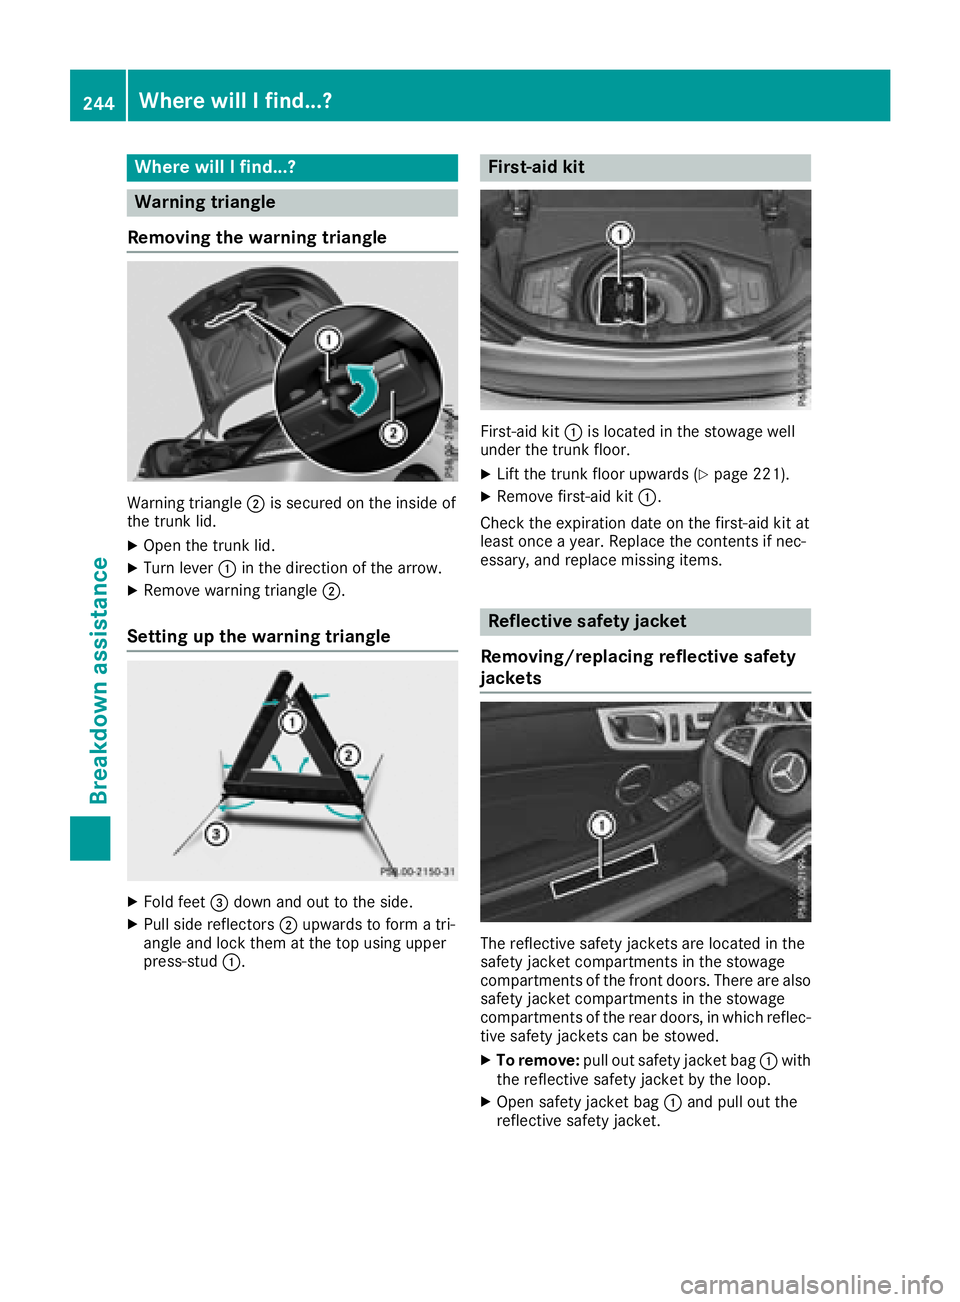
Warning triangle ;is secure donthe insid eof
the trunk lid.
XOpen the trunk lid.
XTurn lever :in the direction of the arrow.
XRemove warning triangle ;.
Setting up the warning triangle
XFold feet=downa nd out to the side.
XPullside reflectors ;upwards to form atri-
angl eand lock them at the top using upper
press-stud :.
First-aid kit
First-aidkit: is located in the stowage well
under the trunk floor.
XLift the trunk floor upwards (Ypag e221).
XRemove first-ai dkit:.
Check the expiration date on the first-ai dkit at
least once ayear. Replace the contents if nec-
essary, and replace missing items.
Reflective safety jacket
Removing/replacing reflective safety
jackets
The reflective safety jackets are located in the
safety jacket compartments in the stowage
compartments of the front doors.T here are also
safety jacket compartments in the stowage
compartments of the rear doors,inw hich reflec-
tive safety jackets can be stowed.
XTo remove: pullout safety jacket bag :with
the reflective safety jacket by the loop.
XOpen safety jacket bag :and pul lout the
reflective safety jacket.
244Where will Ifind...?
Breakdown assistance
Page 247 of 298
XTo stow:foldthe reflective safety jacket, roll
it up and stow it in safety jacke tbag :.
XSlide safety jacke tbag : along the lower
edge of the armresti nto the safety jacket
compartment. Meanwhile, ensure that
loop ;hangs outw ellw ithinr each.
iRemove anew reflective safety jacke tfrom
its packaging material before sliding it into
the safety jacke tcompartment. The packag-
ing material may otherwise cause it to slip out
or make removing it difficult.
Observ ethe legalr equirements in each country.
Notesont he reflective safety jacket
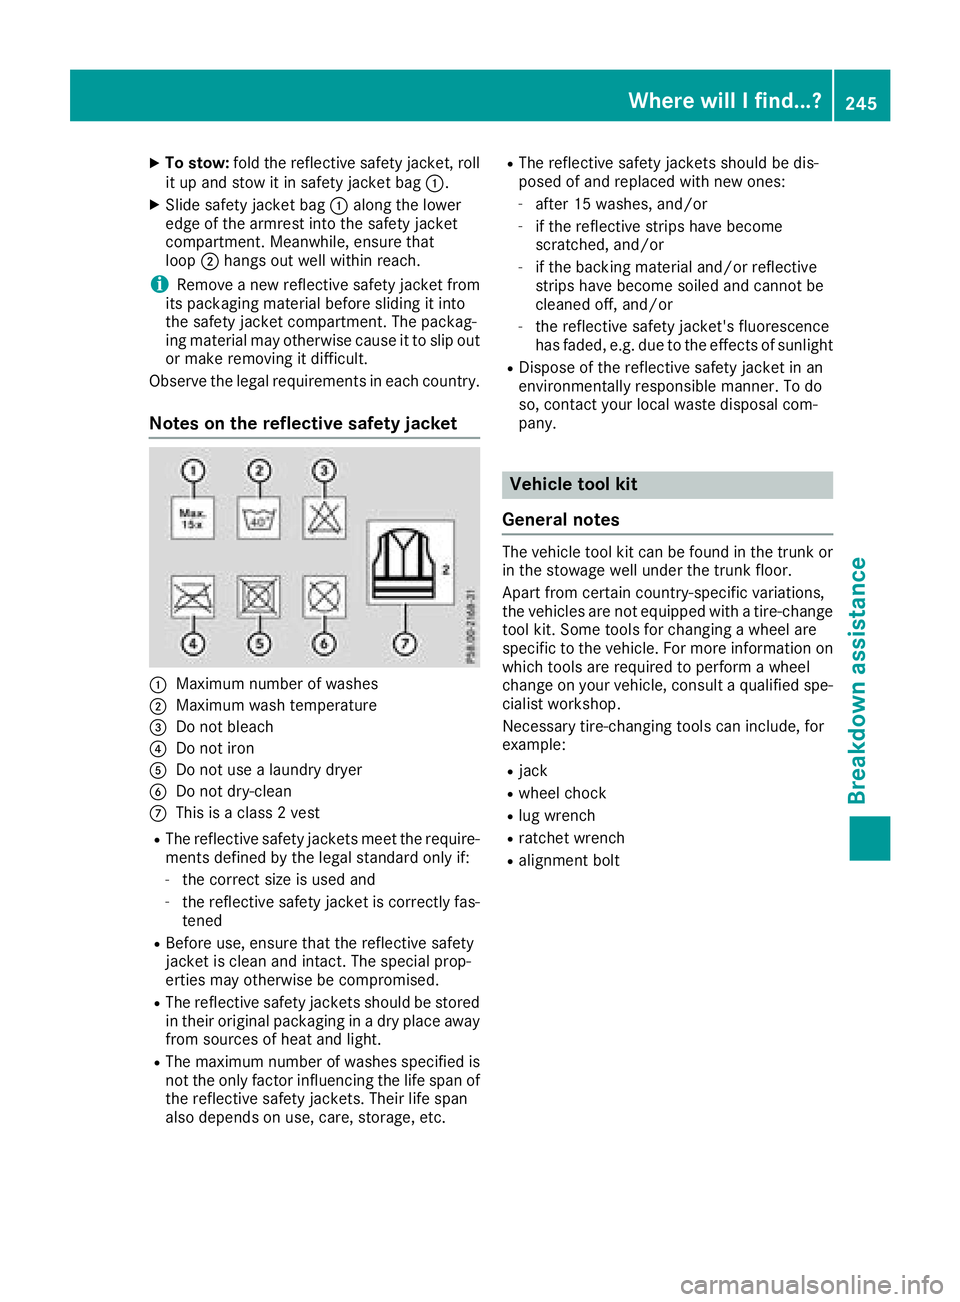
:Maximu mnumbe rofw ashes
;Maximu mwasht emperature
=Do not bleach
?Do not iron
ADo not us ealaundry dryer
BDo not dry-clean
CThi sisa class2vest
RThe reflective safety jackets meett he require-
ments define dbythe legals tandard onlyi f:
-the correct size is used and
-the reflective safety jacke tisc orrectl yfas-
tened
RBefore use, ensure thatt he reflective safety
jacke tisc lean and intact. The specia lprop-
erties mayo therwise be compromised.
RThe reflective safety jackets shoul dbestored
in thei roriginal packaging in adry place away
from sources of hea tand light.
RThe maximu mnumbe rofwashess pecified is
not the onlyf actor influencing the life spa nof
the reflective safety jackets. Their life span
also depends on use, care, storage, etc.
RThe reflective safety jackets shoul dbedis-
posed of and replaced with new ones:
-afte r15w ashes, and/or
-if the reflective strips have become
scratched ,and/or
-if the backing material and/or reflective
strips have become soile dand canno tbe
cleane doff, and/or
-the reflective safety jacket's fluorescence
hasf aded ,e.g.d ue to the effects of sunlight
RDispose of the reflective safety jacke tinan
environmentally responsibl emanner. To do
so, contact your local waste d
isposalc
om-
pany.
Vehicl etoolkit
General notes
The vehicl etool kit can be found in the trunk or
in the stowag ewellu nder the trunk floor.
Apart from certain country-specifi cvariations,
the vehicles are not equipped with atire-change
tool kit. Some tool sfor changing awheel are
specifi ctothe vehicle. For more informatio non
which tool sare required to performaw heel
change on your vehicle, consult aquali fied spe-
cialist workshop.
Necessary tire-changing tool scan include, for
example:
Rjack
Rwhee lchock
Rlugw rench
Rratchet wrench
Ralignment bolt
Where will Ifind...?245
Breakdo wn assis tance
Page 248 of 298
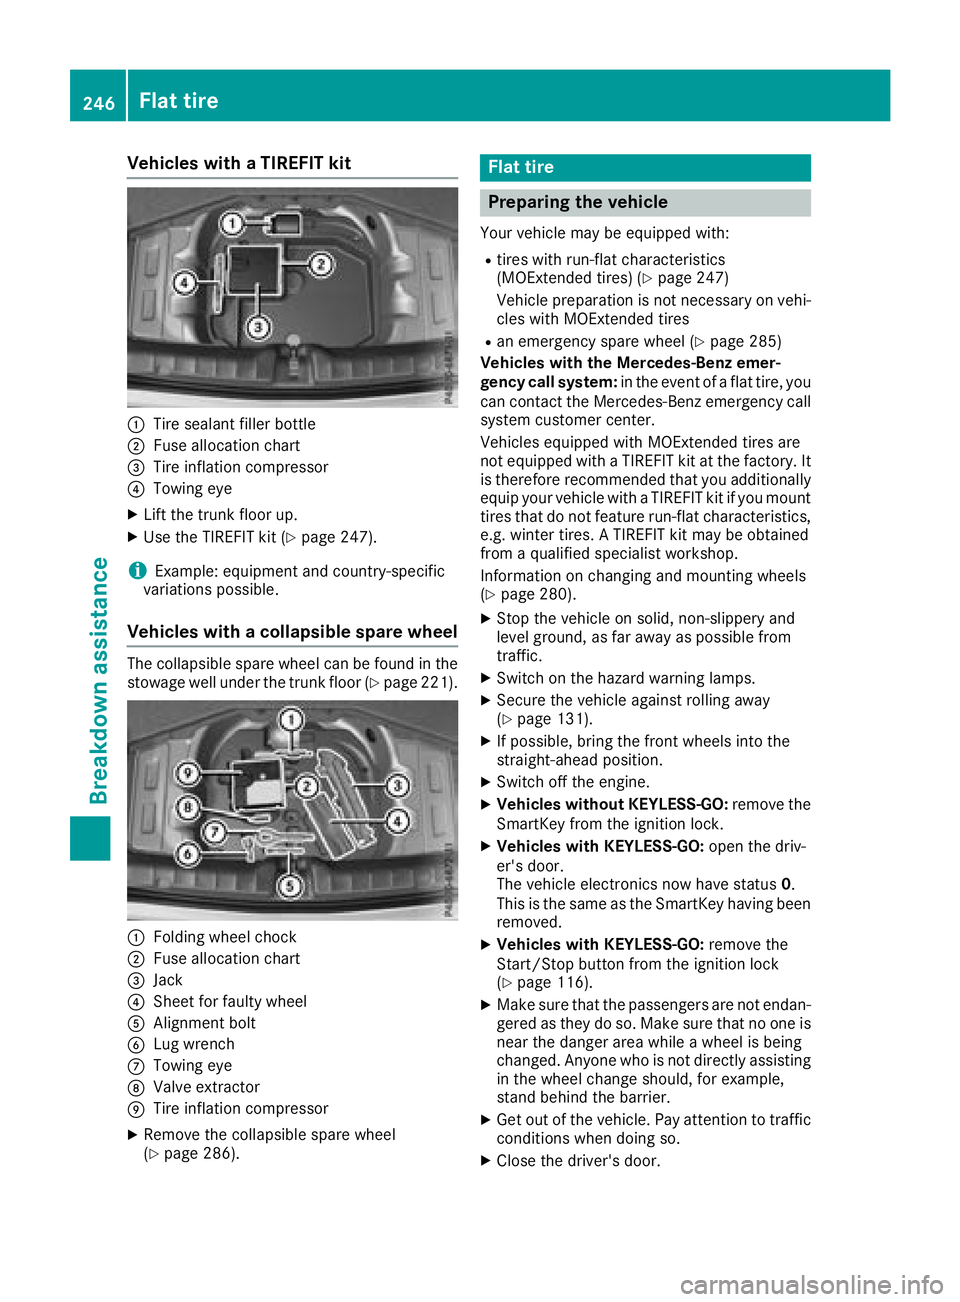
Vehicles withaTIREFI Tkit
:Tire sealant fille rbottle
;Fus ealloc ation chart
=Tire inflation compressor
?Towing eye
XLiftthe trunk floor up.
XUse the TIREFIT kit (Ypage 247).
iExample :equipment and country-specific
variations possible.
Vehicles with acolla psibl espare wheel
The collapsibl espare whee lcan be found in the
stowag ewellu nder the trunk floor (Ypage 221).
:Folding whee lchock
;Fus ealloc ation chart
=Jack
?Shee tfor faulty wheel
AAlignment bolt
BLugw rench
CTowing eye
DValve extractor
ETire inflation compressor
XRemove the collapsibl espare wheel
(Ypage 286).
Flat tire
Preparin gthe vehicle
Your vehicl emaybe equipped with:
Rtire sw ithr un-fla tcharacteristics
(MOExtended tires) (Ypage 247)
Vehicl epreparation is not necessary on vehi-
cle sw ithM OExtende dtires
Ran emergency spare whee l(Ypage 285)
Vehicles with the Mercedes-Benz emer-
genc ycalls ystem: in the event of aflatt ire ,you
can contact the Mercedes-Benz emergency call
system customerc enter.
Vehicles equipped with MOExtende dtiresa re
not equipped with aTIREFIT kit at the factory .It
is therefore recommende dthaty ouadditionally
equi pyourvehicl ewithaT IREFIT kit if yo umount
tire sthatd onot feature run-fla tcharacteristics,
e.g .winter tires. ATIREFIT kit maybeo btained
from aquali fied specialist workshop.
Informatio nonchanging and mounting wheels
(
Ypage 280).
XStop the vehicl eonsolid,non-slippery and
level ground ,asfar away as possibl efrom
traffic.
XSwitch on the hazard warning lamps.
XSecure the vehicl eagain st rolling away
(Ypage 131).
XIf possible, bring the front wheels into the
straight-ahea dposition.
XSwitch off the engine.
XVehicles withou tKEYLESS -GO:remove the
SmartKey from the ignition lock.
XVehicles with KEYLESS-GO: open the driv-
er' sd oor.
T he vehicl eelectronics now have status 0.
Thi sist he same as the SmartKey having been
removed.
XVehicles with KEYLESS-GO: remove the
Start/Stop button from the ignition lock
(
Ypage 116).
XMake sure thatt he passengersare not endan-
gered as they do so. Make sure thatnoo ne is
nea rthe danger are awhile awheel is being
changed .Anyone wh oisnot directlya ssisting
in the whee lchange should, for example,
stand behind the barrier.
XGe toutof the vehicle. Paya ttentiontotraffic
conditions when doing so.
XClose the driver'sd oor.
246Flat tire
Breakdo wn assis tance
Page 250 of 298
GWARNING
In the following situations, the tire sealant is
unable to provides ufficient breakdown assis-
tance, as it is unable to seal the tire properly:
Rthere are cuts or puncture sinthe tire larger
than those mentioned above.
Rthe wheelr im is damaged.
Ryou have drivenatv ery low tire pressures or
on aflat tire.
There is arisk of an accident.
Do not drive the vehicle. Contact aqualified
specialist workshop.
GWARNING
The tire sealant is harmfu land causes irrita-
tion. It must not come into contact with your
skin, eye sorclothing or be swallowed.Don ot
inhal eTIREFIT fumes .Keep tire sealant away
from children. There is arisk of injury.
If you come into contact with the tire sealant,
observe the following:
RRinse off the tire sealant from you rskin
immediatel ywith water.
RIf the tire sealant comes into contact with
you reyes, immediatel yrinse them thor-
oughly with cleanw ater.
RIf tire sealant is swallowed,i mmediately
rinse you rmouth out thoroughly and drink
plenty of water. Do not induce vomiting,
and seek medical attention immediately.
RImmediately change out of clothing which
has come into contact with tire sealant.
RIf an allergic reactio noccurs, seek medical
attention immediately.
!Do not operate the tire inflation compressor
for longer than eightm inutes atatime without
ab reak. It may otherwise overheat.
The tire inflation compressor can be operated
again once it has cooledd own.
Comply with the manufacturer’s safety instruc-
tions on the sticker on the tire inflation com-
pressor.
Using the TIREFIT kit
XDo not remove any foreigno bjects which have
penetrated the tire, e.g. screws or nails.
XRemove the tire sealant bottle, the accompa-
nying TIREFIT sticker and the tire inflation
compressor from the stowage wellu nder-
neath the trunk floor (
Ypag e245).
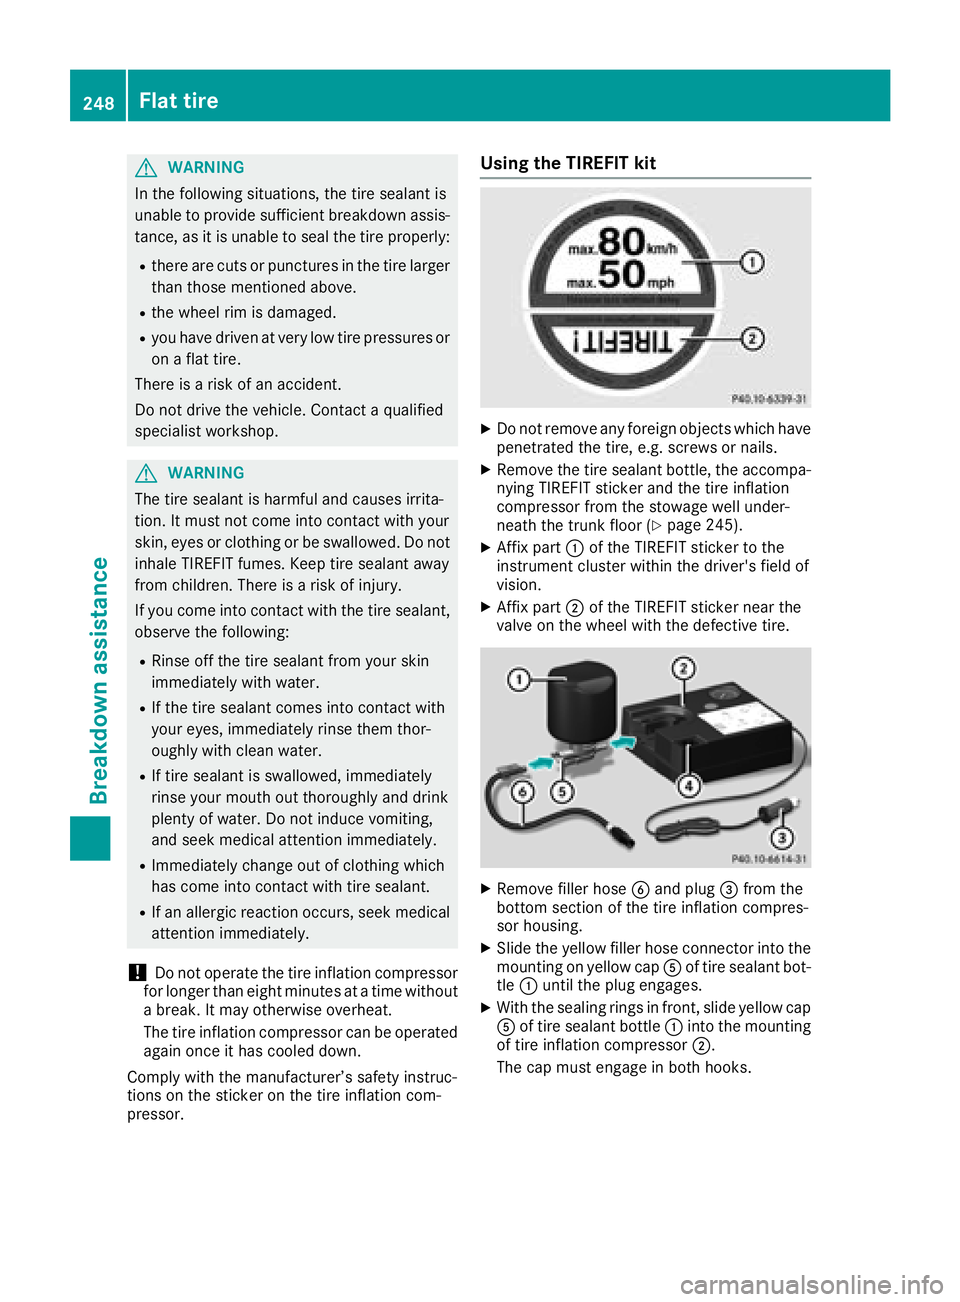
XAffix part :of the TIREFIT sticker to the
instrument cluster withi nthe driver's fieldo f
vision.
XAffix part ;of the TIREFIT sticker near the
valve on the wheelw ith the defective tire.
XRemove filler hoseBand plug =from the
bottom section of the tire inflation compres-
sor housing.
XSlide the yellow filler hose connector into the
mounting on yellow cap Aof tire sealant bot-
tle : until the pluge ngages.
XWith the sealing rings in front, slidey ellow cap
A of tire sealant bottle :into the mounting
of tire inflation compressor ;.
The cap must engag einboth hooks.
248Flat tire
Breakdown assistance
Page 260 of 298
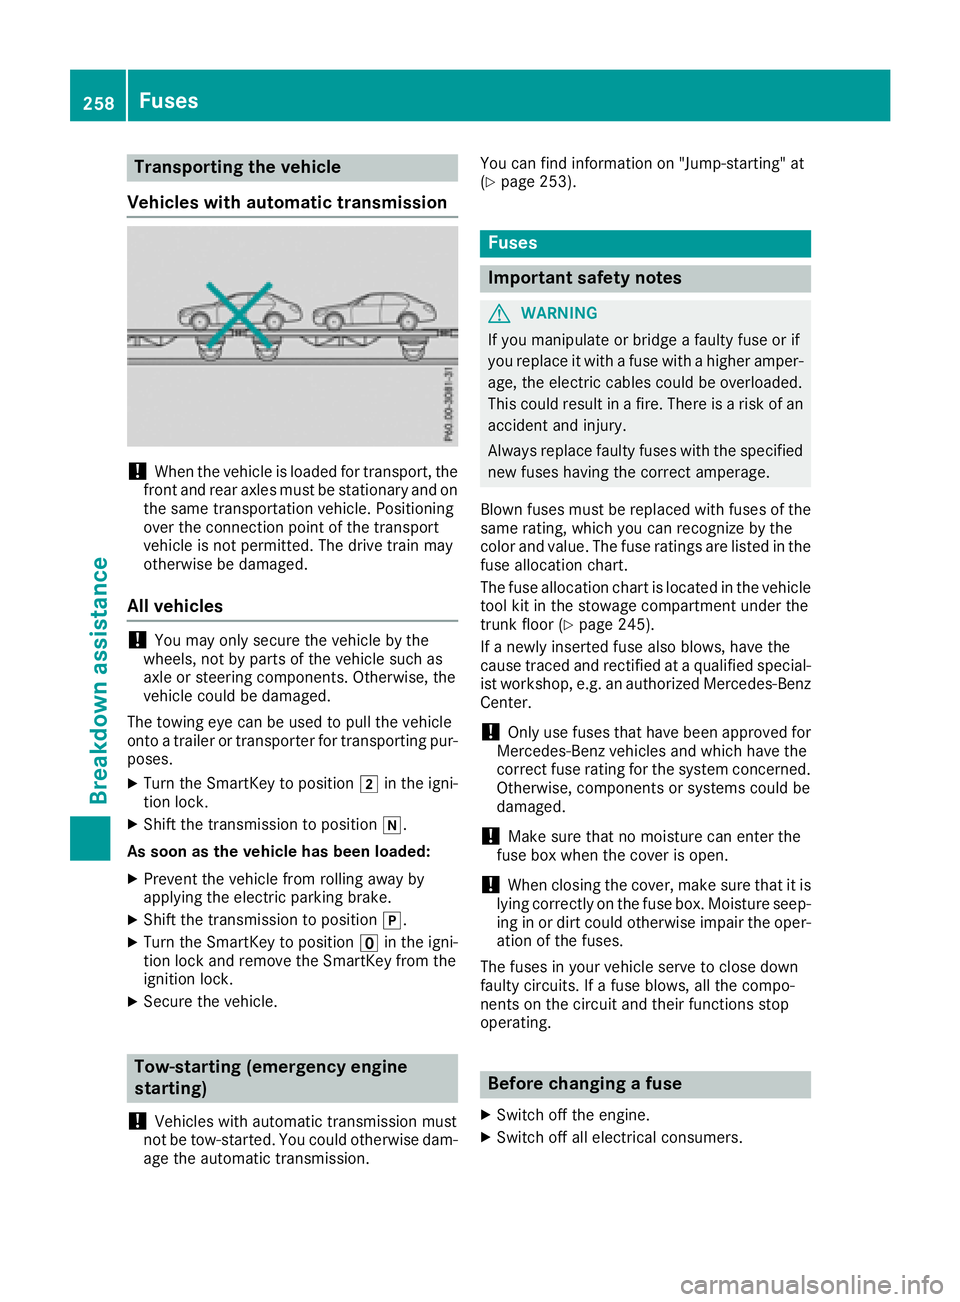
Transporting the vehicle
Vehicle switha utomatic transmission
!When the vehicl eisloaded for transport, the
front and rea raxles must be stationar yand on
the same transportatio nvehicle. Positioning
ove rthe connectio npoint of the transport
vehicl eisnot permitted .The drive train may
otherwis ebedamaged .
Allv eh icles
!Youm ayonl ysecur ethe vehicl ebythe
wheels ,not by parts of the vehicl esucha s
axl eors teerin gcomponents. Otherwise, the
vehicl ecould be damaged.
The towing ey ecan be used to pull the vehicle
onto atrailer or transporte rfor transporting pur-
poses.
XTurn the SmartKeytop osition 2in the igni-
tio nlock.
XShift the transmission to position i.
As soon as the vehicle has been loaded:
XPrevent the vehicl efromr olling away by
applying the electri cparkin gb rake.
XShift the transmission to position j.
XTurn the SmartKeytoposition uin the igni-
tio nlocka nd remove the SmartKeyf romthe
ignition lock.
XSecure the vehicle.
Tow-starting (emergency engine
starting)
!
Vehicles with automatic transmission must
not be tow-started .You could otherwis edam -
ag et he automatic transmission. Yo
uc an find informatio non"Jump-starting "at
(
Ypage 253).
Fuses
Important safety notes
GWARNING
If yo umanipulate or bridg eafaulty fuse or if
yo ur eplace it with afusew ithah ighe ramper -
age, the electri ccable scould be overloaded.
Thi scould resul tinafire. There is ariskofa n
accident and injury.
Alway sreplace faulty fuses with the specified
new fuses havin gthe correct amperage.
Blown fuses must be replaced with fuses of the
same rating ,which yo ucan recognize by the
color and value. The fuse rating sarelisted in the
fuse allocation chart.
The fuse allocation chart is locate dinthe vehicle
tool kit in the stowag ecompartment under the
trunk floor (
Ypage 245).
If an ewly inserte dfusea lsob lows ,havet he
cause traced and rectifie dataqualified special-
is tw orkshop ,e.g.ana uthorize dMercedes-Benz
Center.
!Onlyu sefuses thath aveb eena pproved for
Mercedes-Benz vehicles and which have the
correct fuse rating for the system concerned.
Otherwise, components or system scould be
damaged.
!Make sure thatnom oisture can enterthe
fuse bo xwhent he cove risopen.
!When closing the cover, make sure thatiti s
lying correctl yonthe fuse box. Moisture seep-
ing in or dirt could otherwis eimpai rthe oper-
atio
n of the fuses.
The fuses in your vehicl eserve to close down
faulty circuits. If afuseb lows ,allthe compo-
nents on the circui tand their functions stop
operating.
Before changin gafuse
XSwitch off the engine.
XSwitch off al lelectrical consumers.
258Fuses
Breakdow nassistance
Page 261 of 298
XMake sure that the ignition is switched off
(Ypage 116).
or
XWhen using the SmartKey, turn the SmartKey to position uin the ignition lock and remove
it (
Ypage 116).
XSecure the vehicle against rolling away
(Ypage 131).
All indicator lamps in the instrumen tcluster
must be off.
The fuses are located in various fuse boxes:
RFuse box in the engine compartmentont he
left-hand side of the vehicle, when viewed in
the direction of travel
RFuse box in the trunk
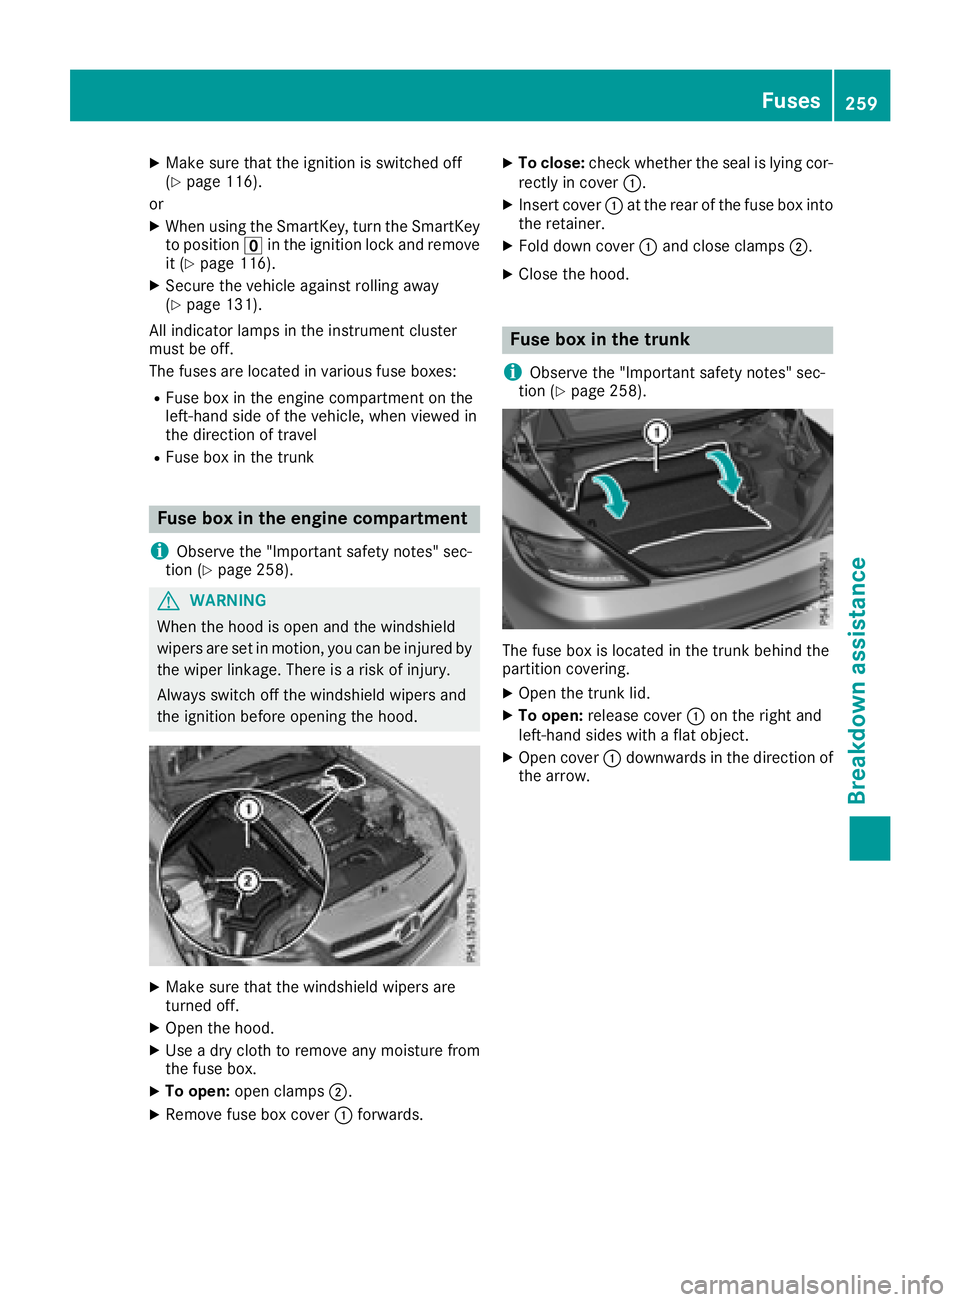
Fuse box in the engine compartment
i
Observe the "Important safety notes" sec-
tion (Ypage 258).
GWARNING
When the hood is open and the windshield
wipers are set in motion, you can be injured by
the wiper linkage. There is arisk of injury.
Always switch off the windshield wipers and
the ignition before opening the hood.
XMake sure that the windshield wipers are
turned off.
XOpen the hood.
XUse adry cloth to remove any moisture from
the fuse box.
XTo open: open clamps ;.
XRemove fuse box cover :forwards.
XTo close: check whether the seal is lying cor-
rectly in cover :.
XInsert cover:at the rear of the fuse box into
the retainer.
XFold down cover :and close clamps ;.
XClose the hood.
Fuse box in the trunk
i
Observe the "Important safety notes" sec-
tion (Ypage 258).
The fuse box is located in the trunk behind the
partition covering.
XOpen the trunk lid.
XTo open: release cover :on the right and
left-hand sides with aflat object.
XOpen cover :downwards in the direction of
the arrow.
Fuses259
Breakdown assistance
Z
Page 284 of 298
must be positioned vertically, directly under
the jacking point of the vehicle.
!Only position the jack at the appropriate
jacking point of the vehicle. Otherwise, you
could damage the vehicle.
Observe the following when raising the vehicle:
RTo rais ethe vehicle, only use the vehicle-spe-
cific jack that has been tested and approved
by Mercedes-Benz. If used incorrectly, the
jack could tip over with the vehicler aised.
RThe jack is designed only to raiseand hold the
vehiclef oras hort time while awheelisb eing
changed. It must not be used for performing
maintenance work under the vehicle.
RAvoid changing the wheelonu phill and down-
hill slopes.
RBefore raising the vehicle, secure it from roll-
ing awa ybyapplying the parking brake and
inserting wheelc hocks. Do not disengage the
parking brake whilet he vehicleisraised.
RThe jack must be placed on afirm, flat and
non-slip surface. On aloose surface, alarge,
flat, load-bearing underlay must be used .Ona
slippery surface, anon-slip underlay must be
used ,e.g. rubber mats.
RDo not use wooden blocks or similar objects
as ajack underlay.O therwise, the jack willn ot
be abletoa chieve its load-bearing capacity
due to the restricted height.
RMake sure that the distance betweent he
underside of the tires and the ground does not
exceed 1.2 in (3 cm).
RNever place you rhands and feet under the
raised vehicle.
RDo not lie under the vehicle.
RDo not start the engine when the vehiclei s
raised.
RDo not open or close adoor or the trunk lid
when the vehicleisr aised.
RMake sure that no persons are present in the
vehiclewhen the vehicleisr aised.
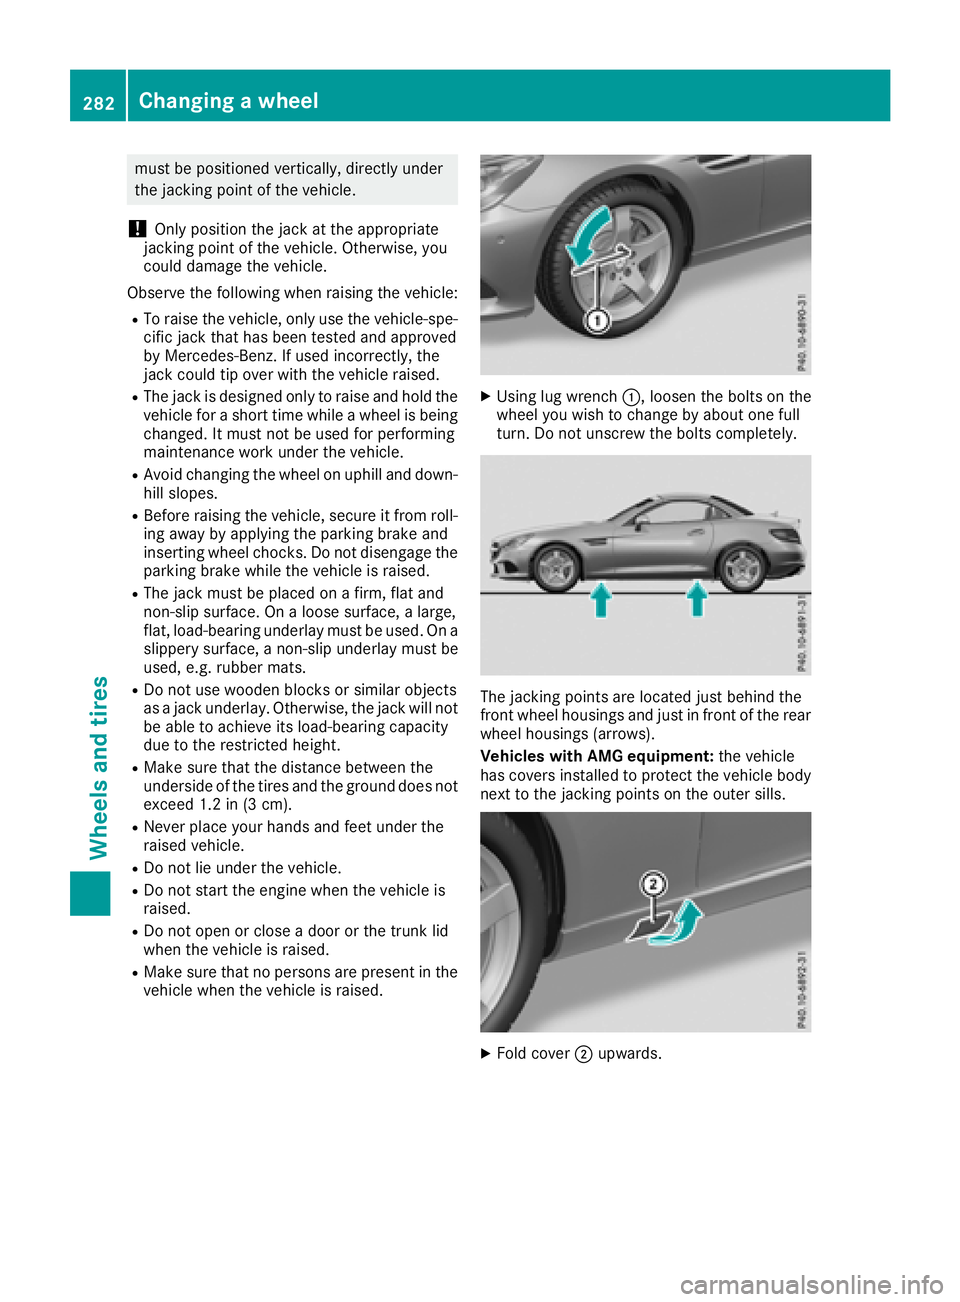
XUsing lug wrench:,loosent he bolts on the
wheely ou wish to change by abouto ne full
turn. Do not unscrew the bolts completely.
The jacking points are located just behind the
front wheelh ousings and just in front of the rear
wheelh ousings (arrows).
Vehicles with AMG equipment: the vehicle
has covers installed to protect the vehicleb ody
next to the jacking points on the outer sills.
XFold cover ;upwards.
282Changing awheel
Wheelsa nd tires
Page 288 of 298
Snow chains mustnot be mounted on emer-
gency spare wheels.
General notes
You can as kfor information regarding permitted
emergency spare wheel satanauthorized
Mercedes-Benz Center.
You shoul dregularl ycheck the pressure of the
emergency spare wheel ,particularly prior to
long trips, and correct the pressure as neces-
sary (
Ypage 263). The value on the wheel is
valid.
An emergency spare wheel may also be moun-
ted against the direction of rotation. Observe
the time restriction on us easwellast he speed
limitation specified on the emergency spare
wheel.
Replace the tire saftersix years at the latest,
regardless of wear. Thisa lsoa pplies to the
emergency spare wheel.
Wheny ouare driving with the collapsibl espare
wheel mounted, the tire pressure loss warning
system or the tire pressure monitor canno tfunc-
tion reliably. Only restart the tire pressure loss
warning system or tire pressure monitor when
the defectiv ewheel hasb eenr eplaced with a
new wheel.
Vehicles with tire pressure monitor: after
mounting an emergency spare wheel ,the sys-
tem may stil ldisplay the tire pressure of the
removed wheel for afew minutes. The value dis-
played for the mounted emergency spare wheel
is not the same as the current tire pressure of
the emergency spare wheel.
Removin gthe emergencys pare wheel
Vehicles with acolla psibles pare wheel
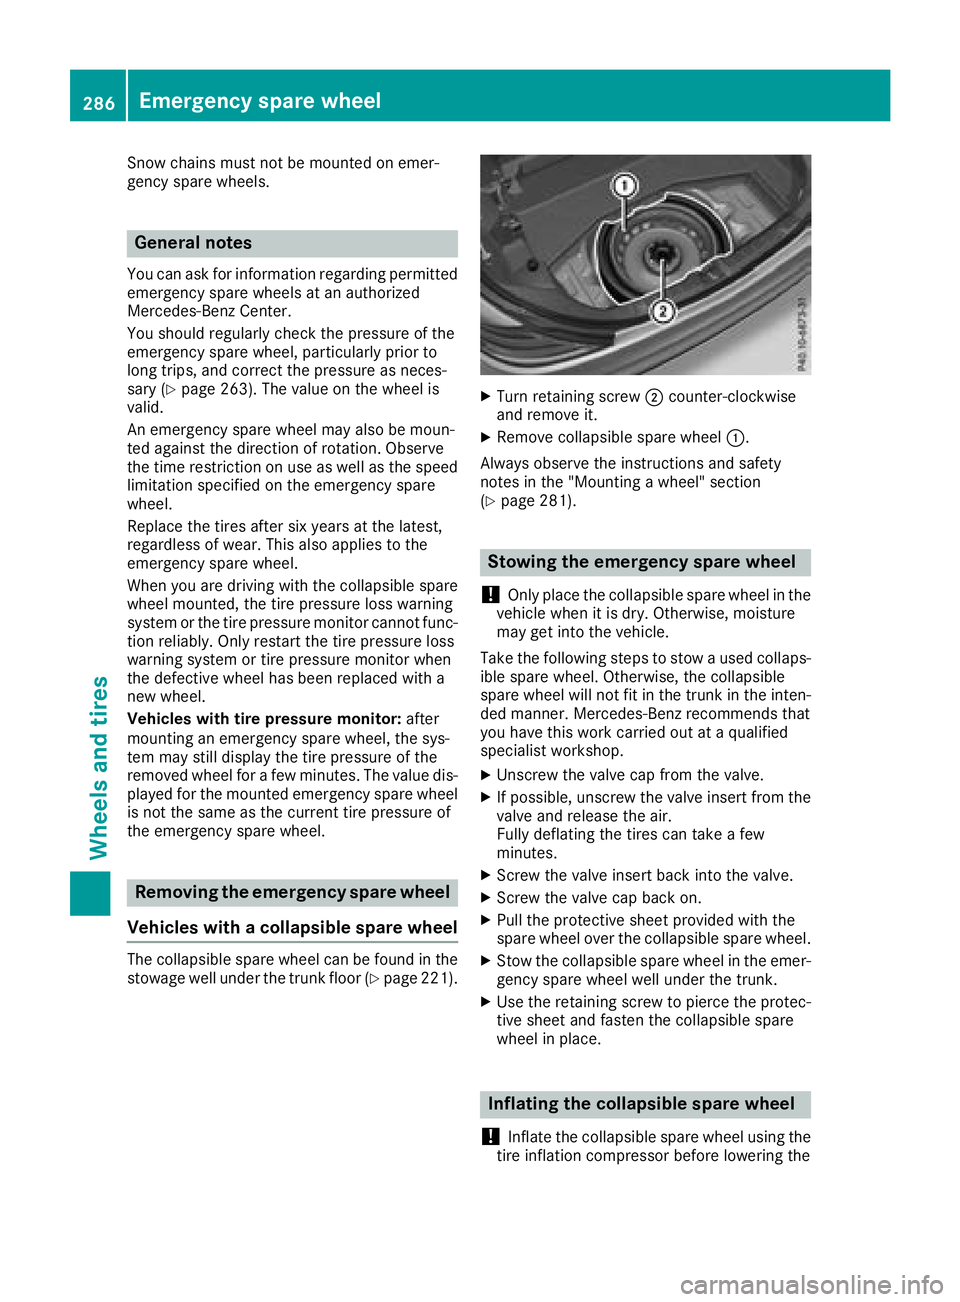
The collapsibl espare wheel can be found in the
stowag ewellu nder the trunk floor (Ypage 221).
XTurn retaining screw ;counter-clockwise
and remove it.
XRemove collapsibl espare wheel :.
Alway sobserve the instructions and safety
notes in the "Mounting awheel"s ection
(
Ypage 281).
Stowin gthe emergencys pare wheel
!
Only place the collapsibl espare wheel in the
vehicl ewhenitisd ry.O therwise, moisture
may get into the vehicle.
Take the following stepstos towausedc ollaps-
ible spare wheel .Otherwise, the collapsible
spare wheel will not fit in the trunk in the inten-
ded manner. Mercedes-Benz recommendst hat
yo uh avet his work carrie doutataq uali fied
specialist workshop.
XUnscrewt he valve cap from the valve.
XIf possible ,unscrew the valve insert from the
valve and release the air.
Fully deflating the tire scan take afew
minutes.
XScrew the valve insert back into the valve.
XScrew the valve cap back on.
XPull the protectiv esheet provided with the
spare wheel overt he collapsiblespare wheel.
XStow the collapsibl espare wheel in the emer-
gency spare wheel well under the trunk.
XUse the retaining screwtop ierce the protec-
tive sheet and fasten the collapsibl espare
wheel in place.
Inflating the collapsibles pare wheel
!
Inflate the collapsibl espare wheel using the
tire inflation compressor before lowering the
286Emergencys pare wheel
Wheels and tires