2018 MERCEDES-BENZ SLC ROADSTER trunk
[x] Cancel search: trunkPage 74 of 298
XTo deactivate:press and holdbutton :for
aboutf ives econds unti latone sounds.
XTo activate: press and hol dbutton ;for
aboutf ives econds unti latone sounds.
If yo upress one of the two buttons and do not
hea rat one, the relevant setting hasa lready
been selected.
The vehicl eislocked automaticall ywhent he
ignition is switched on and the wheels are turn-
ing.
Yo uc ould therefore lock yoursel fout if:
Rthe vehicl eisbeing pushed.
Rthe vehicl eisbeing towed.
Rthe vehicl eisonar ollerdynamometer.
Yo uc an also switch the automatic locking func-
tio nona nd off using the on-board computer
(
Ypage 173).
Unlocking/lockin gthe driver's door
using the mechanical key
i
If yo uwanttoc entrall yloc kthe vehicl eusing
the mechanical key,b eginby pressing the
locking button for the interio rloc king mech-
anism whil ethe driver's door is open. Then
lock the driver's door using the mechanical
key.
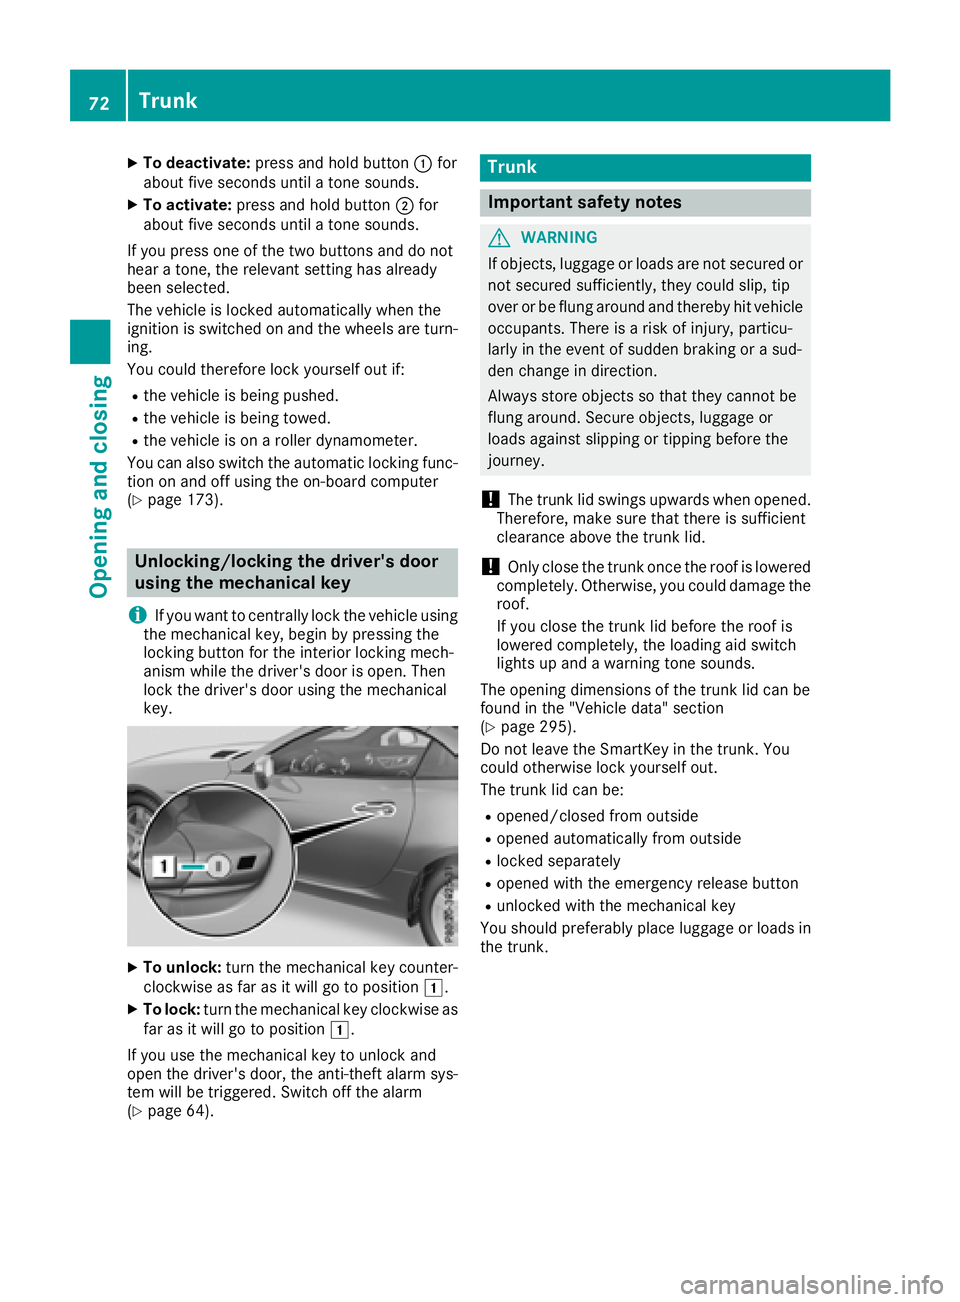
XTo unlock: turn the mechanical key counter-
clockwise as far as it will go to position 1.
XTo lock:turn the mechanical key clockwise as
far as it will go to position 1.
If yo uusethe mechanical key to unlock and
open the driver's door, the anti-thef talarm sys-
tem will be triggered .Switch off the alarm
(
Ypage 64).
Trunk
Important safety notes
GWARNING
If objects, luggage or load sare not secured or
not secured sufficiently ,they could slip ,tip
overorbef lung around and thereb yhitvehicle
occupants. There is ariskofi njury,p articu-
larly in the event of sudden braking or asud-
de nc hange in direction.
Alway sstoreo bjects so thatt hey cannotbe
flung around .Secure objects, luggage or
load sagain st slipping or tipping before the
journey.
!The trunk li dswing su pwar ds when opened.
Therefore, make sure thatt hereiss ufficient
clearance above the trunk lid.
!Onlyc lose the trunk once the roofisl owered
completely. Otherwise, yo ucould damag ethe
roof.
If yo uclose the trunk li dbefore the roofi s
lowered completely, the loading ai dswitch
lights up and awarning tone sounds.
The opening dimensions of the trunk li dcan be
found in the "Vehicle data" section
(
Ypage 295).
Do not leave the SmartKey in the trunk. You
could otherwise lock yoursel fout.
The trunk li dcan be:
Ropened/closedf rom outside
Ropenedautomaticall yfrom outside
Rlocked separately
Ropene dwitht he emergency release button
Runlockedw itht he mechanical key
Yo us houl dpreferabl yplace luggage or load sin
the trunk.
72Trunk
Opening and closing
Page 75 of 298
Opening/closing from outside
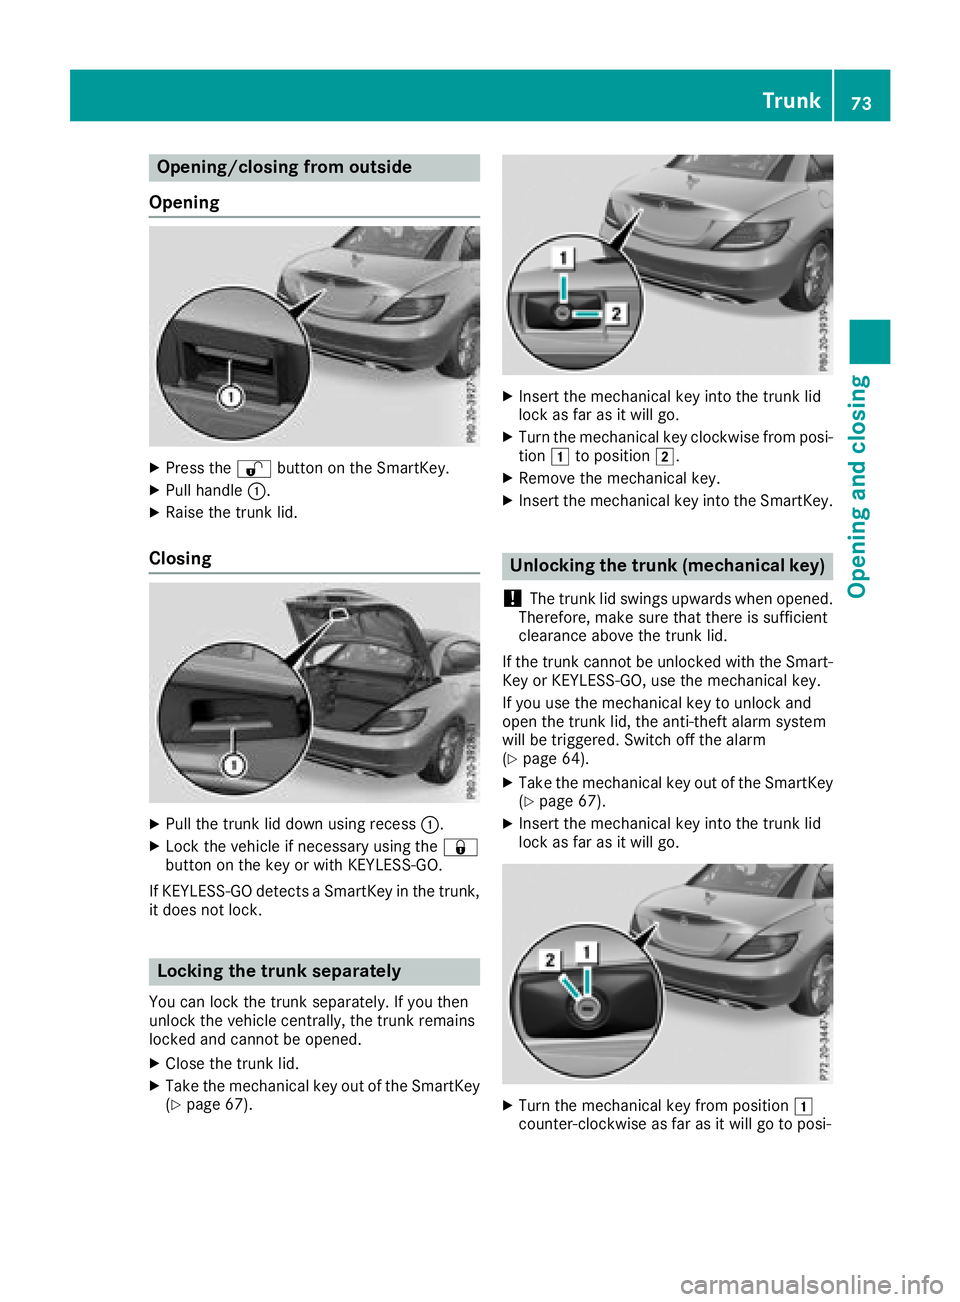
Opening
XPress the %button on the SmartKey.
XPull handle :.
XRaise the trun klid.
Closing
XPull the trun klid down using recess :.
XLock the vehicle if necessary using the &
button on the key or with KEYLESS-GO.
If KEYLESS-GO detects aSmartKey in the trunk,
it does not lock.
Locking the trunk separately
You can lock the trun kseparately. If you then
unlock the vehicle centrally, the trun kremains
locked and cannot be opened.
XClose the trun klid.
XTake the mechanical key out of the SmartKey
(Ypage 67).
XInser tthe mechanical key into the trun klid
lock as far as it will go.
XTurn the mechanical key clockwise from posi-
tion 1to position 2.
XRemove the mechanical key.
XInsertthe mechanical key into the SmartKey.
Unlocking the trunk (mechanical key)
!
The trun klid swings upwards when opened.
Therefore, make sure that there is sufficient
clearanc eabove the trun klid.
If the trun kcannot be unlocked with the Smart-
Key or KEYLESS-GO, use the mechanical key.
If you use the mechanical key to unlock and
open the trun klid, the anti-thef talarm system
will be triggered. Switc hoff the alarm
(
Ypage 64).
XTake the mechanical key out of the SmartKey
(Ypage 67).
XInser tthe mechanical key into the trun klid
lock as far as it will go.
XTurn the mechanical key from position 1
counter-clockwise as far as it will go to posi-
Trunk73
Opening and closing
Z
Page 76 of 298
tion2.S imultaneouslyp ullthe trunk li dhan-
dle.
The trunk is unlocked.
XTurn the mechanica lkey back to position 1
and remove it.
XInsert the mechanica lkey into the SmartKey.
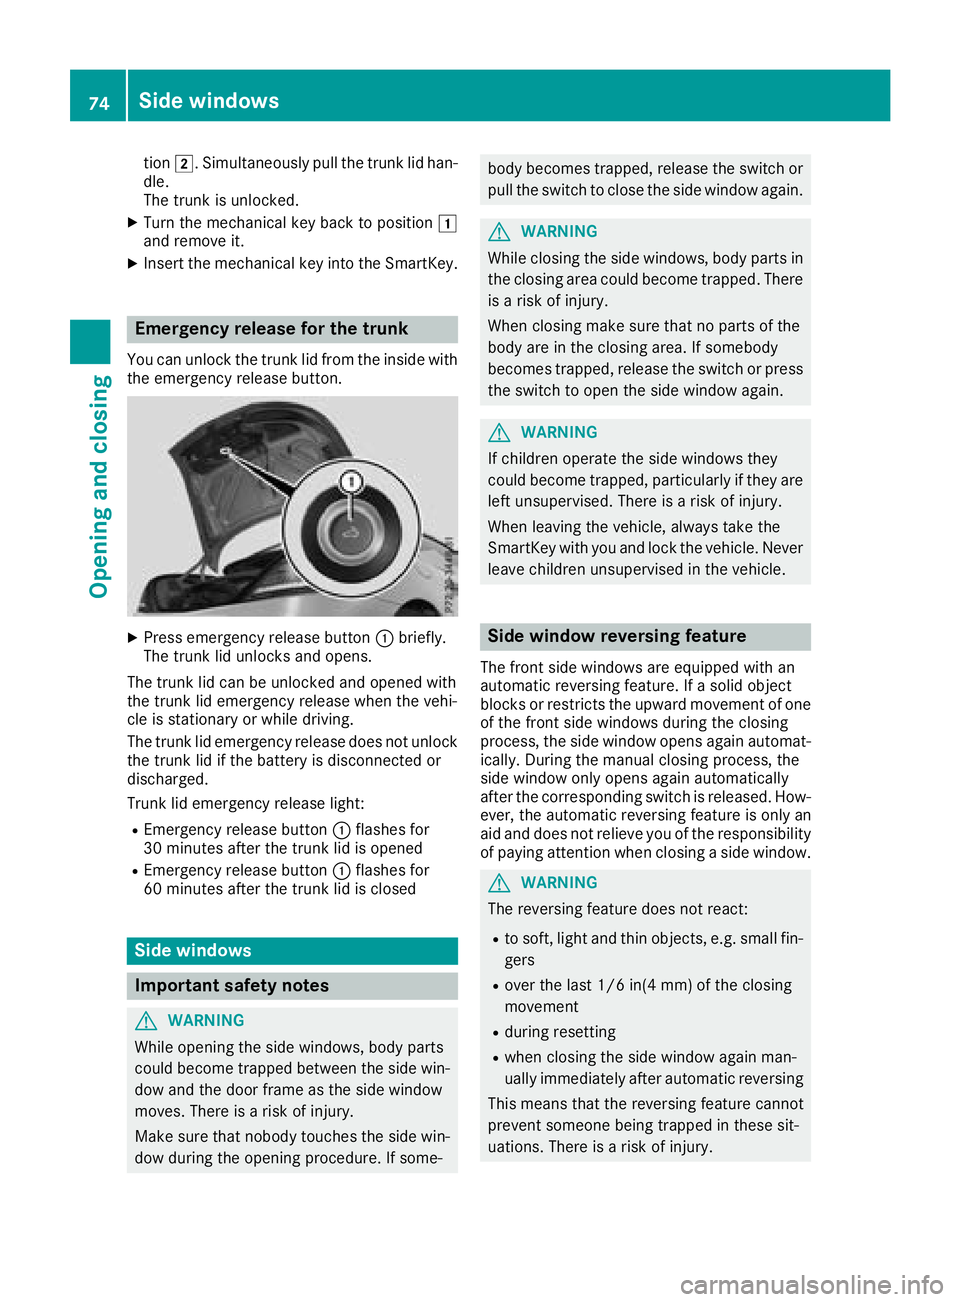
Emergenc yrelease fort he trunk
Youc an unlock the trunk li dfromt he insid ewith
the emergency release button.
XPress emergency release button :briefly.
The trunk li dunlocks and opens.
The trunk li dcan be unlocke dand opene dwith
the trunk li demergency release when the vehi-
cle is stationar yorwhiledriving.
The trunk li demergency release does not unlock
the trunk li difthe battery is disconnecte dor
discharged.
Trunk li demergency release light:
REmergency release button :flashe sfor
30 minute safter the trunk li disopened
REmergency release button :flashe sfor
60 minute safter the trunk li disclosed
Side windows
Important safety notes
GWARNING
Whil eopening the side windows ,bod yp arts
could become trapped between the side win-
do wa nd the door frame as the side window
moves .There is ariskofi njury.
Make sure thatn obodytouche sthe side win-
do wd uringt he opening procedure. If some-
body becomest rapped,release the switch or
pull the switch to close the side windo wagain .
GWARNING
Whil eclosing the side windows ,bod yp arts in
the closing area could become trapped .There
is ar iskofi njury.
When closing make sure thatnop arts of the
body ar einthe closing area .Ifsomebody
become strapped ,release the switch or press
the switch to open the side windo wagain .
GWARNING
If children operate the side windows they
could become trapped ,particularly if theya re
left unsupervised .There is ariskofi njury.
When leaving the vehicle, always take the
SmartKeyw ithy ou and lock the vehicle. Never
leav echildren unsupervised in the vehicle.
Side windo wreversin gfeature
The front side windows ar eequippe dwitha n
automatic reversing feature. If asolid object
blocks or restricts the upward movement of one
of the front side windows durin gthe closing
process, the side windo wopens agai nautomat-
ically. During the manua lclosing process, the
side windo wonlyo pens agai nautomatically
after the corresponding switch is released. How-
ever, the automatic reversing featur eisonlya n
ai da nd does not relieve yo uofthe responsibility
of paying attentio nwhenc losing asidew indow.
GWARNING
The reversing featur edoesn ot react:
Rto soft, light and thino bjects ,e.g.s mall fin-
gers
Rove rthe last 1/6 in(4 mm) of the closing
movement
Rdurin gresetting
Rwhen closing the side windo wagain man-
uall yimm ediatel yafter automatic reversing
Thi sm eans thatt he reversing featur ecannot
prevent someone being trapped in these sit-
uations. There is ariskofi njury.
74Side windows
Openin gand closing
Page 79 of 298
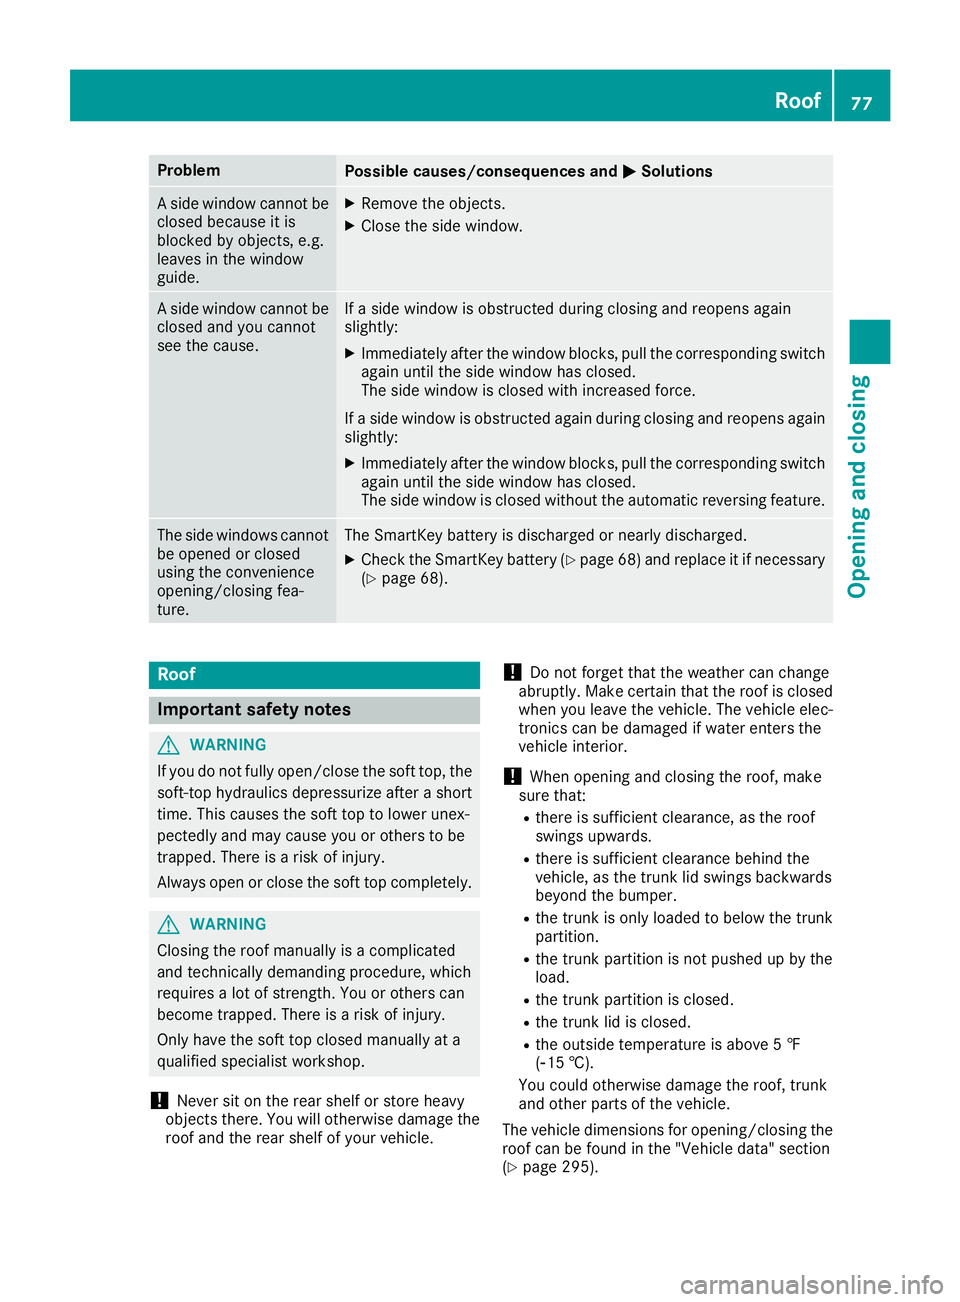
ProblemPossible causes/consequences andMSolutions
Aside window cannot be
closed because it is
blocked by objects, e.g.
leaves in the window
guide.XRemove the objects.
XClose the side window.
As ide window cannot be
closed and you cannot
see the cause.If as ide window is obstructed during closing and reopens again
slightly:
XImmediately after the window blocks, pull the correspondings witch
again until the side window has closed.
The side window is closed with increased force.
If as ide window is obstructed again during closing and reopens again
slightly:
XImmediately after the window blocks, pull the correspondings witch
again until the side window has closed.
The side window is closed without the automatic reversing feature.
The side windows cannot
be opened or closed
using the convenience
opening/closing fea-
ture.The SmartKey battery is discharged or nearly discharged.
XCheck the SmartKey battery (Ypage 68) and replace it if necessary
(Ypage 68).
Roof
Important safety notes
GWARNING
If you do not fully open/close the soft top, the
soft-top hydraulics depressurize after ashort
time. This causes the soft top to lower unex-
pectedly and may cause you or others to be
trapped. There is arisk of injury.
Always open or close the soft top completely.
GWARNING
Closing the roof manually is acomplicated
and technically demanding procedure, which
requires alot of strength. You or others can
become trapped. There is arisk of injury.
Only have the soft top closed manually at a
qualified specialist workshop.
!Never sit on the rear shelf or store heavy
object sthere. You will otherwise damage the
roof and the rear shelf of your vehicle.
!Do not forget that the weather can change
abruptly. Make certain that the roof is closed
when you leave the vehicle. The vehicle elec-
tronics can be damaged if water enters the
vehicle interior.
!When opening and closing the roof, make
sure that:
Rthere is sufficient clearance, as the roof
swings upwards.
Rthere is sufficient clearance behind the
vehicle, as the trunk lid swings backwards
beyond the bumper.
Rthe trunk is only loaded to below the trunk
partition.
Rthe trunk partition is not pushed up by the
load.
Rthe trunk partition is closed.
Rthe trunk lid is closed.
Rthe outside temperature is above 5‡
(Ò15 †).
You could otherwise damage the roof, trunk
and other parts of the vehicle.
The vehicle dimensions for opening/closing the
roof can be found in the "Vehicle data" section
(
Ypage 295).
Roof77
Opening and closing
Z
Page 80 of 298
Make sure that the roof and rear window are
clean and dry before opening the roof. Other-
wise, water or dirt could enter the vehicle inte-
rior or trunk.
Opening and closing using the roof
switch
Important safety notes
GWARNING
When opening or closing the roof, body parts
could be trapped by, for example, the roof
mechanism, trunk lid or side windows. There
is ar isk of injury.
When raising or lowering the roof, make sure
that no body parts are in the vicinity of moving
components. If someone becomes trapped,
release the button.
For safety reasons, you can only open or close
the roof when the vehicle is stationary.
!Operating the roof while pulling away:
RObserve the following traffic carefully.
RDo not drive faster than 25 mph (40 km/h).
RAvoid abrupt braking and swerving maneu-
vers.
Do not operate the roof when cornering, driv-
ing on uneven surfaces or during strong
winds. The vehicle may otherwise be dam-
aged.
iIf the traffic conditionsm ean that you have
to drive off while opening/closing the roof,
the procedure which was started while sta-
tionary can be continued at speeds of up to
approximately 25 mph (40 km/h).
Opening and closing
XVehicles without semi-automatic trunk
partition: close the trunk partition
(
Ypage 79).
XClose the trunk lid (Ypage 72).
XTurn the SmartKey to position 2in the igni-
tion lock.
XOpen the cover in the lower center console.
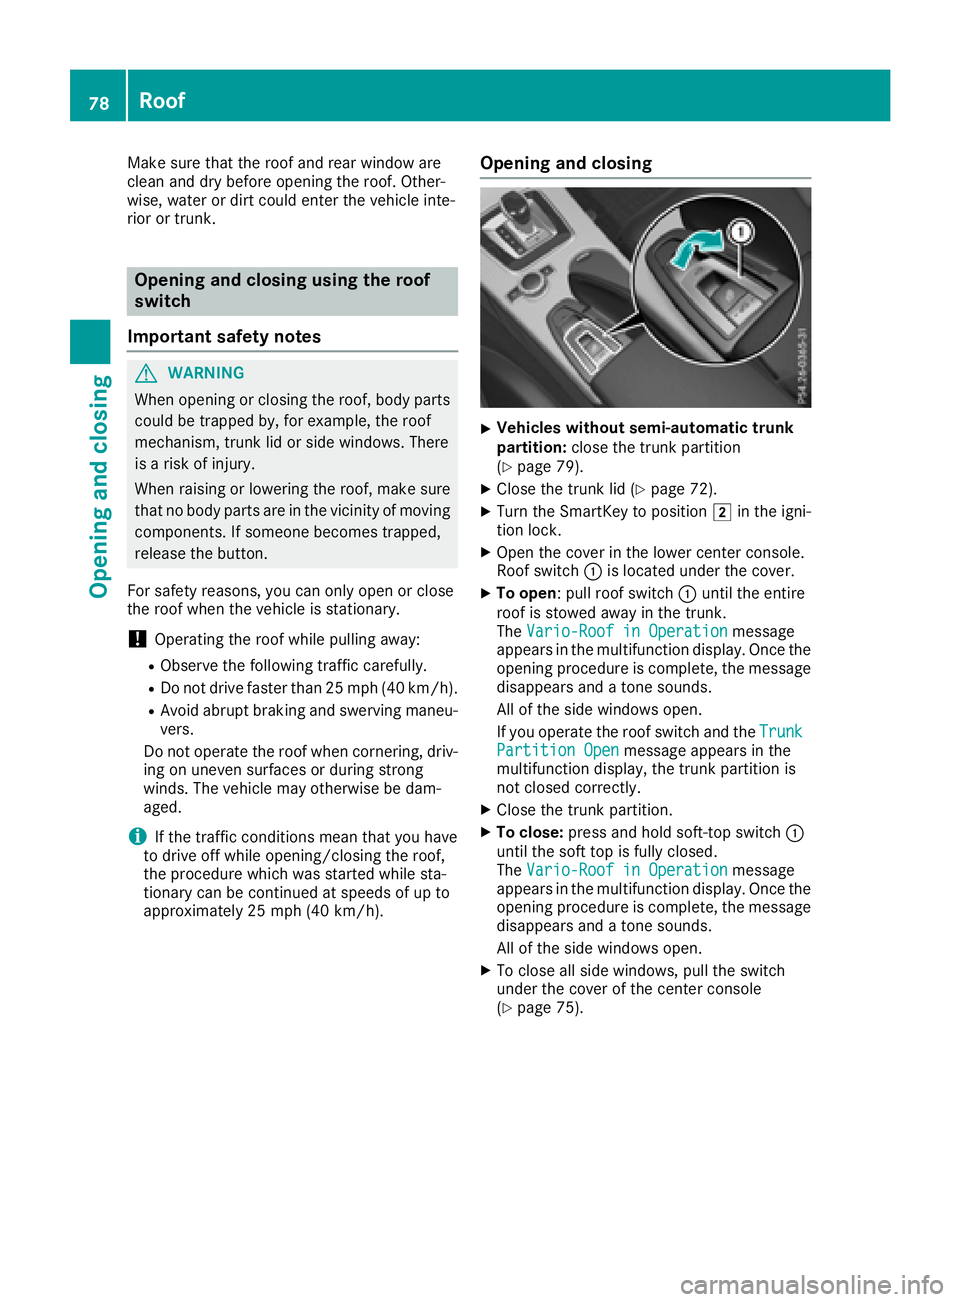
Roof switch :is located under the cover.
XTo open:p ull roof switch :until the entire
roof is stowed away in the trunk.
The Vario-Roof in Operation
message
appears in the multifunction display.O nce the
opening procedure is complete, the message
disappears and atone sounds.
All of the side windows open.
If you operate the roof switch and the Trunk
Partition Openmessage appears in the
multifunction display,t he trunk partition is
not closed correctly.
XClose the trunk partition.
XTo close: press and hold soft-top switch :
until the soft top is fully closed.
The Vario-Roof in Operation
message
appears in the multifunction display.O nce the
opening procedure is complete, the message
disappears and atone sounds.
All of the side windows open.
XTo close all side windows, pull the switch
under the cover of the center console
(
Ypage 75).
78Roof
Opening and closing
Page 81 of 298
Opening/closing using the SmartKey
Important safetyn otes
GWARNING
When opening or closing the roof, body parts
could be trapped by, for example, the roof
mechanism, trun klid or side windows. There
is ar isk of injury.
When raising or lowering the roof, make sure
that no body parts are in the vicinity of moving
components. If someoneb ecomes trapped,
release the button.
Opening and closing
This function is only available on vehicles with
KEYLESS-GO or with roof comfort operation.
XClose the trun klid (Ypage 72).
XVehicles with comfort operation: point the
tip of the SmartKey at the driver's door han-
dle.
XVehicles with KEYLESS-GO: the SmartKey
must be within 6ft(2m)ofthe vehicle.
XTo open: press and hold the %button on
the SmartKey until the roof is fully opened.
The roof and the rear side windows open. The
fronts ide windows close.
XTo interrupt the opening procedure:
release the %button.
XTo open the front side windows: press the
% button on the SmartKey again.
XTo close: press and hold the &button on
the SmartKey until the roof is fully closed.
The roof and the side windows close.
XTo interrupt the closing procedure: release
the & button.
Locking the roof again
Important safetyn otes
GWARNING
If you do not fully open/close the soft top, the
soft-top hydraulics depressurizea fterashort
time. This causes the soft top to lower unex-
pectedly and may cause you or other stobe
trapped. There is arisk of injury.
Always open or close the soft top completely.
The roof is not locked if:
Rthe K symbol and the Vario-Roof inOperationmessage appear in the multifunc-
tion display
Rthe K symbol and the Open/CloseVario-RoofCompletelymessage appear in
the multifunction display and you hear awarn-
ing tone
Ryou hear awarning ton efor up to ten seconds
when pulling away or while driving
Locking
You can lock the roof again if it is not locked
fully.
XPull over and stop the vehicle safely as soon
as possible, paying attention to road and traf-
fic conditions.
XEnsure that the SmartKey is in position 2in
the ignition lock.
XPress the roof switch (Ypage 78).
Trunk partition
General notes
!To avoid damaging the roof or luggage when
folding back the roof, you should:
Ronly load the trun ktobelow the trun kpar-
tition
Rnot place any objects on or in frontoft he
trun kpartition
Rnot place any objects on the cover behind
the roll bars
Rnot allow the cargo to push the trun kpar-
tition upwards
The trun kpartition can be used to cover luggage
and loads in the trunk.
Roof79
Opening and closing
Z
Page 82 of 298
Opening and closing
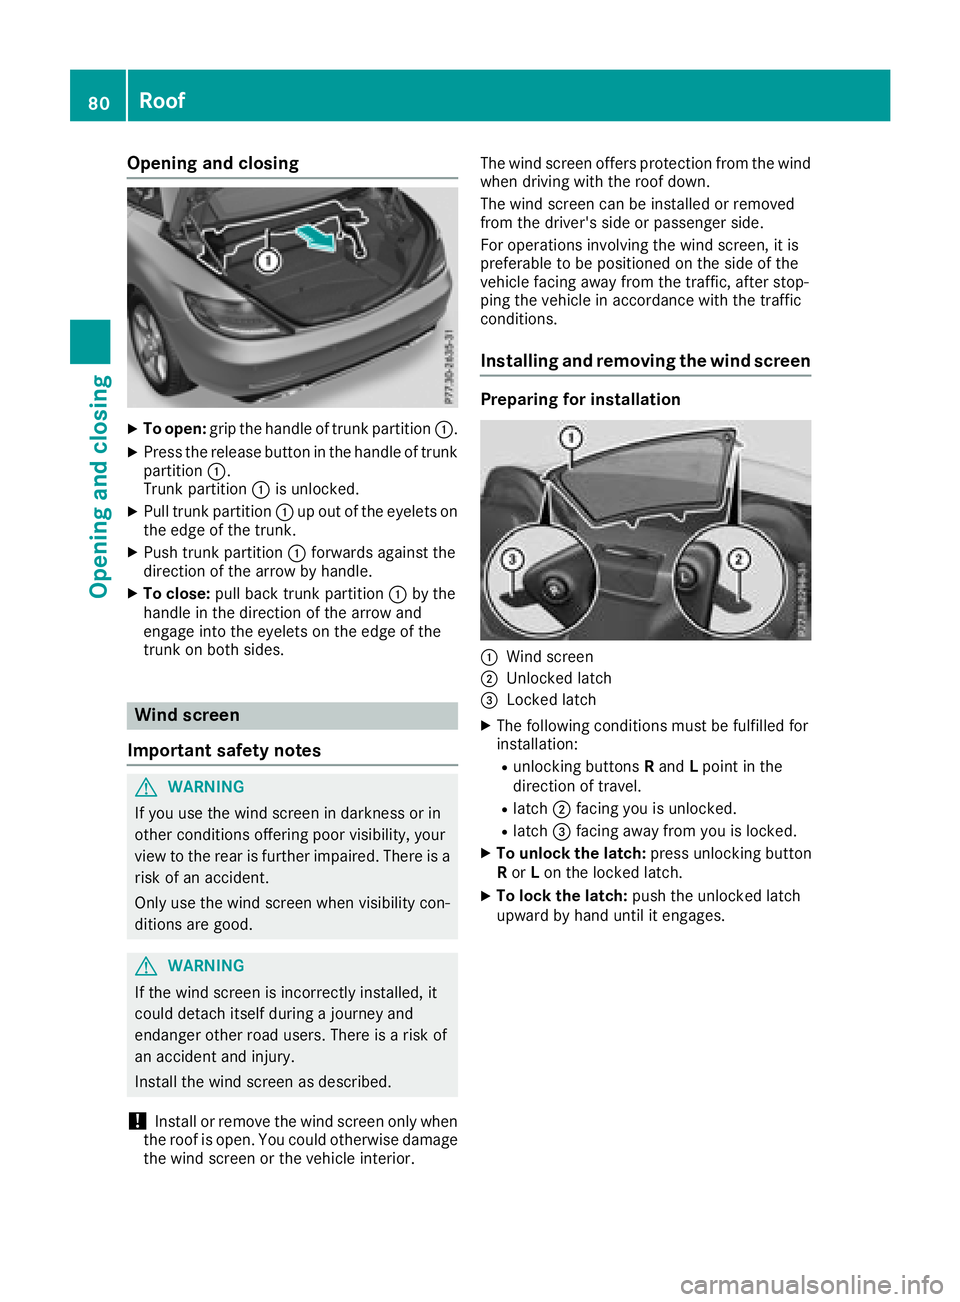
XTo open:grip the handle of trun kpartition :.
XPress the release button in the handle of trunk
partition :.
Trunk partition :is unlocked.
XPull trun kpartition :up out of the eyelets on
the edge of the trunk.
XPush trun kpartition :forwards against the
direction of the arrow by handle.
XTo close: pull back trun kpartition :by the
handle in the direction of the arrow and
engage into the eyelets on the edge of the
trun konb oth sides.
Wind screen
Important safetyn otes
GWARNING
If you use the wind screen in darkness or in
other conditions offeringp oor visibility, your
view to the rear is further impaired. There is a
risk of an accident.
Only use the wind screen when visibility con-
ditions are good.
GWARNING
If the wind screen is incorrectly installed, it
could detach itself during ajourney and
endanger other road users. There is arisk of
an accidenta nd injury.
Install the wind screen as described.
!Install or remove the wind screen only when
the roof is open. You could otherwise damage
the wind screen or the vehicle interior. The wind screen offers protection from the wind
when driving with the roof down.
The wind screen can be installed or removed
from the driver's side or passenger side.
For operation
sinvolvin gthe wind screen,iti s
preferable to be positioned on the side of the
vehicle facing away from the traffic, after stop-
ping the vehicle in accordance with the traffic
conditions.
Installing and removing the wind screen
Preparing for installation
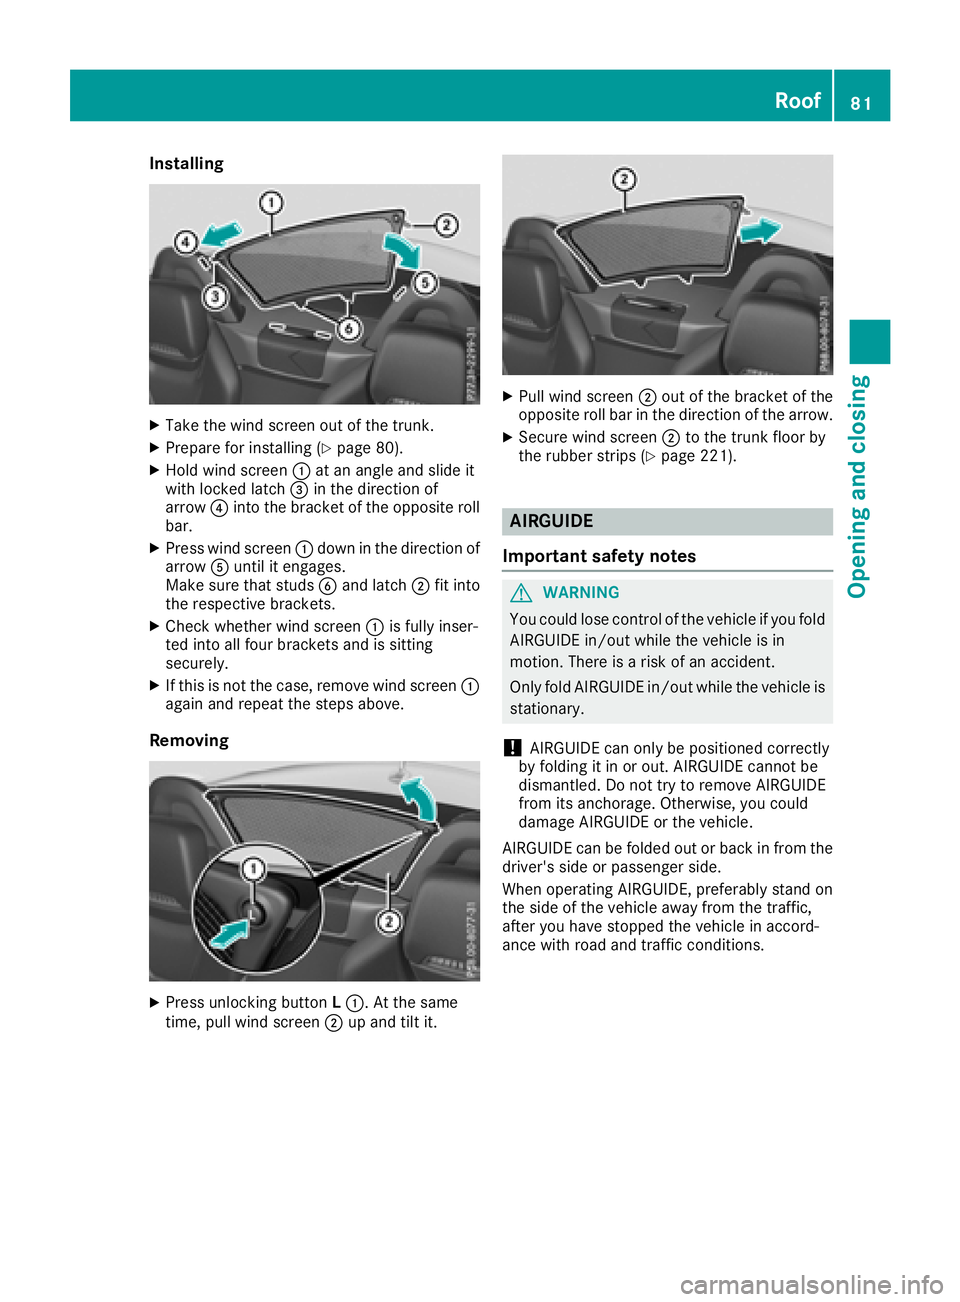
:Wind screen
;Unlocked latch
=Locked latch
XThe following conditions must be fulfilled for
installation:
Runlocking buttons Rand Lpoint in the
direction of travel.
Rlatch ;facing you is unlocked.
Rlatch =facing away from you is locked.
XTo unlock the latch: press unlocking button
R or Lon the locked latch.
XTo lock the latch: push the unlocked latch
upward by hand until it engages.
80Roof
Opening and closing
Page 83 of 298
Installing
XTakethewin dscree no ut of th etrunk.
XPrepare for instal ling(Ypage 80).
XHol dw inds creen :at an ang leand slide it
wit hlocke dlatch =inthed irection of
arrow ?intot he bracke toftheoppo siteroll
bar.
XPress windscreen :down in thed irection of
arrow Auntil it engages.
Makes ure that studs Band latch ;fit into
th er espectiv ebrackets.
XCheckw hetherwindscreen :isfully inser-
te di ntoa llfour brackets and issitting
securely.
XIf th is is notthe case, remove windscreen :
again and repeat th esteps above.
Removing
XPress unlocking button L:.Att hesame
time, pull win dscreen ;up and til tit.
XPull winds creen ;out of th ebracke tofthe
oppo siteroll bar in th edirection of th earrow.
XSecure windscreen ;to th etrunk floor by
th er ubber strips (Ypage 221).
AIRGUIDE
Important safety notes
GWARNING
You could lose control of th evehicle ifyou fold
AIRGUID Ein/out while th evehicle isin
motion.T hereisar iskofana ccident.
Only foldA IRGUIDEi n/out while th evehicle is
stationary.
!AIRGUID Ecan only be positione dcorrectly
by foldingitinoro ut.AIRGUIDEc annotbe
dismantled. Do no ttry to remove AIRGUIDE
from its anchorage. Otherwise, you could
damag eAIRGUIDEort hevehicle.
AIRGUID Ecan be folded out or back in from the
driver' sside or passenger side.
When operating AIRGUIDE, preferably stand on
th es ide of th evehicle away from th etraffic,
after you have stoppe dthe vehicle inaccord-
anc ewithr oad and traffic conditions.
Roof81
Opening and closing
Z