2018 MERCEDES-BENZ SLC ROADSTER air condition
[x] Cancel search: air conditionPage 60 of 298
Active BrakeAssist
Gene ralinform ation
iObserv ethe "Importan tsafet ynotes "sec-
tion (Ypage 56).
Active Brake Assis tconsists ofad istanc ewarn-
ing function wit hanautonomous braking func-
tion and Adaptive Brake Assist.
Active Brake Assis tcan help you to minimiz ethe
ris kofac ollision wit hthe vehicl einfrontor
reduce th eeffects of suc hacollision .
If Active Brake Assis tdetects that there is arisk
of collision ,you will be warned visually and
acoustically. If you do no treac ttot hevisual and
audible collision warning ,autonomous braking
can be initiate dincritical situations. If you apply
th eb rak eyourself in acritical situation ,Adap-
tive Brake Assis toftheActive Brake Assis tsys-
te ms upport syou.
Import ant safety notes
In particular, th edetection of obstacles can be
impaire dif:
Rthere is dir tonthesensor soranythin gelse
covering th esensor s
Rthere is snow or heav yrain
Rthere is interferenc ebyother radar source s
Rthere are strongradar reflections, for exam-
ple in parking garages
Ran arrow vehicl eistraveling in front, e.g. a
motorbik e
Ravehicl eistraveling in fron tonadifferentlin e
Ryou are drivin ganewvehicl eorservicing on
th eA ctiv eBrake Assis tsystem has jus tbeen
carrie dout
Observ ethe important safet ynotes in the
"Breaking-in notes" section (
Ypage 115).
Followin gdamag etothefron tend of th evehicle,
hav ethe configuration and operation of th e
radar sensor checke dataqualified specialis t
workshop .This also applie stocollision satslow
speeds wher ethere is no visible damag etothe
fron toft hevehicle.
Activating/deactivating
Active Brake Assis tisautomatically active after
switching on th eignition .
You can activat eordeactivat eActiv eBrake
Assis tusin gthe on-board computer (
Ypage 171). When deactivated, th
edistanc e
warning function and th eautonomous braking
function are also deactivated.
If Active Brake Assis tisdeactivated, th eæ
symbol appear sintheassistanc egraphic dis-
play.
Distance warning function
Genera linformation
The distanc ewarning function can help you to
minimiz ethe riskofaf ront-end collision wit ha
vehicl eahead or reduce th eeffects of suc ha
collision .Ifthedistanc ewarning function
detects that there is ariskofac ollision ,you will
be warned visually and acoustically.
Important safety notes
iObserv ethe "Importan tsafet ynotes "sec-
tion for drivin gsafet ysystems (Ypage 56) .
GWARNIN G
The distanc ewarning function does no treact:
Rto people or animals
Rto oncomin gvehicles
Rto crossing traffic
Rwhen cornering
The distanc ewarning function may no tgive
warning sinall critical situations. There is a
ris kofana ccident.
Always pay careful attention to th etraffic sit -
uation and be read ytob rake.
Always adapt your spee dtosuit theprevailing
road and traffic conditions.
GWARNIN G
The distanc ewarning function canno talways
clearly identify objects and comple xtraffic
situations.
In suc hcases, th edistanc ewarning function
may:
Rgiv eanu nnecessary warning
Rnotg iveaw arning
There is ariskofana ccident.
Always pay careful attention to th etraffic sit -
uation and do no trelys olely on th edistanc e
warning function .
58Driving safety systems
Safety
Page 82 of 298
Opening and closing
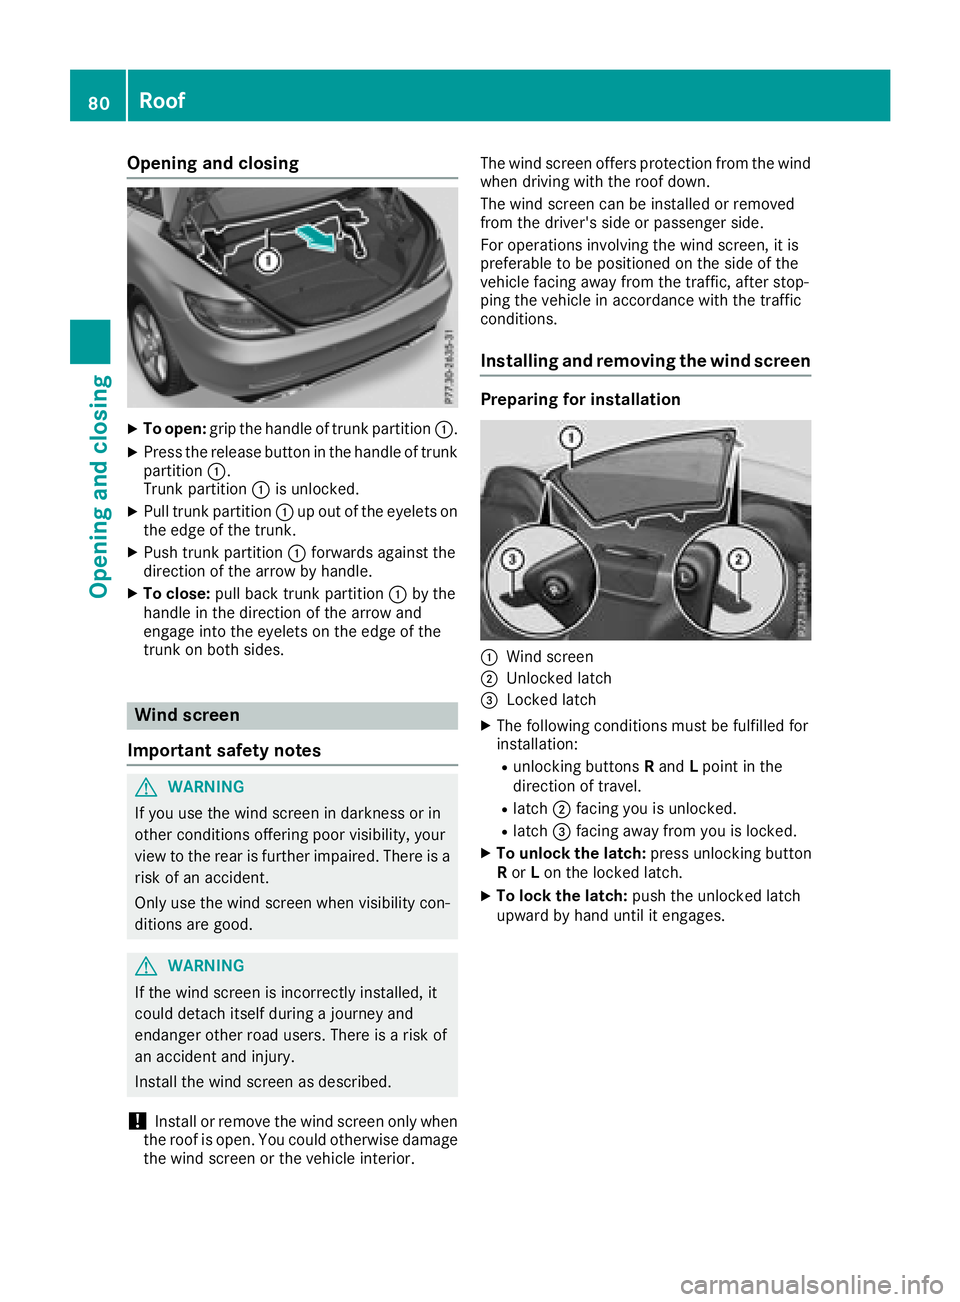
XTo open:grip the handle of trun kpartition :.
XPress the release button in the handle of trunk
partition :.
Trunk partition :is unlocked.
XPull trun kpartition :up out of the eyelets on
the edge of the trunk.
XPush trun kpartition :forwards against the
direction of the arrow by handle.
XTo close: pull back trun kpartition :by the
handle in the direction of the arrow and
engage into the eyelets on the edge of the
trun konb oth sides.
Wind screen
Important safetyn otes
GWARNING
If you use the wind screen in darkness or in
other conditions offeringp oor visibility, your
view to the rear is further impaired. There is a
risk of an accident.
Only use the wind screen when visibility con-
ditions are good.
GWARNING
If the wind screen is incorrectly installed, it
could detach itself during ajourney and
endanger other road users. There is arisk of
an accidenta nd injury.
Install the wind screen as described.
!Install or remove the wind screen only when
the roof is open. You could otherwise damage
the wind screen or the vehicle interior. The wind screen offers protection from the wind
when driving with the roof down.
The wind screen can be installed or removed
from the driver's side or passenger side.
For operation
sinvolvin gthe wind screen,iti s
preferable to be positioned on the side of the
vehicle facing away from the traffic, after stop-
ping the vehicle in accordance with the traffic
conditions.
Installing and removing the wind screen
Preparing for installation
:Wind screen
;Unlocked latch
=Locked latch
XThe following conditions must be fulfilled for
installation:
Runlocking buttons Rand Lpoint in the
direction of travel.
Rlatch ;facing you is unlocked.
Rlatch =facing away from you is locked.
XTo unlock the latch: press unlocking button
R or Lon the locked latch.
XTo lock the latch: push the unlocked latch
upward by hand until it engages.
80Roof
Opening and closing
Page 83 of 298
Installing
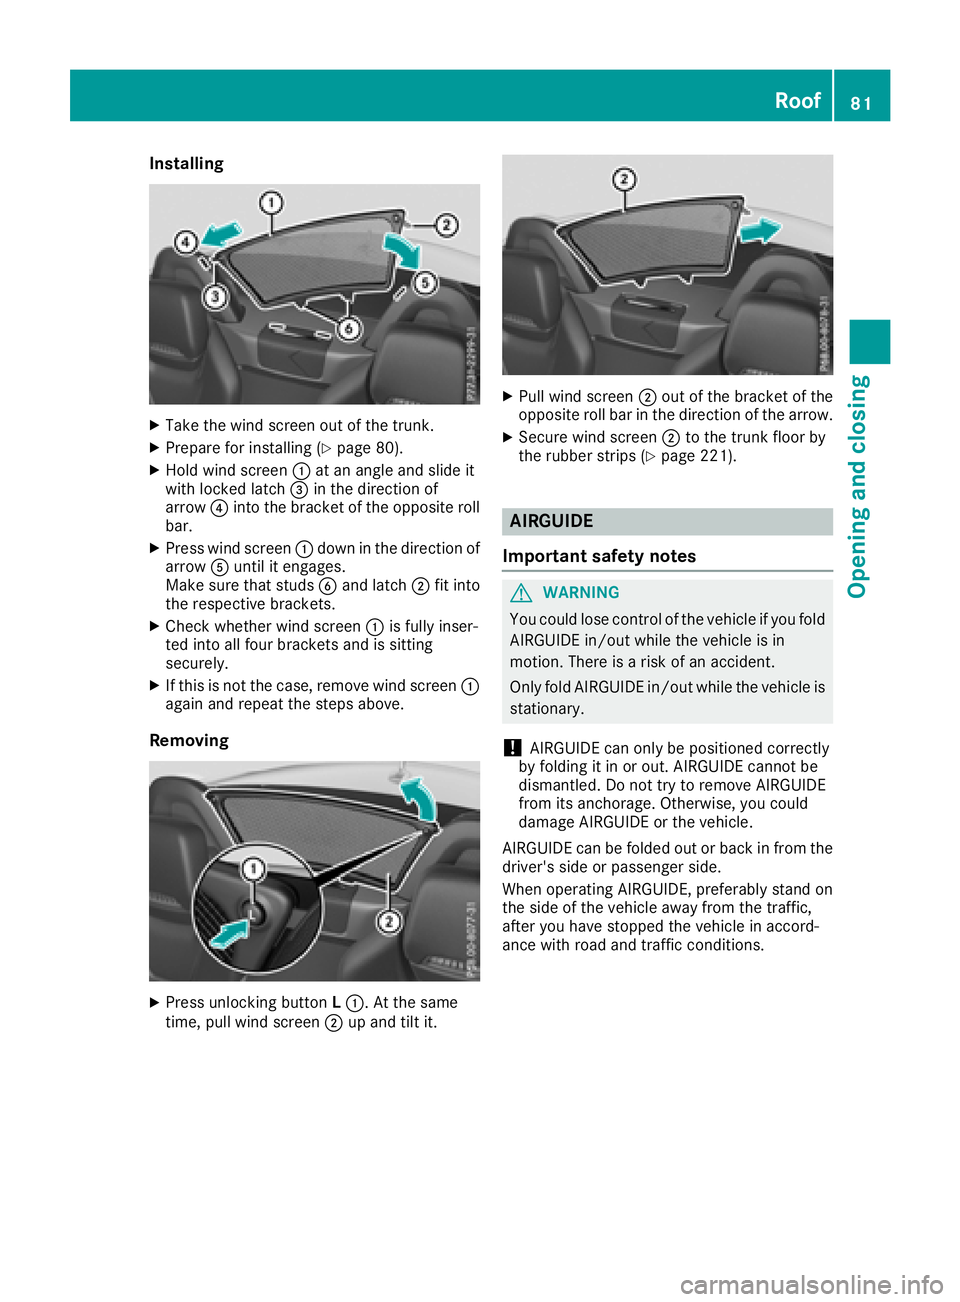
XTakethewin dscree no ut of th etrunk.
XPrepare for instal ling(Ypage 80).
XHol dw inds creen :at an ang leand slide it
wit hlocke dlatch =inthed irection of
arrow ?intot he bracke toftheoppo siteroll
bar.
XPress windscreen :down in thed irection of
arrow Auntil it engages.
Makes ure that studs Band latch ;fit into
th er espectiv ebrackets.
XCheckw hetherwindscreen :isfully inser-
te di ntoa llfour brackets and issitting
securely.
XIf th is is notthe case, remove windscreen :
again and repeat th esteps above.
Removing
XPress unlocking button L:.Att hesame
time, pull win dscreen ;up and til tit.
XPull winds creen ;out of th ebracke tofthe
oppo siteroll bar in th edirection of th earrow.
XSecure windscreen ;to th etrunk floor by
th er ubber strips (Ypage 221).
AIRGUIDE
Important safety notes
GWARNING
You could lose control of th evehicle ifyou fold
AIRGUID Ein/out while th evehicle isin
motion.T hereisar iskofana ccident.
Only foldA IRGUIDEi n/out while th evehicle is
stationary.
!AIRGUID Ecan only be positione dcorrectly
by foldingitinoro ut.AIRGUIDEc annotbe
dismantled. Do no ttry to remove AIRGUIDE
from its anchorage. Otherwise, you could
damag eAIRGUIDEort hevehicle.
AIRGUID Ecan be folded out or back in from the
driver' sside or passenger side.
When operating AIRGUIDE, preferably stand on
th es ide of th evehicle away from th etraffic,
after you have stoppe dthe vehicle inaccord-
anc ewithr oad and traffic conditions.
Roof81
Opening and closing
Z
Page 94 of 298
thenopent he driver's or front-passenger
door.
iThe exterio rmirrors do not fol doutif they
have been folde dinmanually.
Exterior mirro rpushed ou tofposition
If an exterio rmirrorh asbeen pushe doutof
position, procee dasfollows:
XVehicle swithout electricall yfolding exte-
rio rm irrors: movethe exterio rmirrori nto
the correct positio nmanually.
XVehicle swithe lect ricall yfolding exterior
mirrors: press and hol dmirror-folding button
unti lyou hear the mirrorc lick into place
(
Ypage 91).
The mirrorh ousing is engaged agai nand you
can adjus tthe exterio rmirrors as usual
(
Ypage 91).
Automati canti-glare mirrors
GWARNING
Electrolyte maye scap eift he glas sinana uto-
matic anti-glar emirror breaks. Th eelectrolyte
is harmfula nd causesirritation. It must not
come into contact with your skin, eyes ,res-
piratory organs or clothing or be swallowed.
There is ariskofi njury.
If yo ucome into contact with the electrolyte,
observe the following:
RRinse off the electrolyte fromy ours kin
immediatel ywithw ater.
RImmediately rinse the electrolyte ou tof
your eyes thoroughl ywithc lean water.
RIf the electrolyte is swallowed, immediately
rinse your mouth ou tthoroughly. Do not
induce vomiting.
RIf electrolyte come sinto contact with your
skinorh airoriss wallowed ,see km edical
attentio nimm ediately.
RImmediately change ou tofclothing which
hasc ome into contact with electrolyte.
RIf an allergi creactio noccurs, seek medical
attentio nimm ediately. The rear-view mirrora
nd the exteriormirroro n
the driver's side automaticall ygointo anti-glare
mod eift he following conditions ar emet simul-
taneously:
Rthe ignition is switched on and
Rincident light fromh eadlamps strikes the sen-
sor in the rear-view mirror
The mirrors do not go into anti-glar emodei
f
re
vers egearise ngaged or if the interio rlighting
is switched on.
Parking position fort he exterior mir-
ror on the front-passenge rside
Settin gand storin gthe parking position
Usin grevers egear
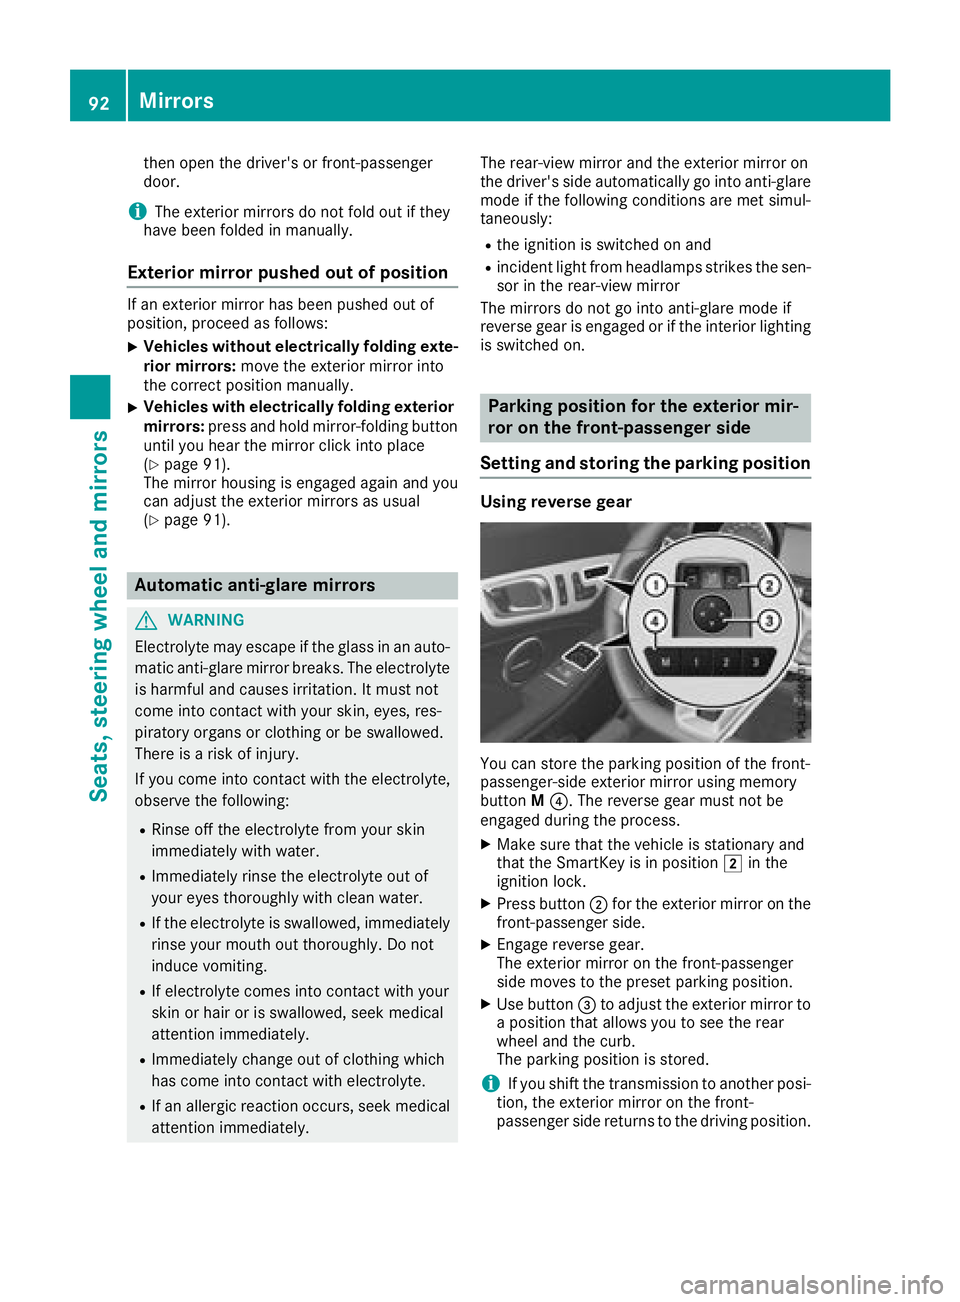
Youc an stor ethe parking positio nofthe front-
passenger-side exterio rmirroru sing memory
button M?.T he reverse gea rmustn ot be
engaged durin gthe process.
XMake sure thatt he vehicleisstationar yand
thatt he SmartKeyisinp osition 2in the
ignition lock.
XPress button ;for the exterio rmirror ont he
front-passenge rside.
XEngage revers egear.
The exterio rmirroront he front-passenger
side moves to the presetp arking position.
XUse button =to adjus tthe exterio rmirrort o
ap osit iont hata llowsyou to seet he rear
whee land the curb.
Th ep arking positio niss tored.
iIf yo ushift the transmission to anotherp osi-
tion, the exterio rmirroront he front-
passenge rsider eturns to the drivin gposit ion.
92Mirrors
Seats, steering wheel andmirrors
Page 106 of 298
Overview of climatecontrol systems
General notes
Observe the settings recommended on the fol-
lowing pages. The windows could otherwise fog
up.
To preventt he windows from fogging up:
Rswitch off climate control only briefly
Rswitch on air-recirculation mode only briefly
Rswitch on the cooling with air dehumidifica-
tion function
Rswitch on the defrost windshield function
briefly, if required
Climate control regulates the temperature and
the humidity in the vehicle interior and filters
undesirable substances out of the air.
Climate control can only be operated when the
engin eisrunning. Optimum operation is only
achieved with the side windows and roof closed.
iWhen the weather is warm, ventilate the
vehicle for abrief period. This will speed up
the cooling process and the desired vehicle
interior temperature will be reached more
quickly.
iThe integrated filter filters out most parti-
cles of dust and soot and completely filters
out pollen. It also reduces gaseous pollutants
and odors. Aclogged filter reduces the
amount of air supplied to the vehicle interior.
For this reason, you should alwayso bserve
the interval for replacing the filter, which is
specified in the Maintenance Booklet. As it
depends on environmental conditions ,e.g.
heavy air pollution, the interval may be
shorter than stated in the Maintenance Book- let.
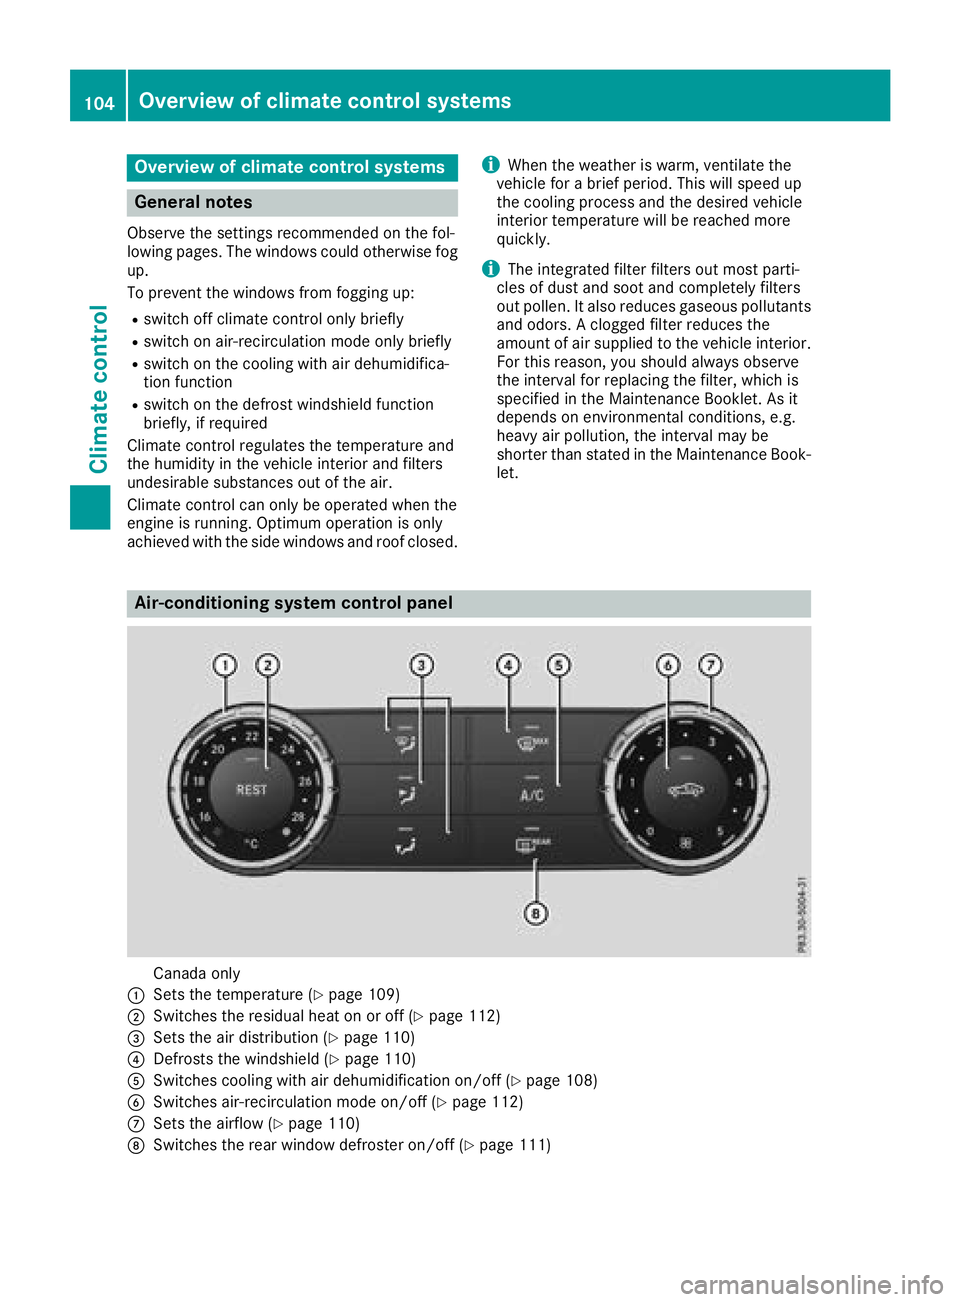
Air-conditioning system control panel
Canada only
:Setst he temperature (Ypage 109)
;Switches the residual heat on or off (Ypage 112)
=Setsthe air distribution (Ypage 110)
?Defrosts the windshield (Ypage 110)
ASwitches cooling with air dehumidification on/off (Ypage 108)
BSwitches air-recirculation mode on/off (Ypage 112)
CSetsthe airflow (Ypage 110)
DSwitches the rear window defroster on/off (Ypage 111)
104Overview of climatec ontrol systems
Climatecontrol
Page 107 of 298
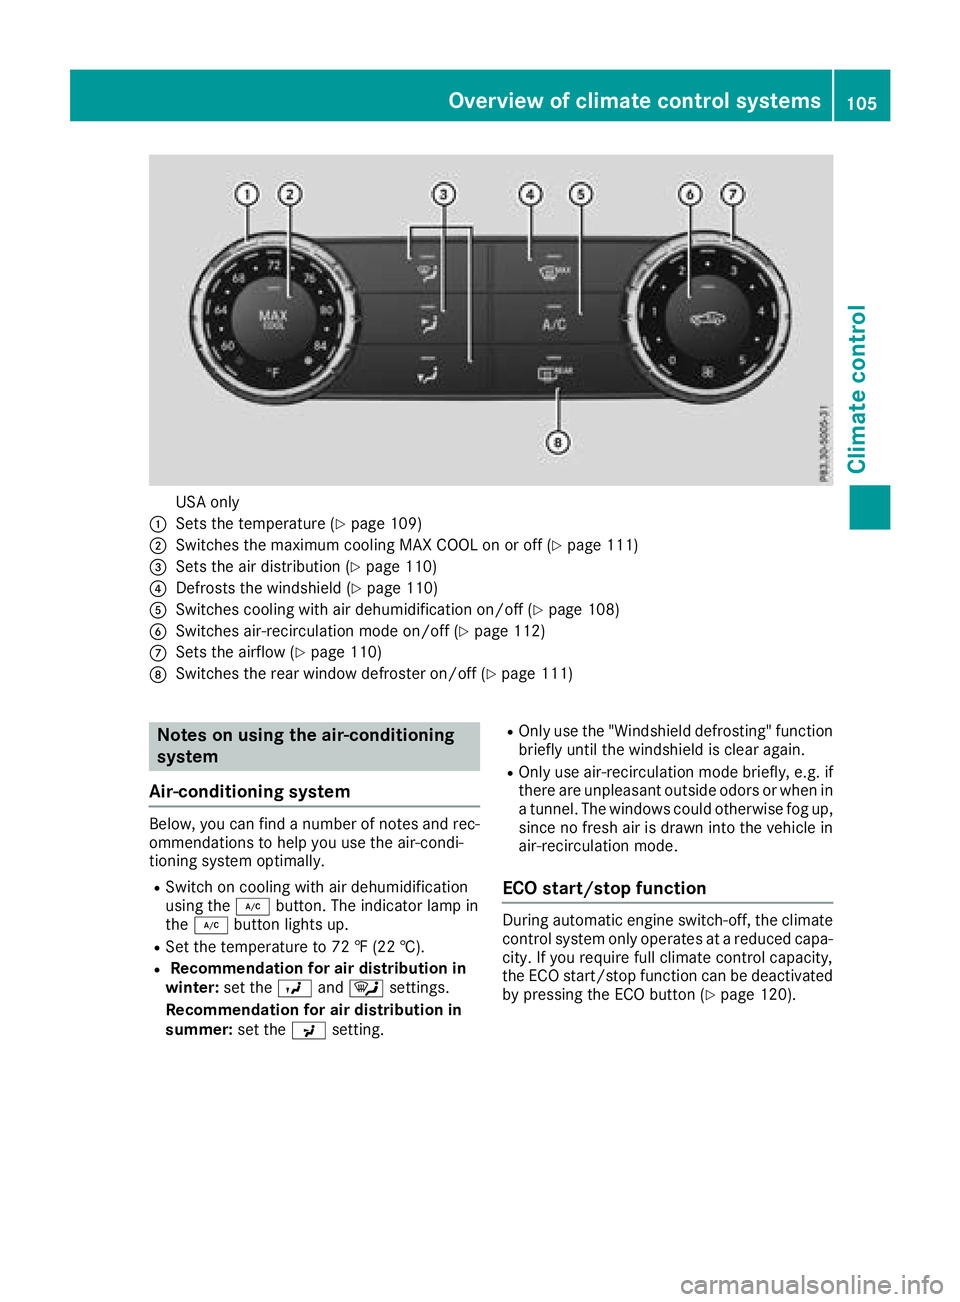
USA only
:Sets the temperature (Ypage 109)
;Switches the maximum cooling MAX COOL on or off (Ypage 111)
=Sets the air distribution (Ypage 110)
?Defrosts the windshield(Ypage 110)
ASwitches cooling with air dehumidification on/off (Ypage 108)
BSwitches air-recirculation mode on/off (Ypage 112)
CSets the airflow (Ypage 110)
DSwitches the rear window defroster on/off (Ypage 111)
Notes on using the air-conditioning
system
Air-conditioning system
Below, you can find anumber of notes and rec-
ommendations to help you use the air-condi-
tioning system optimally.
RSwitch on cooling with air dehumidification
using the ¿button. The indicator lamp in
the ¿ button lights up.
RSet the temperature to 72 ‡(22 †).
RRecommendation for air distribution in
winter: set theOand¯ settings.
Recommendation for air distribution in
summer: set thePsetting.
ROnly use the "Windshield defrosting" function
briefly until the windshieldisc lear again.
ROnly use air-recirculation mode briefly,e .g. if
there are unpleasant outside odors or when in
at unnel. The windows could otherwise fog up,
since no fresh air is drawn into the vehicle in
air-recirculation mode.
ECO start/stop function
During automatic engine switch-off, the climate
control system only operates at areduced capa-
city. If you require full climate control capacity,
the ECO start/stop function can be deactivated by pressing the ECO button (
Ypage 120).
Overview of climatec ontrol systems105
Climatecontrol
Page 110 of 298
ECO start/stop function
During automatic engine switch-off,the climate
control system only operate satareduced capa-
city. If you require full climate control capacity,
th eE CO start/sto pfunction can be deactivated
by pressingt heECO button (
Ypage 120).
Operating th eclimat econtrol sys-
tems
Activating/deactivatin gclimat econ-
trol
General notes
When th eclimate control is switched off ,the air
supply and air circulation are also switched off.
The windows coul dfog up. Therefore, switch off
climate control only briefly
iActivate climate control primarily usingt he
à button(Ypage 109).
Air-conditioning system
XTurn th eSmartKey to position 2in th eigni-
tio nlock(Ypage 116).
XTo switch on: turna irflow control Cclock-
wise to th edesired position (excep tposition
0)(
Ypage 104).
XTo switch off: turna irflow control Ccoun-
ter-clockwise to position 0(Ypage 104).
3-zone automatic climat econtrol
XTurn th eSmartKey to position 2in th eigni-
tio nlock(Ypage 116).
XTo switch on: pressthe à button.
The indicator lamp in the Ãbutton lights
up. Airflow and air distribution are set to auto-
matic mode.
or
XPress the ^button.
The indicator lamp in the ^button goes
out.T he previously selecte dsettings are
restored.
XTo switch off: pressthe ^ button.
The indicator lamp in the ^button lights
up.
Switching cooling with air dehumidi-
fication on/off
General notes
If you deactivate th e"Coolingw ith air-dehumid-
ification" function,t heair inside th evehicle will
no tbec ooled. The air inside th evehicle will also
no tbed ehumidified. The windows can fog up
mor equickly. Therefore, deactivate th ecooling
with air-dehumidification function only briefly.
The "Coolingw ith air dehumidification"f unction
is only availabl ewhen th eengine is running. The
air inside th evehicle is cooled and dehumidified
according to th etem peratur eselected.
Condensation may drip from th eundersid eof
th ev ehicle when it is in cooling mode. This is
normal and no tasign that there is amalfunc-
tion.
Activating/deactivating
XTo activate: pressthe ¿ orÁ button.
The indicator lamp in the ¿orÁ button
lightsu p.
XTo deactivate: pressthe ¿ orÁ but-
ton.
The indicator lamp in the ¿orÁ button
goes out.T he "Coolingw ith air dehumidifica-
tion" function has adelayed switch-off fea-
ture.
108Operating th eclimate control systems
Climate control
Page 111 of 298
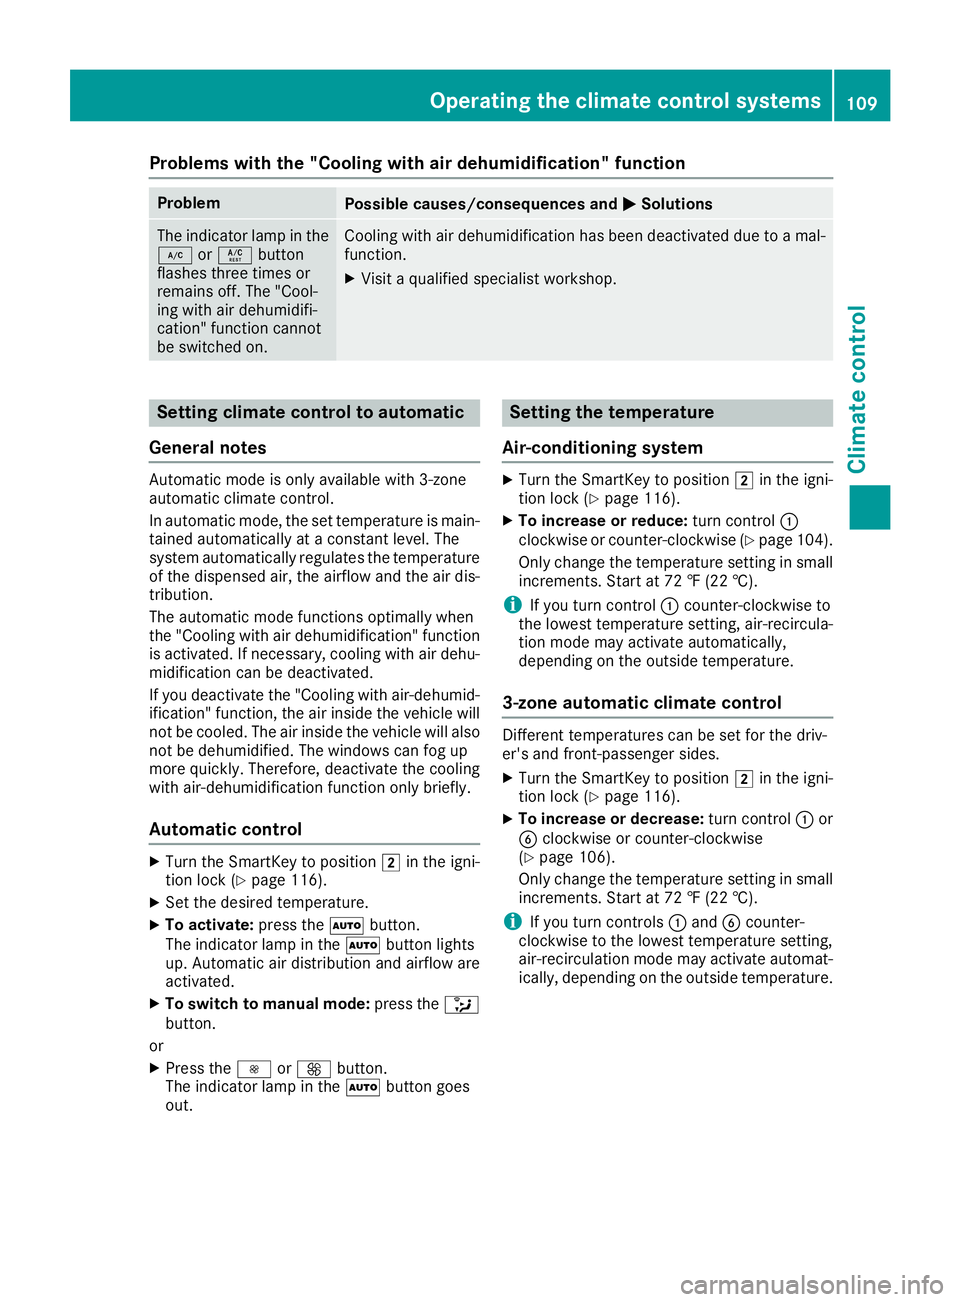
Problems with the "Cooling with air dehumidification" function
ProblemPossible causes/consequences andMSolutions
The indicator lamp in the
¿orÁ button
flashes three times or
remains off. The "Cool-
ing with air dehumidifi-
cation" function cannot
be switched on.Cooling with air dehumidification has been deactivated due to amal-
function.
XVisit aqualified specialist workshop.
Setting climate control to automatic
General notes
Automatic mode is only available with 3-zone
automatic climate control.
In automatic mode, the set temperature is main-
tained automatically at aconstant level. The
system automatically regulates the temperature
of the dispensed air, the airflow and the air dis-
tribution.
The automatic mode functions optimally when
the "Cooling with air dehumidification" function
is activated. If necessary, cooling with air dehu-
midification can be deactivated.
If you deactivate the "Cooling with air-dehumid- ification" function, the air inside the vehicle will
not be cooled. The air inside the vehicle will also
not be dehumidified.T he windows can fog up
more quickly. Therefore, deactivate the cooling
with air-dehumidification function only briefly.
Automatic control
XTurn the SmartKey to position 2in the igni-
tion lock (Ypage 116).
XSet the desired temperature.
XTo activate: press theÃbutton.
The indicator lamp in the Ãbutton lights
up. Automatic air distribution and airflow are
activated.
XTo switch to manualm ode:press the _
button.
or
XPress the IorK button.
The indicator lamp in the Ãbutton goes
out.
Setting the temperature
Air-conditioning system
XTurn the SmartKey to position 2in the igni-
tion lock (Ypage 116).
XTo increase or reduce: turn control:
clockwise or counter-clockwise (Ypage 104).
Only change the temperature settingins mall
increments. Start at 72 ‡(22 †).
iIf you turn control :counter-clockwise to
the lowest temperature setting, air-recircula-
tion mode may activate automatically,
depending on the outside temperature.
3-zone automatic climate control
Differentt emperatures can be set for the driv-
er's and front-passenger sides.
XTurn the SmartKey to position 2in the igni-
tion lock (Ypage 116).
XTo increase or decrease: turn control:or
B clockwise or counter-clockwise
(
Ypage 106).
Only change the temperature settingins mall
increments. Start at 72 ‡(22 †).
iIf you turn controls :and Bcounter-
clockwise to the lowest temperature setting,
air-recirculation mode may activate automat-
ically, depending on the outside temperature.
Operating the climate control systems109
Climatec ontrol