2018 MERCEDES-BENZ SLC ROADSTER heating
[x] Cancel search: heatingPage 13 of 298
Google™ Local Searchsee alsoD igital Operator's Man-
ual. ................................................. 211
H
Hazard warning lamps
Displaym essage............................ 201
Switching on/off. ............................. 97
Hea dbags
Displa ymessage ............................ 186
Operation ......................................... 45
Hea dlevel heatin g(AIRSCARF) .......... 87
Hea drestraints
Adjusting ......................................... 86
see NECK-PROh eadrestraints
Headlamps
see Automati cheadlamp mode
Heating
see Climate control
Hig hbeamf lasher ............................... 96
High-beam headlamps
Displa ymessage ............................ 189
Replacing bulb s............................. 100
Switching on/off. ............................. 96
Hil lstart assist .................................. 118
HOLDf unction
Activating ....................................... 148
Activation conditions ..................... 148
Deactivating ................................... 148
Displa ymessage ............................ 193
Generaln otes ................................ 148
Home address
see also Digital Operator's Man-
ual.................................................. 211
Hood
Closing ........................................... 234
Displa ymessage ............................ 200
Important safety notes .................. 233
Opening ......................................... 233
Horn ...................................................... 31
Hydroplaning ..................................... 138
I
Ignitionlock
see Key positions
Immobilizer .......................................... 63 Indicator lamps
see Warning and indicator lamps
Indicators
see Turn signals
Instrument cluster
Overview .......................................... 32
Instrument clusterl ighting .............. 163
Interior lighting
Automati ccontrol ............................ 99
Delayed switch-off (on-board
computer) ...................................... 173
Overview .......................................... 99
Reading lamp ................................... 99
Setting the brightness of the
ambient lighting (on-board com-
puter) ............................................. 172
Setting the color of the ambient
lighting (on-board computer) ......... 173
iPod
®
see also Digital Operator's Man-
ua l.................................................. 211
J
Jack
Storage location ............................ 245
Using ............................................. 281
Jump starting (engine) ...................... 253
K
Keyp ositions
KEYLESS-GO .................................. 116
SmartKey ....................................... 116
KEYLESS-GO
Activating ......................................... 65
Convenience closing feature ............ 76
Deactivation ..................................... 65
Displa ymessage ............................ 202
Locking ............................................ 65
Removing the Start/Sto pbutton ... 117
Start/Sto pbutton .......................... 116
Starting the engine ........................ 118
Unlocking ......................................... 65
Kickdown
Driving tip s.................................... 125
Manua lgearshifting ....................... 128
Knee bag .............................................. 44
Index11
Page 36 of 298
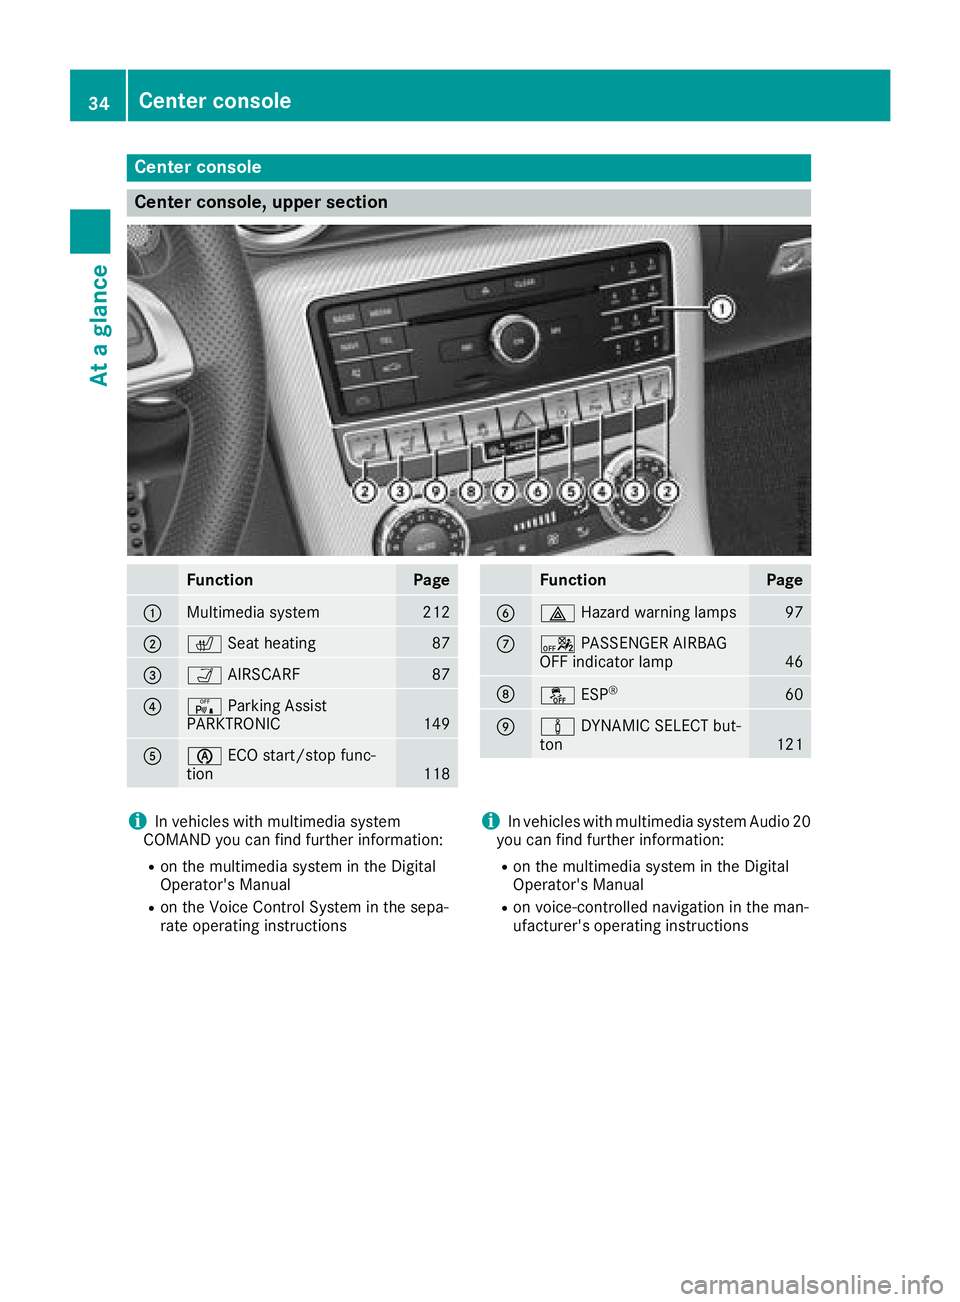
Center console
Center console, upper section
FunctionPage
:Multimedia system212
;cSeat heating87
=ÒAIRSCARF87
?cParking Assist
PARKTRONIC149
Aè ECO start/sto pfunc-
tion118
FunctionPage
B£ Hazard warning lamps97
CaPASSENGER AIRBAG
OFFi ndicator lamp46
Då ESP®60
EàDYNAMIC SELECT but-
ton121
iIn vehicle swithm ultimedia system
COMAND you can fin dfurther information:
Ron th emultimedia system in th eDigital
Operator's Manual
Ron th eVoiceC ontrol Syste minthesepa-
rat eo peratin ginstructions
iIn vehicle swithm ultimedia system Audi o20
you can fin dfurther information:
Ron th emultimedia system in th eDigital
Operator's Manual
Ron voice-controlled navigation in th eman-
ufacturer'so peratinginstructions
34Center console
At ag lance
Page 72 of 298
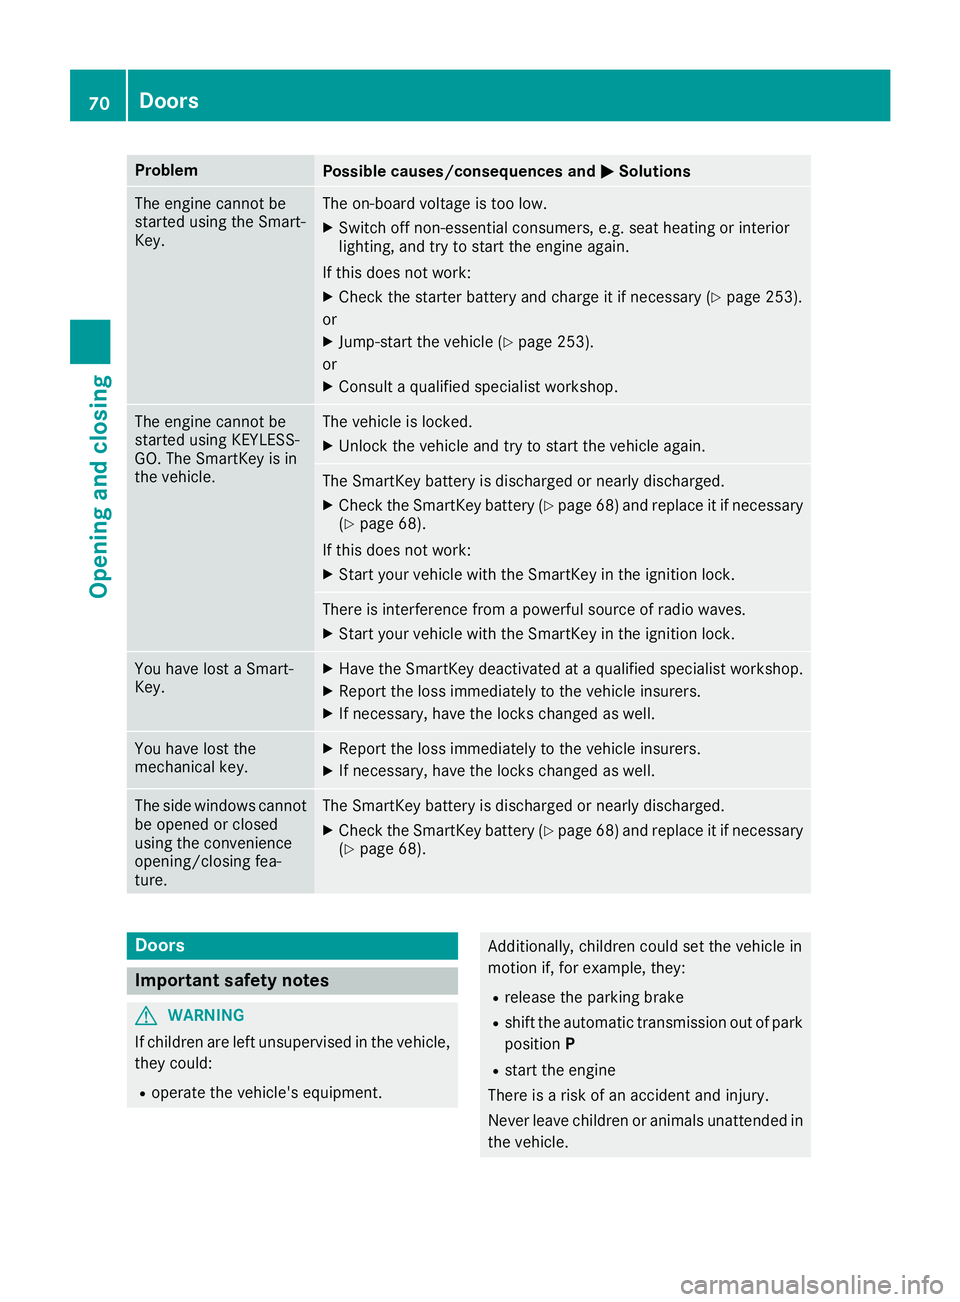
ProblemPossible causes/consequences andMSolutions
The engine cannot be
started using the Smart-
Key.The on-board voltage is too low.
XSwitch off non-essential consumers, e.g. seat heating or interior
lighting, and try to start the engine again.
If this does not work:
XCheck the starter battery and charge it if necessary (Ypage 253).
or
XJump-start the vehicle (Ypage 253).
or
XConsult aqualified specialist workshop.
The engine cannot be
started using KEYLESS-
GO. The SmartKey is in
the vehicle.The vehicle is locked.
XUnlock the vehicle and try to start the vehicle again.
The SmartKey battery is discharged or nearly discharged.
XCheck the SmartKey battery (Ypage 68) and replace it if necessary
(Ypage 68).
If this does not work:
XStart your vehicle with the SmartKey in the ignition lock.
There is interference from apowerful source of radio waves.
XStart your vehicle with the SmartKey in the ignition lock.
You have lost aSmart-
Key.XHave the SmartKey deactivated at aqualified specialist workshop.
XReport the loss immediately to the vehicle insurers.
XIf necessary, have the locks changed as well.
You have lost the
mechanical key.XReport the loss immediately to the vehicle insurers.
XIf necessary, have the locks changed as well.
The side windows cannot
be opened or closed
using the convenience
opening/closing fea-
ture.The SmartKey battery is discharged or nearly discharged.
XCheck the SmartKey battery (Ypage 68) and replace it if necessary
(Ypage 68).
Doors
Important safety notes
GWARNING
If children are left unsupervised in the vehicle,
they could:
Roperate the vehicle's equipment.
Additionally, children could set the vehicle in
motion if, for example, they:
Rrelease the parking brake
Rshift the automatic transmission out of park
position P
Rstart the engine
There is arisk of an accident and injury.
Never leave children or animals unattended in
the vehicle.
70Doors
Opening and closing
Page 87 of 298
The seats can still be adjusted when there is no
SmartKey in the ignition lock.
GWARNING
When you adjust aseat, you or other vehicle
occupantsc ould become trapped, e.g. on the
seat guide rail. There is arisk of injury.
Make sure when adjusting aseat that no one
has any body parts in the sweep of the seat.
GWARNING
If the driver's seat is not engaged, it could
move forwards as far as the next catc hduring
movements uch as braking or abrupt changes
of direction .Asaresult, you would be pushed
against your seat belt by the unsecured driv-
er's seat.
This could cause you to lose control of the
vehicle. The seat belt cannot protec tasinten-
ded and could result in additional injury.
There is arisk of an accident and injury.
Before every journey, make sure that the driv-
er's seat is fully engaged.
Observe the safety notes on "Air bags"
(
Ypage 43) and "Children in the vehicle"
(Ypage 53).
GWARNING
If the driver's seat is not engaged, it could
move unexpectedly while the vehicle is in
motion.T his could cause you to lose control of
the vehicle. There is arisk of an accident.
Always make sure that the driver's seat is
engaged before starting the vehicle.
GWARNING
If you adjust the seat height carelessly, you or
other vehicle occupantsc ould be trapped and
thereby injured. Children in particular could
accidentally press the electrical seat adjust-
ment button sand become trapped. There is a
risk of injury.
While moving the seats, make sure that your
hands or other body parts do not get under the
lever assembly of the seat adjustmen tsys-
tem.
GWARNING
If the head restraints are not installed or not
adjusted correctly, they cannot provide pro-
tection as intended. There is an increased risk
of injury in the head and neck area, e.g. in the event of an accident or when braking.
Always drive with the head restraints instal-
led. Before driving off, make sure for every
vehicle occupant that the center of the head
restraint supports the back of the head at
about eye level.
GWARNING
You could lose control of your vehicle if you do the following while driving:
Radjust the driver's seat, head restraint,
steerin gwheel or mirrors
Rfasten the seat belt
There is arisk of an accident.
Adjust the driver's seat, head restraint, steer-
ing wheel and mirror and fasten your seat belt before starting the engine.
!To prevent damage to the seats and the seat
heating, observe the following notes:
RDo not spill liquids ontot he seats. Dry the
seats as soon as possible if liquid does get
spilled on the seats.
RIf the seat covers are damp or wet, do not
switch on the seat heating. Also, do not use
the seat heating to dry the seats.
RClean the seat covers as recommended;
see the "Interior care" section.
RDo not transport heavy loads on the seats.
Do not place pointed object sonthe seat
cushions such as knives, nails or tools.
Where possible, use the seats only for car-
rying passengers.
RWhen operating the seat heating, do not
cover the seats with insulating materials,
e.g. blankets ,coats, bags, protective cov-
ers, child seats or booster seats.
RWhen the seat heating is switched on, the
seat surface can be damaged as aresult of
object sbeing placed on the seats; for
example, seat cushions, child seats and
protective covers not approved by
Mercedes-Benz.
Seats85
Seats, steering wheel and mirrors
Z
Page 89 of 298
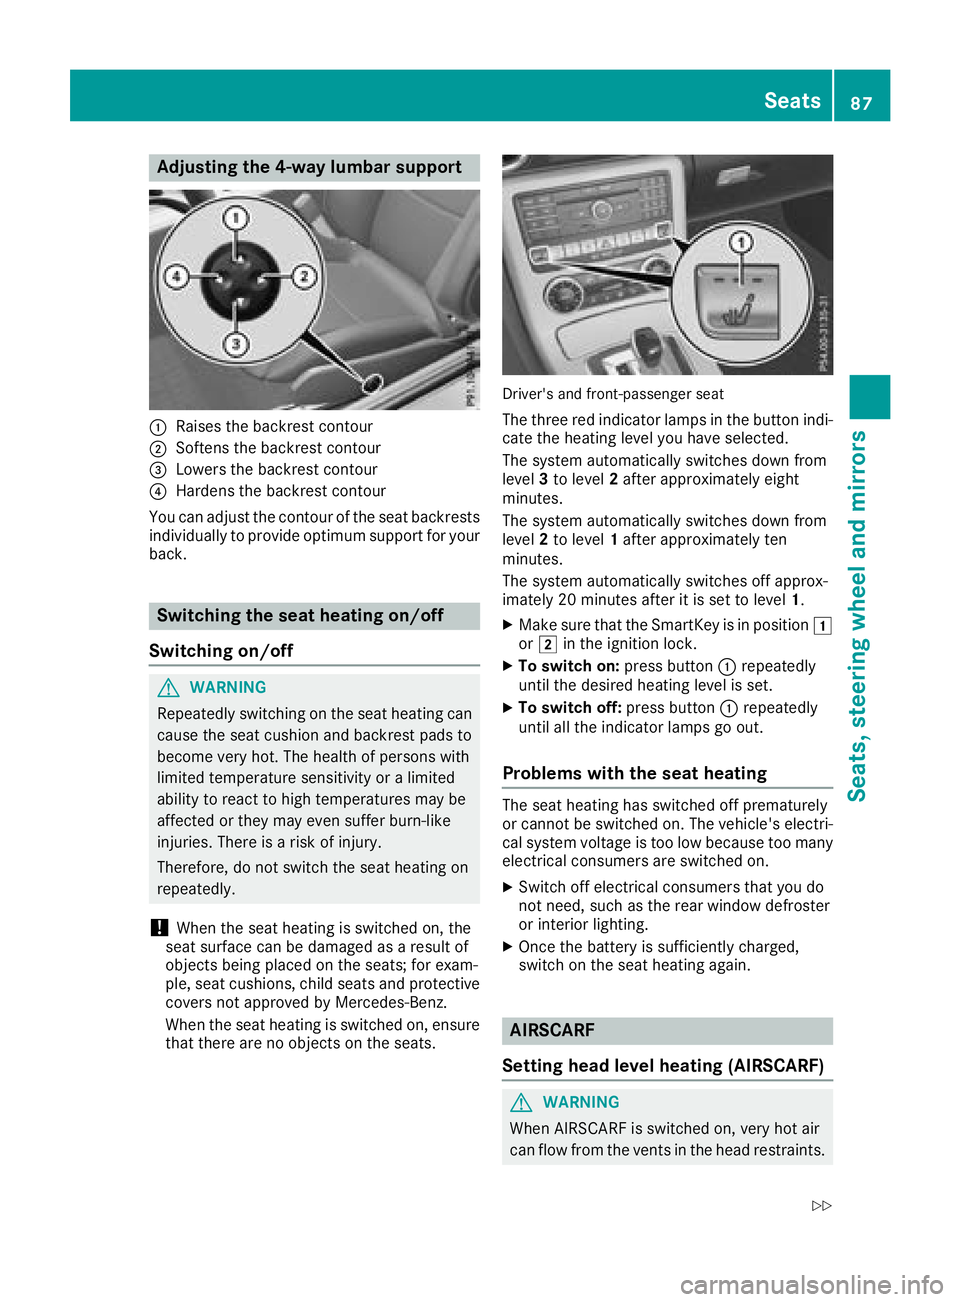
Adjusting the4-wa ylumbar support
:Raises th ebackrest contour
;Soften sthe backrest contour
=Lowers th ebackrest contour
?Harden sthe backrest contour
You can adjust th econtou roftheseat backrest s
individually to provid eoptimum support for your
back.
Switchin gthe seath eating on/off
Switchin gon/off
GWARNIN G
Repeatedly switching on th eseat heating can
caus ethe seat cushion and backrest pads to
become ver yhot.T he healt hofpersonswith
limite dtem perature sensitivit yoralimited
abilit ytor eac ttoh igh temperatures may be
affecte dortheym ay eve nsuffer burn-like
injuries. There is ariskofi njury.
Therefore ,donotswitch th eseat heating on
repeatedly.
!When th eseat heating is switched on ,the
seat surfac ecan be damaged as aresult of
objects bein gplaced on th eseats; for exam-
ple, seat cushions, child seat sand protective
cover snotapprove dbyMercedes-Benz .
When th eseat heating is switched on ,ens ure
that there are no objects on th eseats.
Driver's and front-passenger seat
The three red indicator lamp sinthebutto nindi-
cat ethe heating level you hav eselected.
The system automatically switches down from
level 3to level 2after approximately eigh t
minutes.
The system automatically switches down from
level 2to level 1after approximately te n
minutes.
The system automatically switches off approx -
imately 20 minute safter it is set to level 1.
XMakesuret ha tthe SmartKey is in position 1
or 2 in th eignition lock.
XTo switch on: press button: repeatedly
until th edesired heating level is set .
XTo switch off:press butto n: repeatedly
until all th eindicator lamp sgoout.
Problemsw ith theseath eating
The seat heating has switched off prematurel y
or canno tbeswitched on .The vehicle's electri-
cal system voltag eistoolow because to omany
electrical consumer sare switched on .
XSwitchoff electrical consumer sthaty ou do
no tn eed, suc hastherear window defroste r
or interior lighting .
XOnce thebattery is sufficientl ycharged,
switch on th eseat heating again .
AIRSCARF
Setting hea dlevel heating (AIRSCARF)
GWARNIN G
When AIRSCARF is switched on ,veryh ot air
can flo wfromt hevents in th ehead restraints .
Seats87
Seats,steering wheel and mirrors
Z
Page 90 of 298
This could result in burns in the immediate
vicinityofthe air vents. There is arisk of injury.
Reduce the heater output before it becomes
too hot.
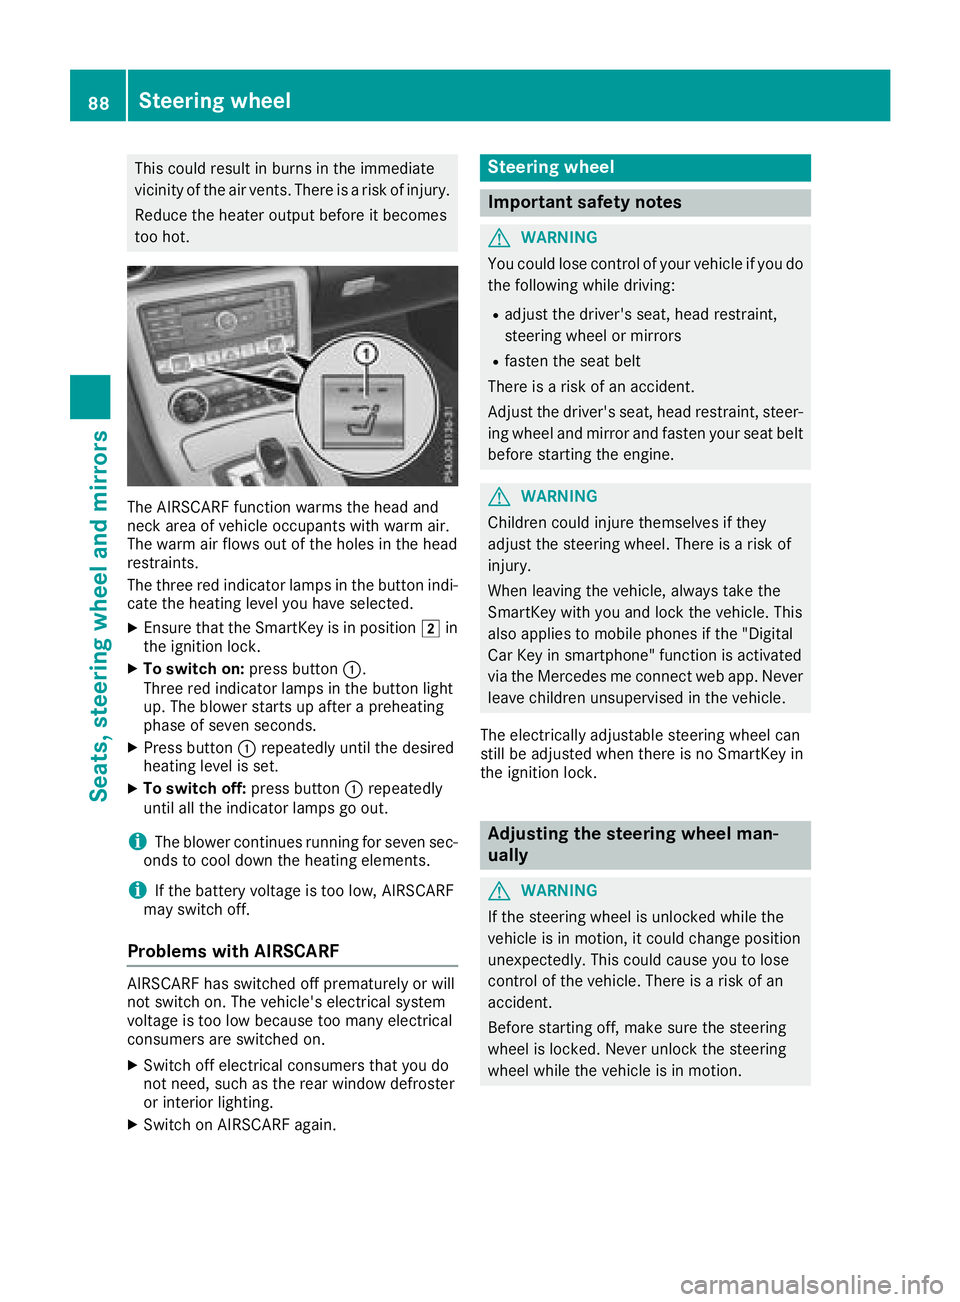
The AIRSCARF function warms the head and
neck area of vehicle occupantsw ith warm air.
The warm air flows out of the holes in the head
restraints.
The three red indicator lamps in the button indi-
cate the heating level you have selected.
XEnsure that the SmartKey is in position 2in
the ignition lock.
XTo switch on: press button:.
Three red indicator lamps in the button light
up. The blower start supafterapreheating
phase of seven seconds.
XPress button :repeatedly until the desired
heating level is set.
XTo switch off: press button:repeatedly
until all the indicator lamps go out.
iThe blower continues runnin gfor seven sec-
onds to cool down the heating elements.
iIf the battery voltage is too low, AIRSCARF
may switch off.
Problems with AIRSCARF
AIRSCARF has switched off prematurely or will
not switch on. The vehicle's electrical system
voltage is too low because too many electrical
consumersa re switched on.
XSwitch off electrical consumer sthat you do
not need, such as the rear window defroster
or interior lighting.
XSwitch on AIRSCARF again.
Steering wheel
Important safety notes
GWARNING
You could lose control of your vehicle if you do the following while driving:
Radjust the driver's seat, head restraint,
steerin gwheel or mirrors
Rfasten the seat belt
There is arisk of an accident.
Adjust the driver's seat, head restraint, steer-
ing wheel and mirror and fasten your seat belt before starting the engine.
GWARNING
Children could injure themselves if they
adjust the steerin gwheel. There is arisk of
injury.
When leaving the vehicle, alwayst ake the
SmartKey with you and lock the vehicle. This
also applies to mobile phones if the "Digital
Car Key in smartphone" function is activated
via the Mercedes me connect web app. Never leave children unsupervised in the vehicle.
The electrically adjustable steerin gwheel can
still be adjusted when there is no SmartKey in
the ignition lock.
Adjusting the steering wheel man-
ually
GWARNING
If the steerin gwheel is unlocked while the
vehicle is in motion,itc ould change position
unexpectedly. This could cause you to lose
control of the vehicle. There is arisk of an
accident.
Before starting off, make sure the steering
wheel is locked. Never unlock the steering
wheel while the vehicle is in motion.
88Steering wheel
Seats, steering wheel and mirrors
Page 93 of 298
Exteriormirrors
Adjusting th eexterio rmirrors
GWARNING
You coul dlose control of your vehicle if you do
th ef ollowingw hile driving:
Radjust thedriver'ss eat,head restraint,
steering wheel or mirrors
Rfasten th eseat belt
Thereisar isk of an accident.
Adjust th edriver'ss eat,head restraint ,steer-
ing wheel and mirror and fasten your seat belt before starting th eengine.
GWARNING
The exteriorm irror on thefront-pa ssenger
side reduces th esizeoft heimage .Visible
object sare actually closer than they appear.
This mean sthaty ou coul dmisjudge th edis-
tance from road userst ravelin gbehind, e.g.
when changing lane .Thereisar isk of an acci-
dent.
For this reason,a lways makesure of the
actual distanc efromt heroad userst raveling
behindbyg lancingovery our shoulder.
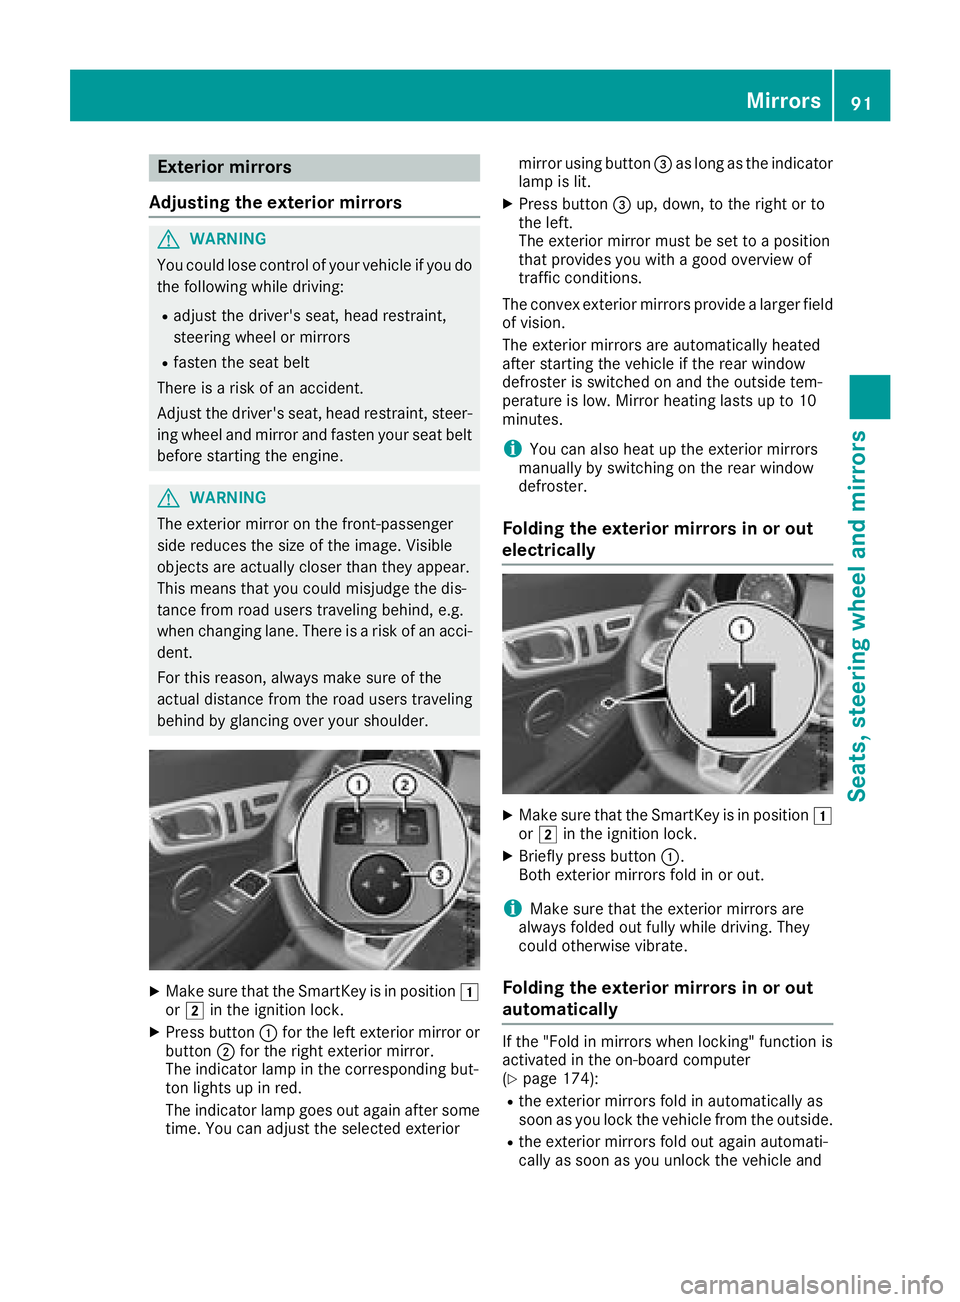
XMakes ure that th eSma rtKey is in position 1
or 2 in th eignition lock.
XPress button :for th eleft exteriorm irror or
button ;for th erigh texteriorm irror.
The indicator lamp in th ecorrespondingb ut-
to nl ightsupinr ed.
The indicator lamp goes out again after some time. You can adjust th eselecte dexterior mirror usingb
utton=as longast heindicator
lamp is lit.
XPress button =up, down,tot herigh tort o
th el eft.
The exteriorm irror must be set to aposition
that provide syou with agood overview of
traffic conditions.
The convex exteriorm irrorsprovide alarge rfield
of vision.
The exteriorm irrorsare automaticall yheated
after starting th evehicle if th erear window
defroster is switched on and th eoutside tem-
perature is low. Mirror heating lastsupto1 0
minutes.
iYou can also heat up th eexteriorm irrors
manually by switching on th erear window
defroster.
Foldin gthe exterio rmirror sinoro ut
electrically
XMakes ure that th eSma rtKey is in position 1
or 2 in th eignition lock.
XBriefly pres sbutton :.
Bot hexteriorm irrorsfold in or out.
iMakes ure that th eexteriorm irrorsare
always folded out fully while driving .They
coul dotherwise vibrate.
Foldin gthe exterio rmirror sinoro ut
automatically
If th e"Fol dinm irrorswhen locking" function is
activated in th eon-board computer
(
Ypage 174):
Rth ee xteriorm irrorsfold in automaticall yas
soon as you lockt hevehicle from th eoutside.
Rthee xteriorm irrorsfold out again automati-
cally as soon as you unlock th evehicle and
Mirrors91
Seats, steerin gwheel and mirrors
Z
Page 114 of 298
Problems with the rear window defroster
ProblemPossible causes/consequences andMSolutions
The indicator lamp on
the¤ button flashes.
The rear window
defroster has deactiva-
ted prematurely or can-
not be activated.The on-board voltage is too low because too many electrical consum-
ers are switched on.
XSwitch off any consumers that are not required, e.g. reading lamps, interior lighting or the seat heating.
When the battery is sufficiently charged, the rear window defroster
can be activated again.
The roof is open.
XClose the roof.
When the roof is closed, the rear window defroster can be activated
again.
Switching air-recirculation mode
on/off
General notes
If you switch on air-recirculation mode, the win-
dows can fog up more quickly, in particular at
low temperatures. Only use air-recirculation
mode briefly to prevent the windows from fog-
ging up.
Activating/deactivating
XTurn the SmartKey to position 2in the igni-
tion lock (Ypage 116).
XTo activate: press thegbutton.
The indicator lamp in the gbutton lights
up.
iAir-recirculation mode is automatically acti-
vated at high levels of pollution (dual-zone
automatic climate control only) or at high out-
side temperatures. When air-recirculation
mode is activated automatically, the indicator
lamp in the gbutton is not lit. Outside air
is added after about 30 minutes.
XTo deactivate: press thegbutton.
The indicator lamp in the gbutton goes
out.
iAir-recirculation mode deactivates auto-
matically:
Rafter approximately five minutes at outside
temperatures below approximately 41 ‡
(5 †)
Rafter approximately five minutes if cooling
with air dehumidification is deactivated
Rafter approximately 30 minutes at outside
temperatures above approximately 41 ‡
(5 †) if the "Cooling with air dehumidifica-
tion" function is activated
Switching the residual heat on or off
General notes
The residual heat function is only available on
vehicles for Canada.
It is possible to make use of the residual heat of
the engine to continue heating the stationary
vehicle for up to 30 minutes after the engine has
been switched off. The heating time depends on
the set interior temperature.
Activating/deactivating
XTurn the SmartKey to position uin the igni-
tion lock or remove it (Ypage 116).
XTo activate: press theÌorÁ button.
The indicator lamp in the ÌorÁ button
lights up.
iThe blower will run at alow speed regardless
of the airflow setting.
112Operating the climate control systems
Climatec ontrol