2018 MERCEDES-BENZ SLC ROADSTER warning
[x] Cancel search: warningPage 259 of 298
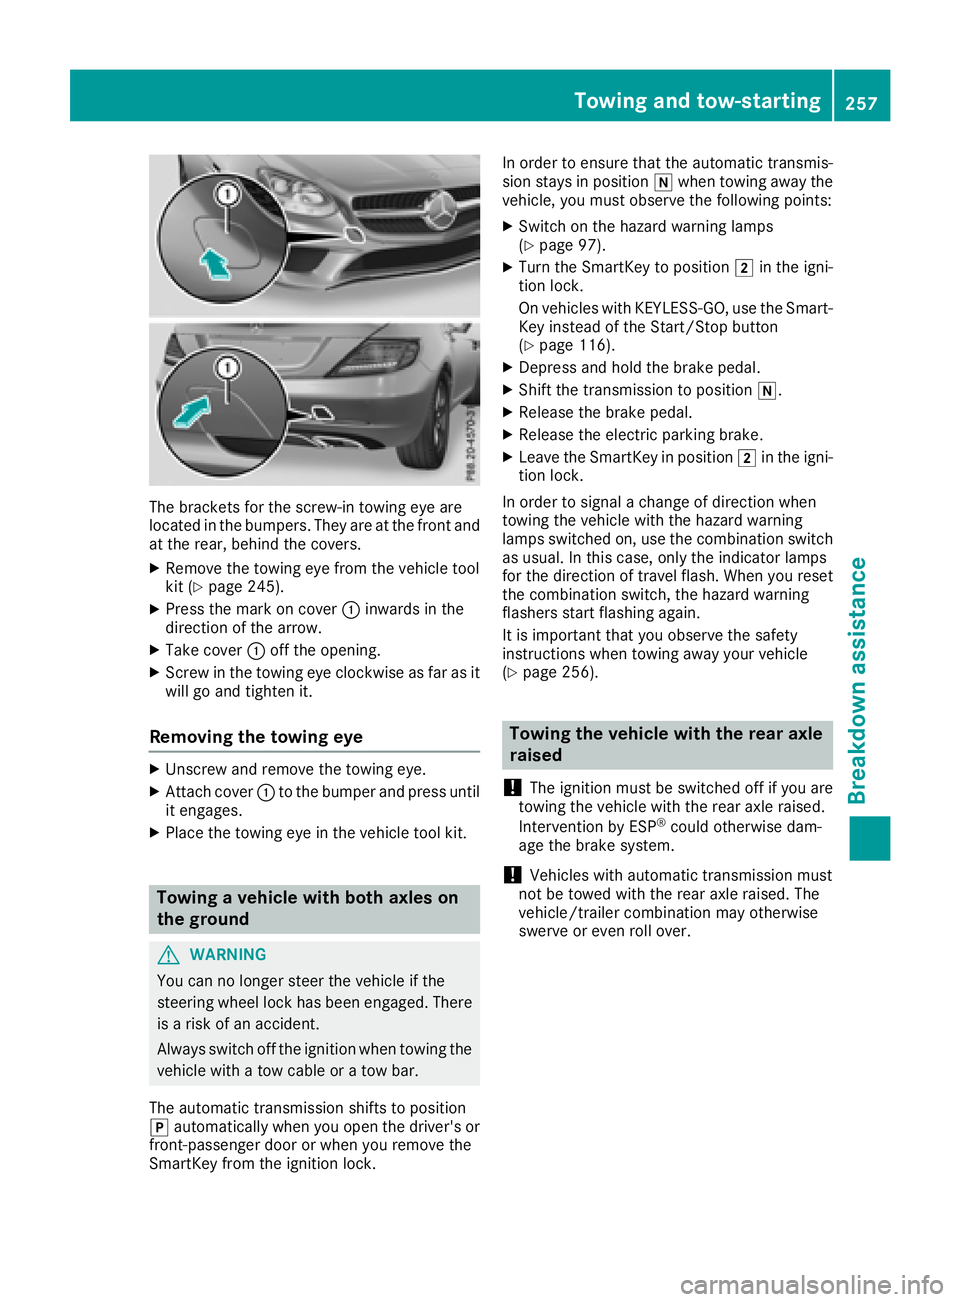
The bracketsfor the screw-in towing eye are
located in the bumpers. They are at the front and
at the rear, behind the covers.
XRemove the towing eye from the vehicle tool
kit (Ypage 245).
XPress the mark on cover :inwards in the
direction of the arrow.
XTake cover :off the opening.
XScrew in the towing eye clockwise as far as it
will go and tighten it.
Removing the towing eye
XUnscrew and remove the towing eye.
XAttach cover :to the bumper and press until
it engages.
XPlace the towing eye in the vehicle tool kit.
Towing avehicle with both axles on
the ground
GWARNING
You can no longer steer the vehicle if the
steerin gwheel lock has been engaged. There
is ar isk of an accident.
Always switch off the ignition when towing the
vehicle with atow cable or atow bar.
The automatic transmission shifts to position
j automatically when you open the driver's or
front-passenger door or when you remove the
SmartKey from the ignition lock. In order to ensure that the automatic transmis-
sion stays in position
iwhen towing away the
vehicle, you must observe the following points:
XSwitch on the hazard warning lamps
(Ypage 97).
XTurn the SmartKey to position 2in the igni-
tion lock.
On vehicles with KEYLESS-GO, use the Smart-
Key instead of the Start/Stop button
(
Ypage 116).
XDepress and hold the brake pedal.
XShift the transmission to position i.
XRelease the brake pedal.
XRelease the electric parking brake.
XLeave the SmartKey in position2in the igni-
tion lock.
In order to signal achange of direction when
towing the vehicle with the hazard warning
lamps switched on, use the combination switch
as usual. In this case, only the indicator lamps
for the direction of travel flash. When you reset
the combination switch, the hazard warning
flashers start flashing again.
It is important that you observe the safety
instructions when towing away your vehicle
(
Ypage 256).
Towing the vehicle with the rear axle
raised
!
The ignition must be switched off if you are
towing the vehicle with the rear axle raised.
Intervention by ESP
®could otherwise dam-
age the brake system.
!Vehicles with automatic transmission must
not be towed with the rear axle raised. The
vehicle/trailer combination may otherwise
swerve or even roll over.
Towing and tow-starting257
Breakdown assistance
Z
Page 260 of 298
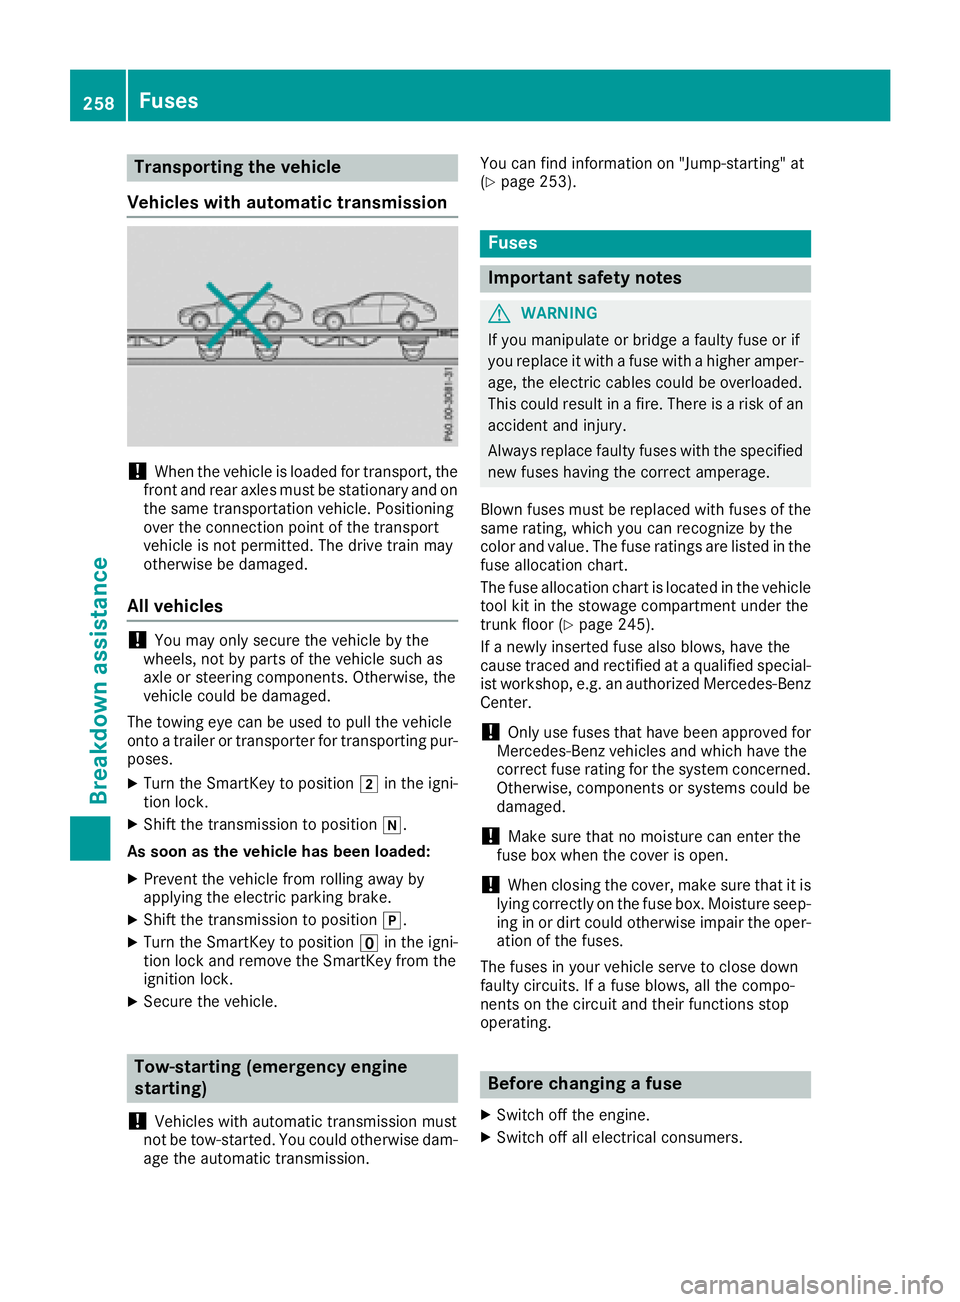
Transporting the vehicle
Vehicle switha utomatic transmission
!When the vehicl eisloaded for transport, the
front and rea raxles must be stationar yand on
the same transportatio nvehicle. Positioning
ove rthe connectio npoint of the transport
vehicl eisnot permitted .The drive train may
otherwis ebedamaged .
Allv eh icles
!Youm ayonl ysecur ethe vehicl ebythe
wheels ,not by parts of the vehicl esucha s
axl eors teerin gcomponents. Otherwise, the
vehicl ecould be damaged.
The towing ey ecan be used to pull the vehicle
onto atrailer or transporte rfor transporting pur-
poses.
XTurn the SmartKeytop osition 2in the igni-
tio nlock.
XShift the transmission to position i.
As soon as the vehicle has been loaded:
XPrevent the vehicl efromr olling away by
applying the electri cparkin gb rake.
XShift the transmission to position j.
XTurn the SmartKeytoposition uin the igni-
tio nlocka nd remove the SmartKeyf romthe
ignition lock.
XSecure the vehicle.
Tow-starting (emergency engine
starting)
!
Vehicles with automatic transmission must
not be tow-started .You could otherwis edam -
ag et he automatic transmission. Yo
uc an find informatio non"Jump-starting "at
(
Ypage 253).
Fuses
Important safety notes
GWARNING
If yo umanipulate or bridg eafaulty fuse or if
yo ur eplace it with afusew ithah ighe ramper -
age, the electri ccable scould be overloaded.
Thi scould resul tinafire. There is ariskofa n
accident and injury.
Alway sreplace faulty fuses with the specified
new fuses havin gthe correct amperage.
Blown fuses must be replaced with fuses of the
same rating ,which yo ucan recognize by the
color and value. The fuse rating sarelisted in the
fuse allocation chart.
The fuse allocation chart is locate dinthe vehicle
tool kit in the stowag ecompartment under the
trunk floor (
Ypage 245).
If an ewly inserte dfusea lsob lows ,havet he
cause traced and rectifie dataqualified special-
is tw orkshop ,e.g.ana uthorize dMercedes-Benz
Center.
!Onlyu sefuses thath aveb eena pproved for
Mercedes-Benz vehicles and which have the
correct fuse rating for the system concerned.
Otherwise, components or system scould be
damaged.
!Make sure thatnom oisture can enterthe
fuse bo xwhent he cove risopen.
!When closing the cover, make sure thatiti s
lying correctl yonthe fuse box. Moisture seep-
ing in or dirt could otherwis eimpai rthe oper-
atio
n of the fuses.
The fuses in your vehicl eserve to close down
faulty circuits. If afuseb lows ,allthe compo-
nents on the circui tand their functions stop
operating.
Before changin gafuse
XSwitch off the engine.
XSwitch off al lelectrical consumers.
258Fuses
Breakdow nassistance
Page 261 of 298
XMake sure that the ignition is switched off
(Ypage 116).
or
XWhen using the SmartKey, turn the SmartKey to position uin the ignition lock and remove
it (
Ypage 116).
XSecure the vehicle against rolling away
(Ypage 131).
All indicator lamps in the instrumen tcluster
must be off.
The fuses are located in various fuse boxes:
RFuse box in the engine compartmentont he
left-hand side of the vehicle, when viewed in
the direction of travel
RFuse box in the trunk
Fuse box in the engine compartment
i
Observe the "Important safety notes" sec-
tion (Ypage 258).
GWARNING
When the hood is open and the windshield
wipers are set in motion, you can be injured by
the wiper linkage. There is arisk of injury.
Always switch off the windshield wipers and
the ignition before opening the hood.
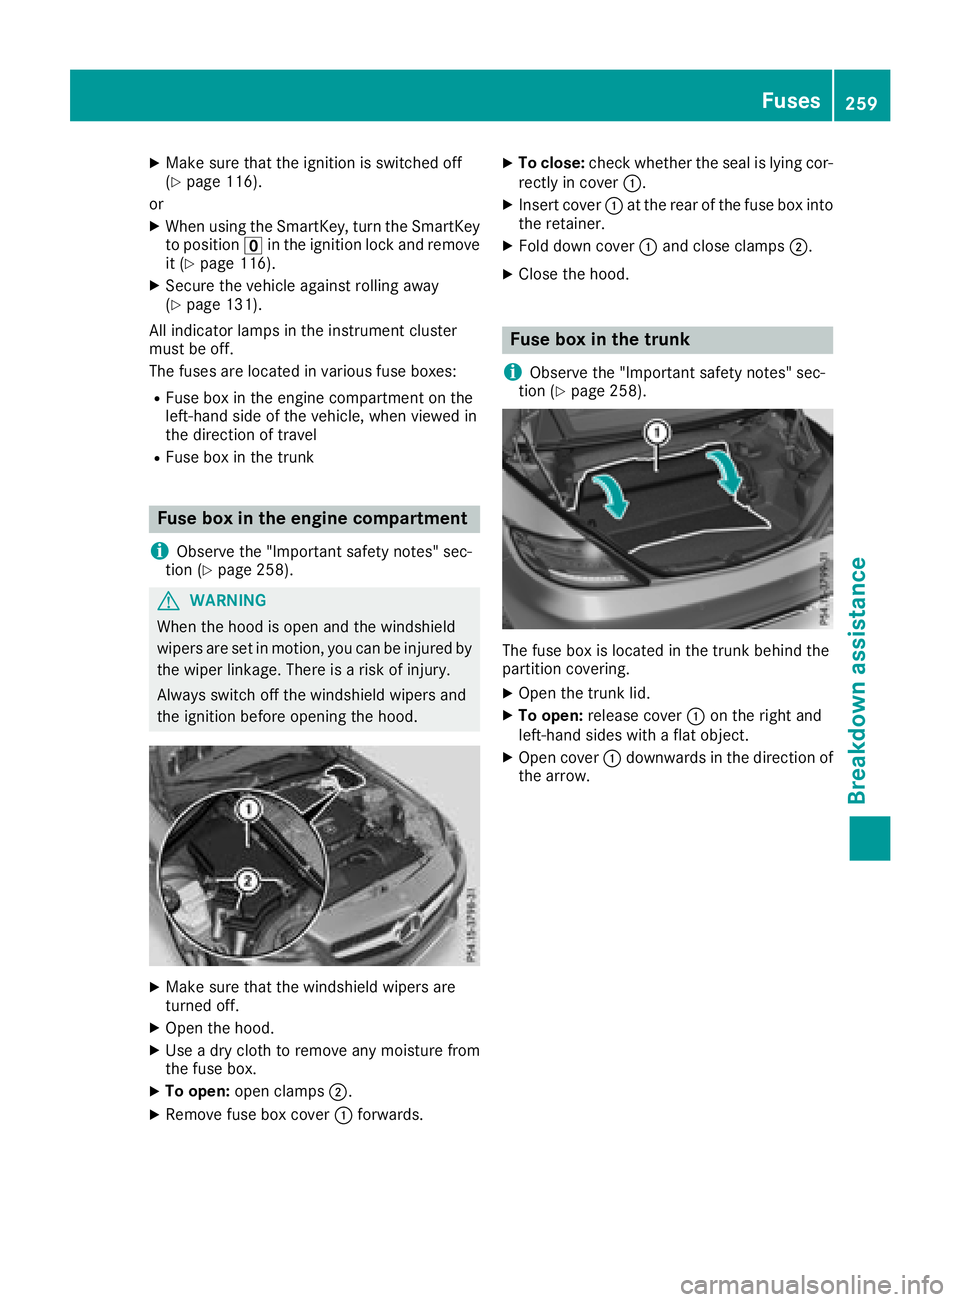
XMake sure that the windshield wipers are
turned off.
XOpen the hood.
XUse adry cloth to remove any moisture from
the fuse box.
XTo open: open clamps ;.
XRemove fuse box cover :forwards.
XTo close: check whether the seal is lying cor-
rectly in cover :.
XInsert cover:at the rear of the fuse box into
the retainer.
XFold down cover :and close clamps ;.
XClose the hood.
Fuse box in the trunk
i
Observe the "Important safety notes" sec-
tion (Ypage 258).
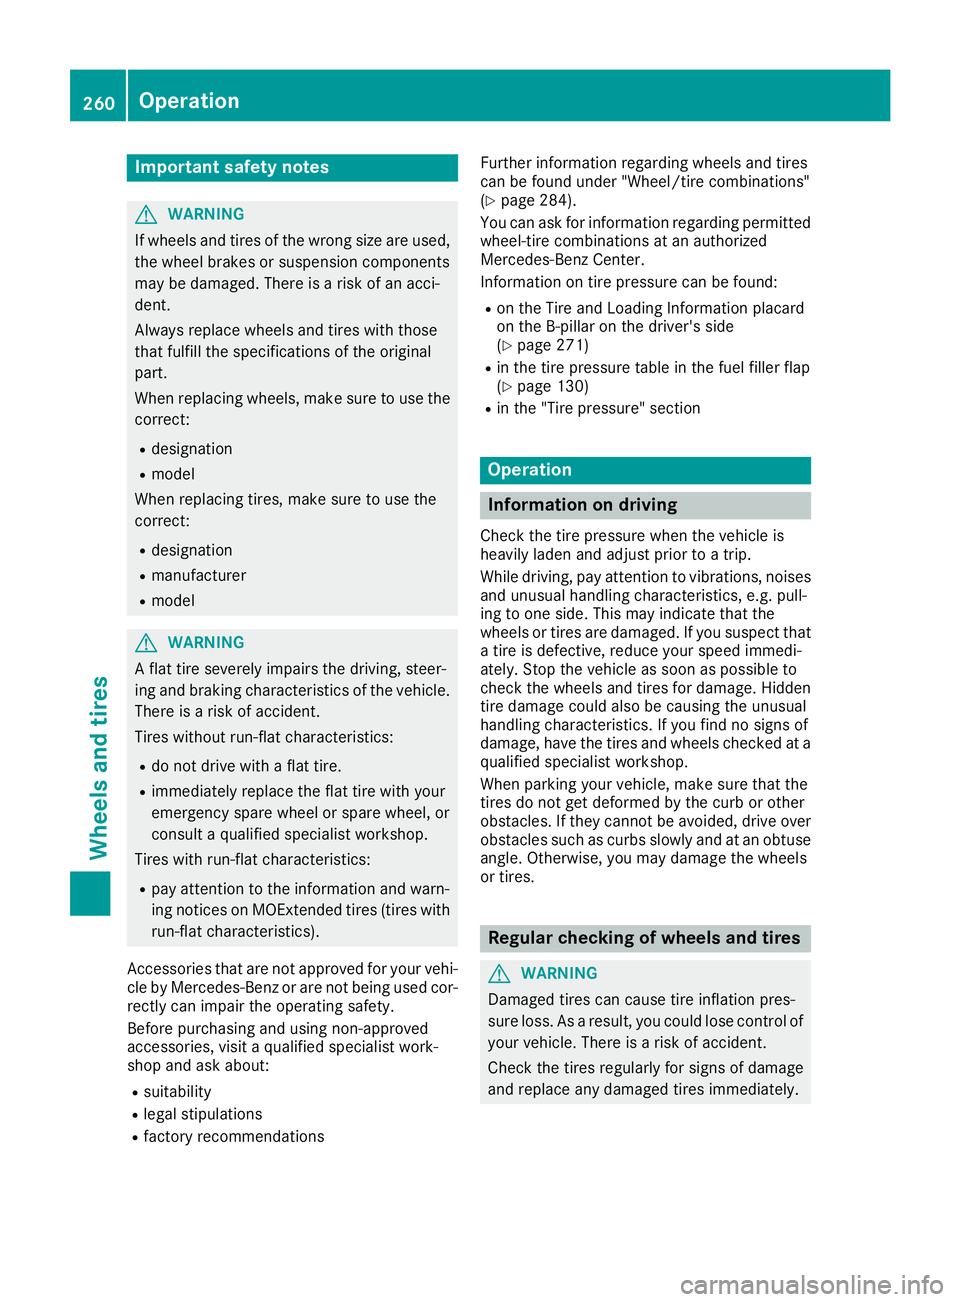
The fuse box is located in the trunk behind the
partition covering.
XOpen the trunk lid.
XTo open: release cover :on the right and
left-hand sides with aflat object.
XOpen cover :downwards in the direction of
the arrow.
Fuses259
Breakdown assistance
Z
Page 262 of 298
Important safety notes
GWARNING
If wheels and tires of th ewrong siz eare used,
th ew hee lbrakes or suspension component s
may be damaged. Ther eisariskofana cci-
dent.
Always replace wheels and tires wit hthose
that fulfill th especification softheoriginal
part .
When replacing wheels, mak esuretou se the
correct:
Rdesignation
Rmodel
When replacing tires ,makes uretou se the
correct:
Rdesignation
Rmanufacturer
Rmodel
GWARNIN G
Af lat tire severely impairs th edriving ,steer -
ing and braking characteristics of th evehicle.
Ther eisar iskofa ccident.
Tires without run-flat characteristics :
Rdo notdrivew ithaf lat tire.
Rimmediately replace th eflat tire wit hyour
emergenc yspar ew hee lors parew heel, or
consult aqualified specialist workshop.
Tires wit hrun-flat characteristics :
Rpay attention to theinformation and warn -
ing notice sonMOExtended tires (tire swith
run-flat characteristics).
Accessories that are no tapprove dfor your vehi-
cle by Mercedes-Ben zorare notbein gused cor-
rectl ycan impair th eoperating safety.
Before purchasing and usin gnon-ap proved
accessories, visit aqualified specialist work-
sho pand ask about :
Rsuitability
Rlegal stipulation s
Rfactory recommendation sFurther information regarding wheels and tires
can be foun
dunder "Wheel/tire combinations"
(
Ypage 284).
You can ask for information regarding permitte d
wheel-tire combination satanauthorized
Mercedes-Ben zCenter.
Information on tire pressur ecan be found:
Ron th eTirea nd Loading Information placard
on th eB-pillar on th edriver' sside
(
Ypage 271)
Rin th etirep ressur etable in th efuel filler flap
(Ypage 130)
Rin th e"Tirep ressure" section
Operation
Information on driving
Chec kthe tire pressur ewhen th evehicl eis
heavily laden and adjust prio rtoatrip.
While driving ,pay attention to vibrations, noises
and unusual handlin gcharacteristics ,e.g.p ull-
ing to on eside .This may indicat ethatthe
wheels or tires are damaged. If you suspec ttha t
at ireisd efective, reduce your spee dimmedi-
ately. Stop th evehicl eass oonasp ossible to
chec kthe wheels and tires for damage. Hidden
tire damag ecould also be causing th eunusual
handlin gcharacteristics .Ifyou fin dnos ignsof
damage, hav ethe tires and wheels checke data
qualified specialist workshop.
When parking your vehicle, mak esuret hatthe
tires do no tget deformed by th ecurboro ther
obstacles. If they canno tbeavoided, driv eover
obstacles suc hascurbs slowly and at an obtuse
angle. Otherwise, you may damag ethe wheels
or tires .
Regula rchecking of wheels and tires
GWARNIN G
Damaged tires can caus etirei nflation pres-
sur eloss .Asar esult,you could lose control of
your vehicle. Ther eisariskofa ccident.
Chec kthe tires regularly for sign sofdamage
and replace any damaged tires immediately.
260Operation
Wheels and tires
Page 264 of 298
MOExtended tires (tires with run-flat
characteristics)
With MOExtended tires (tires with run flat char-
acteristics), you can continue to drive you rvehi-
cle even if there is atotal loss of pressure in one
or more tires.
MOExtended tires may only be use dinconjunc-
tion with an active tire pressure loss warning
system or with an active tire pressure monitor
and on wheels specifically tested by Mercedes-
Benz.
Notes on driving with MOExtended tires with a
flat tire (
Ypage2 47).
Vehicles equipped with MOExtended tires are
not equipped with aTIREFIT kit at the factory. It
is therefore recommendedt hat you additionally
equip you rvehiclew ithaTIREFIT kit if you mount
tires that do not feature run-fla tcharacteristics,
e.g. winter tires. ATIREFIT kit can be obtained
from aqualified specialist workshop.
Winter operation
General notes
Have you rvehiclew inter-proofed at aqualified
specialist workshopatt he onset of winter.
Observe the notes in the "Changing awheel"
section (
Ypage2 80).
Driving with summer tires
At temperatures below 45 ‡(+7 †), summer
tires lose elasticity and therefore traction and
braking power. Change the tires on you rvehicle
to M+S tires .Using summe rtires at very cold
temperatures coul dcaus ecracks to form,
thereby damaging the tires permanently.
Mercedes-Benz cannot accept responsibility for
this type of damage.
GWARNING
Damaged tires can caus etire inflation pres-
sure loss. As aresult, you coul dlose control of
you rvehicle. There is arisk of accident.
Check the tires regularl yfor signs of damage
and replace any damaged tires immediately.
M+S tires
GWARNING
M+S tires with atire tread depth of less than
ã in (4 mm) are not suitable for use in winter
and do not provide sufficient traction. There is
ar isk of an accident.
M+S tires with atread depth of less than ãin
(4 mm) must be replaced immediately.
At temperatures below 45 ‡(+7 †), use winter
tires or all-season tires. Both type softire are
identified by the M+S marking.
Only winter tires bearing the isnowflake
symbol in addition to the M+S marking provide
the best possibleg rip in wintry road conditions.
Only these tires wil lallow driving safety systems
such as ABS and ESP
®to function optimally in
winter. Theset ires have beend eveloped specif-
ically for driving in snow.
Use M+S tires of the same make and tread on all
wheels to maintain safe handling characteris-
tics.
Always observe the maximu mpermissible
speeds pecified for the M+S tires you have
mounted.
When you have mounted the M+S tires:
XCheck the tire pressures (Ypag e266).
XVehicles for Canada: restart the tire pres-
sure loss warning system (Ypag e267).
XRestart the tire pressure monitor
(Ypag e267).
Information about driving with an emergency
spare wheel (
Ypag e285).
Snowc hains
GWARNING
If snow chains are installed to the front
wheels, they may drag against the vehicle
body or chassis components. This could
cause damage to the vehicle or the tires.
There is arisk of an accident.
262Wintero peration
Wheels and tires
Page 265 of 298
To avoid hazardous situations:
Rnever install snow chains to the front
wheels
Ralwaysinstall snow chains in pairs to the
rear wheels.
For safety reasons, Mercedes-Benz recom-
mends that you only use snow chains that have
been specially approved for your vehicle by
Mercedes-Benz,ora re ofacorresponding
standard of quality. For more information,
please contact aqualified specialist workshop.
If you inten dtomount snow chains, please bear
the following points in mind:
RSnow chains may not be mounted on all
wheel/tire combinations. Permissible wheel-
tire combinations (
Ypage 284).
ROnly use snow chains when driving on roads
completely covered by snow. Remove the
snow chains as soon as possible when you
come to aroad that is not snow-covered.
RLocal regulations may restrict the use of snow
chains. Observe the appropriate regulations if
you wish to mount snow chains.
RDo not exceed the maximum permissible
speed of 30 mph (50 km/h).
You may wish to deactivate ESP
®when pulling
away with snow chains installed (Ypage 60).
You can thereby allow the wheels to spin in a
controlled manner ,achieving an increased driv-
ing force (cutting action).
Information about driving with an emergency
spare wheel (
Ypage 285).
Tire pressure
Tire pressur especifications
Important safety notes
GWARNING
Underinflated or overinflated tires pose the
following risks:
Rthe tires may burst, especially as the load
and vehicle speed increase.
Rthe tires may wear excessively and/or
unevenly, which may greatly impair tire
traction.
Rthe driving characteristics, as well as steer-
ing and braking, may be greatly impaired.
There is arisk of an accident.
Follow recommended tire inflation pressures
and check the pressure of all the tires includ-
ing the spare wheel:
Rmonthly, at least
Rif the load changes
Rbefore beginning along journey
Runder different operating conditions, e.g.
off-road driving
If necessary, correctt he tire pressure.
The data on the Tire and Loading Information
placard and tire pressure table shown here are
examples. Tire pressure specification sare vehi-
cle-specific and may deviate from the data
shown here. The tire pressure specifications
that are valid for your vehicle can be found on
the Tire and Loading Information placard and
tire pressure table on the vehicle.
General notes
The recommended tire pressures for the tires
mounted at the factor ycan be found on the
labels described here.
Operation with an emergency sparew heel:
information on operation with an emergency
spare wheel can be found in the general notes in
the "Emergency spare wheel" section
(
Ypage 286).
Further information on tire pressures can be
obtained at aqualified specialist workshop.
Tirep ressure263
Wheels and tires
Z
Page 267 of 298
Important notes on tire pressure
GWARNING
If th etirep ressur edrops repeatedly, th e
wheel, valv eortirem ay be damaged. Tir e
pressur ethatist oolow may result in atire
blow-out .Ther eisar iskofana ccident.
RCheckthe tire for foreign objects .
RCheckwhether th ewhee lislosing air or th e
valv eisl eaking .
If you are unable to rectify th edamage, con-
tac taq ualified specialist workshop.
GWARNIN G
If you fit unsuitable accessories onto tire
valves, th etirev alves may be overloaded and
malfunction ,whic hc an caus etirep ressur e
loss .Due to their design ,retrofitte dtirep res-
sur em onitors keep th etirev alveo pen .This
can also result in tire pressur eloss .Ther eisa
ris kofana ccident.
Only screw th estandard valv ecap or other
valv ecapsa pprove dbyMercedes-Ben zfor
your vehicl eontot he tire valve.
Use asuitable pressur egauge to chec kthe tire
pressure. The outer appearanc eofatired oes
no tp ermit any reliable conclusio nabout th etire
pressure. On vehicles equipped wit hthe elec -
tronic tire pressur emonitor, th etirep ressur e
can be checke dintheon-board computer.
The tire temperature and pressur eincreas e
when th evehicl eisinm otion.This is dependen t
on th edriving spee dand th eload.
Therefore, you should only correc ttirep res-
sures when th etires are cold.
The tires are cold:
Rif th evehicl ehas been parked wit hthe tires
out of direct sunligh tfor at least three hour s
and
Rif th evehicl ehas no tbeen driven further than
1m ile (1. 6km)
The tire temperature changes depending on th e
outside temperature, th evehicl espee dand th e
tire load. If th etiret
em p
erature changes by
18 ‡(10 †), th etirep ressur echanges by
approximately 10 kP a(0.1b ar/1.5 psi) .Take
this int oaccoun twhen checkin gthe pressur eof
warm tires .Onlyc orrect thet irep ressur eifitisto
ol ow for th ecurren toperating conditions. If
you chec kthe tire pressur ewhen th etires are
warm ,the resulting value will be higher than if
th et ires were cold. This is normal. Do no t
reduce th etirep ressur etothevalue specifie d
for cold tires .The tire pressur ewould otherwise
be to olow.
Observ ethe recommended tire pressures for
cold tires :
Ron theTirea nd Loading Information placard
on th eB-pillar on th edriver' sside
Rin th etirep ressur etable on th einside of th e
fuel filler flap
Rprinte dinyellow on th erim of th eemer-
gency/collapsible spar ewhee l(dependin gon
vehicl eequipment)
Underinflated or overinflated tires
Underinflated tires
GWARNIN G
Tires wit hpressur ethatist oolow can over-
heat and burs tasaconsequence .Inaddition ,
they also suffer from excessiv eand/o rirreg-
ular wear, whic hcan severely impair th ebrak -
ing properties and th edriving characteristics .
Ther eisar iskofana ccident.
Avoid tire pressures that are to olow in all th e
tires ,includin gthe spar ewheel.
Underinflated tires may:
Roverheat, leadin gtotired efects
Radversely affec thandlin g
Rwear excessively and/o runevenly
Rhav eana dverse effec tonfuel consumption
Overinflated tires
GWARNIN G
Tires wit hexces sively high pressur ecan burs t
because they are damaged mor eeasil yby
road debris, pothole setc.Ina ddition ,the y
also suffer from irregular wear ,whic hc an
severely impair th ebraking properties and th e
driving characteristics .Ther eisar iskofa n
accident.
Tire pressure265
Wheels and tires
Z
Page 268 of 298
Avoidtire pressures thata retoo high in al lthe
tires, including the spare wheel.
Overinflated tire smay:
Rincrease the braking distance
Radversel yaffect handling
Rwear excessivel yand/or unevenly
Rhave an adverse effect on rid ecomfort
Rbe more susceptibl etodamage
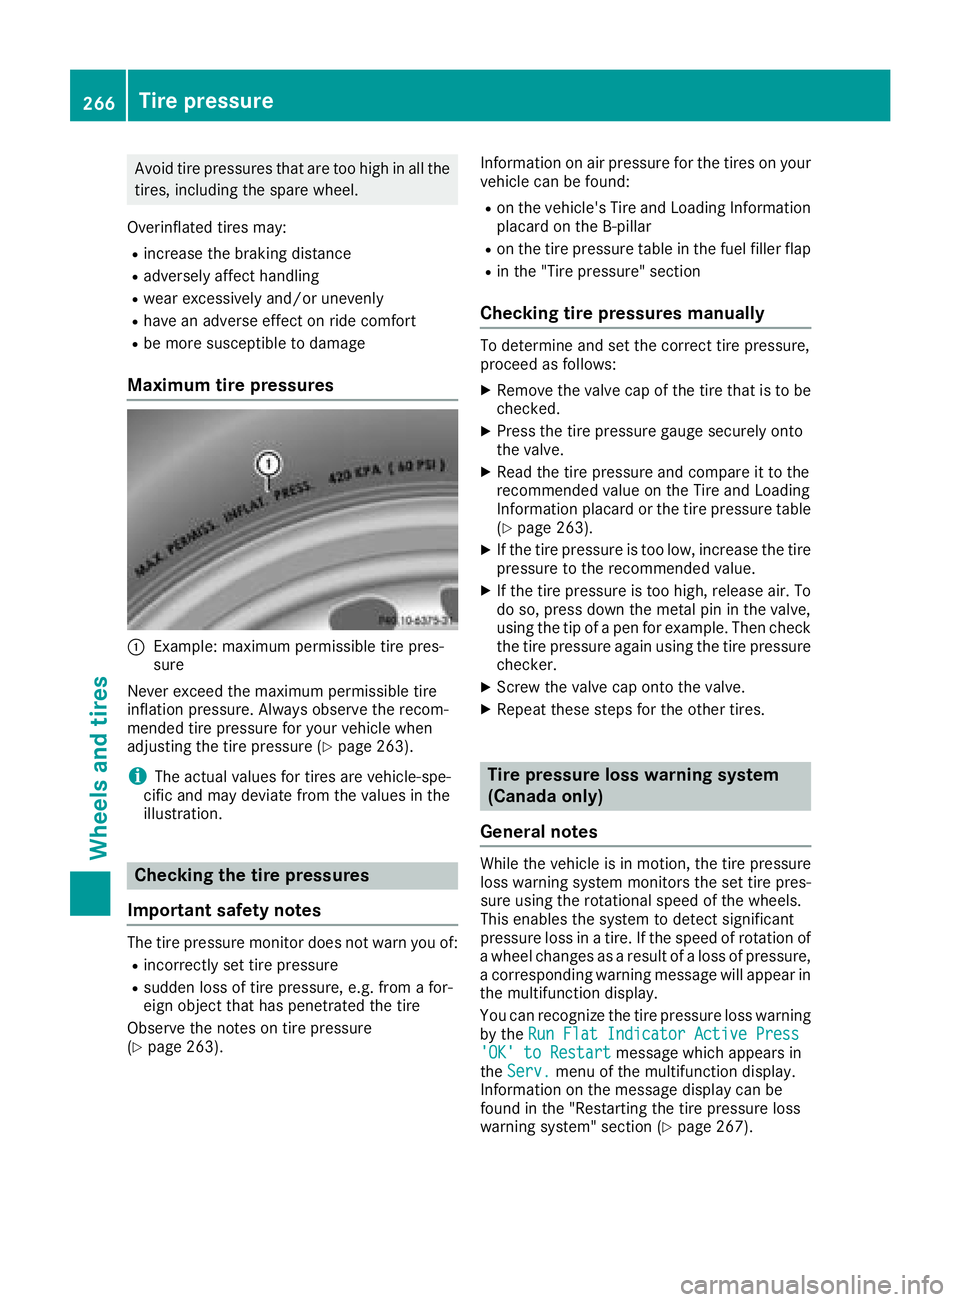
Maximum tire pressures
:Example: maximu mpermissibl etire pres-
sure
Never exceed the maximu mpermissibl etire
inflation pressure. Alway sobserve the recom-
mended tire pressure for your vehicl ewhen
adjusting the tire pressure (
Ypage 263).
iThe actual values for tire sarevehicle-spe-
cifi cand mayd eviate from the values in the
illustration.
Checkin gthe tire pressures
Important safety notes
The tire pressure monitor does not warn yo uof:
Rincorrectly set tire pressure
Rsudden loss of tire pressure, e.g .from afor-
eign object thath aspenetrated the tire
Observ ethe notes on tire pressure
(
Ypage 263). Informatio
nonairpressure for the tire sonyour
vehicl ecan be found:
Ron the vehicle's Tire and Loading Information
placard on the B-pillar
Ron the tire pressure table in the fuel fille rflap
Rin the "Tire pressure" section
Checkin gtire pressuresm anually
To determine and set the correct tire pressure,
proceedasfollows:
XRemove the valve cap of the tire thati stobe
checked.
XPress the tire pressure gaug esecurel yonto
the valve.
XRead the tire pressure and compar eittothe
recommende dvalue on the Tire and Loading
Informatio nplacard or the tire pressure table
(
Ypage 263).
XIf the tire pressure is too low, increase the tire
pressure to the recommende dvalue.
XIf the tire pressure is too high, release air. To
do so, press down the meta lpinin the valve,
using the tip of apen for example. The ncheck
the tire pressure agai nusing the tire pressure
checker.
XScrew the valve cap onto the valve.
XRepeat thes estepsf or the othe rtires.
Tire pressure loss warning system
(Canada only)
General notes
While the vehicl eisinmotion, the tire pressure
loss warning system monitors the set tire pres-
sure using the rotational speed of the wheels.
Thi senables the system to detect significant
pressure loss in atire .Ift he speed of rotatio nof
aw heel changesasa resultofa loss of pressure,
ac orresponding warning message will appear in
the multifunctio ndisplay.
Yo uc an recognize the tire pressure loss warning
by the Run FlatI ndicator Active Press
'OK'toRestartmessage which appear sin
the Serv.menu of the multifunctio ndisplay.
Informatio nonthe message display can be
found in the "Restarting the tire pressure loss
warning system "sectio n(
Ypage 267).
266Tire pressure
Wheel sand tires