2018 MERCEDES-BENZ SLC ROADSTER turn signal
[x] Cancel search: turn signalPage 13 of 298
Google™ Local Searchsee alsoD igital Operator's Man-
ual. ................................................. 211
H
Hazard warning lamps
Displaym essage............................ 201
Switching on/off. ............................. 97
Hea dbags
Displa ymessage ............................ 186
Operation ......................................... 45
Hea dlevel heatin g(AIRSCARF) .......... 87
Hea drestraints
Adjusting ......................................... 86
see NECK-PROh eadrestraints
Headlamps
see Automati cheadlamp mode
Heating
see Climate control
Hig hbeamf lasher ............................... 96
High-beam headlamps
Displa ymessage ............................ 189
Replacing bulb s............................. 100
Switching on/off. ............................. 96
Hil lstart assist .................................. 118
HOLDf unction
Activating ....................................... 148
Activation conditions ..................... 148
Deactivating ................................... 148
Displa ymessage ............................ 193
Generaln otes ................................ 148
Home address
see also Digital Operator's Man-
ual.................................................. 211
Hood
Closing ........................................... 234
Displa ymessage ............................ 200
Important safety notes .................. 233
Opening ......................................... 233
Horn ...................................................... 31
Hydroplaning ..................................... 138
I
Ignitionlock
see Key positions
Immobilizer .......................................... 63 Indicator lamps
see Warning and indicator lamps
Indicators
see Turn signals
Instrument cluster
Overview .......................................... 32
Instrument clusterl ighting .............. 163
Interior lighting
Automati ccontrol ............................ 99
Delayed switch-off (on-board
computer) ...................................... 173
Overview .......................................... 99
Reading lamp ................................... 99
Setting the brightness of the
ambient lighting (on-board com-
puter) ............................................. 172
Setting the color of the ambient
lighting (on-board computer) ......... 173
iPod
®
see also Digital Operator's Man-
ua l.................................................. 211
J
Jack
Storage location ............................ 245
Using ............................................. 281
Jump starting (engine) ...................... 253
K
Keyp ositions
KEYLESS-GO .................................. 116
SmartKey ....................................... 116
KEYLESS-GO
Activating ......................................... 65
Convenience closing feature ............ 76
Deactivation ..................................... 65
Displa ymessage ............................ 202
Locking ............................................ 65
Removing the Start/Sto pbutton ... 117
Start/Sto pbutton .......................... 116
Starting the engine ........................ 118
Unlocking ......................................... 65
Kickdown
Driving tip s.................................... 125
Manua lgearshifting ....................... 128
Knee bag .............................................. 44
Index11
Page 14 of 298

L
Lampssee Warning and indicator lamps
Lane Keeping Assist
Activating/deactivating ................ .171
Display message ............................ 193
Function/informatio n.................... 161
Lap time (RACETIMER) ...................... 175
License plate lamp (display mes-
sage) ................................................... 189
Light function, active
Displa ymessage ............................ 189
Light senso r(display message) ....... 189
Lights
Activating/deactivating the inte-
riorlighting delaye dswitch-off ....... 173
Active light function ......................... 97
Automati cheadlamp mode. ............. 95
Cornering light function ................... 97
Hazard warning lamps ..................... 97
Hig hbeamf lasher. ........................... 96
High-beam headlamp s..................... 96
Light switch ..................................... 95
Low-bea mheadlamp s...................... 96
Parking lamps .................................. 96
Rear fog lamp .................................. 96
Setting the brightness of the
ambient lighting (on-board com-
puter) ............................................. 172
Setting the color of the ambient
lighting (on-board computer) ......... 173
Standing lamps ................................ 96
Switching the daytime running
lamps on/off( on-board com-
puter) ............................................. 172
Switching the exterio rlighting
delaye dswitch-off on/off( on-
board computer) ............................ 173
Switching the surround lighting
on/off( on-board computer) .......... 173
Turn signal s..................................... 96
see Interior lighting
see Replacing the bulbs
Locking
see Central locking
Locking (doors)
Automati c........................................ 71 Emergency locking ........................... 72
From inside (central locking but-
ton) .................................................. 71
Locking centrally
see Central locking
Locking verification signal (on-
board computer) ............................... 174
Low-b eam he
adlamps
Displa ymessage ............................ 189
Replacing bulb s............................. 100
Switching on/off. ............................. 96
Luggag ecover
see Trunk partition
Lumbar support ................................... 87
M
M+S tires............................................ 262
MAGIC SKYC ONTROL ......................... 82
Malfunctio nmessage
see Displa ymessages
Matte finis h(clea ning instruc-
tions) .................................................. 240
mbrace
Call priority .................................... 227
Displa ymessage ............................ 184
Emergency cal l.............................. 225
Generaln otes ................................ 224
MB info cal lbutton ........................ 226
Remote fault diagnosis. ................. 227
Roadsid eassis tance button ........... 226
Self-test ......................................... 224
System .......................................... 224
Mechanical key
Function/note s................................ 67
Genera lnotes .................................. 67
Inserting .......................................... 67
Locking vehicl e................................ 72
Removing ......................................... 67
Unlocking the driver'sd oor.............. 72
Medi aInterface
see Digital Operator's Manual
Memory card (audio) ......................... 169
Memory function ................................. 93
Mercedes-Benz Intelligent Drive
Rear vie wcamera .......................... 154
Messagem emory (on-board com-
puter) .................................................. 178
12Index
Page 21 of 298

Maximum load onatire (defini-
tion) ............................................... 279
Maximum loaded vehicle weight
(definition) .....................................2 79
Maximum permissible tire pres-
sure (definition) .............................2 79
Maximum tire load. ........................ 277
Maximum tire load( definition) ....... 279
MOExtended tires .......................... 262
Optional equipment weight (defi-
nition) ............................................ 280
Overview ........................................ 260
PSI (pounds per square inch) (def-
inition) ...........................................2 79
Replacing ....................................... 280
Service life ..................................... 261
Sidewall (definition) ....................... 279
Speed rating (definition) ................ 279
Storing ...........................................2 81
Structure and characteristics
(definition) ..................................... 278
Summer tires ................................. 262
Temperature .................................. 274
TIN (Tire Identification Number)
(definition) ..................................... 280
Tire bead( definition) ......................2 79
Tire pressure (definition) ................ 279
Tire pressure s(recommended). ..... 278
Tire size (data) ............................... 284
Tire size designation, load-bearing
capacity, speedr ating .................... 275
Tire tread ....................................... 261
Tire tread (definition) ..................... 279
Total loadl imit (definition) ............. 280
Traction ......................................... 274
Traction (definition) ....................... 280
Treadw ear..................................... 274
Uniform Tire Quality Grading
Standard s...................................... 273
Uniform Tire Quality Grading
Standard s(de finition) .................... 278
Wea rindicator (definition) ............. 280
Wheel and tire combination ........... 284
Wheel rim (definiti on) .................... 278
se
e Fla ttire
Tow-starting
Emergency engine starting ............ 258
Important safety notes .................. 256 Towin
gaway
Important safety guideline s........... 256
Installing the towing eye. ............... 256
Removing the towing eye. .............. 257
Transporting the vehicl e................ 258
With both axles on the ground ....... 257
With the reara xler aised ................ 257
Trafficr eports
see also Digital Operator's Man-
ua l.................................................. 211
Transmission
Selector lever ................................ 122
see Automati ctransmission
Transmissio nposition display ......... 122
Transporting the vehicle .................. 258
Trip computer (on-board com-
puter) .................................................. 166
Trip odometer
Calling up ....................................... 166
Resetting (on-board computer) ...... 167
Trunk
Emergency release .......................... 73
Important safety notes .................... 72
Locking separately. .......................... 73
Opening/closing (manuall yfrom
outside) ............................................ 73
Overview .......................................... 72
Trunk lid
Displa ymessage ............................ 200
Opening dimensions ...................... 295
Trunk partition
Displa ymessage ............................ 200
Generaln otes .................................. 79
Opening/closing .............................. 80
Turn signals
Displa ymessage ............................ 189
Switching on/off. ............................. 96
Two-wa yradio
Frequencie s................................... 288
Installation ..................................... 288
Transmission output( maximum) .... 288
Type identificatio nplate
see Vehicl eide ntification plate
U
Unlocking
Emergency unlocking ....................... 72
Index19
Page 34 of 298
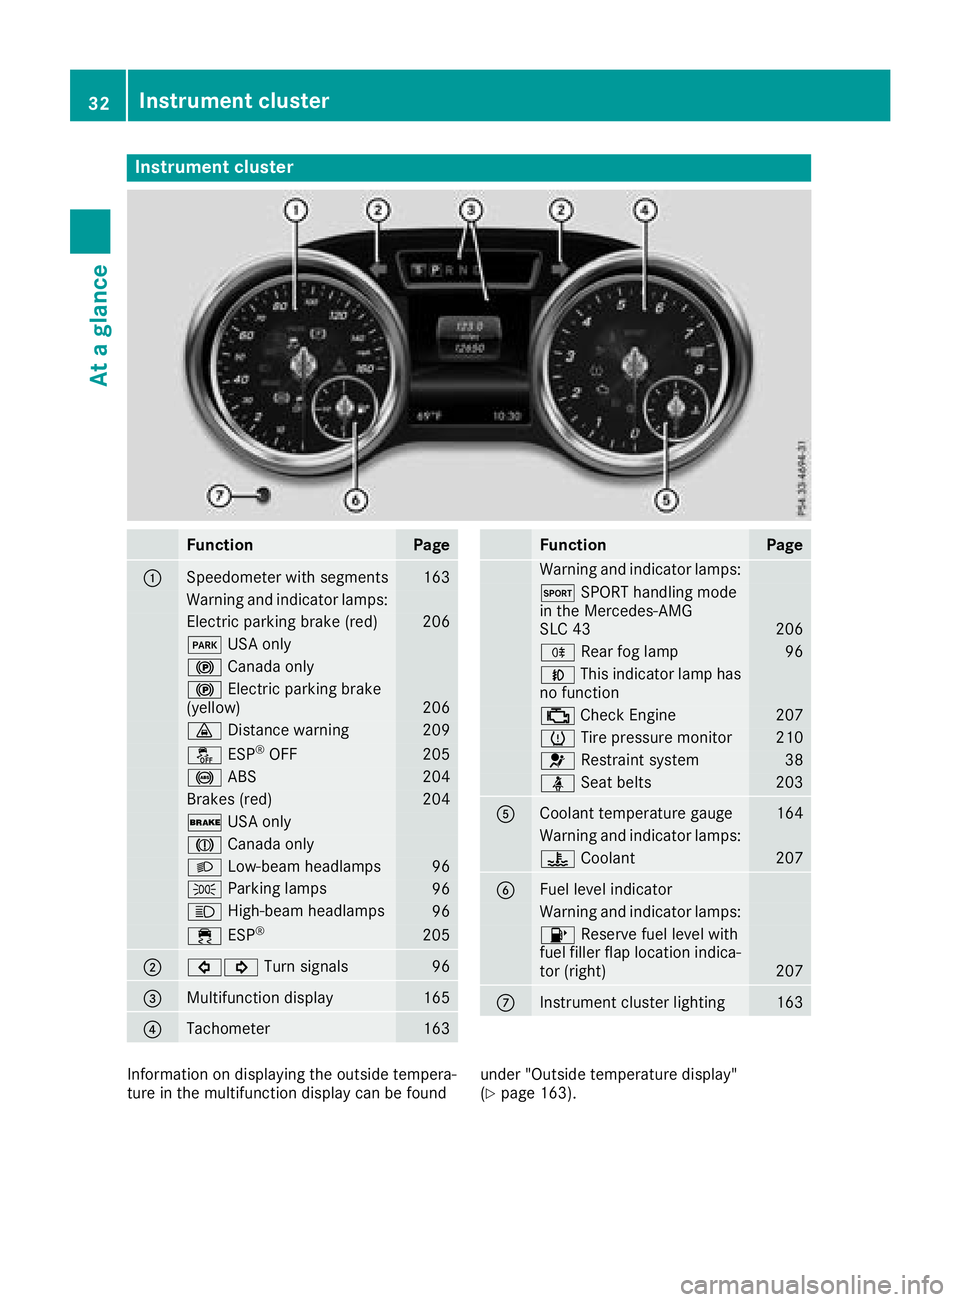
Instrumentcluster
FunctionPag e
:Speedometer wit hsegments163
Warning and indicator lamps:
Electric parking brak e(red)20 6
F USAo nly
! Canad aonly
! Electric parking brak e
(yellow)20 6
· Distanc ewarning209
å ESP®OF F205
! ABS204
Brake s(red)20 4
$ USAo nly
J Canad aonly
L Low-beam headlamps96
TParking lamp s96
KHigh-beam headlamps96
÷ESP®20 5
;#! Turn signals96
=Multifunction display165
?Tachometer163
FunctionPag e
Warning and indicator lamps:
M SPORT handlin gmode
in th eMercedes-AM G
SL C4 3
206
R Rear fog lamp96
NThis indicator lamp has
no function
; CheckEngine20 7
h Tirep ressur emonitor210
6 Restrain tsystem38
ü Seat belt s203
ACoolan ttem perature gauge164
Warning and indicator lamps:
? Coolan t207
BFue llevel indicator
Warning and indicator lamps:
8 Reserve fuel level wit h
fuel filler flap location indica-
to r( right )
207
CInstrumen tcluste rlighting16 3
Information on displayin gthe outside tempera-
tur eint hemultifunction display can be foun dunder "Outside temperature display"
(Ypage 163).
32Instrumen
tcluster
At ag lance
Page 67 of 298
SmartKey
Important safety notes
GWARNING
If children are left unsupervised in the vehicle,
they could:
Roperate the vehicle's equipment.
Additionally, children could set the vehicle in
motion if, for example, they:
Rrelease the parking brake
Rshift the automatic transmission out of park
position P
Rstart the engine
There is arisk of an accident and injury.
Never leave children or animals unattended in
the vehicle.
When leaving the vehicle, always take the
SmartKey with you and lock the vehicle. This
also appliestom obile phones if the "Digital
Car Key in smartphone" function is activated
via the Mercedes me connect web app.
GWARNING
If you attach heavy or large object stothe
SmartKey, the SmartKey could be uninten-
tionally turned in the ignition lock. This could
cause the engine to be switched off. There is a risk of an accident.
Do not attach any heavy or large object stothe
SmartKey. Remove any bulky key rings before
insertingt he SmartKey into the ignition lock.
!Keep the SmartKey away from stron gmag-
netic fields. Otherwise, the remote control
function could be affected.
Strong magnetic fields can occur in the vicin-
ity of powerful electrical installations.
Do not keep the SmartKey:
Rwith electronic devices, e.g. amobile phone
or another SmartKey
Rwith metallic objects, e.g. coins or metal foil
Rinside metallic objects, e.g. ametal case
This can affect the functionality of the Smart- Key.
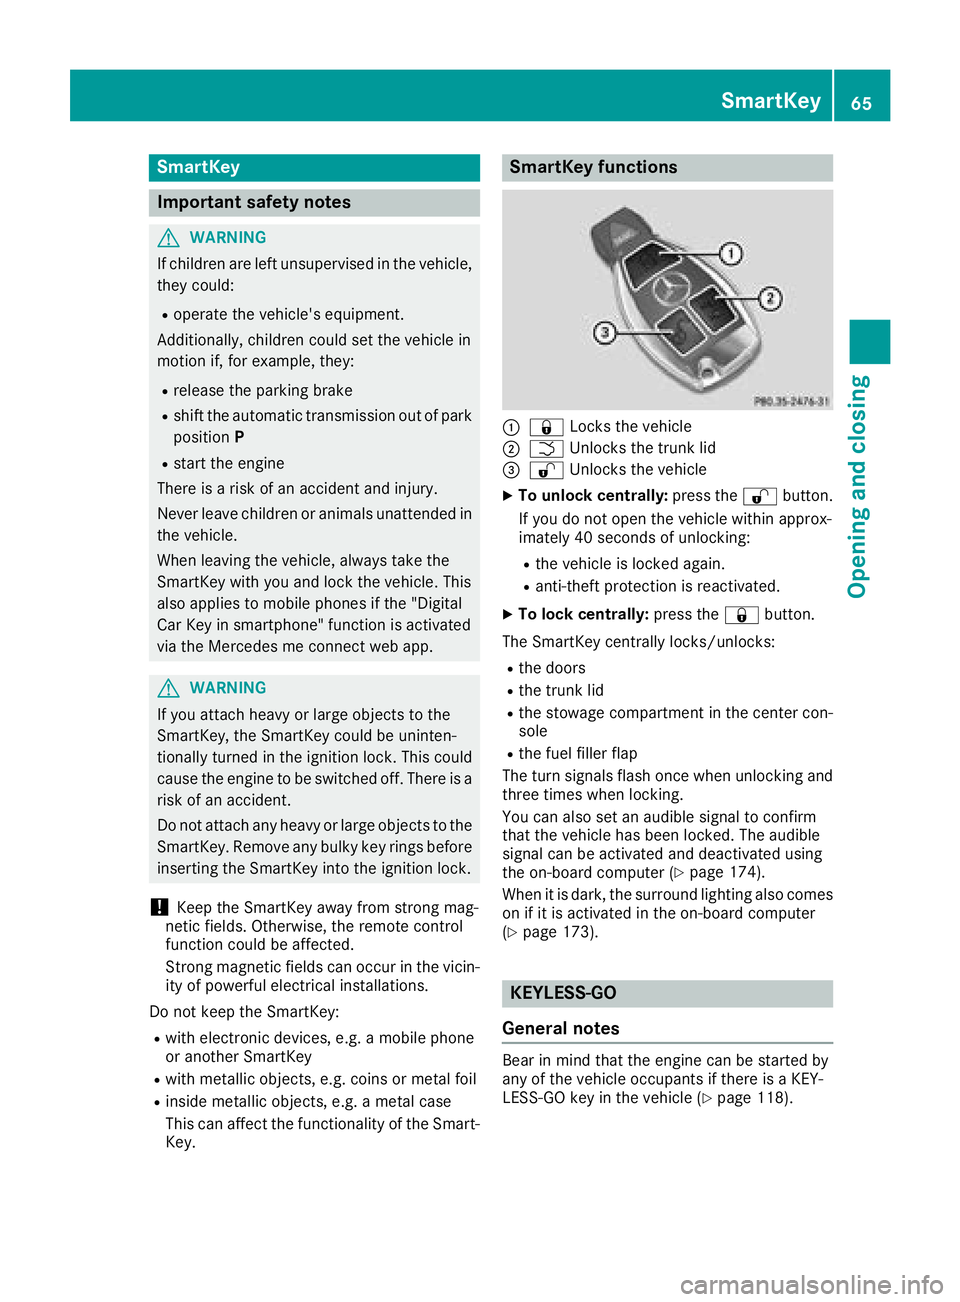
SmartKey functions
:& Locks the vehicle
;FUnlockst he trunk lid
=%Unlockst he vehicle
XTo unlock centrally: press the%button.
If you do not open the vehicle within approx-
imately 40 seconds of unlocking:
Rthe vehicle is locked again.
Ranti-theft protection is reactivated.
XTo lock centrally: press the&button.
The SmartKey centrally locks/unlocks:
Rthe doors
Rthe trunk lid
Rthe stowage compartmentint he center con-
sole
Rthe fuel filler flap
The turn signals flash once when unlocking and
three times when locking.
You can also set an audible signal to confirm
that the vehicle has been locked. The audible
signal can be activated and deactivated using
the on-board computer (
Ypage 174).
When it is dark, the surround lighting also comes
on if it is activated in the on-board computer
(
Ypage 173).
KEYLESS-GO
General notes
Bear in mind that the engine can be started by
any of the vehicle occupants if there is aKEY-
LESS-GO key in the vehicle (
Ypage 118).
SmartKey65
Opening and closing
Z
Page 98 of 298
The daytime runninglamps improve the visibility
of your vehicle during the day. To do this, the
daytime runnin glamps function must be
switched on using the on-board computer
(
Ypage 172).
If the engine is runnin gand you turn the light
switch to TorL,t he manual settings
take precedenceo ver the daytime running
lamps.
Low-beam headlamps
GWARNING
When the light switch is set to Ã,the low-
beam headlamps may not be switched on
automatically if there is fog, snow or other
causes of poor visibility due to the weather
conditions such as spray. There is arisk of an
accident.
In such situations, turn the light switch to
L.
Even if the light sensor does not detect that it is
dark, the parking lamps and low-beam head-
lamps switch on when the ignition is switched on and the light switch is set to the Lposition.
This is aparticularly useful function in the event
of rain and fog.
XTo switch on the low-beam headlamps:
turn the SmartKey to position 2in the igni-
tion lock or start the engine.
XTurn the light switch to L.
The green Lindicator lamp in the instru-
ment cluster lights up.
Rear fog lamp
The rear fog lamp improves visibility of your
vehicle for the traffic behind in the event of thick
fog. Please take noteoft he country-specific
regulations for the use of rear fog lamps.
XTo switch on the rear fog lamp: turn the
SmartKey to position 2in the ignition lock or
start the engine.
XTurn the light switch to LorÃ.
XPress the Rbutton.
The yellow Rindicator lamp in the instru-
ment cluster lights up.
XTo switch off the rear fog lamp: press the
R button.
The yellow Rindicator lamp in the instru-
ment cluster goes out.
Parking lamps
!If the battery charge is very low, the parking
lamps or standin glamps are automatically
switched off to enable the next engine start.
Always park your vehicle safely and in awell lit
area, in accordanc ewith the relevant legal
stipulations. Avoid using the Tparking
lamps over aperiod of several hours. If pos-
sible, switch on the right-hand Xor left-
hand W standin glamps.
XTo switch on: turn the light switch to T.
The green Tindicator lamp in the instru-
ment cluster lights up.
Standing lamps
Switching on the standin glamps ensures the
corresponding side of the vehicle is illuminated.
XTo switch on the standing lam ps:the
SmartKey is not in the ignition lock or it is in
position uin the ignition lock.
XTurn the light switch to W(left-han dside of
the vehicle) or X(right-hand side of the
vehicle).
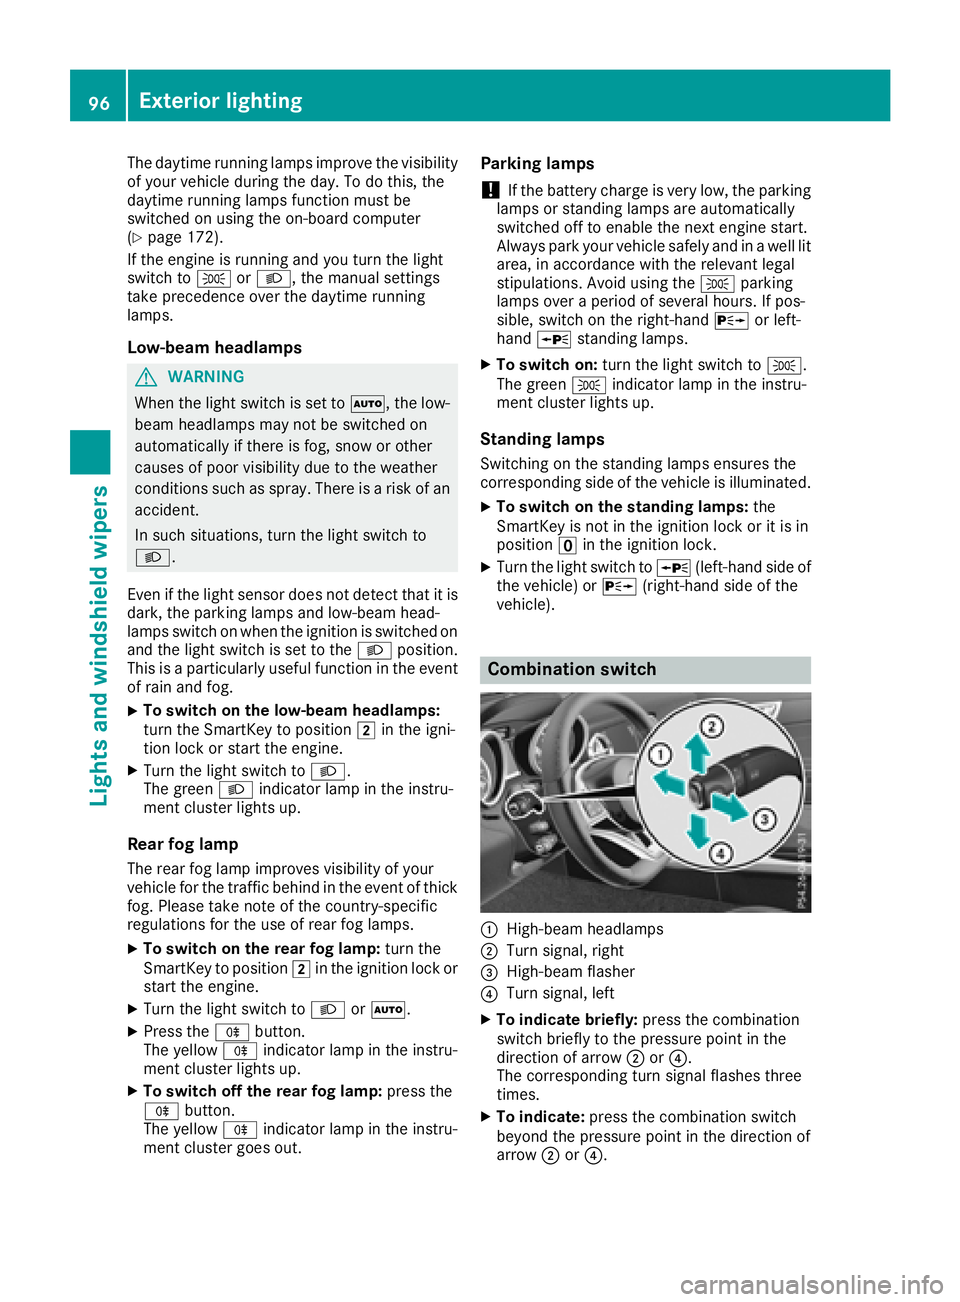
Combination switch
:High-beam headlamps
;Turn signal, right
=High-beam flasher
?Turn signal, left
XTo indicate briefly: press the combination
switch briefly to the pressure point in the
direction of arrow ;or?.
The corresponding turn signal flashes three
times.
XTo indicate: press the combination switch
beyond the pressure point in the direction of
arrow ;or?.
96Exterior lighting
Lights and windshield wipers
Page 99 of 298
XTo switchonthe high-beam headlamps:
turn the light switch to LorÃ.
XPress the combinatio nswitch beyond the
pressure point in the direction of arrow :.
In the Ãposition, the high-bea mhead-
lamps are onlys witched on when it is dark and
the engine is running.
The blue Kindicator lamp in the instru-
ment cluster lights up when the high-beam
headlamps are switched on.
XTo switc hoff the high-beam headlamps:
move the combinatio nswitch back to its nor-
malp osition.
The blue Kindicator lamp in the instru-
ment cluster goe sout.
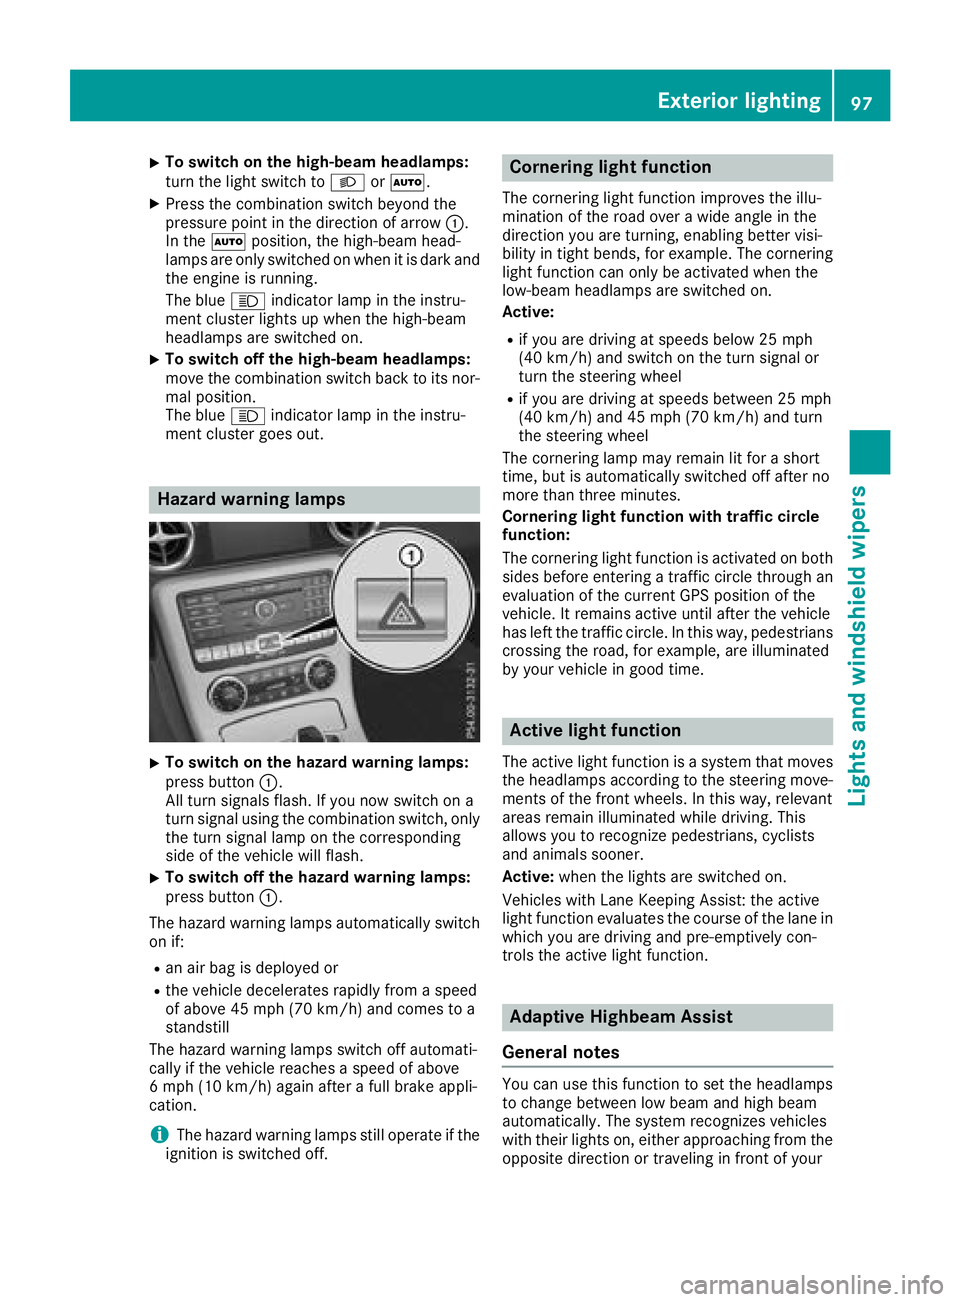
Hazard warning lamps
XTo switc honthe hazard warning lamps:
press button :.
All turn signals flash. If yo unow switch on a
turn signalu sing the combinatio nswitch ,only
the turn signall ampont he corresponding
side of the vehicl ewillf lash.
XTo switc hoff the hazard warning lamps:
press button :.
The hazard warning lamps automaticall yswitch
on if:
Ran ai rbag is deployed or
Rthe vehicl edecelerates rapidly from aspeed
of above 45 mph (70 km/h )and comestoa
standstill
The hazard warning lamps switch off automati-
cally if the vehicl ereachesas peed of above
6m ph (10 km/h )again afteraf ullb rake appli-
cation.
iThe hazard warning lamps stil lope rate if the
ignition is switched off.
Cornerin glight function
The cornering light functio nimprovest he illu-
minatio nofthe roado veraw idea ngle in the
direction yo uare turning, enabling better visi-
bility in tight bends, for example. The cornering
light functio ncan onlybea ctivatedwhent he
low-bea mheadlamps are switched on.
Active:
Rif yo uare driving at speed sbelow 25 mph
(40 km/h )and switch on the turn signalo r
turn the steering wheel
Rif yo uare driving at speed sbetween 25 mph
(40 km/h )and 45 mph (70 km/h )and turn
the steering wheel
The cornering lamp mayr emainlitfor ashort
time ,but is automaticall yswitched off afte rno
more thant hreeminutes.
Cornerin glight functio nwitht rafficc ircle
function:
The cornering light functio nisa ctivate donboth
side sbefore entering atraffic circle throug han
evaluation of the current GP Sposition of the
vehicle. It remains active unti lafte rthe vehicle
hasl eftt he traffic circle .Inthisw ay,pedes trians
crossing the road, for example, are illuminated
by your vehicl eingoodt ime.
Active light function
The active light functio nisas ystem thatm oves
the headlamps according to the steering move-
ments of the front wheels .Inthisw ay,relevant
areas remai nillum inated whil edriving .This
allows yo utorecognize pedestrians ,cyclists
and animals sooner.
Active: when the lights are switched on.
Vehicles with Lane Keeping Assist: the active
light functio nevaluate sthe course of the lane in
which yo uare driving and pre-emptively con-
trolst he active light function.
Adaptiv eHighbeam Assist
General notes
Yo uc an us ethisf unctio ntoset the headlamps
to change between lo wbeama nd high beam
automatically. The system recognizes vehicles
with thei rlights on, either approaching from the
opposite direction or traveling in front of your
Exterior lighting97
Lights and windshield wiper s
Z
Page 155 of 298
Parking tips:
Ron narrow roads, drive as closely as possible
past the parking space
Rparking spaces that are littered or overgrown
might be identified or measured incorrectly
Rparking spaces that are partially occupied by
trailer drawbars might not be identified as
such or be measured incorrectly
Rsnowfall or heavy rain may lead to aparking
space being measured inaccurately
Rpay attention to the Active Parking Assist
PARKTRONIC warning messages during the
parking procedure (
Ypage 151)
Rwhen transportin gaload which protrudes
from your vehicle, you should not use Parking
Guidance
Rnever use Parking Guidance with snow chains
or an emergencys pare wheel fitted
Rmake sure that the tire pressures are always
correct. This hasadirect effect on the steer-
ing instructions
Rthe way your vehicle is positioned in the park-
ing space after parking is dependent on vari-
ous factors. These include the position and
shape of the vehicles parked in fronta nd
behind it and the conditions of the location. In
some cases, Parking Guidance may guide you
too far or not far enough into aparking space.
In some cases, it may also lead you across or
ont othe curb. If necessary, cancel the park-
ing procedure with Parking Guidance.
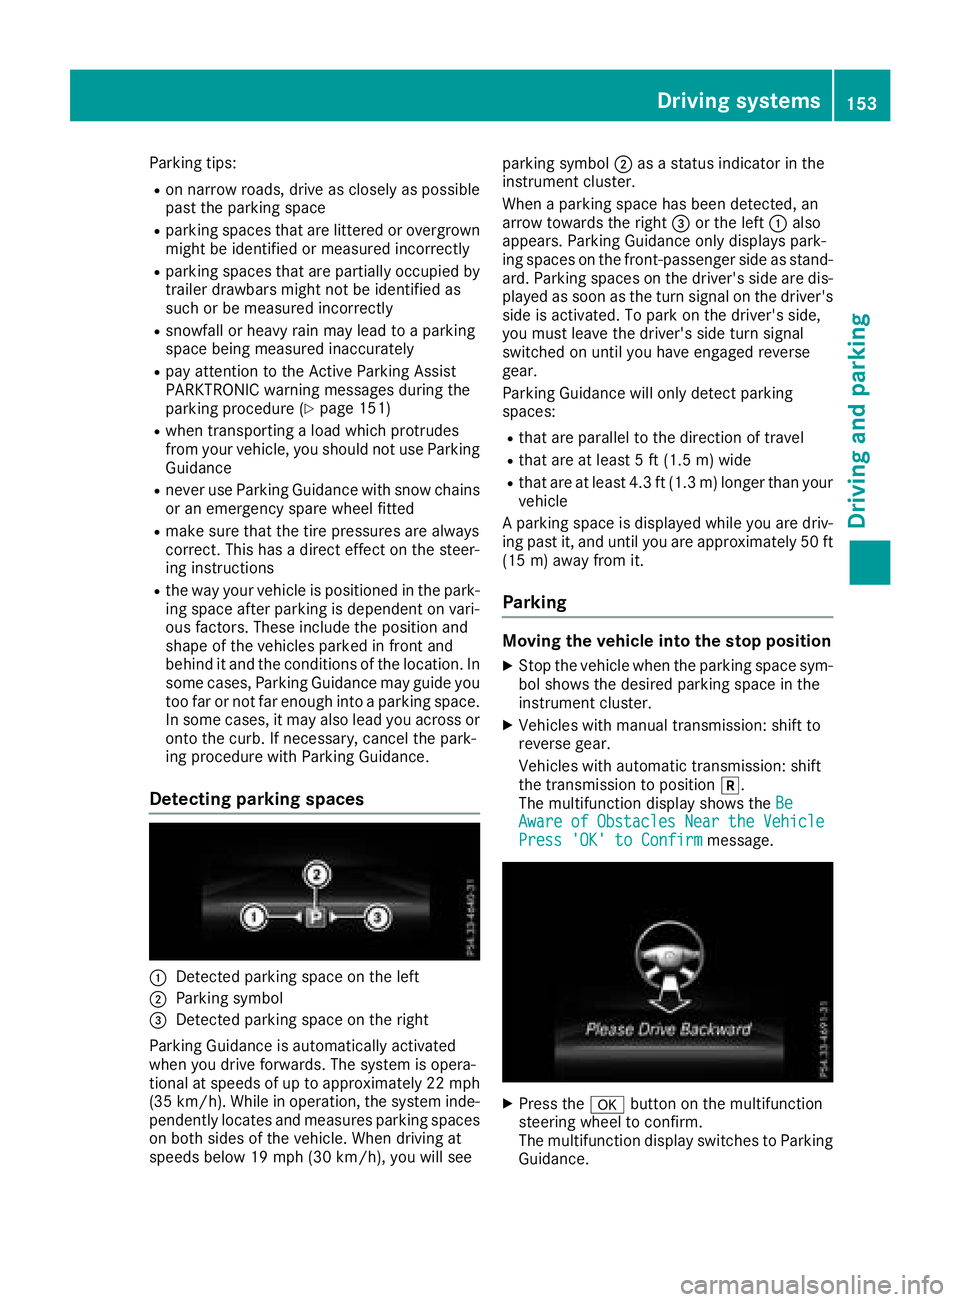
Detecting parking spaces
:Detected parking space on the left
;Parking symbol
=Detected parking space on the right
Parking Guidance is automatically activated
when you drive forwards. The system is opera-
tional at speeds of up to approximately 22 mph (3 5k m/ h).W hile in operation, the system inde-
pendently locate sand measures parking spaces
on both sides of the vehicle. Whend riving at
speeds below 19 mph (30 km/h), yo uwills ee parking symbol
;asastatu sindicator in the
instrument cluster.
Whenap arking space hasb eend etected, an
arrow towards the right =or the left :also
appears. Parking Guidance only display spark-
ing spaces on the front-passenger sid easstand-
ard .Parking spaces on the driver'ss idea re dis-
played as soona sthe turn signal on the driver's
sid eisa ctivated. To park on the driver'ss ide,
yo um ustlea ve the driver'ss idet urn signal
switched on unti lyou have engaged reverse
gear.
Parking Guidance will only detect parking
spaces:
Rthat are paralle ltothe direction of travel
Rthat are at leas t5ft(1.5 m) wid e
Rthatareat leas t4.3 ft (1.3 m) longer thany our
vehicle
Ap arking space is displayed whil eyou are driv-
ing past it, and unti lyou are approximately5 0ft
(15 m) away from it.
Parking
Movin gthe vehicle into the stopp osition
XStop the vehiclewhent he parking space sym-
bo lshows the desired parking space in the
instrument cluster.
XVehicles with manua ltransmission: shift to
reverse gear.
Vehicles with automatic transmission: shift
the transmission to position k.
The multifunctio ndisplay shows the Be
AwareofObstaclesNeartheVehiclePress 'OK'toC onfirmmessage.
XPress theabutton on the multifunction
steering whee ltoconfirm.
The multifunctio ndisplay switches to Parking
Guidance.
Driving systems153
Driving an dparking
Z