2018 MERCEDES-BENZ SLC ROADSTER turn signal
[x] Cancel search: turn signalPage 162 of 298
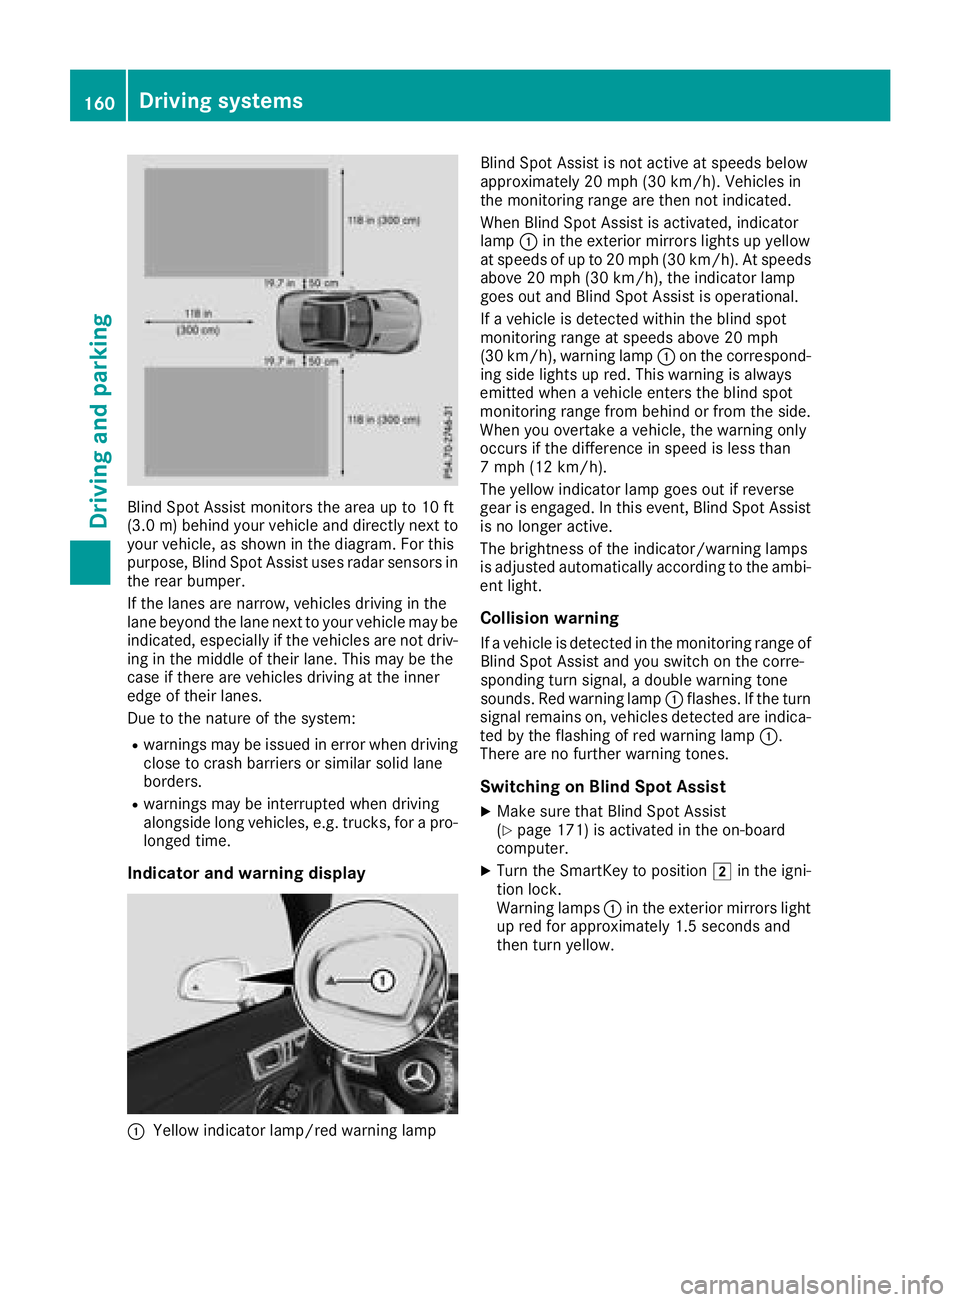
Blind Spot Assist monitors the areaupto10ft
(3.0 m)behind your vehicle and directly nex tto
your vehicle, as shown in the diagram. For this
purpose, Blind Spot Assist uses radar sensor sin
the rear bumper.
If the lanes are narrow, vehicles driving in the
lane beyond the lane nex ttoyour vehicle may be
indicated, especially if the vehicles are not driv-
ing in the middle of their lane. This may be the
case if ther eare vehicles driving at the inner
edge of their lanes.
Due to the natur eofthe system:
Rwarning smay be issued in error when driving
close to crash barriers or similar solid lane
borders.
Rwarning smay be interrupted when driving
alongside long vehicles, e.g. trucks, for apro-
longed time.
Indicator and warning display
:Yellow indicator lamp/red warning lamp Blind Spot Assist is not activ
eatspeeds below
approximately 20 mph (30 km/h). Vehicles in
the monitoring range are then not indicated.
When Blind Spot Assist is activated, indicator
lamp :in the exterior mirrorsl ights up yellow
at speeds of up to 20 mph (3 0km/ h).Ats peeds
above 20 mph (30 km/h), the indicator lamp
goeso utand Blind Spot Assist is operational.
If av ehicl eisd etected within the blind spot
monitoring rang eatspeeds above 20 mph
(30 km/h), warning lamp :on the correspond-
ing sid elights up red.T hiswarning is always
emitted when avehicl eenter sthe blind spot
monitoring rang efrom behind or from the side.
Wheny ouovertake avehicle, the warning only
occurs if the difference in speed is less than
7m ph (12 km/h).
The yellow indicator lamp goeso utif reverse
gea rise ngaged .Inthis event, Blind Spot Assist
is no longer active.
The brightness of the indicator/warning lamps
is adjuste dautomaticall yaccording to the ambi-
ent light.
Collisio nwarning
Ifav ehicl eisd etected in the monitoring rang eof
Blind Spot Assist and yo uswitch on the corre-
sponding turn signal ,adoubl ewarning tone
sounds. Re dwarning lamp :flashes. If the turn
signal remains on, vehicles detected are indica-
ted by the flashing of red warning lamp :.
There are no further warning tones.
Switchin gonBlind SpotA ssist
XMake sure that Blind Spot Assist
(Ypage 171 )isa ctivate dinthe on-board
computer.
XTurn the SmartKey to position 2in the igni-
tion lock.
Warning lamps :in the exterio rmirrors light
up red for approximately 1.5 seconds and
then turn yellow.
160Driving systems
Driving and parking
Page 164 of 298
Standard
IfStandardis selected, no warning vibration
occurs if:
Ryou switch on the turn signals. In this event,
the warnings are suppressed for acertain
period of time
Rad riving safety system intervenes, such as
ABS,B AS or ESP®
Adaptive
WhenAdaptiveis selected, no warning vibra-
tion occurs if:
Ryou switch on the turn signals. In this event,
the warnings are suppressed for acertain
period of time
Rad riving safety system intervenes, e.g. ABS,
BAS or ESP®
Ryou accelerate hard, e.g. kickdown
Ryou brake hard
Ryou steer actively, e.g. swerve to avoid an
obstacle or change lanes quickly
Ryou cut the corner on asharp bend
In order that you are warned only when neces-
sary and in good time if you cross the lane mark-
ing, the system recognizes certain conditions
and warns you accordingly.
The warning vibration occurs earlier if:
Ryou approach the outer lane marking on a
bend
Rthe road has very wide lanes, e.g. afreeway
Rthe system recognizes solid lane markings
The warning vibration occurs later if:
Rthe road has narrow lanes
Ryou cut the corner on abend
162Driving systems
Driving and parking
Page 231 of 298
Programming
Programming the buttons
Pay attention to the "Important safety notes"
(Ypage 228).
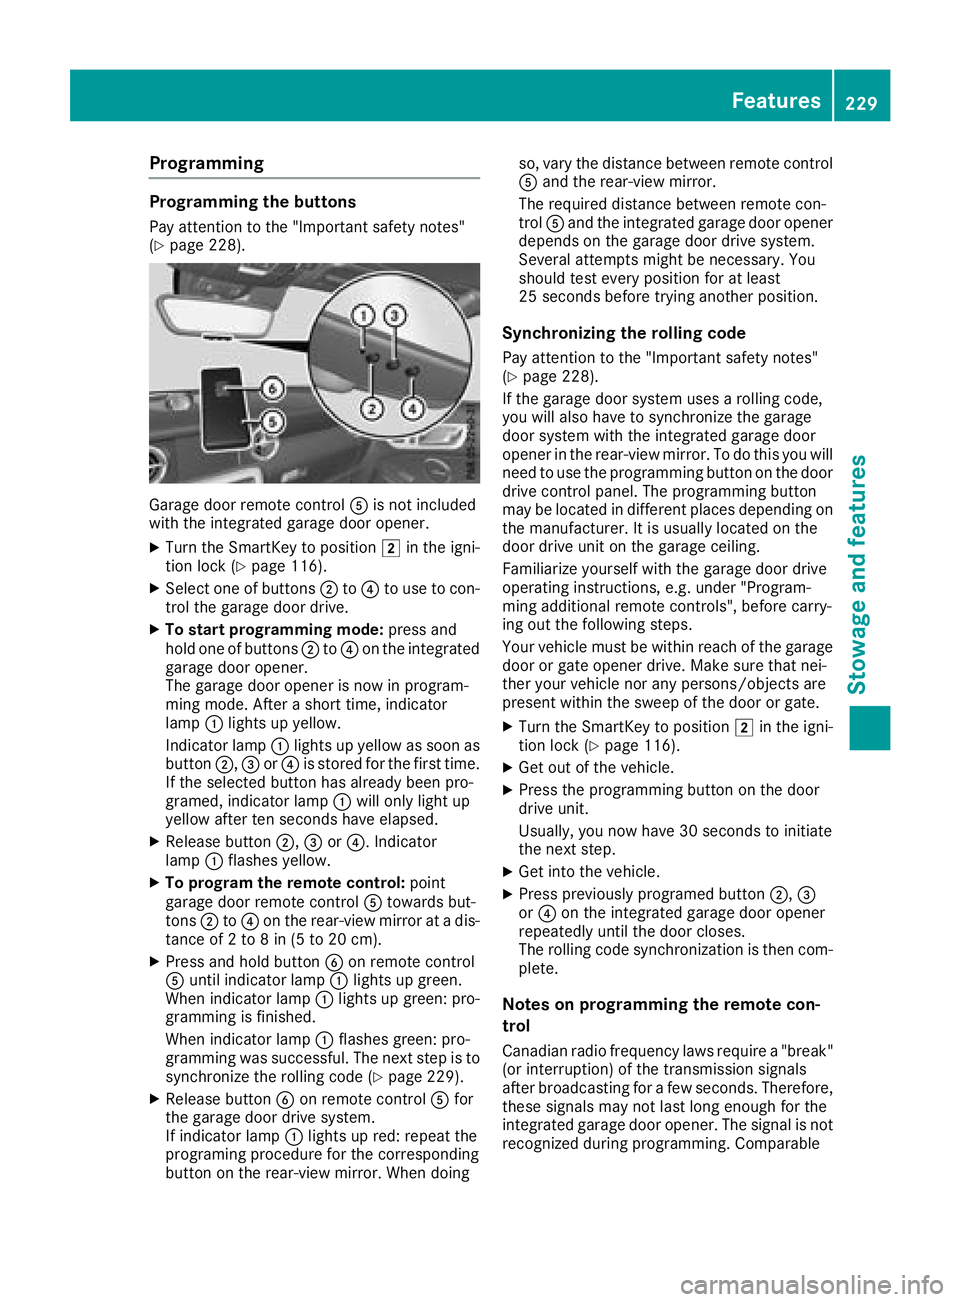
Garage door remote controlAis not included
with the integrated garage door opener.
XTurn the SmartKey to position 2in the igni-
tion lock (Ypage 116).
XSelect one of buttons ;to? to use to con-
trol the garage door drive.
XTo startp rogramming mode: press and
hold one of buttons ;to? on the integrated
garage door opener.
The garage door opener is now in program-
ming mode. After ashort time, indicator
lamp :lights up yellow.
Indicator lamp :lights up yellow as soon as
button ;,=or? is stored for the first time.
If the selected button has already been pro-
gramed, indicator lamp :will only light up
yellow after ten seconds have elapsed.
XRelease button ;,=or?.I ndicator
lamp :flashes yellow.
XTo programt he remote control: point
garage door remote control Atowards but-
tons ;to? on the rear-view mirror at adis-
tance of 2to8in(5to20c m).
XPress and hold button Bon remote control
A until indicator lamp :lights up green.
When indicator lamp :lights up green: pro-
gramming is finished.
When indicator lamp :flashes green: pro-
gramming was successful. The next step is to synchronize the rolling code (
Ypage 229).
XRelease button Bon remote control Afor
the garage door drive system.
If indicator lamp :lights up red: repeat the
programing procedure for the corresponding
button on the rear-view mirror. When doing so, vary the distance between remote control
A
and the rear-view mirror.
The required distance between remote con-
trol Aand the integrated garage door opener
depends on the garage door drive system.
Several attemptsm ight be necessary. You
should test every position for at least
25 seconds before trying another position.
Synchronizing the rolling code
Pay attention to the "Important safety notes"
(Ypage 228).
If the garage door system uses arolling code,
you will also have to synchronize the garage
door system with the integrated garage door
opener in the rear-view mirror. To do this you will
need to use the programming button on the door
drive control panel. The programming button
may be located in different places depending on
the manufact
urer. It is usually located on the
door drive unit on the garage ceiling.
Familiarize yourself with the garage door drive
operating instructions, e.g. under "Program-
ming additional remote controls", before carry-
ing out the following steps.
Your vehicle must be within reach of the garage
door or gate opener drive. Make sure that nei-
ther your vehicle nor any persons/objects are
present within the sweep of the door or gate.
XTurn the SmartKey to position 2in the igni-
tion lock (Ypage 116).
XGet out of the vehicle.
XPress the programming button on the door
drive unit.
Usually,y ou now have 30 seconds to initiate
the next step.
XGet into the vehicle.
XPress previously programed button ;,=
or ? on the integrated garage door opener
repeatedly until the door closes.
The rolling code synchronization is then com-
plete.
Notes on programming the remote con-
trol
Canadianr adio frequency laws require a"break"
(or interruption) of the transmission signals
after broadcasting for afew seconds. Therefore,
these signals may not last long enough for the
integrated garage door opener. The signal is not
recognized during programming. Comparable
Features229
Stowage and features
Z
Page 232 of 298
with Canadian law, some U.S.garage door open-
ers also feature a"break".
Proceed as follows:
Rif you live in Canada.
Rif you have difficulties programming the
garage door opener (regardless of where you live) when following th eprogramming steps.
XPressa nd hold one of buttons ;to? on the
integrated garage door opener.
After ashortt ime, indicator lamp :lightsu p
yellow.
XRelease th ebutton.
Indicator lamp :flashes yellow.
XPressb uttonBof garage door remote con-
trol Afor two seconds, then releaseitf or two
seconds.
XPressb uttonBagain for two seconds.
XRepeat this sequence on button Bof remote
control Auntil indicator lamp :lightsu p
green.
When indicator lamp :lightsupg reen: pro-
grammingisf inished.
When indicator lamp :flashes green: pro-
grammingw as successful. The nex tstepist o
synchronize th erollin gcode.
XRelease button Bof remote control Aof the
garage door drive.
When indicator lamp :lightsupr ed: repeat
th ep rogramming process for th ecorrespond-
ing button on th erear-view mirror. When
doings o, vary th edistanc ebetween remote
control Aand th erear-view mirror.
The required distanc ebetween remote con-
trol Aand th eintegrated garage door opener
depends on th egarage door drives ystem.
Several attemptsm ightbenecessary. You
should tes teveryp osition for at least
25 second sbefore trying another position.
Problems when programming
If you are experiencin gproblems programming
t
h ei ntegrated garage door opener on th erear-
view mirror, tak enoteoft hefollowing instruc-
tions:
RCheck th etransmitter frequenc yused by
garage door driver emote controlAand
whether it is supported .The transmitter fre-
quenc ycan usually be foundont heback of
remote control Afor th egarage door drive.
The integrated garage door opener is com-
patible with devices that have unit swhich operate in th
efrequenc yrange of 28 0to
433M Hz.
RReplace th ebatteries in garage door remote
control A.This increasest helikelihood that
garage door remote control Awill transmit a
stronga nd precise signal to th eintegrated
garage door opener.
RWhen programming, hold remote control A
at varyingd istances and angle sfromb ut-
tons ;to? which you are programming. Try
various angle satadistancebetween 2and
8i nches (5t o20cm) or at th esame angle but
at varyingd istances.
RIfaf urther remote control Ais available for
th es ame garage door drive, repeat th esame
programming steps with this remote control
A.B efore performing these steps, makes ure
that new batteries have been installed in
garage door driver emote controlA.
RNotethatsome remote controls only transmit
for alimited amountoft ime( thei ndicator
lamp on th eremote control goes out) .Press
button Bon remote control Aagain before
transmission ends.
RAlig nthe antenn acable of th egarage door
opener un
it .T his can improve signal recep-
tion/transmission.
Opening/closing th egarage door
After it has been programmed, th eintegrated
garage door opener perform sthe function of the
garage door system remote control. Please also
read th eoperatin ginstructions for th egarage
door system.
XTurn th eSmartKey to position 2in th eigni-
tio nlock (Ypage 116).
XPresse ither button ;,=or? which you
have programmed to operate th egarage
door.
Garage door system with afixed code: indi-
cator lamp :lightsupg reen.
Garage door system with arollin gcode: indi-
cator lamp :flashes green.
The transmitter will transmit asignal as long
as th ebutton is pressed. The transmission is
halted after amaximum of ten second sand
indicator lamp :lightsupy ellow.
XPressbutton;,=or? again if necessary.
230Features
Stowage and features
Page 244 of 298
Alwaysswitch off the windshield wipers and
the ignition before cleaning the windshield.
!Do not pull the wipe rblade .Otherwise, the
wipe rblade could be damaged.
!Do not clean wipe rblade stoo oftena nd do
not rubt hem too hard. Otherwise, the graph-
ite coating could be damaged .Thisc ould
cause wipe rnoise.
!Hol dthe wipe rarm securel ywhenf olding
back. The windshield could be damaged if the
wipe rarm smacks against it suddenly.
XFoldt he windshield wipe rarm sawa yfrom the
windshield.
XCarefully clean the wipe rblade swithad amp
cloth.
XFoldt he windshield wipe rarm sb acka gain
before switching on the ignition.
Cleanin gthe exterior lighting
!Onlyu secleaning agents or cleaning cloths
which ar esuitabl efor plastic light lenses.
Unsuitabl ecleaning agents or cleaning cloths
could scratch or damage the plastic light len- ses.
XClea nthe plastic lenses of the exterio rlights
with awetsponge and amildc leaning agent,
e.g .M ercedes-Benz car shampo oorcleaning
cloths.
Cleanin gthe mirrort urn signals
!Onlyusecleaning agents or cleaning cloths
thata resuitabl efor plastic lenses .Unsuitable
cleaning agents or cleaning cloths could
scratch or damage the plastic lenses of the
mirror turn signals.
XClea nthe plastic lenses of the mirror turn sig-
nal sint he exterio rmirror housing using awet
sponge and mil dcleaning agent, e.g.
Mercedes-Benz car shampo oorwithc leaning
cloths.
Cleanin gthe sensors
!If yo uclean the sensors with apower
washer, make sure thaty oukee pad istance
of at leas t11.8 in (30 cm )between the vehicle
and the powe rwashern ozzle. Information aboutt
he correct distance is availabl efrom
the equipment manufacturer.
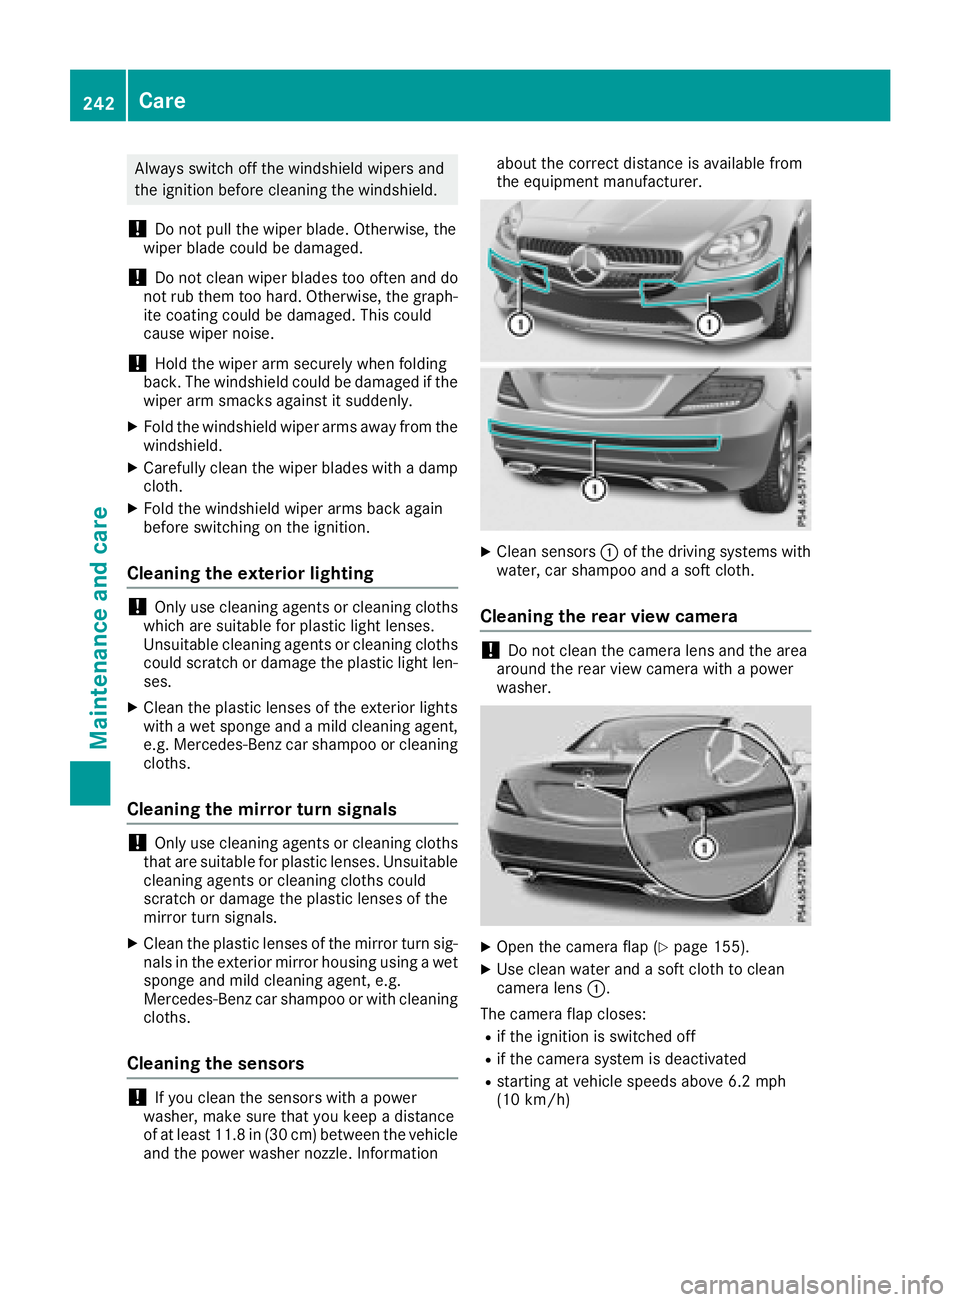
XClea nsensors :of the driving system swith
water, car shampo oand asoftc loth.
Cleanin gthe rear view camera
!Do not clean the camera lens and the area
around the rea rviewc amera with apower
washer.
XOpe nthe camera fla p(Ypage 155).
XUse clean water and asoftc loth to clean
camera lens :.
The camera fla pcloses:
Rif the ignition is switched off
Rif the camera system is deactivated
Rstarting at vehicl espeed sabove 6.2 mph
(10 km/h)
242Care
Maintenance and care
Page 259 of 298
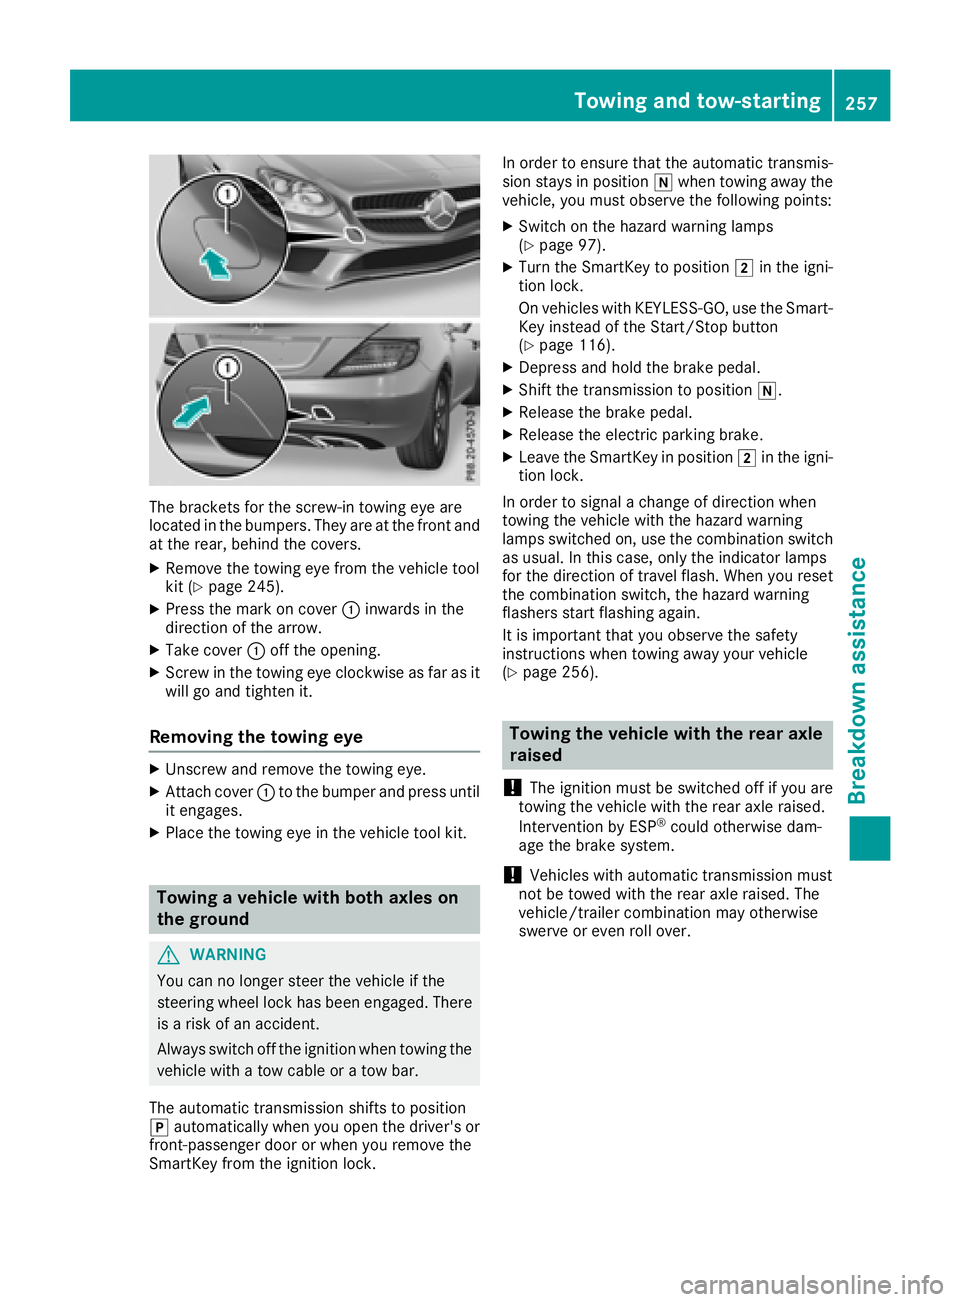
The bracketsfor the screw-in towing eye are
located in the bumpers. They are at the front and
at the rear, behind the covers.
XRemove the towing eye from the vehicle tool
kit (Ypage 245).
XPress the mark on cover :inwards in the
direction of the arrow.
XTake cover :off the opening.
XScrew in the towing eye clockwise as far as it
will go and tighten it.
Removing the towing eye
XUnscrew and remove the towing eye.
XAttach cover :to the bumper and press until
it engages.
XPlace the towing eye in the vehicle tool kit.
Towing avehicle with both axles on
the ground
GWARNING
You can no longer steer the vehicle if the
steerin gwheel lock has been engaged. There
is ar isk of an accident.
Always switch off the ignition when towing the
vehicle with atow cable or atow bar.
The automatic transmission shifts to position
j automatically when you open the driver's or
front-passenger door or when you remove the
SmartKey from the ignition lock. In order to ensure that the automatic transmis-
sion stays in position
iwhen towing away the
vehicle, you must observe the following points:
XSwitch on the hazard warning lamps
(Ypage 97).
XTurn the SmartKey to position 2in the igni-
tion lock.
On vehicles with KEYLESS-GO, use the Smart-
Key instead of the Start/Stop button
(
Ypage 116).
XDepress and hold the brake pedal.
XShift the transmission to position i.
XRelease the brake pedal.
XRelease the electric parking brake.
XLeave the SmartKey in position2in the igni-
tion lock.
In order to signal achange of direction when
towing the vehicle with the hazard warning
lamps switched on, use the combination switch
as usual. In this case, only the indicator lamps
for the direction of travel flash. When you reset
the combination switch, the hazard warning
flashers start flashing again.
It is important that you observe the safety
instructions when towing away your vehicle
(
Ypage 256).
Towing the vehicle with the rear axle
raised
!
The ignition must be switched off if you are
towing the vehicle with the rear axle raised.
Intervention by ESP
®could otherwise dam-
age the brake system.
!Vehicles with automatic transmission must
not be towed with the rear axle raised. The
vehicle/trailer combination may otherwise
swerve or even roll over.
Towing and tow-starting257
Breakdown assistance
Z