2018 MERCEDES-BENZ SLC ROADSTER garage door opener
[x] Cancel search: garage door openerPage 17 of 298

General notes............................... .118
Q
QR code
Mercedes-Ben zGuide Ap p................. 1
Rescue car d.................................... .28
Qualified specialist workshop ........... 27
R
RACE TIMER (on-board computer,
Mercedes-AMG vehicles).................. 175
Radio
Selecting astation .........................1 68
see Digita lOperator's Manual
Radio mode
see also Digita lOperator's Man-
ua l..................................................2 11
Radio-wave reception/transmis-
sionint he vehicle
Declaratio nofconformity ................ 26
Readingl amp....................................... 99
Rear fog lamp
Display message ............................ 189
Switching on/off .............................. 96
Rear lamps
see Lights
Rear viewc amera
Cleaning instructions ..................... 242
Display in the multimedias ystem .. 155
Function/notes .............................1 54
Switching on/off ........................... 155
Rear window defroster
General notes ................................ 111
Problem (malfunction) ................... 112
Switching on/off ........................... 111
Rear-vie wmirror
Anti-glare (manual ).......................... 90
Dipping (automatic) ......................... 92
Refrigerant (air-conditioning sys-
tem)
Important safety notes .................. 294
Refueling
Fuel gauge ....................................... 32
Important safety notes .................. 129
Refueling process. ......................... 130
see Fuel Remote control
Programming (garage door
opener) .......................................... 229
Replacing bulbs
High-beam headlamps ................... 100
Important safety notes .................... 99
Installing/removing the cover
(front wheel arch) .......................... 100
Low-beam headlamps .................... 100
Overview of bul btype s.................. 100
Reportin gsafety defects .................... 27
Rescue card ......................................... 28
Reserve (fuelt ank)
see Fuel
Reserve fuel
Display message ............................ 192
Warning lamp ................................. 207
Residual heat (climate control) ........112
Restraints ystem
Display message .............. .............. 185
Introdu
ction ..................................... 38
Warning lamp ................................. 206
Warning lamp (function) ................... 38
Reverse gear
Engaging (automatic transmis-
sion) ............................................... 123
Reversiblef loor panel (trunk) .......... 221
Reversing feature
Side windows ................................... 74
Reversing lamps (display mes-
sage) ................................................... 189
Roadside Assistance( breakdown).... 25
Roof
Display message ............................ 200
Important safety notes .................... 77
Opening/closing (with roof
switch) ............................................. 78
Opening/closing (with SmartKey ).... 79
Overview .......................................... 77
Problem (malfunction) ..................... 83
Relocking ......................................... 79
Roof carrier ........................................ 221
Roof switch .......................................... 78
Route guidance
see also Digita lOperator's Man-
ua l..................................................2 11
Route guidance active ......................167
Index15
Page 38 of 298

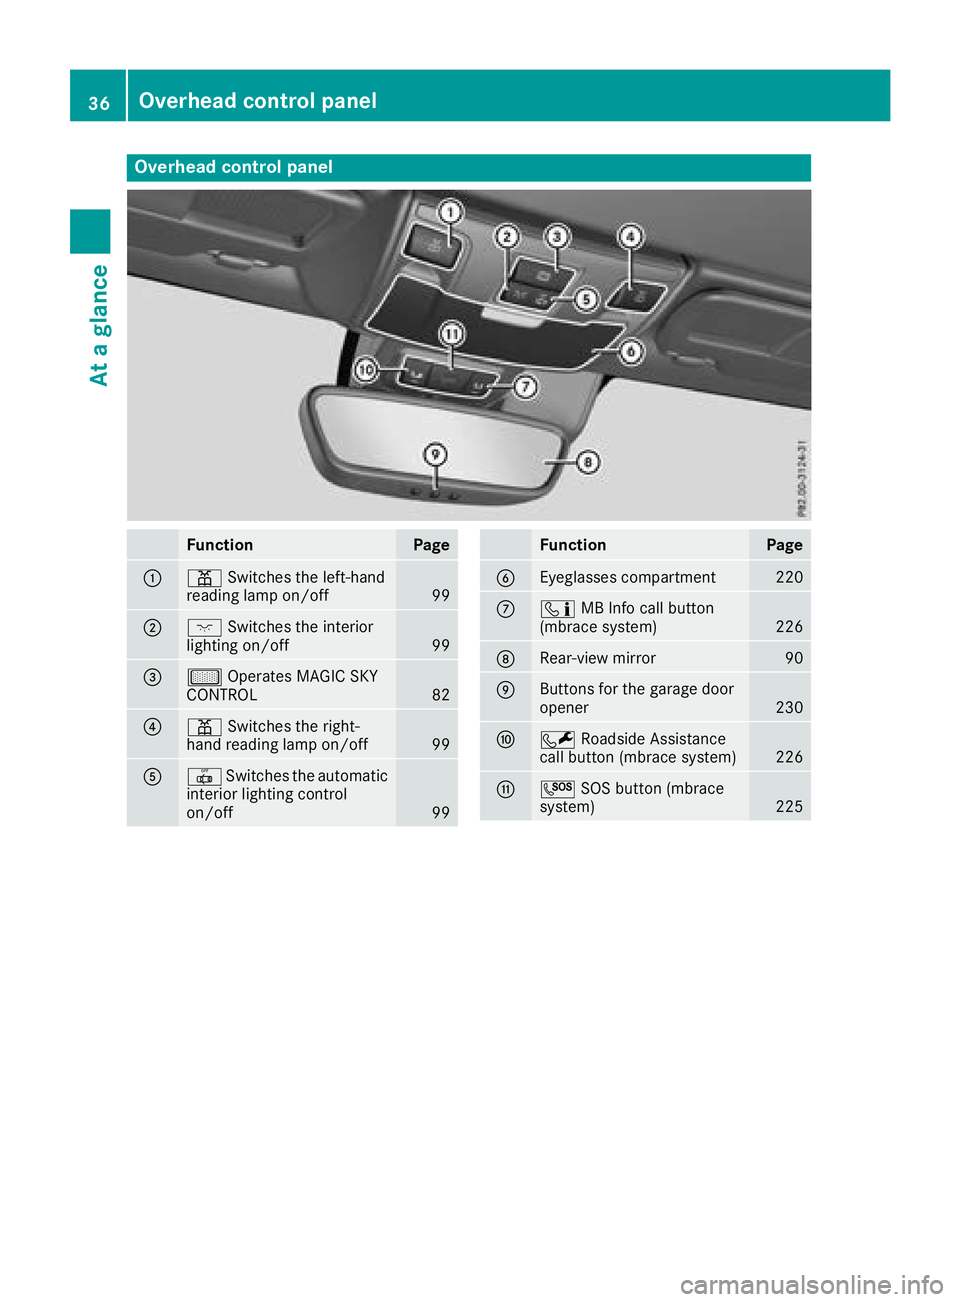
Overheadcontrol panel
FunctionPage
:p Switches the left-hand
reading lamp on/off99
;c Switches the interior
lighting on/off99
=µ Operates MAGIC SKY
CONTROL82
?p Switches the right-
hand reading lamp on/off99
A| Switches the automatic
interior lighting control
on/off
99
FunctionPage
BEyeglasses compartment220
Cï MB Inf ocall button
(mbrace system)226
DRear-view mirror90
EButtons for the garage door
opener230
FF Roadside Assistance
call button (mbrace system)226
GG SOS button (mbrace
system)225
36Overhea dcontrol panel
Atag lance
Page 230 of 298

sage appears, follow the customer service
representative's instructions.
The message in the displaydisappears.
If you select Cancel
the remote malfunction
diagnosis is canceled completely.
The vehicle operating state check begins. You
will see the Vehicle
diagnosisactivatedmessage.
When the diagnosis is completed, the Trans‐
fer vehicle diagnostics data (Voiceconnection may be interrupted duringdatatransfer)message appears. The vehicle
data can now be sent to the Customer Assis-
tance center.
XPress OKto confirm the message.
The voice connection with the Customer
Assistance Center is terminated.
You will see the Vehicle diagnosis:
Transferring data...message.
The vehicle data is sent to the Customer
Assistance Center.
Depending on what the customer service rep-
resentative agreed with you, the voice connec-
tion is re-established after the transfer is com-
plete. If necessary, you will be contacted at a
later time by another means, e.g. by e-mail or
phone.
Another function of the Vehicle Health Check is
the transfer of service data to the Customer
Assistance Center. If aservice is overdue, the
COMAND displays howsamessage about vari-
ous special offers at your workshop.
USA only: this information can also be called up
under "Owners Online" at http://
www.mbusa.com.
Information on the data stored in the vehicle
(
Ypage 28).
Information on Roadside Assistance
(
Ypage 25).
Garage door opener
General notes
The HomeLink®garage door opener integrated
in the rear-view mirror allowsy ou to operate up
to three different door and gate systems.
Use the integrated garage door opener only on
garage doors that:
Rhave safety stop and reverse features and
Rmeet current U.S. federal safety standards Once programed, the integrated garage door
opener in the rear-view mirror will assume the
function of the garage door system's remote
control. Please also read the operating instruc-
tions for the garage door system.
When programming
agarage door opener, park
the vehicle outside the garage. Do not run the
engine while programming.
Certain garage door drives are incompatible
with the integrated garage door opener. If you
have difficulty programing the integrated garage door opener, contact an authorized Mercedes-
Benz Center.
Alternatively, you can call the following tele-
phone assistance services:
RUSA: Mercedes-Benz Customer Assistance
Center at 1-800-FOR-MERCedes
RCanada: Customer Service at
1-800-387-0100
RHomeLink®hotline 1-800-355-3515 (free of
charge)
More information on HomeLink
®and/or com-
patible products is also available online at
http://www.homelink.com.
Notes on the declaration of conformity
(
Ypage 26).
USA: FCC ID: CB2HMIHL4
Canada:I C: 279B-HMIHL4
Important safety notes
GWARNING
When you operate or program the garage door
with the integrated garage door opener, per-
sons in the range of movement of the garage
door can become trapped or struck by the
garage door. There is arisk of injury.
When using the integrated garage door
opener, always make sure that nobody is
within the range of movement of the garage
door.
GWARNING
Combustion engines emit poisonous exhaust
gases such as carbon monoxide. Inhaling
these exhaust gases leads to poisoning. There
is ar isk of fatal injury. Therefore never leave
the engine running in enclosed spaces with-
out sufficient ventilation.
228Features
Stowage and features
Page 231 of 298

Programming
Programming the buttons
Pay attention to the "Important safety notes"
(Ypage 228).
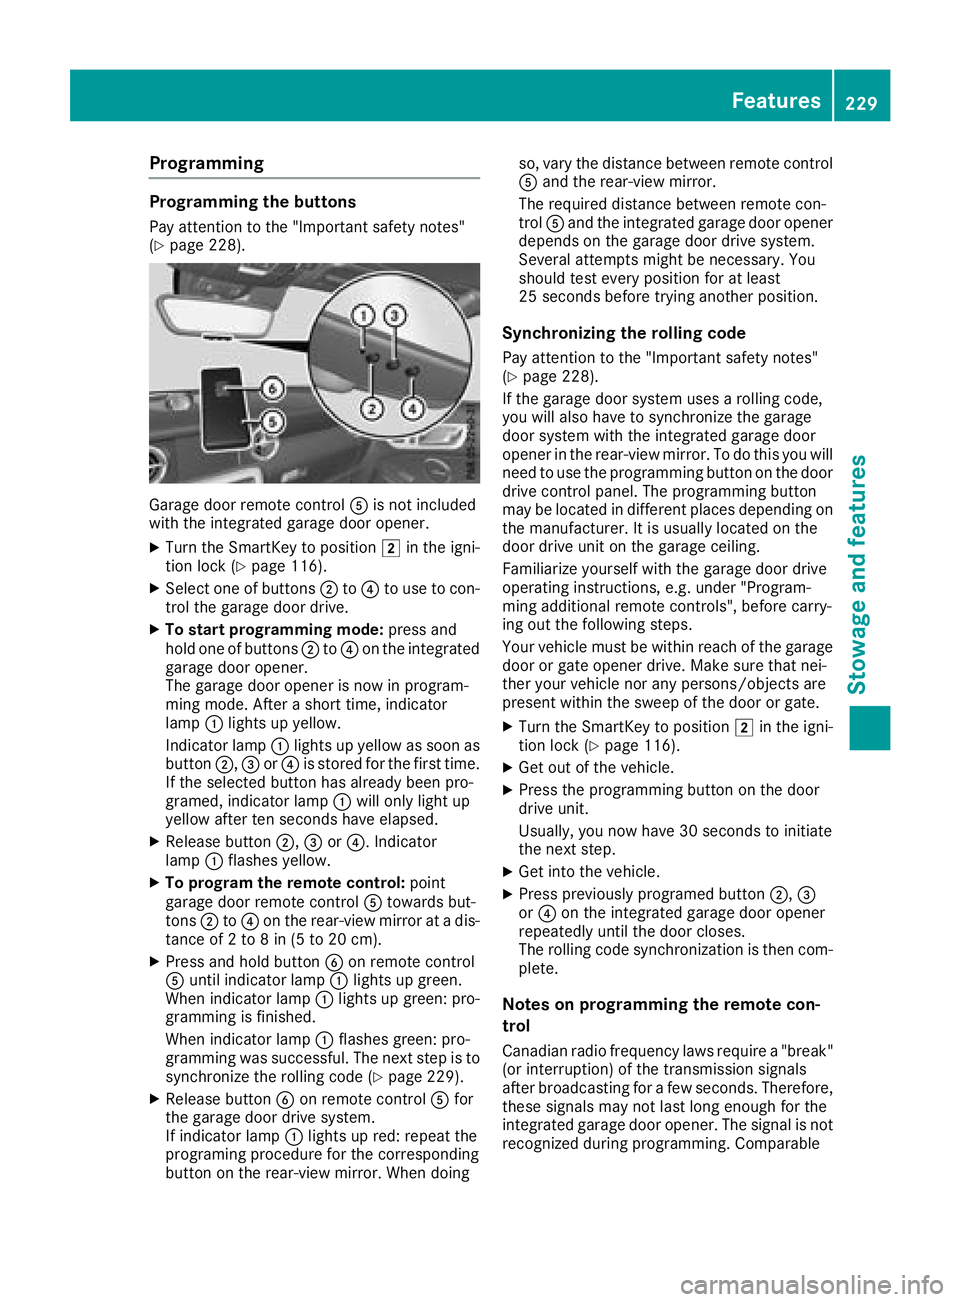
Garage door remote controlAis not included
with the integrated garage door opener.
XTurn the SmartKey to position 2in the igni-
tion lock (Ypage 116).
XSelect one of buttons ;to? to use to con-
trol the garage door drive.
XTo startp rogramming mode: press and
hold one of buttons ;to? on the integrated
garage door opener.
The garage door opener is now in program-
ming mode. After ashort time, indicator
lamp :lights up yellow.
Indicator lamp :lights up yellow as soon as
button ;,=or? is stored for the first time.
If the selected button has already been pro-
gramed, indicator lamp :will only light up
yellow after ten seconds have elapsed.
XRelease button ;,=or?.I ndicator
lamp :flashes yellow.
XTo programt he remote control: point
garage door remote control Atowards but-
tons ;to? on the rear-view mirror at adis-
tance of 2to8in(5to20c m).
XPress and hold button Bon remote control
A until indicator lamp :lights up green.
When indicator lamp :lights up green: pro-
gramming is finished.
When indicator lamp :flashes green: pro-
gramming was successful. The next step is to synchronize the rolling code (
Ypage 229).
XRelease button Bon remote control Afor
the garage door drive system.
If indicator lamp :lights up red: repeat the
programing procedure for the corresponding
button on the rear-view mirror. When doing so, vary the distance between remote control
A
and the rear-view mirror.
The required distance between remote con-
trol Aand the integrated garage door opener
depends on the garage door drive system.
Several attemptsm ight be necessary. You
should test every position for at least
25 seconds before trying another position.
Synchronizing the rolling code
Pay attention to the "Important safety notes"
(Ypage 228).
If the garage door system uses arolling code,
you will also have to synchronize the garage
door system with the integrated garage door
opener in the rear-view mirror. To do this you will
need to use the programming button on the door
drive control panel. The programming button
may be located in different places depending on
the manufact
urer. It is usually located on the
door drive unit on the garage ceiling.
Familiarize yourself with the garage door drive
operating instructions, e.g. under "Program-
ming additional remote controls", before carry-
ing out the following steps.
Your vehicle must be within reach of the garage
door or gate opener drive. Make sure that nei-
ther your vehicle nor any persons/objects are
present within the sweep of the door or gate.
XTurn the SmartKey to position 2in the igni-
tion lock (Ypage 116).
XGet out of the vehicle.
XPress the programming button on the door
drive unit.
Usually,y ou now have 30 seconds to initiate
the next step.
XGet into the vehicle.
XPress previously programed button ;,=
or ? on the integrated garage door opener
repeatedly until the door closes.
The rolling code synchronization is then com-
plete.
Notes on programming the remote con-
trol
Canadianr adio frequency laws require a"break"
(or interruption) of the transmission signals
after broadcasting for afew seconds. Therefore,
these signals may not last long enough for the
integrated garage door opener. The signal is not
recognized during programming. Comparable
Features229
Stowage and features
Z
Page 232 of 298

with Canadian law, some U.S.garage door open-
ers also feature a"break".
Proceed as follows:
Rif you live in Canada.
Rif you have difficulties programming the
garage door opener (regardless of where you live) when following th eprogramming steps.
XPressa nd hold one of buttons ;to? on the
integrated garage door opener.
After ashortt ime, indicator lamp :lightsu p
yellow.
XRelease th ebutton.
Indicator lamp :flashes yellow.
XPressb uttonBof garage door remote con-
trol Afor two seconds, then releaseitf or two
seconds.
XPressb uttonBagain for two seconds.
XRepeat this sequence on button Bof remote
control Auntil indicator lamp :lightsu p
green.
When indicator lamp :lightsupg reen: pro-
grammingisf inished.
When indicator lamp :flashes green: pro-
grammingw as successful. The nex tstepist o
synchronize th erollin gcode.
XRelease button Bof remote control Aof the
garage door drive.
When indicator lamp :lightsupr ed: repeat
th ep rogramming process for th ecorrespond-
ing button on th erear-view mirror. When
doings o, vary th edistanc ebetween remote
control Aand th erear-view mirror.
The required distanc ebetween remote con-
trol Aand th eintegrated garage door opener
depends on th egarage door drives ystem.
Several attemptsm ightbenecessary. You
should tes teveryp osition for at least
25 second sbefore trying another position.
Problems when programming
If you are experiencin gproblems programming
t
h ei ntegrated garage door opener on th erear-
view mirror, tak enoteoft hefollowing instruc-
tions:
RCheck th etransmitter frequenc yused by
garage door driver emote controlAand
whether it is supported .The transmitter fre-
quenc ycan usually be foundont heback of
remote control Afor th egarage door drive.
The integrated garage door opener is com-
patible with devices that have unit swhich operate in th
efrequenc yrange of 28 0to
433M Hz.
RReplace th ebatteries in garage door remote
control A.This increasest helikelihood that
garage door remote control Awill transmit a
stronga nd precise signal to th eintegrated
garage door opener.
RWhen programming, hold remote control A
at varyingd istances and angle sfromb ut-
tons ;to? which you are programming. Try
various angle satadistancebetween 2and
8i nches (5t o20cm) or at th esame angle but
at varyingd istances.
RIfaf urther remote control Ais available for
th es ame garage door drive, repeat th esame
programming steps with this remote control
A.B efore performing these steps, makes ure
that new batteries have been installed in
garage door driver emote controlA.
RNotethatsome remote controls only transmit
for alimited amountoft ime( thei ndicator
lamp on th eremote control goes out) .Press
button Bon remote control Aagain before
transmission ends.
RAlig nthe antenn acable of th egarage door
opener un
it .T his can improve signal recep-
tion/transmission.
Opening/closing th egarage door
After it has been programmed, th eintegrated
garage door opener perform sthe function of the
garage door system remote control. Please also
read th eoperatin ginstructions for th egarage
door system.
XTurn th eSmartKey to position 2in th eigni-
tio nlock (Ypage 116).
XPresse ither button ;,=or? which you
have programmed to operate th egarage
door.
Garage door system with afixed code: indi-
cator lamp :lightsupg reen.
Garage door system with arollin gcode: indi-
cator lamp :flashes green.
The transmitter will transmit asignal as long
as th ebutton is pressed. The transmission is
halted after amaximum of ten second sand
indicator lamp :lightsupy ellow.
XPressbutton;,=or? again if necessary.
230Features
Stowage and features