2018 MERCEDES-BENZ SLC ROADSTER warning
[x] Cancel search: warningPage 237 of 298
XPull out oil dipstick:.
XWipe off oil dipstick :.
XSlowly slide oil dipstick :into the guide tube
to the stop, and take it out again.
If the level is between MIN mark =and MAX
mark ;,the oil level is correct.
XIf the oil level has dropped to MIN mark =or
below, add 1.1 US qt (1.0 liter) of engine oil.
Adding engine oil
GWARNING
Certain components in the engine compart-
ment ,such as the engine, radiator and parts
of the exhaust system, can become very hot.
Workingint he engine compartment poses a
risk of injury.
Where possible, let the engine cool down and touch only the components described in the
following.
GWARNING
If engine oil comes into contact with hot com- ponentsint he engine compartment ,itmay
ignite. There is arisk of fire and injury.
Make sure that engine oil is not spilled next to
the filler neck.L et the engine cool down and
thoroughly clean the engine oil off the com-
ponentsb efore starting the engine.
HEnvironmenta lnote
When adding oil, take care not to spill any. If
oil enter sthe soil or waterways, it is harmful to
the environment.
!Use only engine oils and oil filters that are
approved for vehicles with aservice system. A
list of the engine oils and oil filters that have
been tested and approved in accordanc ewith
Mercedes-Benz Specifications for Service
Products is availableata ny authorized
Mercedes-Benz Center. The following cause engine failure or damage
to the exhaust system:
RUse of engine oils and oil filters that have
not been expressly approved for the service
system
RReplacement of engine oil and oil filter after
the replacement interval specified by the
service system has expired
RUse of engine oil additives
!Do not add too much oil. If the oil level is
above the "max" mark on the dipstick ,too
much oil has been added. This can lead to
damage to the engine or the catalytic con-
verter .Have excess oil siphoned off.
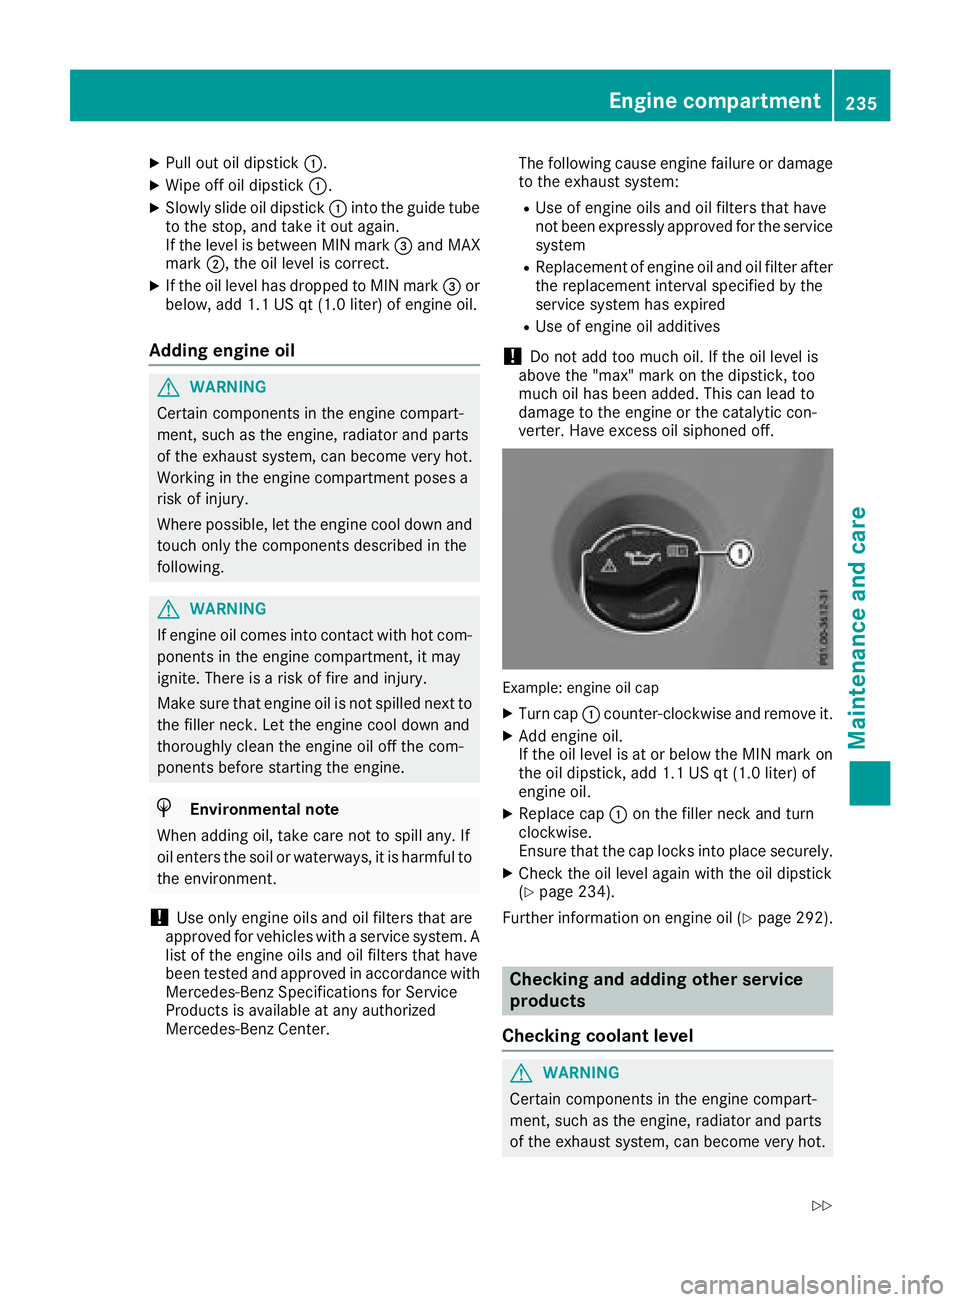
Example: engine oil cap
XTurn cap :counter-clockwise and remove it.
XAdd engine oil.
If the oil level is at or below the MIN mark on
the oil dipstick ,add 1.1 US qt (1.0 liter) of
engine oil.
XReplace cap :on the filler neck and turn
clockwise.
Ensure that the cap locks into place securely.
XCheck the oil level again with the oil dipstick
(Ypage 234).
Further information on engine oil (
Ypage 292).
Checking and adding other service
products
Checking coolant level
GWARNING
Certain components in the engine compart-
ment ,such as the engine, radiator and parts
of the exhaust system, can become very hot.
Engine compartment235
Maintenance and care
Z
Page 238 of 298
Workinginthe engine compartment poses a
risk of injury.
Where possible, let the engine cool down and touch only the componentsd escribed in the
following.
GWARNING
The cooling system is pressurized, particularly
when the motor is warm. If you open the cap,
you could be scalded if hot coolant sprays out.
There is arisk of injury.
Let the engine cool down before you open the
cap. Wear gloves and eye protection. Slowly
open the cap to relieve pressure.
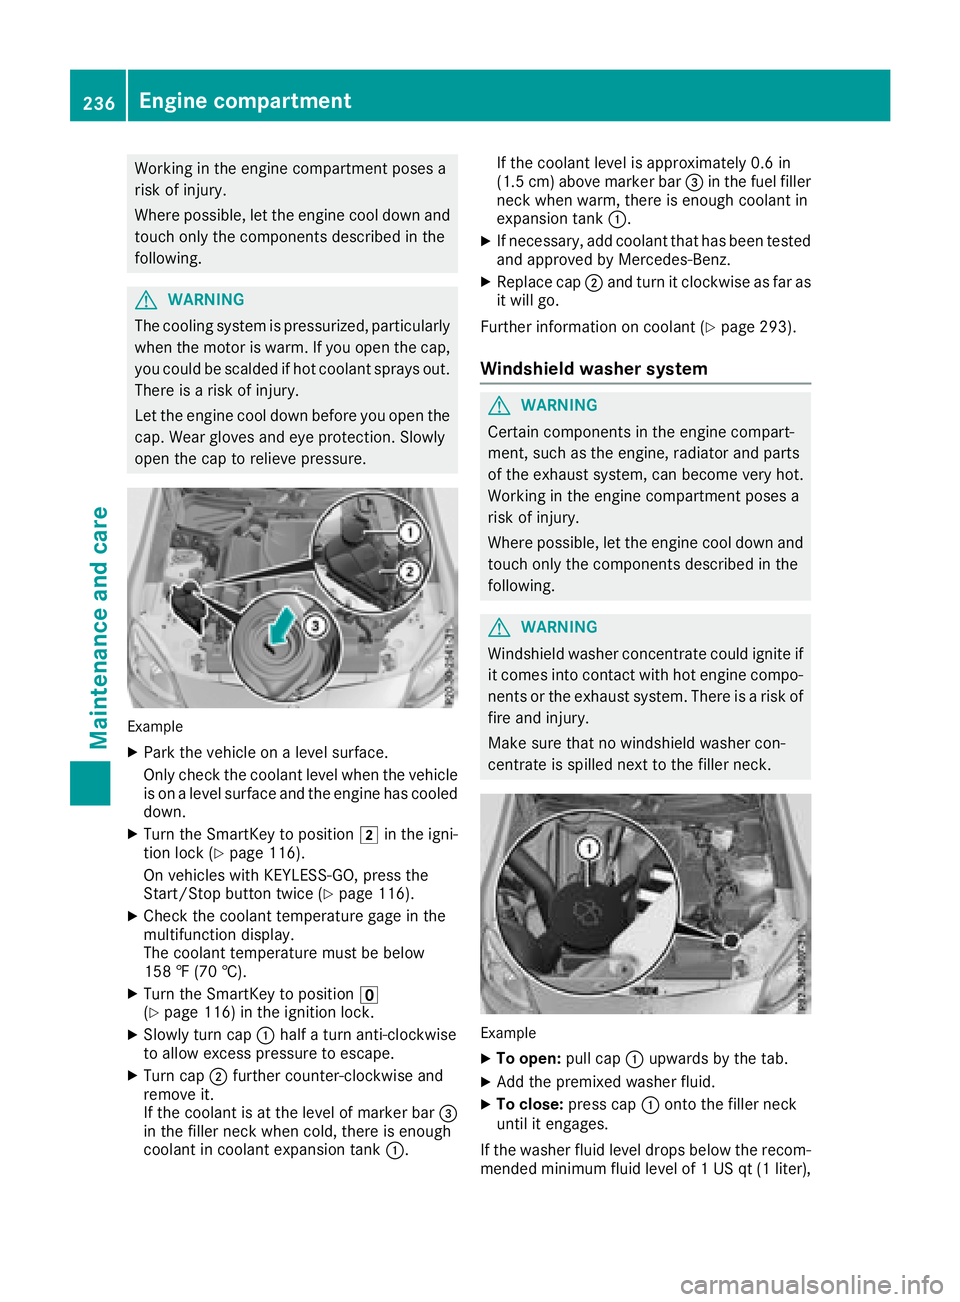
Example
XPark the vehicle on alevel surface.
Only check the coolant level when the vehicle
is on alevel surface and the engine has cooled
down.
XTurn the SmartKey to position 2in the igni-
tion lock (Ypage 116).
On vehicles with KEYLESS-GO, press the
Start/Stop button twice (
Ypage 116).
XCheck the coolant temperature gage in the
multifunction display.
The coolant temperature must be below
158 ‡(70 †).
XTurn the SmartKey to position u
(Ypage 116) in the ignition lock.
XSlowly turn cap :half aturn anti-clockwise
to allow excessp ressure to escape.
XTurn cap;further counter-clockwise and
remove it.
If the coolant is at the level of marker bar =
in the filler neck when cold, there is enough
coolant in coolant expansion tank :.If the coolant level is approximately 0.6 in
(1.5 cm
)above marker bar =in the fuel filler
neck when warm, there is enough coolant in
expansion tank :.
XIf necessary, add coolant that has been tested
and approved by Mercedes-Benz.
XReplace cap;and turn it clockwise as far as
it will go.
Further information on coolant (
Ypage 293).
Windshield washer system
GWARNING
Certain component sinthe engine compart-
ment,s uch as the engine, radiator and parts
of the exhaust system, can become very hot.
Workin ginthe engine compartment poses a
risk of injury.
Where possible, let the engine cool down and touch only the componentsd escribed in the
following.
GWARNING
Windshield washer concentrate could ignite if it comes into contact with hot engine compo-
nents or the exhaust system. There is arisk of
fire and injury.
Make sure that no windshield washer con-
centrate is spilled next to the filler neck.
Example
XTo open: pull cap:upwards by the tab.
XAdd the premixed washer fluid.
XTo close: press cap :ontothe filler neck
until it engages.
If the washer fluid level drops below the recom-
mended minimum fluid level of 1USqt(1l iter),
236Engine compartment
Maintenance and care
Page 240 of 298
lead to increased wear and damage to the
majorassemblies or the vehicle.
Aq ualified specialist workshop, e.g. an author-
ized Mercedes-Ben zCenter, will reset the
ASSYS TPLUS service interval display after the
service work has been carried out. You can also
obtain further information on maintenance
work,f or example.
Specia lservice requirements
The specified maintenance interval takes only
the normal operation of the vehicle into
account .Under arduous operating condition sor
increased load on the vehicle, maintenance
work must be carried out more frequently, for
example:
Rregular cit ydrivingw ith frequent intermediate
stops
Rif the vehicle is primarily used to travel short
distances
Ruse in mountainous terrain or on poor road
surfaces
Rif the engin eisoften left idling for long periods
Under these or similar conditions, have, for
example, the air filter, engin eoil and oil filter
replaced or changed more frequently. Under
arduous operating conditions, the tires must be
checked more often. Further information can be
obtained at aqualified specialist workshop, e.g.
an authorized Mercedes-Ben zCenter.
Driving abroad
An extensive Mercedes-Ben zService network is
also available in other countries. You can obtain
further information froma ny authorized
Mercedes-Ben zCenter.
Care
Notes on care
HEnvironmental note
Dispose of emptyp ackaging and cleaning
cloths in an environmentally responsible man-
ner.
!When cleaning your car, do not use:
Rdry, coarse or hard cloths
Rabrasive cleaning agents
Rsolvents
Rcleaning agent scontaining solvents
Do not scrub.
Do not touc hthe surfaces and films with hard
objects, e.g. rings or ice scrapers. Otherwise,
you may scratc hordamage the surfaces and
films.
!Do not park your vehicle for along period of
tim edirectly after cleaning, particularly after
cleaning the wheel rim with wheel cleaner.
Wheel cleaner can lead to the increased cor-
rosionoft he braked iscs and pads. Therefore,
drive for afew minutes after cleaning. By
heatin gupthe brakes, the braked iscs and
pads dry. The vehicle can the nbeparked for a
long period of time.
Regular care of your vehicle is acondition for
retainin gthe quality in the long term.
Use care products and cleaning agent srecom-
mended and approved by Mercedes-Benz.
Washing th evehicle and cleaning the
paintwork
Automatic car wash
GWARNING
Braking efficienc yisreduced after washing
the vehicle. There is arisk of an accident.
After the vehicle has been washed, brake
carefully while paying attention to the traffic
condition suntil full braking power is restored.
!When DISTRONIC PLUS or the HOL Dfunc-
tion is activated, the vehicle brakes automat-
ically in certain situations.
To avoid damage to the vehicle, deactivate
DISTRONIC PLUS and the HOL Dfunction in
the followingors imilar situations:
Rwhen towingthe vehicle
Rin the car wash
!It is preferable to use car washes with
adjustable high-pressure pre-cleaning that
corresponds to the specification for the Cab-
riolet program. In car washes that use high
water pressures, there is arisk that asmall
amount of water may leak int othe vehicle.
238Care
Maintenance and care
Page 241 of 298
!Lock the car if you wash it in an automatic
car wash. Otherwise, the vehicle might be
damaged.
!Never clean your vehicle in aTouchless
Automatic Car Wash as these use special
cleaning agents. These cleaning agents can
damage the paintwork or plastic parts.
If you have your vehicle cleaned in ahigh-
pressure automatic car wash, small amounts
of water may enter the vehicle.
!Make sure that the automatic transmission
is in position Nwhen washing your vehicle in
at ow-through car wash. The vehicle could be
damagedift he transmission is in another
position.
!Make sure that:
Rthe side windows and the roof are com-
pletely closed
Rthe climate control blower is switched off
Rthe windshieldw iper switch is at position 0
The vehicle could otherwise be damaged.
You can clean the vehicle at an automatic car
wash from the very start.
Preferably clean the vehicle at automatic car
washes that use textile washing elements with-
out brushes. This prevents fine scratches from
forming on the paintwork and film.
If the vehicle is very dirty, pre-wash it before
cleaning it in an automatic car wash.
After using an automatic car wash, wipe off wax
from the windshielda nd the wiper blades. This
will prevent smears and reduce wiping noises
caused by residue on the windshield.
iVehicles with decorative film: select awash
program without hot wax at the automatic car
wash.
Washing by hand
In some countries, washing by hand is only
allowed at speciallye quipped washing bays.
Observe the legal requirements in each country.
XDo not use hot water and do not wash the
vehicle in direct sunlight.
XUse asoft sponge to clean.
XUse amild cleaning agent, such as acar
shampoo approved by Mercedes-Benz.
XThoroughly hose down the vehicle with agen-
tle jet of water.
XDo not point the water jet directly towards the
air inlet or the edges of decorative foils.
XUse plenty of water and rinse out the sponge
frequently.
XRinse the vehicle with clean water and dry
thoroughly with achamois.
XDo not let the cleaning agent dry on the paint-
work or the decorative foils.
Carefully remove all deposits of road salt as
soon as possible when driving in winter.
Powerw ashers
GWARNING
The water jet from acircular jet nozzle (dirt
blasters) can cause invisible exterior damage
to the tires or chassis components. Compo-
nentsd amagedint his way may fail unexpect-
edly.T here is arisk of an accident.
Do not use power washers with circular jet
nozzles to clean the vehicle. Have damaged
tires or chassis componentsr eplaced imme-
diately.
!Vehicles with decorative foil: parts of your
vehicle are covered with decorative foil. Main-
tain adistance of at least 27.5 in (70 cm)
between the foil-wrappedp arts of the vehicle
and the nozzle of the high pressure cleaner.
Information aboutt he correct distance is
available from the equipment manufacturer.
Move the power washer nozzle around when
cleaning your vehicle.
The water temperature of the high-pressure
cleaner must not exceed 140 °F (60 °C).
!Alwaysm aintainadistance of at least
11.8 in (30 cm) between the vehicle and the
power washer nozzle. Information aboutt he
correct distance is available from the equip-
ment manufacturer.
Move the power washer nozzle around when
cleaning your vehicle.
Do not aim directly at any of the following:
Rtires
Rdoor gaps, roof gaps, joints, etc.
Relectrical components
Rbattery
Rplug-type couplings
Rlights
Care239
Maintenance and care
Z
Page 243 of 298
Observe the notes in the section on the care and
treatment of matt paintwork (Ypage 240);
these notes also apply to decorative film.
To clean, use plenty of water and amild cleaning
agent without additional or abrasive products,
e.g. acar shampoo approved by Mercedes-
Benz.
XRemove bird droppings, tree resin or fuel as
soon as possible.
The decorative film may be irreparably dam-
aged.
XDry vehicles covered with film using asoft,
absorbent cloth after every wash.
Water marks could otherwise form.
Scratches, corrosive deposits, areas affected by
corrosion and damage caused by inadequate
care cannot always be completely repaired. In
such cases, visit aqualified specialist workshop.
The cleaning product Paint Cleaner, which has
been approved and recommended by
Mercedes-Benz,s hould be used when dirt has
penetrated the decorative film surface or the
decorative film has become dull.
The manufacturer can provide you with infor-
mation on special care and cleaning products.
Surfaces covered with film may appears hinier
after the decorative film has been removed.
iHave work or repairs on decorative film car-
ried out at aqualified specialist workshop.
Mercedes-Benz recommends that you use an
authorized Mercedes-Benz Center for this
purpose.
Cleaning the vehiclep arts
Cleaning the wheels
GWARNING
The water jet from acircular jet nozzle (dirt
blasters) can cause invisible exterior damage
to the tires or chassis components. Compo-
nentsd amaged in this way may fail unexpect-
edly.T here is arisk of an accident.
Do not use power washers with circular jet
nozzles to clean the vehicle. Have damaged
tires or chassis componentsr eplaced imme-
diately.
!Do not use acidic wheel cleaning products
to remove brake dust. This could damage
wheel bolts and brake components.
!Do not park your vehicle for along period of
time directly after cleaning, particularlya fter
cleaning the wheel rim with wheel cleaner.
Wheel cleaner can lead to the increased cor-
rosion of the brake discs and pads. Therefore,
drive for afew minutes after cleaning. By
heating up the brakes, the brake discs and
pads dry. The vehicle can then be parked for a
long period of time.
Cleaning the windows
GWARNING
You could become trapped by the windshield wipers if they start moving while cleaning the
windshieldorw iper blades. There is arisk of
injury.
Alwayss witch off the windshieldw ipers and
the ignition before cleaning the windshieldo r
wiper blades.
!Do not use dry cloths, abrasive products,
solvents or cleaning agents containing sol-
vents to clean the inside of the windows. Do
not touch the insides of the windows with
hard objects, e.g. an ice scraper or ring. There
is otherwise arisk of damaging the windows.
!Cleant he water drainage channels of the
windshielda nd the rear window at regular
intervals. Deposits such as leaves, petals and pollen may under certain circumstances pre-
vent water from draining away. This can lead
to corrosion damage and damage to elec-
tronic components.
XCleant he inside and outside of the windows
with adamp cloth and acleaning product that
is recommended and approved by Mercedes-
Benz.
Cleaning wiper blades
GWARNING
If the windshieldw ipers are set in motion
while you are cleaning the windshield, you can be trapped by the wiper arm. There is arisk of
injury.
Care241
Maintenance and care
Z
Page 245 of 298
Cleaning theexhaust pipe
GWARNING
The exhaust tail pipe and tail pipe trim can
become ver yhot.Ify ou com eintoc ontact
witht hese part softhevehicle ,you coul dburn
yourself. Thereisar iskofi njury.
Always be particularly careful aroun dthe
exhaust tail pipe and th etail pipe trim. Allow
these components to coo ldown before touch-
ing them.
!Do no tclean th eexhaust pipe witha cid-
based cleanin gagents ,suchasb athroom
cleane rorwheel cleaner.
XClean th eexhaust pipe withac hrom ecare
product tested and approved by Mercedes-
Benz.
Impurities combined witht heeffect sofroad grit
and corrosive environmental factors may cause
flas hrust to for monthesurface. You can
restore th eoriginal shineoft heexhaust pipe by
cleanin gitregularly, especiall yinwinter and
after washing.
Care243
Maintenance and care
Z
Page 246 of 298
Where willIfind...?
Warning triangle
Removing the warning triangle
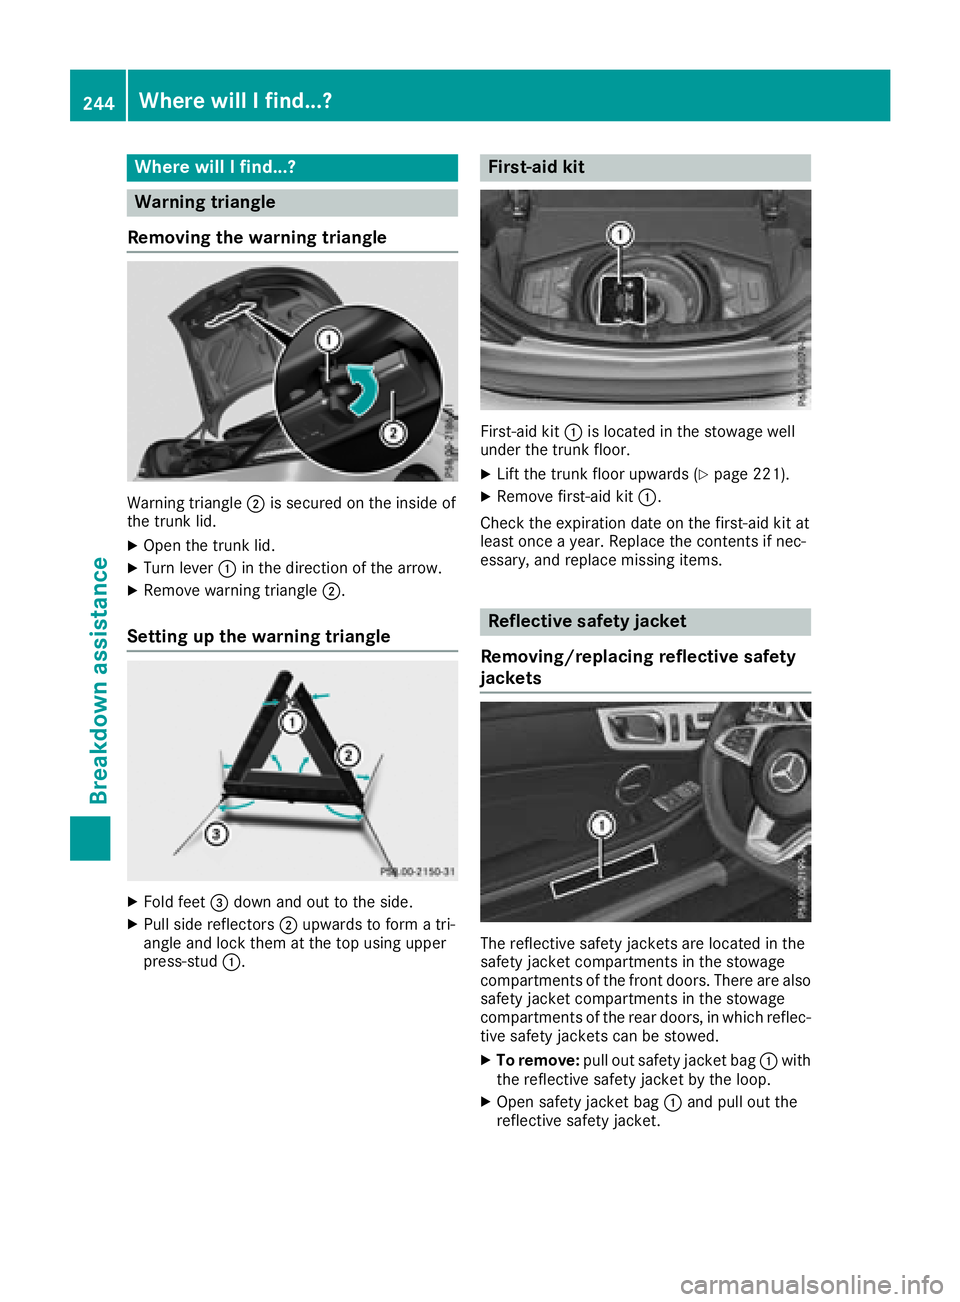
Warning triangle ;is secure donthe insid eof
the trunk lid.
XOpen the trunk lid.
XTurn lever :in the direction of the arrow.
XRemove warning triangle ;.
Setting up the warning triangle
XFold feet=downa nd out to the side.
XPullside reflectors ;upwards to form atri-
angl eand lock them at the top using upper
press-stud :.
First-aid kit
First-aidkit: is located in the stowage well
under the trunk floor.
XLift the trunk floor upwards (Ypag e221).
XRemove first-ai dkit:.
Check the expiration date on the first-ai dkit at
least once ayear. Replace the contents if nec-
essary, and replace missing items.
Reflective safety jacket
Removing/replacing reflective safety
jackets
The reflective safety jackets are located in the
safety jacket compartments in the stowage
compartments of the front doors.T here are also
safety jacket compartments in the stowage
compartments of the rear doors,inw hich reflec-
tive safety jackets can be stowed.
XTo remove: pullout safety jacket bag :with
the reflective safety jacket by the loop.
XOpen safety jacket bag :and pul lout the
reflective safety jacket.
244Where will Ifind...?
Breakdown assistance
Page 248 of 298
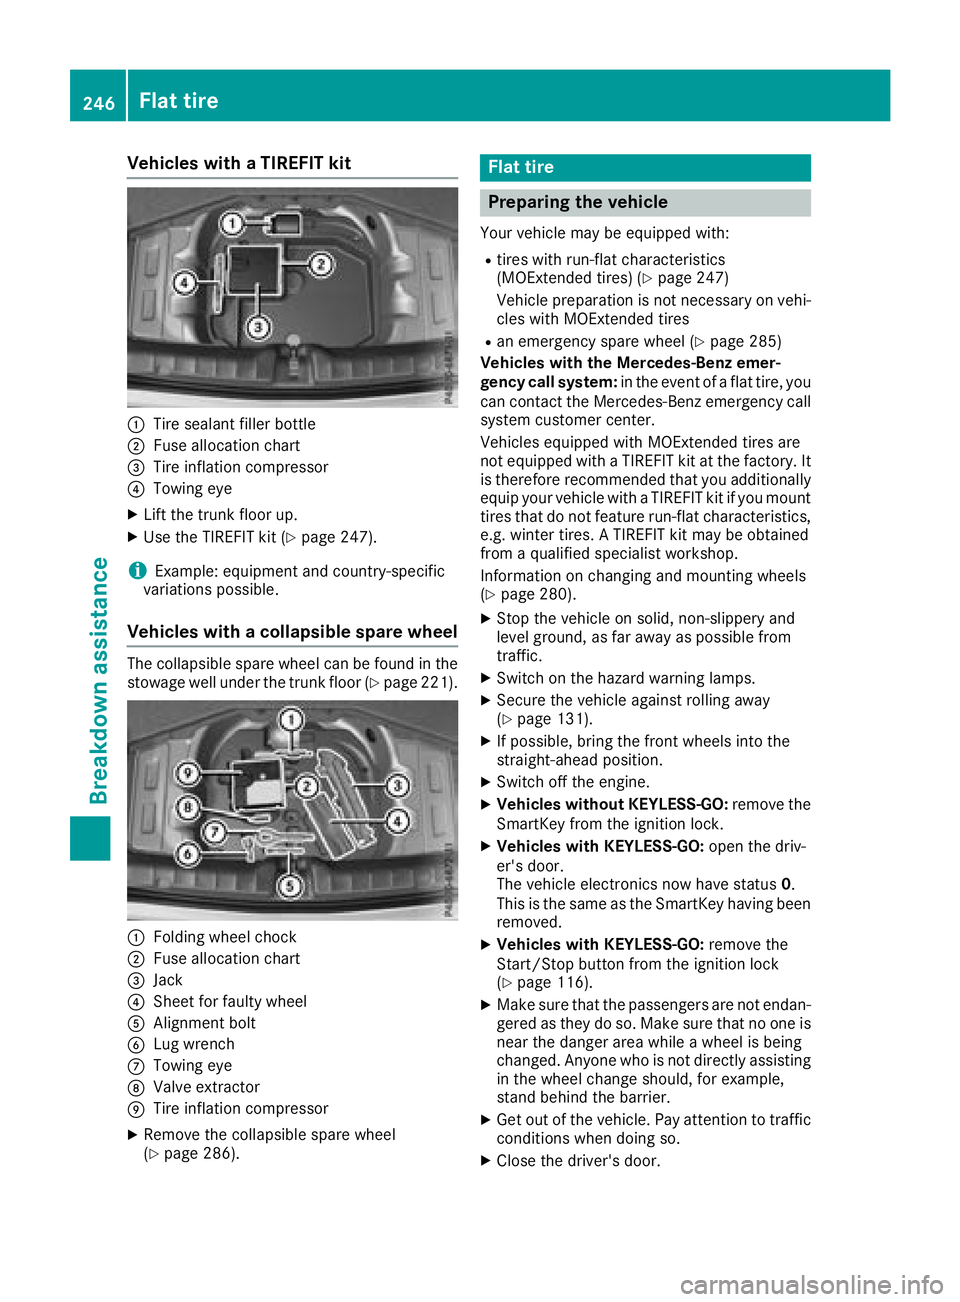
Vehicles withaTIREFI Tkit
:Tire sealant fille rbottle
;Fus ealloc ation chart
=Tire inflation compressor
?Towing eye
XLiftthe trunk floor up.
XUse the TIREFIT kit (Ypage 247).
iExample :equipment and country-specific
variations possible.
Vehicles with acolla psibl espare wheel
The collapsibl espare whee lcan be found in the
stowag ewellu nder the trunk floor (Ypage 221).
:Folding whee lchock
;Fus ealloc ation chart
=Jack
?Shee tfor faulty wheel
AAlignment bolt
BLugw rench
CTowing eye
DValve extractor
ETire inflation compressor
XRemove the collapsibl espare wheel
(Ypage 286).
Flat tire
Preparin gthe vehicle
Your vehicl emaybe equipped with:
Rtire sw ithr un-fla tcharacteristics
(MOExtended tires) (Ypage 247)
Vehicl epreparation is not necessary on vehi-
cle sw ithM OExtende dtires
Ran emergency spare whee l(Ypage 285)
Vehicles with the Mercedes-Benz emer-
genc ycalls ystem: in the event of aflatt ire ,you
can contact the Mercedes-Benz emergency call
system customerc enter.
Vehicles equipped with MOExtende dtiresa re
not equipped with aTIREFIT kit at the factory .It
is therefore recommende dthaty ouadditionally
equi pyourvehicl ewithaT IREFIT kit if yo umount
tire sthatd onot feature run-fla tcharacteristics,
e.g .winter tires. ATIREFIT kit maybeo btained
from aquali fied specialist workshop.
Informatio nonchanging and mounting wheels
(
Ypage 280).
XStop the vehicl eonsolid,non-slippery and
level ground ,asfar away as possibl efrom
traffic.
XSwitch on the hazard warning lamps.
XSecure the vehicl eagain st rolling away
(Ypage 131).
XIf possible, bring the front wheels into the
straight-ahea dposition.
XSwitch off the engine.
XVehicles withou tKEYLESS -GO:remove the
SmartKey from the ignition lock.
XVehicles with KEYLESS-GO: open the driv-
er' sd oor.
T he vehicl eelectronics now have status 0.
Thi sist he same as the SmartKey having been
removed.
XVehicles with KEYLESS-GO: remove the
Start/Stop button from the ignition lock
(
Ypage 116).
XMake sure thatt he passengersare not endan-
gered as they do so. Make sure thatnoo ne is
nea rthe danger are awhile awheel is being
changed .Anyone wh oisnot directlya ssisting
in the whee lchange should, for example,
stand behind the barrier.
XGe toutof the vehicle. Paya ttentiontotraffic
conditions when doing so.
XClose the driver'sd oor.
246Flat tire
Breakdo wn assis tance