2018 MERCEDES-BENZ SLC ROADSTER rear view mirror
[x] Cancel search: rear view mirrorPage 94 of 298
thenopent he driver's or front-passenger
door.
iThe exterio rmirrors do not fol doutif they
have been folde dinmanually.
Exterior mirro rpushed ou tofposition
If an exterio rmirrorh asbeen pushe doutof
position, procee dasfollows:
XVehicle swithout electricall yfolding exte-
rio rm irrors: movethe exterio rmirrori nto
the correct positio nmanually.
XVehicle swithe lect ricall yfolding exterior
mirrors: press and hol dmirror-folding button
unti lyou hear the mirrorc lick into place
(
Ypage 91).
The mirrorh ousing is engaged agai nand you
can adjus tthe exterio rmirrors as usual
(
Ypage 91).
Automati canti-glare mirrors
GWARNING
Electrolyte maye scap eift he glas sinana uto-
matic anti-glar emirror breaks. Th eelectrolyte
is harmfula nd causesirritation. It must not
come into contact with your skin, eyes ,res-
piratory organs or clothing or be swallowed.
There is ariskofi njury.
If yo ucome into contact with the electrolyte,
observe the following:
RRinse off the electrolyte fromy ours kin
immediatel ywithw ater.
RImmediately rinse the electrolyte ou tof
your eyes thoroughl ywithc lean water.
RIf the electrolyte is swallowed, immediately
rinse your mouth ou tthoroughly. Do not
induce vomiting.
RIf electrolyte come sinto contact with your
skinorh airoriss wallowed ,see km edical
attentio nimm ediately.
RImmediately change ou tofclothing which
hasc ome into contact with electrolyte.
RIf an allergi creactio noccurs, seek medical
attentio nimm ediately. The rear-view mirrora
nd the exteriormirroro n
the driver's side automaticall ygointo anti-glare
mod eift he following conditions ar emet simul-
taneously:
Rthe ignition is switched on and
Rincident light fromh eadlamps strikes the sen-
sor in the rear-view mirror
The mirrors do not go into anti-glar emodei
f
re
vers egearise ngaged or if the interio rlighting
is switched on.
Parking position fort he exterior mir-
ror on the front-passenge rside
Settin gand storin gthe parking position
Usin grevers egear
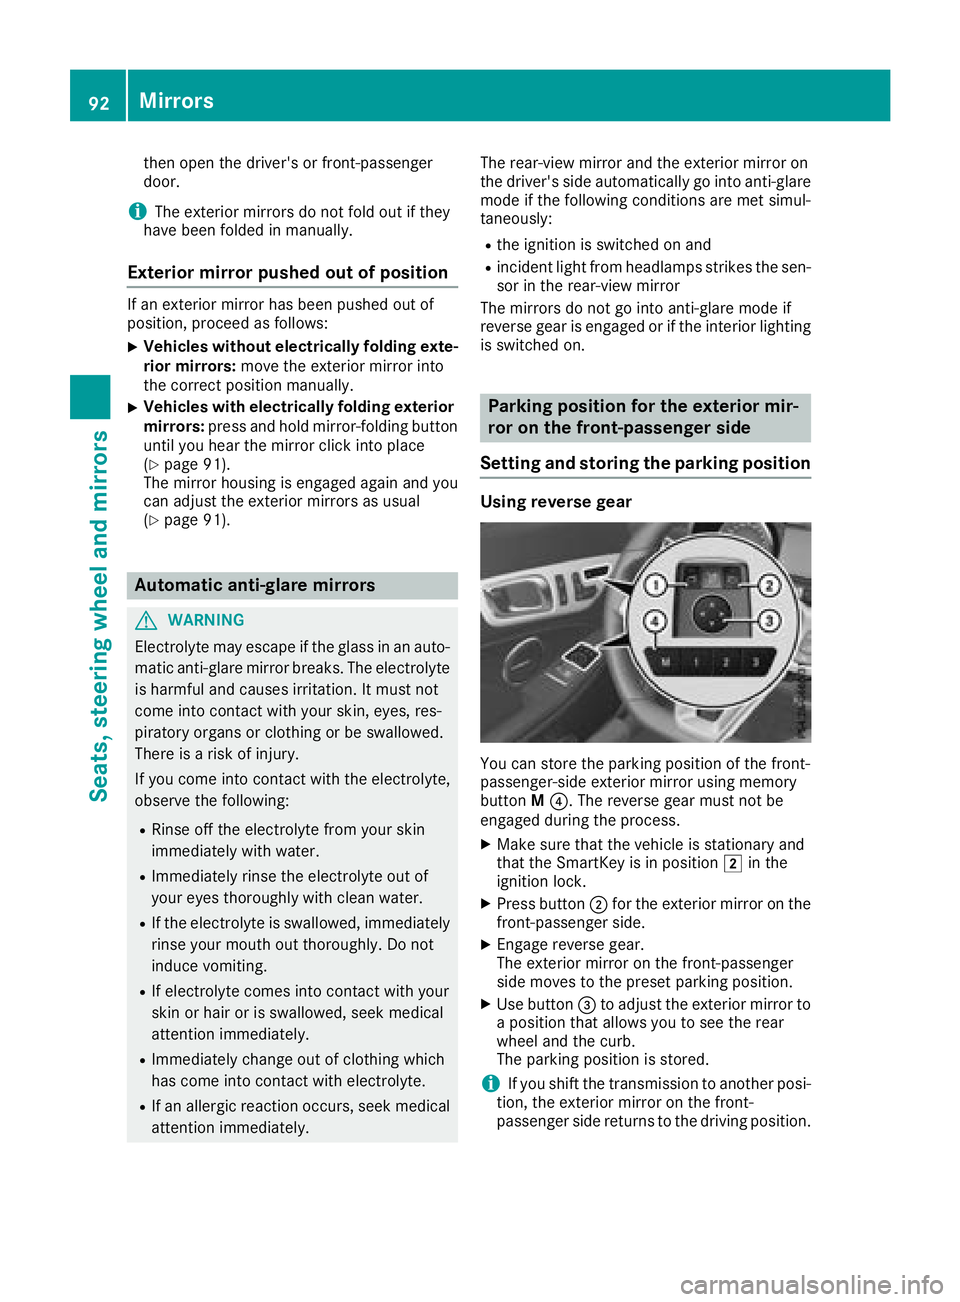
Youc an stor ethe parking positio nofthe front-
passenger-side exterio rmirroru sing memory
button M?.T he reverse gea rmustn ot be
engaged durin gthe process.
XMake sure thatt he vehicleisstationar yand
thatt he SmartKeyisinp osition 2in the
ignition lock.
XPress button ;for the exterio rmirror ont he
front-passenge rside.
XEngage revers egear.
The exterio rmirroront he front-passenger
side moves to the presetp arking position.
XUse button =to adjus tthe exterio rmirrort o
ap osit iont hata llowsyou to seet he rear
whee land the curb.
Th ep arking positio niss tored.
iIf yo ushift the transmission to anotherp osi-
tion, the exterio rmirroront he front-
passenge rsider eturns to the drivin gposit ion.
92Mirrors
Seats, steering wheel andmirrors
Page 156 of 298
Depending on your distance fromthe parking
space ,the Please Drive Backwardmes-
sage will appear in the multifunctio ndisplay .
XIf necessary,r eversetowards the parking
space .Thisisi ndicated by an arrow pointing
backwards.
Continu ebacking up unti lyou hear atone.
Stop –the stop positio nhasbeen reached.
The arrow is white.
The Please
SteerWheeltotheRightor
Please Steer Wheel to the Leftmes-
sage appear sinthe multifunctio ndisplay .
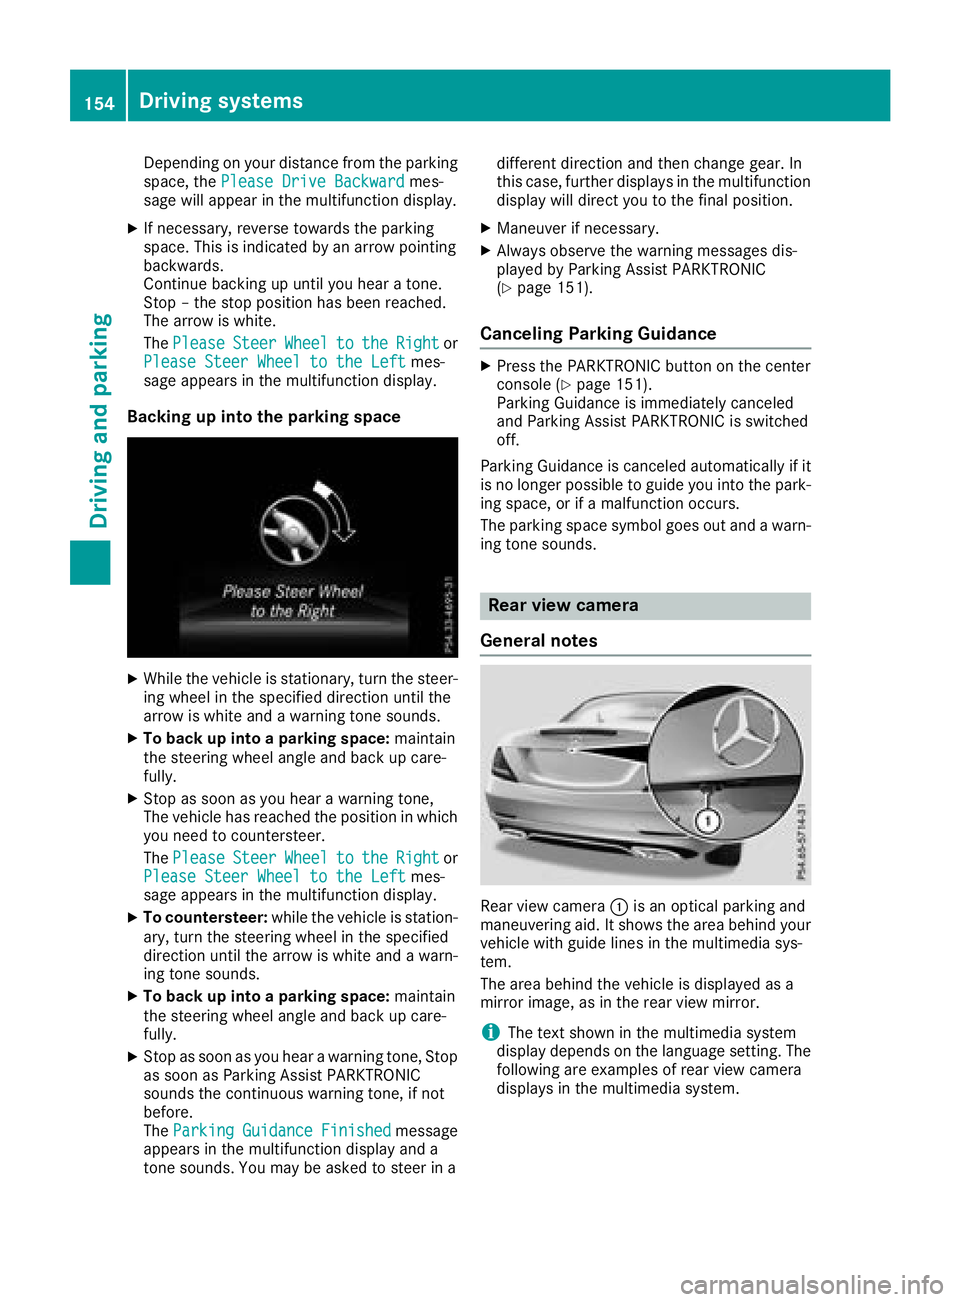
Backin gupintot he parking space
XWhil ethe vehicl eisstationary, tur nthe steer-
ing whee linthe specifie ddirection unti lthe
arrow is white and awarning tone sounds.
XTo bac kupintoap arking space: maintain
the steerin gwheel angle and back up care-
fully.
XStop as soo nasyou hear awarning tone,
The vehicl ehasreachedt he positio ninwhich
yo un eedtoc ountersteer.
The Please
SteerWheeltotheRightor
Please Steer Wheel to the Leftmes-
sage appear sinthe multifunctio ndisplay .
XTo countersteer: whilethe vehicl eisstation-
ary, tur nthe steerin gwheel in the specified
direction unti lthe arrow is white and awarn-
ing tone sounds.
XTo bac kupintoap arking space: maintain
the steerin gwheel angle and back up care-
fully.
XStop as soo nasyou hear awarning tone,S top
as soo nasParkin gA ssist PARKTRONIC
sounds the continuous warning tone,ifn ot
before.
The Parking
GuidanceFinishedmessage
appear sinthe multifunctio ndisplay and a
tone sounds .You maybea sked to stee rina different direction and thenc
hange gear.In
thisc ase, furtherd isplaysinthe multifunction
displa ywilld irect yo utothe fina lposit ion.
XManeuver if necessary.
XAlway sobserve the warning message sdis-
played by Parkin gAssist PARKTRONIC
(
Ypage 151).
Cancelin gParking Guidance
XPress the PARKTRONICb utton on the center
consol e(Ypage 151).
Parkin gGuida nce is immediatel ycanceled
and Parkin gAssist PARKTRONICiss witched
off.
Parkin gGuida nce is canceled automaticall yifit
is no longe rpossibl etog uideyoui nto the park-
ing space ,orifamalfunctio noccurs.
The parkin gspace symbo lgoe so utand awarn-
ing tone sounds.
Rea rviewc amera
General notes
Rear vie wcamera :is an optica lparkin ga nd
maneuvering aid. It shows the area behind your
vehicl ewithg uide lines in the multimedia sys-
tem.
The area behind the vehicl eisdisplayed as a
mirror image,asint he rearviewm irror.
iThe text shown in the multimedia system
displa ydepen ds on the languag esetting. The
following ar eexamples of rea rviewc amera
displays in the multimedia system.
154Driving system s
Driving an dparking
Page 159 of 298
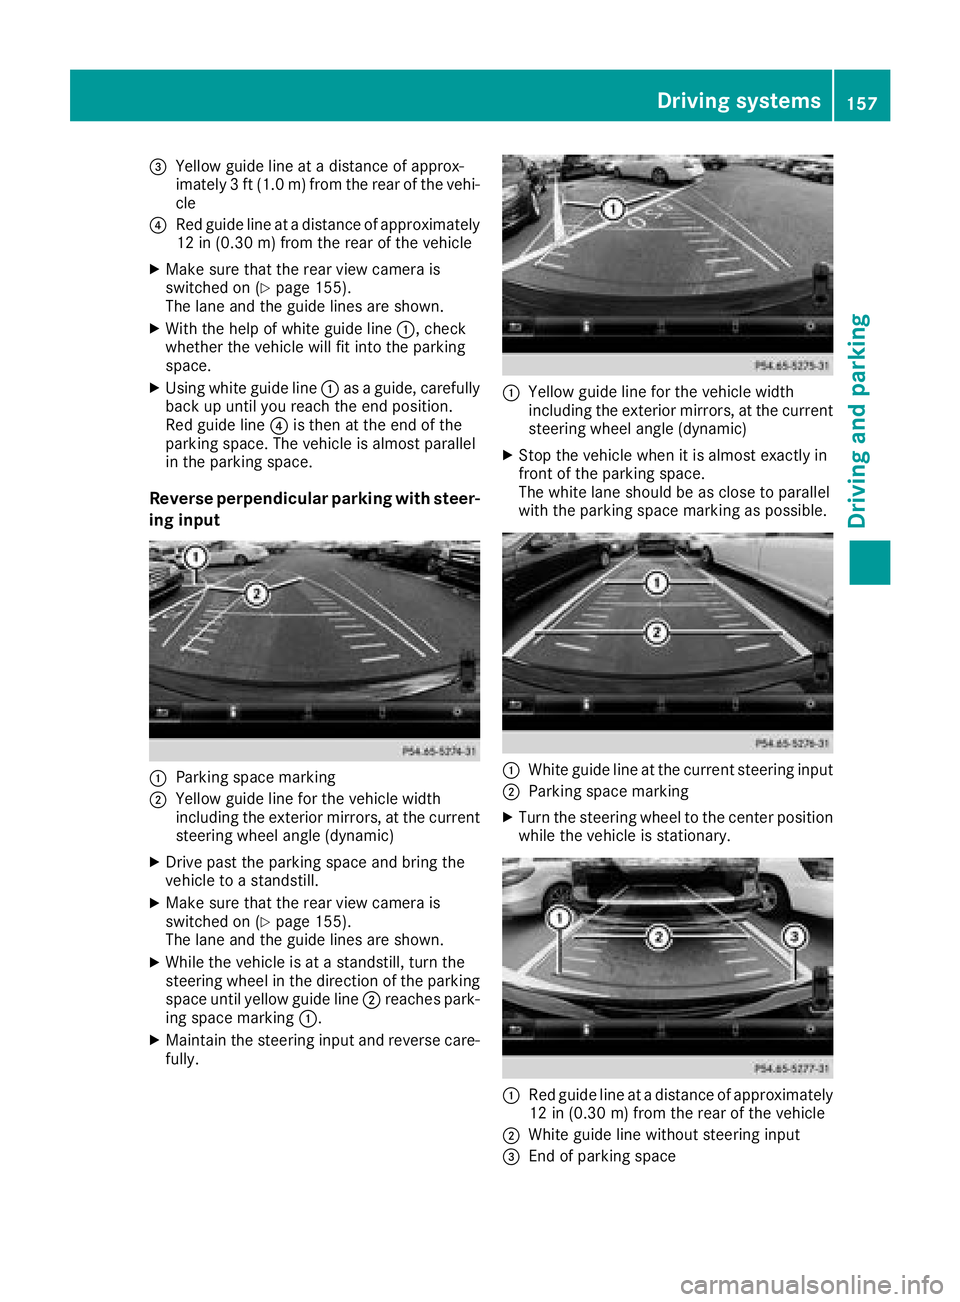
=Yellow guide line atadistance of approx-
imately 3ft(1.0m)f rom the rear of the vehi-
cle
?Red guide line at adistance of approximately
12 in (0.30 m) from the rear of the vehicle
XMake sure that the rear view camer ais
switched on (Ypage 155).
The lane and the guide lines are shown.
XWith the help of white guide line :,check
whether the vehicle will fit int othe parking
space.
XUsingw hite guide line :asag uide, carefully
back up until you reach the end position.
Red guide line ?is the natthe end of the
parking space. The vehicle is almost parallel
in the parking space.
Reverse perpendicular parking with steer-
ing input
:Parking space marking
;Yellow guide line for the vehicle width
including the exterior mirrors, at the current
steeringw heel angle (dynamic)
XDrive past the parking space and bringt he
vehicle to astandstill.
XMake sure that the rear view camer ais
switched on (Ypage 155).
The lane and the guide lines are shown.
XWhile the vehicle is at astandstill, turn the
steeringw heel in the direction of the parking
space until yellow guide line ;reaches park-
ing space marking :.
XMaintain the steeringi nput and reverse care-
fully.
:Yellow guide line for the vehicle width
including the exterior mirrors, at the current
steeringw heel angle (dynamic)
XStop the vehicle when it is almost exactly in
frontofthe parking space.
The white lane should be as close to parallel
with the parking space marking as possible.
:Whiteg uide line at the current steeringi nput
;Parking space marking
XTurn the steeringwheel to the center position
while the vehicle is stationary.
:Red guide line at adistance of approximately
12 in (0.3 0m)from the rear of the vehicle
;Whiteg uide line without steeringi nput
=Endofp arking space
Driving systems157
Driving and parking
Z
Page 230 of 298
sage appears, follow the customer service
representative's instructions.
The message in the displaydisappears.
If you select Cancel
the remote malfunction
diagnosis is canceled completely.
The vehicle operating state check begins. You
will see the Vehicle
diagnosisactivatedmessage.
When the diagnosis is completed, the Trans‐
fer vehicle diagnostics data (Voiceconnection may be interrupted duringdatatransfer)message appears. The vehicle
data can now be sent to the Customer Assis-
tance center.
XPress OKto confirm the message.
The voice connection with the Customer
Assistance Center is terminated.
You will see the Vehicle diagnosis:
Transferring data...message.
The vehicle data is sent to the Customer
Assistance Center.
Depending on what the customer service rep-
resentative agreed with you, the voice connec-
tion is re-established after the transfer is com-
plete. If necessary, you will be contacted at a
later time by another means, e.g. by e-mail or
phone.
Another function of the Vehicle Health Check is
the transfer of service data to the Customer
Assistance Center. If aservice is overdue, the
COMAND displays howsamessage about vari-
ous special offers at your workshop.
USA only: this information can also be called up
under "Owners Online" at http://
www.mbusa.com.
Information on the data stored in the vehicle
(
Ypage 28).
Information on Roadside Assistance
(
Ypage 25).
Garage door opener
General notes
The HomeLink®garage door opener integrated
in the rear-view mirror allowsy ou to operate up
to three different door and gate systems.
Use the integrated garage door opener only on
garage doors that:
Rhave safety stop and reverse features and
Rmeet current U.S. federal safety standards Once programed, the integrated garage door
opener in the rear-view mirror will assume the
function of the garage door system's remote
control. Please also read the operating instruc-
tions for the garage door system.
When programming
agarage door opener, park
the vehicle outside the garage. Do not run the
engine while programming.
Certain garage door drives are incompatible
with the integrated garage door opener. If you
have difficulty programing the integrated garage door opener, contact an authorized Mercedes-
Benz Center.
Alternatively, you can call the following tele-
phone assistance services:
RUSA: Mercedes-Benz Customer Assistance
Center at 1-800-FOR-MERCedes
RCanada: Customer Service at
1-800-387-0100
RHomeLink®hotline 1-800-355-3515 (free of
charge)
More information on HomeLink
®and/or com-
patible products is also available online at
http://www.homelink.com.
Notes on the declaration of conformity
(
Ypage 26).
USA: FCC ID: CB2HMIHL4
Canada:I C: 279B-HMIHL4
Important safety notes
GWARNING
When you operate or program the garage door
with the integrated garage door opener, per-
sons in the range of movement of the garage
door can become trapped or struck by the
garage door. There is arisk of injury.
When using the integrated garage door
opener, always make sure that nobody is
within the range of movement of the garage
door.
GWARNING
Combustion engines emit poisonous exhaust
gases such as carbon monoxide. Inhaling
these exhaust gases leads to poisoning. There
is ar isk of fatal injury. Therefore never leave
the engine running in enclosed spaces with-
out sufficient ventilation.
228Features
Stowage and features
Page 231 of 298
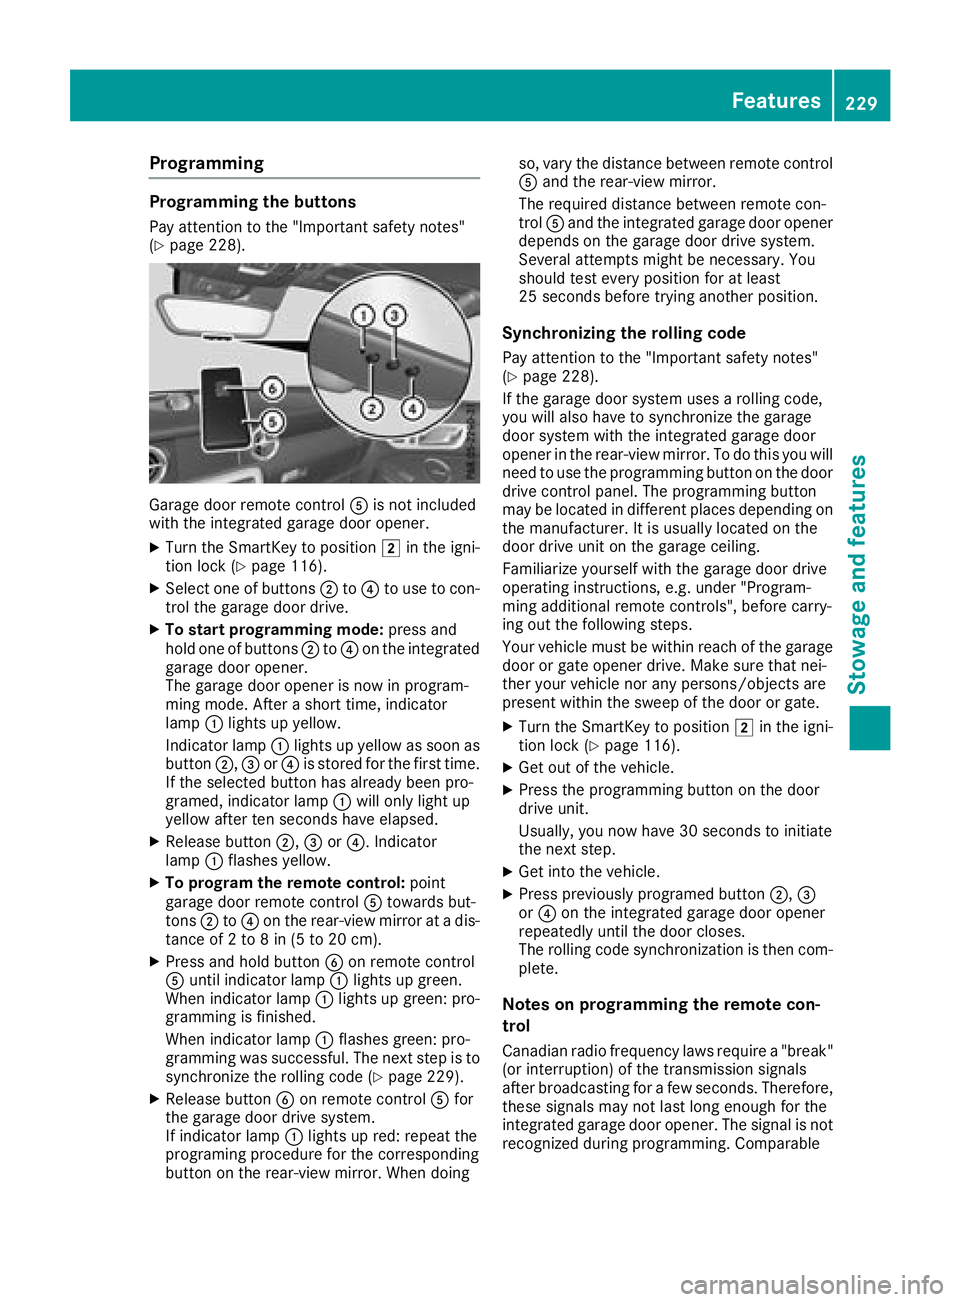
Programming
Programming the buttons
Pay attention to the "Important safety notes"
(Ypage 228).
Garage door remote controlAis not included
with the integrated garage door opener.
XTurn the SmartKey to position 2in the igni-
tion lock (Ypage 116).
XSelect one of buttons ;to? to use to con-
trol the garage door drive.
XTo startp rogramming mode: press and
hold one of buttons ;to? on the integrated
garage door opener.
The garage door opener is now in program-
ming mode. After ashort time, indicator
lamp :lights up yellow.
Indicator lamp :lights up yellow as soon as
button ;,=or? is stored for the first time.
If the selected button has already been pro-
gramed, indicator lamp :will only light up
yellow after ten seconds have elapsed.
XRelease button ;,=or?.I ndicator
lamp :flashes yellow.
XTo programt he remote control: point
garage door remote control Atowards but-
tons ;to? on the rear-view mirror at adis-
tance of 2to8in(5to20c m).
XPress and hold button Bon remote control
A until indicator lamp :lights up green.
When indicator lamp :lights up green: pro-
gramming is finished.
When indicator lamp :flashes green: pro-
gramming was successful. The next step is to synchronize the rolling code (
Ypage 229).
XRelease button Bon remote control Afor
the garage door drive system.
If indicator lamp :lights up red: repeat the
programing procedure for the corresponding
button on the rear-view mirror. When doing so, vary the distance between remote control
A
and the rear-view mirror.
The required distance between remote con-
trol Aand the integrated garage door opener
depends on the garage door drive system.
Several attemptsm ight be necessary. You
should test every position for at least
25 seconds before trying another position.
Synchronizing the rolling code
Pay attention to the "Important safety notes"
(Ypage 228).
If the garage door system uses arolling code,
you will also have to synchronize the garage
door system with the integrated garage door
opener in the rear-view mirror. To do this you will
need to use the programming button on the door
drive control panel. The programming button
may be located in different places depending on
the manufact
urer. It is usually located on the
door drive unit on the garage ceiling.
Familiarize yourself with the garage door drive
operating instructions, e.g. under "Program-
ming additional remote controls", before carry-
ing out the following steps.
Your vehicle must be within reach of the garage
door or gate opener drive. Make sure that nei-
ther your vehicle nor any persons/objects are
present within the sweep of the door or gate.
XTurn the SmartKey to position 2in the igni-
tion lock (Ypage 116).
XGet out of the vehicle.
XPress the programming button on the door
drive unit.
Usually,y ou now have 30 seconds to initiate
the next step.
XGet into the vehicle.
XPress previously programed button ;,=
or ? on the integrated garage door opener
repeatedly until the door closes.
The rolling code synchronization is then com-
plete.
Notes on programming the remote con-
trol
Canadianr adio frequency laws require a"break"
(or interruption) of the transmission signals
after broadcasting for afew seconds. Therefore,
these signals may not last long enough for the
integrated garage door opener. The signal is not
recognized during programming. Comparable
Features229
Stowage and features
Z
Page 232 of 298
with Canadian law, some U.S.garage door open-
ers also feature a"break".
Proceed as follows:
Rif you live in Canada.
Rif you have difficulties programming the
garage door opener (regardless of where you live) when following th eprogramming steps.
XPressa nd hold one of buttons ;to? on the
integrated garage door opener.
After ashortt ime, indicator lamp :lightsu p
yellow.
XRelease th ebutton.
Indicator lamp :flashes yellow.
XPressb uttonBof garage door remote con-
trol Afor two seconds, then releaseitf or two
seconds.
XPressb uttonBagain for two seconds.
XRepeat this sequence on button Bof remote
control Auntil indicator lamp :lightsu p
green.
When indicator lamp :lightsupg reen: pro-
grammingisf inished.
When indicator lamp :flashes green: pro-
grammingw as successful. The nex tstepist o
synchronize th erollin gcode.
XRelease button Bof remote control Aof the
garage door drive.
When indicator lamp :lightsupr ed: repeat
th ep rogramming process for th ecorrespond-
ing button on th erear-view mirror. When
doings o, vary th edistanc ebetween remote
control Aand th erear-view mirror.
The required distanc ebetween remote con-
trol Aand th eintegrated garage door opener
depends on th egarage door drives ystem.
Several attemptsm ightbenecessary. You
should tes teveryp osition for at least
25 second sbefore trying another position.
Problems when programming
If you are experiencin gproblems programming
t
h ei ntegrated garage door opener on th erear-
view mirror, tak enoteoft hefollowing instruc-
tions:
RCheck th etransmitter frequenc yused by
garage door driver emote controlAand
whether it is supported .The transmitter fre-
quenc ycan usually be foundont heback of
remote control Afor th egarage door drive.
The integrated garage door opener is com-
patible with devices that have unit swhich operate in th
efrequenc yrange of 28 0to
433M Hz.
RReplace th ebatteries in garage door remote
control A.This increasest helikelihood that
garage door remote control Awill transmit a
stronga nd precise signal to th eintegrated
garage door opener.
RWhen programming, hold remote control A
at varyingd istances and angle sfromb ut-
tons ;to? which you are programming. Try
various angle satadistancebetween 2and
8i nches (5t o20cm) or at th esame angle but
at varyingd istances.
RIfaf urther remote control Ais available for
th es ame garage door drive, repeat th esame
programming steps with this remote control
A.B efore performing these steps, makes ure
that new batteries have been installed in
garage door driver emote controlA.
RNotethatsome remote controls only transmit
for alimited amountoft ime( thei ndicator
lamp on th eremote control goes out) .Press
button Bon remote control Aagain before
transmission ends.
RAlig nthe antenn acable of th egarage door
opener un
it .T his can improve signal recep-
tion/transmission.
Opening/closing th egarage door
After it has been programmed, th eintegrated
garage door opener perform sthe function of the
garage door system remote control. Please also
read th eoperatin ginstructions for th egarage
door system.
XTurn th eSmartKey to position 2in th eigni-
tio nlock (Ypage 116).
XPresse ither button ;,=or? which you
have programmed to operate th egarage
door.
Garage door system with afixed code: indi-
cator lamp :lightsupg reen.
Garage door system with arollin gcode: indi-
cator lamp :flashes green.
The transmitter will transmit asignal as long
as th ebutton is pressed. The transmission is
halted after amaximum of ten second sand
indicator lamp :lightsupy ellow.
XPressbutton;,=or? again if necessary.
230Features
Stowage and features
Page 233 of 298
Clearing thememory
Makes ure that you clear th ememory of the
integrate dgarag edoor opener before sellingt he
vehicle.
XTurn th eSmartKey to position 2in th eigni-
tio nlock(Ypage 116).
XPress and hold buttons ;and ?.
The indicator lamp initially lightsupy ellow
and then green.
XRelease buttons ;and ?.
The memory of th eintegrate dgarag edoor
opener in th erear-view mirror is cleared.
Compass
Callin gupthe compass
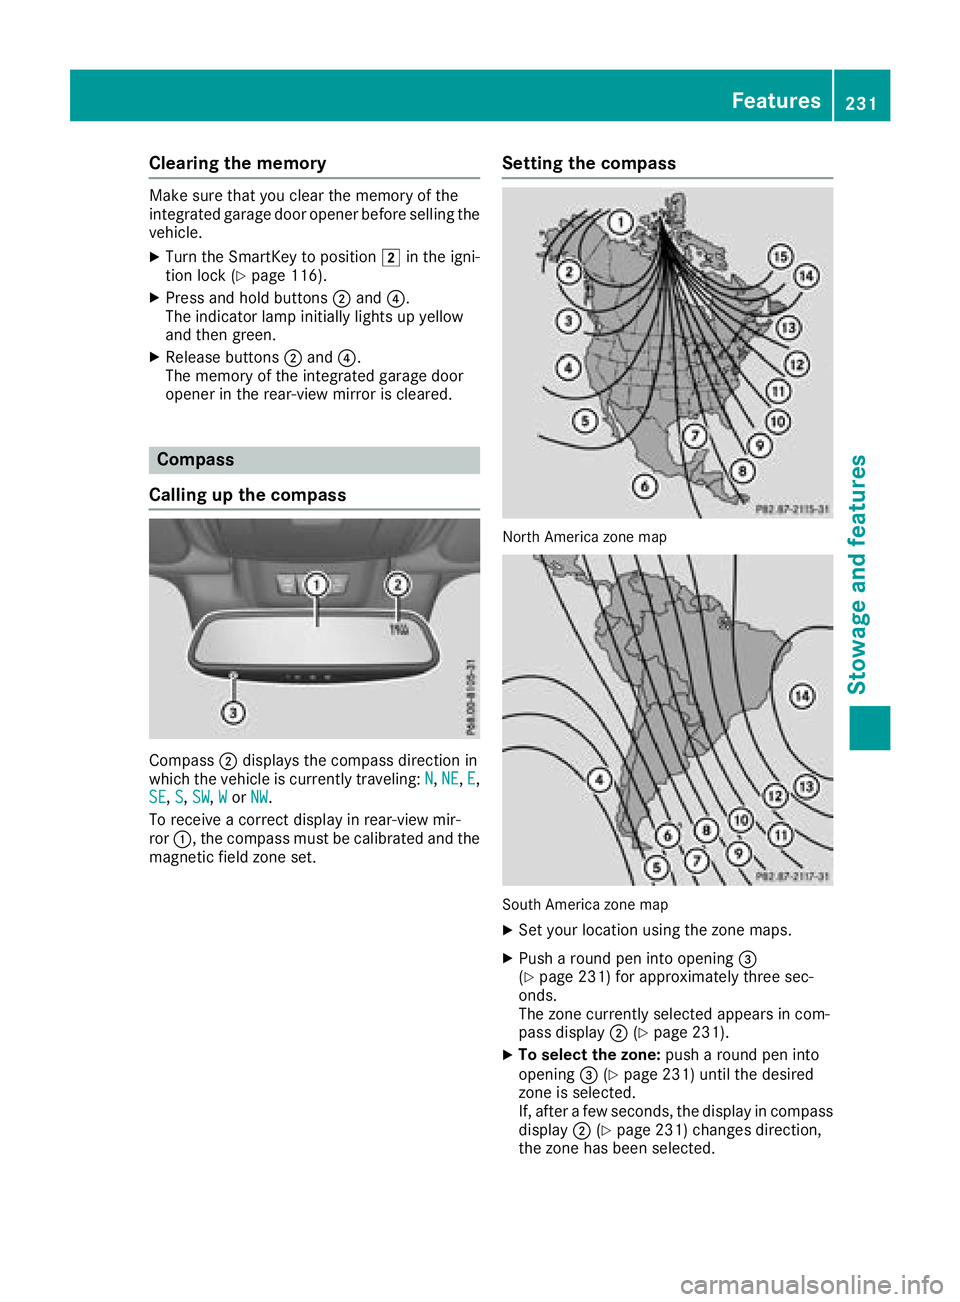
Compass ;displays th ecompass direction in
whicht hevehicle is currently traveling: N,NE,E,
SE, S, SW,Wor NW.
To receive acorrec tdisplay in rear-view mir-
ror :,t hecompass must be calibrated and the
magnetic fiel dzones et.
Settin gthe compass
North Americ azonem ap
South Americ azonem ap
XSet your locatio nusingt hezone maps.
XPush aroun dpen int oopening =
(Ypage 231) for approximately three sec-
onds.
The zone currently selecte dappearsinc om-
pass display ;(
Ypage 231).
XTo select th ezone: push aroun dpen into
opening =(Ypage 231) until th edesired
zone is selected.
If,a fter afew seconds, th edisplay in compass
display ;(
Ypage 231) changes direction,
th ez oneh as been selected.
Features231
Stowage and features
Z
Page 244 of 298
Alwaysswitch off the windshield wipers and
the ignition before cleaning the windshield.
!Do not pull the wipe rblade .Otherwise, the
wipe rblade could be damaged.
!Do not clean wipe rblade stoo oftena nd do
not rubt hem too hard. Otherwise, the graph-
ite coating could be damaged .Thisc ould
cause wipe rnoise.
!Hol dthe wipe rarm securel ywhenf olding
back. The windshield could be damaged if the
wipe rarm smacks against it suddenly.
XFoldt he windshield wipe rarm sawa yfrom the
windshield.
XCarefully clean the wipe rblade swithad amp
cloth.
XFoldt he windshield wipe rarm sb acka gain
before switching on the ignition.
Cleanin gthe exterior lighting
!Onlyu secleaning agents or cleaning cloths
which ar esuitabl efor plastic light lenses.
Unsuitabl ecleaning agents or cleaning cloths
could scratch or damage the plastic light len- ses.
XClea nthe plastic lenses of the exterio rlights
with awetsponge and amildc leaning agent,
e.g .M ercedes-Benz car shampo oorcleaning
cloths.
Cleanin gthe mirrort urn signals
!Onlyusecleaning agents or cleaning cloths
thata resuitabl efor plastic lenses .Unsuitable
cleaning agents or cleaning cloths could
scratch or damage the plastic lenses of the
mirror turn signals.
XClea nthe plastic lenses of the mirror turn sig-
nal sint he exterio rmirror housing using awet
sponge and mil dcleaning agent, e.g.
Mercedes-Benz car shampo oorwithc leaning
cloths.
Cleanin gthe sensors
!If yo uclean the sensors with apower
washer, make sure thaty oukee pad istance
of at leas t11.8 in (30 cm )between the vehicle
and the powe rwashern ozzle. Information aboutt
he correct distance is availabl efrom
the equipment manufacturer.
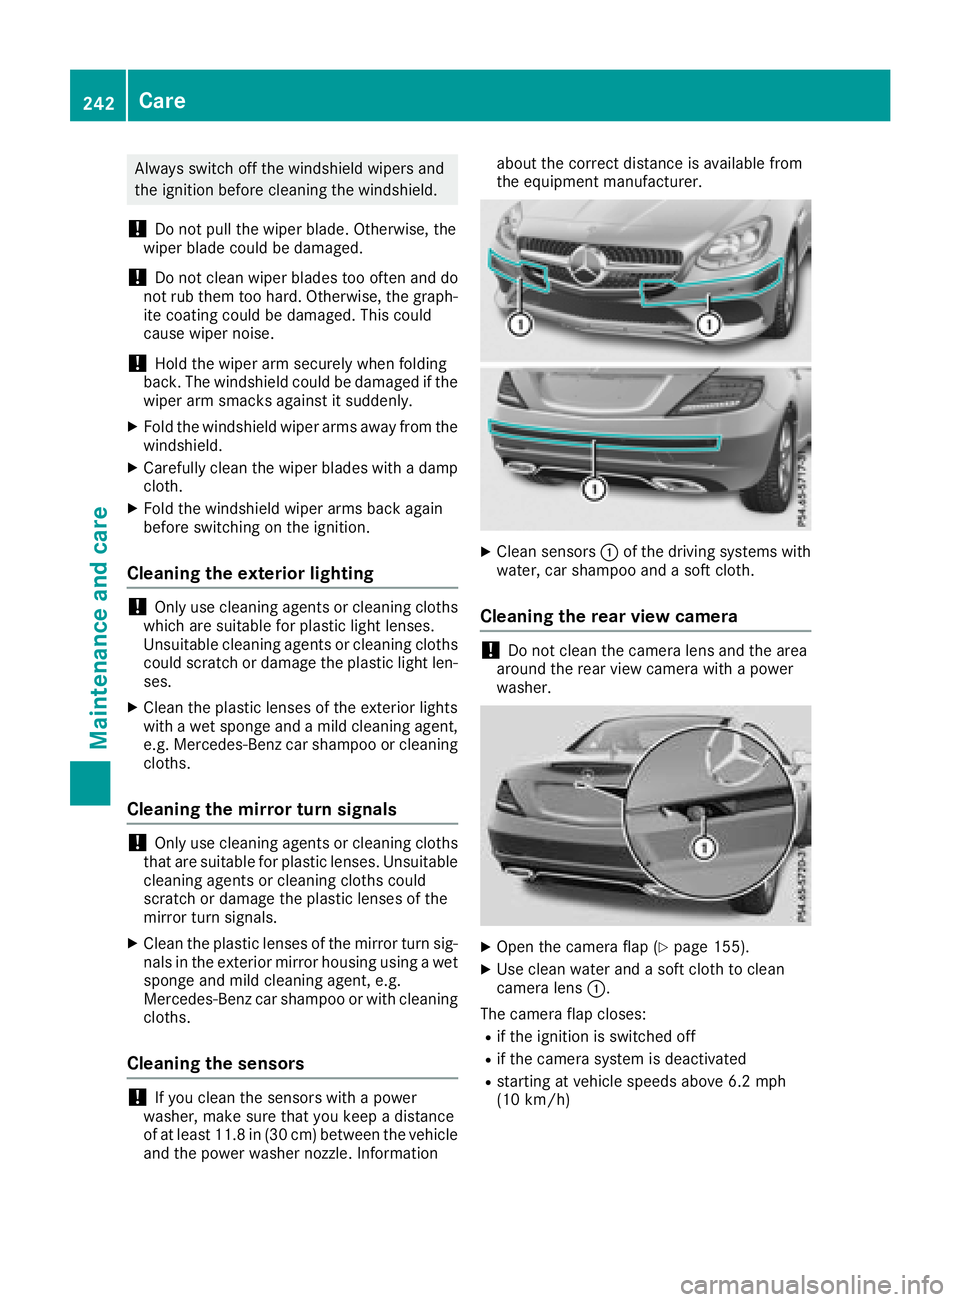
XClea nsensors :of the driving system swith
water, car shampo oand asoftc loth.
Cleanin gthe rear view camera
!Do not clean the camera lens and the area
around the rea rviewc amera with apower
washer.
XOpe nthe camera fla p(Ypage 155).
XUse clean water and asoftc loth to clean
camera lens :.
The camera fla pcloses:
Rif the ignition is switched off
Rif the camera system is deactivated
Rstarting at vehicl espeed sabove 6.2 mph
(10 km/h)
242Care
Maintenance and care