2018 MERCEDES-BENZ SL ROADSTER winter tires
[x] Cancel search: winter tiresPage 5 of 322

Maintenance and care......................258
Engine compartment ........................... 258
Overview of the engine compartment .. 261
ASSYST PLUS ...................................... 262
Care ..................................................... 263
Breakdown assistance .....................269
Where will I find...? .............................. 269
Flat tire ................................................ 271
Battery (vehicle) .................................. 275
Jump-starting ....................................... 278
Towing and tow-starting ...................... 280
Fuses ...................................................2 82
Wheels and tires............................... 285
Important safety notes ........................ 285
Operation ............................................ 285
Winter operation .................................. 287
Tire pressure ....................................... 288
Loading the vehicle .............................. 295
All about wheels and tires ................... 297
Changing a wheel ................................ 303
Wheel and tire combinations ...............3 08
Technical data................................... 310
Information regarding technical data ... 310
Vehicle electronics .............................. 310
Identification plates .............................3 11
Service products and filling capaci-
ties ...................................................... 312
Vehicle data ......................................... 317
Contents3
Page 24 of 322
Washer fluidDisplay message ............................ 225
Weather display (COMAND)
see also Digital Operator's Man-
ual .................................................. 236
Wheel and tire combinations
Tires ............................................... 308
Wheel bolt tightening torque ........... 308
Wheel chock ...................................... 305
Wheels
Changing a wheel .......................... 303
Checking ........................................ 285
Cleaning ......................................... 266
Important safety notes .................. 285
Information on driving .................... 285
Interchanging/changing ................ 304
Mounting a new wheel ...................3 07
Mounting a wheel .......................... 304
Overview ........................................ 285
Removing a wheel .......................... 307
Storing ...........................................3 04
Tightening torque ........................... 308
Wheel size/tire size ....................... 308
Wind screen
Electrical wind screen ......................9 2
Windows
see Side windows
Windshield
Defrosting ...................................... 117
Windshield washer fluid
see Windshield washer system
Windshield washer system
Adding washer fluid ....................... 261
Important safety notes .................. 316
Windshield wipers
Display message ............................ 225
Problem (malfunction) ................... 112
Replacing the wiper blades ............ 111
Switching on/off ........................... 110
Winter driving
Important safety notes .................. 287
Slippery road surfaces ................... 148
Snow chains .................................. 287
Winter operation
Overview ........................................ 287
Winter tires
M+S tires ....................................... 287 Wiper blades
Cleaning ......................................... 267
Important safety notes .................. 111
Replacing ....................................... 111
Workshop
see Qualified specialist workshop
Z
ZONE functionSwitching on/off ........................... 117
22Index
Page 62 of 322
RActive Brake Assist with cross-traffic function(Ypage 69)
RSTEER CONTROL (Ypage 71)
Important safety notes
If you fail to adapt your driving style or if you are
inattentive, the driving safety systems can nei-
ther reduce the risk of an accident nor overridethe laws of physics. Driving safety systems are
merely aids designed to assist driving.
You are responsible for maintaining the distance
to the vehicle in front, for vehicle speed, for
braking in good time, and for staying in lane.
Always adapt your driving style to suit the pre-
vailing road and weather conditions and main-
tain a safe distance from the vehicle in front.
Drive carefully.
The driving safety systems described only work
as effectively as possible when there is ade-
quate contact between the tires and the road
surface. Pay particular attention to the informa-
tion regarding tires, recommended minimum
tire tread depths etc. in the "Wheels and tires"
section (
Ypage 285).
In wintry driving conditions, always use winter
tires (M+S tires) and if necessary, snow chains.
Only in this way will the driving safety systems
described in this section work as effectively as
possible.
ABS (Anti-lock Braking System)
General information
ABS regulates brake pressure in such a way that
the wheels do not lock when you brake. This
allows you to continue steering the vehicle when
braking.
The ! ABS warning lamp in the instrument
cluster lights up when the ignition is switched
on. It goes out when the engine is running.
ABS works from a speed of about 5 mph
(8 km/h), regardless of road-surface conditions.
ABS works on slippery surfaces, even when you
only brake gently.
Important safety notes
iObserve the "Important safety notes" sec-
tion (Ypage 60).
GWARNING
If ABS is malfunctioning, the wheels could
lock when braking. The steerability and brak-
ing characteristics would be severely affec-
ted. There is an increased danger of skidding and accidents.
Drive on carefully. Have ABS checked imme-
diately at a qualified specialist workshop.
When ABS is malfunctioning, other systems,
including driving safety systems, will also
become inoperative. Observe the information
on the ABS warning lamp (
Ypage 229 )and dis-
play messages which may be shown in the
instrument cluster (
Ypage 201).
Brakes
XIf ABS intervenes: continue to depress the
brake pedal vigorously until the braking sit-
uation is over.
XTo make a full brake application: depress
the brake pedal with full force.
If ABS intervenes when braking, you will feel a
pulsing in the brake pedal.
The pulsating brake pedal can be an indication
of hazardous road conditions, and functions as a
reminder to take extra care while driving.
BAS (Brake Assist System)
General information
BAS operates in emergency braking situations.
If you depress the brake pedal quickly, BAS
automatically boosts the braking force, thus
shortening the stopping distance.
Important safety notes
iObserve the "Important safety notes" sec-
tion (Ypage 60).
GWARNING
If BAS is malfunctioning, the braking distance
in an emergency braking situation is
increased. There is a risk of an accident.
In an emergency braking situation, depress
the brake pedal with full force. ABS prevents
the wheels from locking.
60Driving safety systems
Safety
Page 151 of 322
window on the side of the vehicle that is not
facing into the wind.
Have your vehicle winter-proofed at a qualified
specialist workshop at the onset of winter.
Drive particularly carefully on slippery road sur-
faces. Avoid sudden acceleration, steering and
braking maneuvers. Do not use cruise control.
If the vehicle threatens to skid or cannot be
stopped when moving at low speed:
XShift the transmission to position i.
The outside temperature indicator is not
designed to serve as an ice-warning device and is therefore unsuitable for that purpose.
Changes in the outside temperature are dis-
played after a short delay.
Indicated temperatures just above the freezing
point do not guarantee that the road surface is
free of ice. The road may still be icy, especially in
wooded areas or on bridges. The vehicle could
skid if you fail to adapt your driving style. Always
adapt your driving style and drive at a speed to
suit the prevailing weather conditions.
You should pay special attention to road condi-
tions when temperatures are around freezing
point.
For more information on driving with snow
chains, see (
Ypage 287).
For more information on driving with summer
tires, see (
Ypage 287).
Observe the notes in the "Winter operation" sec-
tion (
Ypage 287).
Driving systems
Cruise control
General notes
Cruise control maintains a constant road speed
for you. It brakes automatically in order to avoid
exceeding the set speed. On long and steep
downhill gradients, especially if the vehicle is
laden, you must select a lower gear in good time.
By doing so, you will make use of the braking
effect of the engine. This relieves the load on the
brake system and prevents the brakes from
overheating and wearing too quickly.
Use cruise control only if road and traffic con-
ditions make it appropriate to maintain a steady speed for a prolonged period. You can store any
road speed above 20 mph (30 km/h).
Important safety notes
If you fail to adapt your driving style, cruise con-
trol can neither reduce the risk of an accident
nor override the laws of physics. Cruise control
cannot take into account the road, traffic and
weather conditions. Cruise control is only an
aid. You are responsible for the distance to the
vehicle in front, for vehicle speed, for braking in
good time and for staying in lane.
Do not use cruise control:
Rin road and traffic conditions which do not
allow you to maintain a constant speed e.g. in
heavy traffic or on winding roads
Ron slippery road surfaces. Braking or accel-
erating could cause the drive wheels to lose
traction and the vehicle could then skid
Rwhen there is poor visibility, e.g. due to fog,
heavy rain or snow
If there is a change of drivers, advise the new
driver of the speed stored.
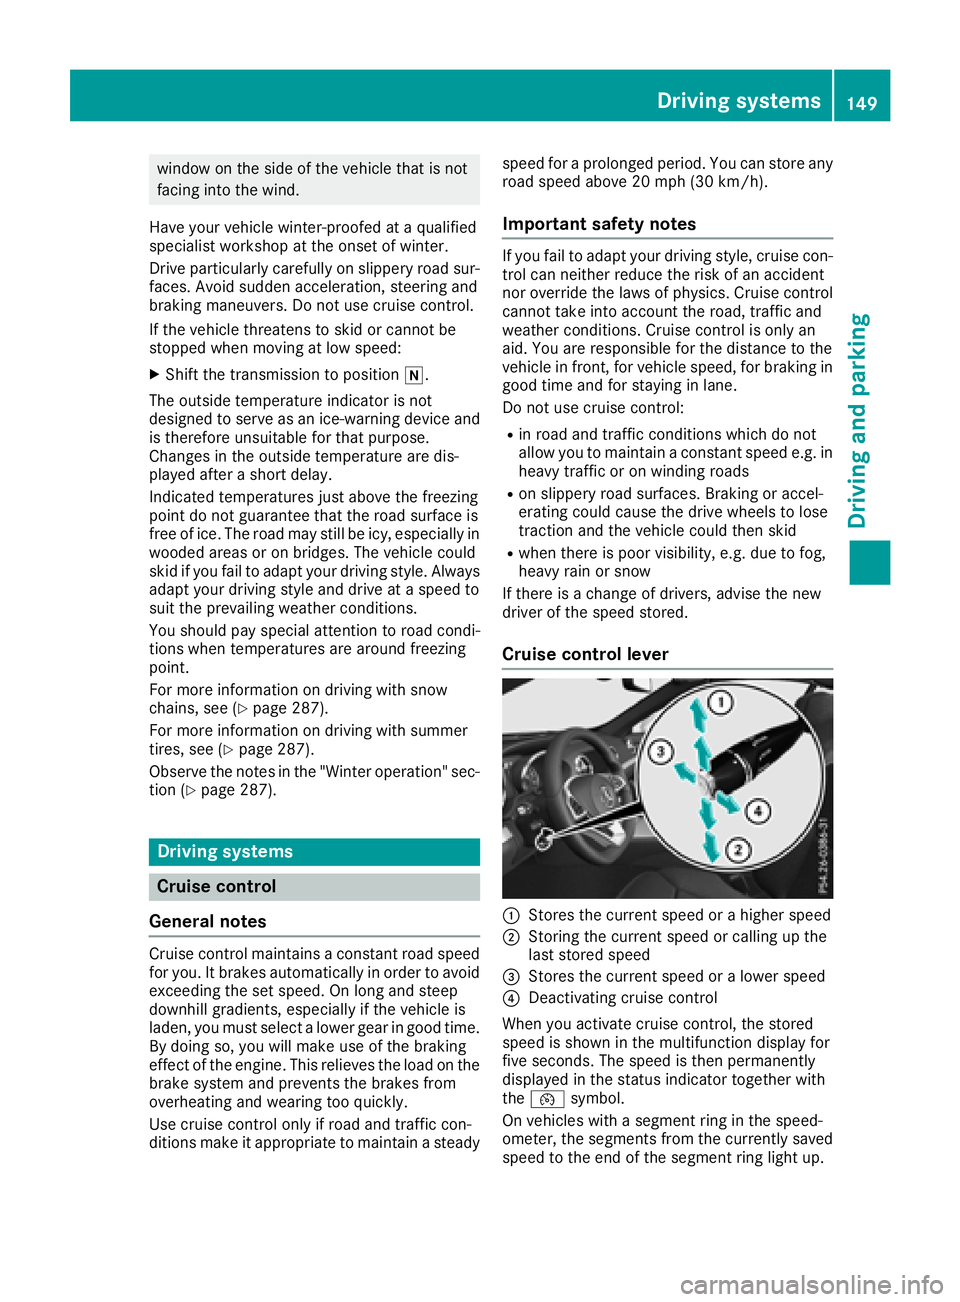
Cruise control lever
:Stores the current speed or a higher speed
;Storing the current speed or calling up the
last stored speed
=Stores the current speed or a lower speed
?Deactivating cruise control
When you activate cruise control, the stored
speed is shown in the multifunction display for
five seconds. The speed is then permanently
displayed in the status indicator together with
the ¯ symbol.
On vehicles with a segment ring in the speed-
ometer, the segments from the currently saved speed to the end of the segment ring light up.
Driving systems149
Driving and parking
Z
Page 266 of 322
!Make sure that:
Rthe side windows and the roof are com-
pletely closed
Rthe climate control blower is switched off
Rthe windshield wiper switch is at position0
The vehicle could otherwise be damaged.
You can clean the vehicle at an automatic car
wash from the very start.
Preferably clean the vehicle at automatic car
washes that use textile washing elements with-
out brushes. This prevents fine scratches from
forming on the paintwork and film.
If the vehicle is very dirty, pre-wash it before
cleaning it in an automatic car wash.
After using an automatic car wash, wipe off wax
from the windshield and the wiper blades. This
will prevent smears and reduce wiping noises
caused by residue on the windshield.
iVehicles with decorative film: select a wash
program without hot wax at the automatic car
wash.
Washing by hand
In some countries, washing by hand is only
allowed at specially equipped washing bays.
Observe the legal requirements in each country.
XDo not use hot water and do not wash the
vehicle in direct sunlight.
XUse a soft sponge to clean.
XUse a mild cleaning agent, such as a car
shampoo approved by Mercedes-Benz.
XThoroughly hose down the vehicle with a gen-
tle jet of water.
XDo not point the water jet directly towards the
air inlet or the edges of decorative foils.
XUse plenty of water and rinse out the sponge
frequently.
XRinse the vehicle with clean water and dry
thoroughly with a chamois.
XDo not let the cleaning agent dry on the paint- work or the decorative foils.
Carefully remove all deposits of road salt as
soon as possible when driving in winter.
Power washers
GWARNING
The water jet from a circular jet nozzle (dirt
blasters) can cause invisible exterior damage
to the tires or chassis components. Compo-
nents damaged in this way may fail unexpect-
edly. There is a risk of an accident.
Do not use power washers with circular jet
nozzles to clean the vehicle. Have damaged
tires or chassis components replaced imme-
diately.
!Vehicles with decorative foil: parts of your
vehicle are covered with decorative foil. Main-
tain a distance of at least 27.5 in (70 cm)
between the foil-wrapped parts of the vehicle
and the nozzle of the high pressure cleaner.
Information about the correct distance is
available from the equipment manufacturer.
Move the power washer nozzle around when
cleaning your vehicle.
The water temperature of the high-pressure
cleaner must not exceed 140 °F (60 °C).
!Always maintain a distance of at least
11.8 in (30 cm) between the vehicle and the
power washer nozzle. Information about the
correct distance is available from the equip-
ment manufacturer.
Move the power washer nozzle around when
cleaning your vehicle.
Do not aim directly at any of the following:
Rtires
Rdoor gaps, roof gaps, joints, etc.
Relectrical components
Rbattery
Rplug-type couplings
Rlights
Rseals
Rtrim
Rventilation slots
Damaged seals or electrical components can
lead to leaks or failures.
264Care
Maintenance and care
Page 273 of 322
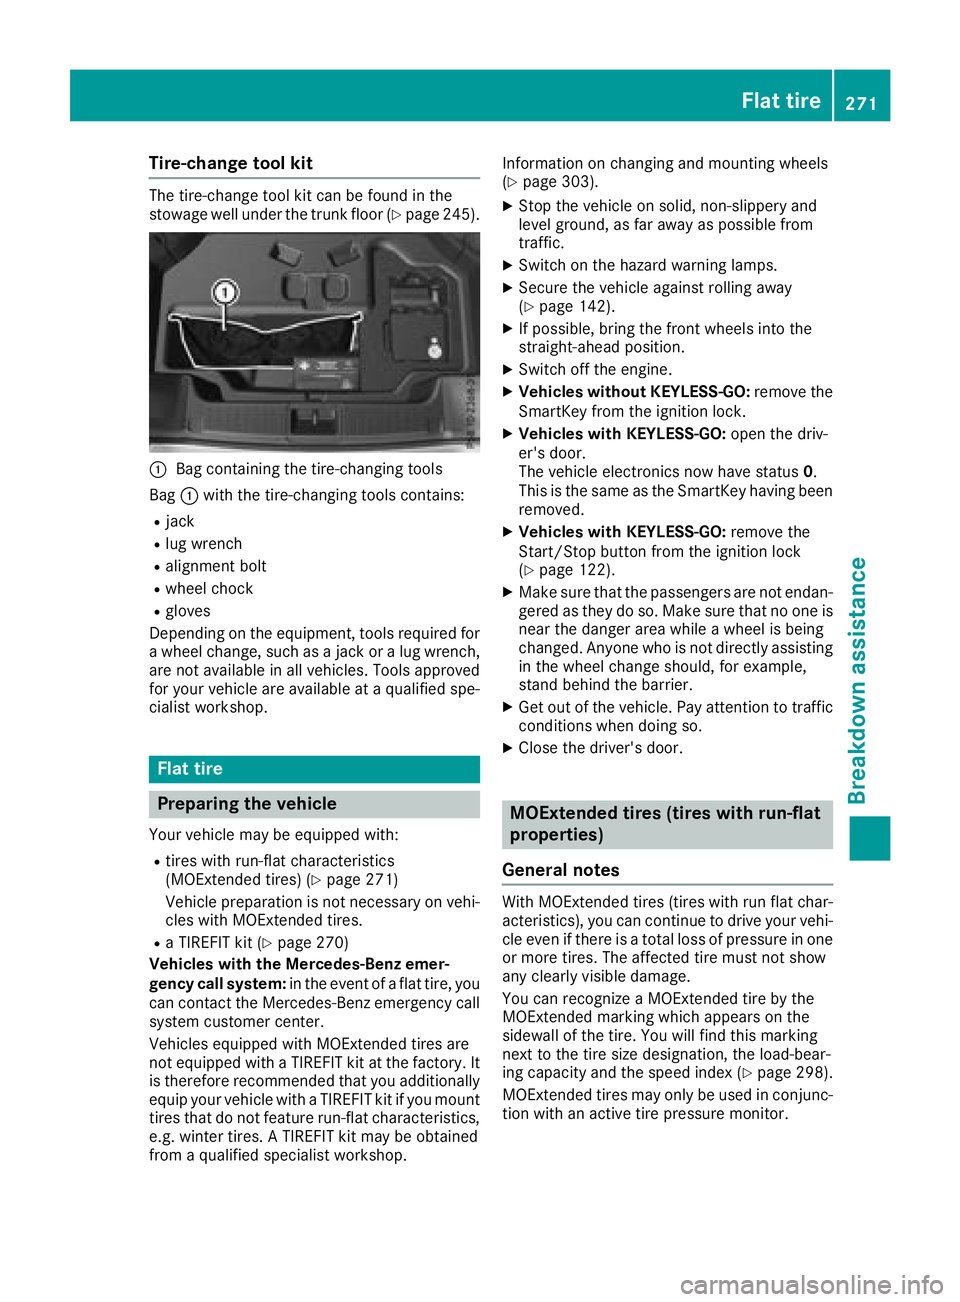
Tire-change tool kit
The tire-change tool kit can be found in the
stowage well under the trunk floor (Ypage 245).
:Bag containing the tire-changing tools
Bag :with the tire-changing tools contains:
Rjack
Rlug wrench
Ralignment bolt
Rwheel chock
Rgloves
Depending on the equipment, tools required for
a wheel change, such as a jack or a lug wrench, are not available in all vehicles. Tools approved
for your vehicle are available at a qualified spe-
cialist workshop.
Flat tire
Preparing the vehicle
Your vehicle may be equipped with:
Rtires with run-flat characteristics
(MOExtended tires) (Ypage 271)
Vehicle preparation is not necessary on vehi-
cles with MOExtended tires.
Ra TIREFIT kit (Ypage 270)
Vehicles with the Mercedes-Benz emer-
gency call system: in the event of a flat tire, you
can contact the Mercedes-Benz emergency call
system customer center.
Vehicles equipped with MOExtended tires are
not equipped with a TIREFIT kit at the factory. It
is therefore recommended that you additionally
equip your vehicle with a TIREFIT kit if you mount tires that do not feature run-flat characteristics,
e.g. winter tires. A TIREFIT kit may be obtained
from a qualified specialist workshop. Information on changing and mounting wheels
(
Ypage 303).
XStop the vehicle on solid, non-slippery and
level ground, as far away as possible from
traffic.
XSwitch on the hazard warning lamps.
XSecure the vehicle against rolling away
(Ypage 142).
XIf possible, bring the front wheels into the
straight-ahead position.
XSwitch off the engine.
XVehicles without KEYLESS-GO:
remove the
SmartKey from the igniti on lock.
XVehicles with KEYLESS-GO: open the driv-
er's door.
The vehicle electronics now have status 0.
This is the same as the SmartKey having been
removed.
XVehicles with KEYLESS-GO: remove the
Start/Stop button from the ignition lock
(
Ypage 122).
XMake sure that the passengers are not endan-
gered as they do so. Make sure that no one is near the danger area while a wheel is being
changed. Anyone who is not directly assisting
in the wheel change should, for example,
stand behind the barrier.
XGet out of the vehicle. Pay attention to traffic
conditions when doing so.
XClose the driver's door.
MOExtended tires (tires with run-flat
properties)
General notes
With MOExtended tires (tires with run flat char-
acteristics), you can continue to drive your vehi-
cle even if there is a total loss of pressure in one
or more tires. The affected tire must not show
any clearly visible damage.
You can recognize a MOExtended tire by the
MOExtended marking which appears on the
sidewall of the tire. You will find this marking
next to the tire size designation, the load-bear-
ing capacity and the speed index (
Ypage 298).
MOExtended tires may only be used in conjunc-
tion with an active tire pressure monitor.
Flat tire271
Breakdown assistance
Page 274 of 322
If a pressure loss warning message appears
in the multifunction display:
Robserve the instructions in the display mes-
sages (Ypage 221)
Rcheck the tire for damage
Rif driving on, observe the following notes
The driving distance possible in run-flat mode is
approximately 50 miles (80 km) when the vehi-
cle is partially laden and approximately 19 miles
(30 km) when the vehicle is fully laden.
In addition to the vehicle load, the driving dis-
tance possible depends upon:
Rvehicle speed
Rroad condition
Routside temperature
The driving distance possible in run-flat mode
may be reduced by extreme driving conditions
or maneuvers, or it can be increased through a
moderate style of driving.
The driving distance possible in run-flat mode is
counted from the moment the tire pressure loss
warning appears in the multifunction display.
You must not exceed a maximum design speed
of 50 mph (80 km/h).
When replacing one or all tires, please observe
the following specifications for your vehicle's
tires:
Rsize
Rtype and
Rthe "MOExtended" mark
If a tire has gone flat and cannot be replaced
with a MOExtended tire, a standard tire may be
used as a temporary measure. Make sure that
you use the proper size and type (summer or
winter tire).
Vehicles equipped with MOExtended tires are
not equipped with a TIREFIT kit at the factory. It
is therefore recommended that you additionally
equip your vehicle with a TIREFIT kit if you mount
tires that do not feature run-flat characteristics,
e.g. winter t
ires. A TIREFIT kit can be obtained
from a qualified specialist workshop, for exam-
ple.
Important safety notes
GWARNING
When driving in emergency mode, the driving
characteristics deteriorate, e.g. when corner-
ing, accelerating quickly and when braking.
There is a risk of an accident.
Do not exceed the stated maximum speed.
Avoid abrupt steering and driving maneuvers, and driving over obstacles (curbs, potholes,
off-road). This applies in particular to a laden
vehicle.
Stop driving in emergency mode if:
Ryou hear banging noises.
Rthe vehicle starts to shake.
Ryou see smoke and smell rubber.
RESP®is intervening constantly.
Rthere are tears in the sidewalls of the tire.
After driving in emergency mode, have the
wheel rims checked at a qualified specialist
workshop with regard to their further use. The
defective tire must be replaced in every case.
TIREFIT kit
Important safety notes
TIREFIT is a tire sealant.
You can use TIREFIT to seal punctures of up to
0.16 in (4 mm), particularly those in the tire
tread. You can use TIREFIT at outside tempera-
tures down to Ò4 ‡ (Ò20 †).
GWARNING
In the following situations, the tire sealant is
unable to provide sufficient breakdown assis-
tance, as it is unable to seal the tire properly:
Rthere are cuts or punctures in the tire larger
than those mentioned above.
Rthe wheel rim is damaged.
Ryou have driven at very low tire pressures or on a flat tire.
There is a risk of an accident.
Do not drive the vehicle. Contact a qualified
specialist workshop.
GWARNING
The tire sealant is harmful and causes irrita-
tion. It must not come into contact with your
skin, eyes or clothing or be swallowed. Do not
272Flat tire
Breakdown assistance
Page 289 of 322
MOExtended tires (tires with run-flat
characteristics)
With MOExtended tires (tires with run flat char-
acteristics), you can continue to drive your vehi-
cle even if there is a total loss of pressure in one
or more tires.
MOExtended tires may only be used in conjunc-
tion with an active tire pressure monitor and
only on wheels specifically tested by Mercedes- Benz.
Notes on driving with MOExtended tires with a
flat tire (
Ypage 271).
Vehicles equipped with MOExtended tires are
not equipped with a TIREFIT kit at the factory. It
is therefore recommended that you additionally
equip your vehicle with a TIREFIT kit if you mount
tires that do not feature run-flat characteristics,
e.g. winter tires. A TIREFIT kit can be obtained
from a qualified specialist workshop.
Winter operation
General notes
Have your vehicle winter-proofed at a qualified
specialist workshop at the onset of winter.
Observe the notes in the "Changing a wheel"
section (
Ypage 304).
Driving with summer tires
At temperatures below 45 ‡ (+7 †), summer
tires lose elasticity and therefore traction and
braking power. Change the tires on your vehicle
to M+S tires. Using summer tires at very cold
temperatures could cause cracks to form,
thereby damaging the tires permanently.
Mercedes-Benz cannot accept responsibility for
this type of damage.
GWARNING
Damaged tires can cause tire inflation pres-
sure loss. As a result, you could lose control of
your vehicle. There is a risk of accident.
Check the tires regularly for signs of damage
and replace any damaged tires immediately.
M+S tires
GWARNING
M+S tires with a tire tread depth of less than
ã in (4 mm) are not suitable for use in winter
and do not provide sufficient traction. There is
a risk of an accident.
M+S tires with a tread depth of less than ãin
(4 mm) must be replaced immediately.
At temperatures below 45 ‡(+7 †), use winter
tires or all-season tires. Both types of tire are
identified by the M+S marking.
Only winter tires bearing the isnowflake
symbol in addition to the M+S marking provide
the best possible grip in wintry road conditions.
Only these tires will allow driving safety systems
such as ABS and ESP
®to function optimally in
winter. These tires have been developed specif-
ically for driving in snow.
Use M+S tires of the same make and tread on all
wheels to maintain safe handling characteris-
tics.
Always observe the maximum permissible
speed specified for the M+S tires you have
mounted.
When you have mounted the M+S tires:
XCheck the tire pressures (Ypage 291).
XRestart the tire pressure monitor
(Ypage 293).
Snow chains
GWARNING
If snow chains are installed to the front
wheels, they may drag against the vehicle
body or chassis components. This could
cause damage to the vehicle or the tires.
There is a risk of an accident.
To avoid hazardous situations:
Rnever install snow chains to the front
wheels
Ralways install snow chains in pairs to the
rear wheels.
For safety reasons, Mercedes-Benz recom-
mends that you only use snow chains that have
been specially approved for your vehicle by
Winter operation287
Wheels and tires
Z