2018 MERCEDES-BENZ SL ROADSTER low beam
[x] Cancel search: low beamPage 14 of 322
General notes ................................ 159
Home address
see also Digital Operator's Man-
ual .................................................. 236
Hood
Closing .......................................... .259
Display message ............................ 224
Important safety notes .................. 258
Opening ......................................... 258
Horn ...................................................... 32
Hydroplaning ..................................... 148
I
Ignition lock
see Key positions
Immobilizer .......................................... 71
Indicator lamps
see Warning and indicator lamps
Indicators
see Turn signals
Instrument cluster
Overview .......................................... 33
Instrument cluster lighting .............. 185
Interior lighting
Automatic control .......................... 110
Delayed switch-off (on-board
computer) ...................................... 196
Overview ........................................ 109
Reading lamp ................................. 109
Setting the brightness of the
ambient lighting (on-board com-
puter) ............................................. 195
Setting the color of the ambient
lighting (on-board computer) ......... 195
iPod
®
see also Digital Operator's Man-
ual ..................................................2 36
J
Jack
Storage location ............................ 271
Using ............................................. 305
Jump starting (engine) ......................278
K
Key positions
KEYLESS-GO .................................. 122
SmartKey ....................................... 122
KEYLESS-GO
Activating ......................................... 73
Convenience closing feature ............ 87
Deactivation ..................................... 73
Display message ............................ 226
Locking ............................................ 73
Removing the Start/Stop button ... 123
Start/Stop button .......................... 122
Starting the engine ........................ 124
Unlocking ......................................... 73
Kickdown
Driving tips ....................................1 34
Manual gearshifting ....................... 139
Knee bag .............................................. 46
L
Lamps
see Warning and indicator lamps
Lane Keeping Assist
see Active Lane Keeping Assist
Lap time (RACETIMER) ......................198
License plate lamp (display mes-
sage) ................................................... 212
Light function, active
Display message ............................ 212
Light sensor (display message) ....... 212
Lights
Activating/deactivating the inte-
rior lighting delayed switch-off ....... 196
Active light function ....................... 108
Automatic headlamp mode ............ 106
Cornering light function ................. 108
Hazard warning lamps ................... 108
High beam flasher .......................... 107
High-beam headlamps ................... 107
Light switch ................................... 106
Low-beam headlamps .................... 107
Parking lamps ................................ 107
Setting the brightness of the
ambient lighting (on-board com-
puter) ............................................. 195
12Index
Page 15 of 322
Setting the color of the ambient
lighting (on-board computer) ......... 195
Standing lamps .............................. 107
Switching the daytime running
lamps on/off (on-board com-
puter) ............................................. 195
Switching the exterior lighting
delayed switch-off on/off (on-
board computer) ............................ 195
Switching the surround lighting
on/off (on-board computer) .......... 195
Turn signals ................................... 107
see Interior lighting
see Replacing the bulbs
Loading aid (trunk)
Raising/lowering the roof .............. 244
Locking
see Central locking
Locking (doors)
Automatic ........................................ 79
Emergency locking ........................... 80
From inside (central locking but-
ton) .................................................. 79
Locking centrally
see Central locking
Locking verification signal (on-
board computer) ............................... 196
Low-beam headlamps
Display message ............................ 212
Switching on/off ........................... 107
Luggage cover
see Trunk partition
M
M+S tires ............................................ 287
MAGIC SKY CONTROL ......................... 93
Malfunction message
see Display messages
Matte finish (cleaning instruc-
tions) .................................................. 265
mbrace
Call priority .................................... 251
Display message ............................ 206
Emergency call .............................. 249
General notes ................................ 248
MB info call button ........................ 251
Remote fault diagnosis .................. 251 Roadside assistance button ........... 250
Self-test ......................................... 248
System .......................................... 248
Mechanical key
Function/notes ................................ 75
General notes .................................. 75
Inserting .......................................... 75
Locking vehicle ................................ 80
Removing ......................................... 75
Unlocking the driver's door .............. 80
Media Interface
see Digital Operator's Manual
Memory card (audio) ......................... 191
Memory function ............................... 105
Mercedes-Benz Intelligent Drive
Active Blind Spot Assist ................. 179
Active Lane Keeping Assist ............ 181
ATTENTION ASSIST ........................ 177
Distance Pilot DISTRONIC with
Steering Pilot and Stop&Go Pilot ... 158
PRE-SAFE
®PLUS (anticipatory
occupant protection PLUS) .............. 56
Rear view camera .......................... 174
Message memory (on-board com-
puter) .................................................. 200
Messages
see Display messages
Mirrors
see Exterior mirrors
Mobile phone
Connecting (Bluetooth
®inter-
face) .............................................. 239
Frequencies ................................... 310
Installation ..................................... 310
Menu (on-board computer) ............ 191
Transmission output (maximum) .... 310
Modifying the programming
(SmartKey) ........................................... 74
MOExtended tires .............................. 271
Mounting wheels
Lowering the vehicle ...................... 308
Mounting a new wheel ................... 307
Preparing the vehicle ..................... 304
Raising the veh icle ......................... 305
R
emoving a wheel .......................... 307
Securing the vehicle against roll-
ing away ........................................ 305
Index13
Page 35 of 322
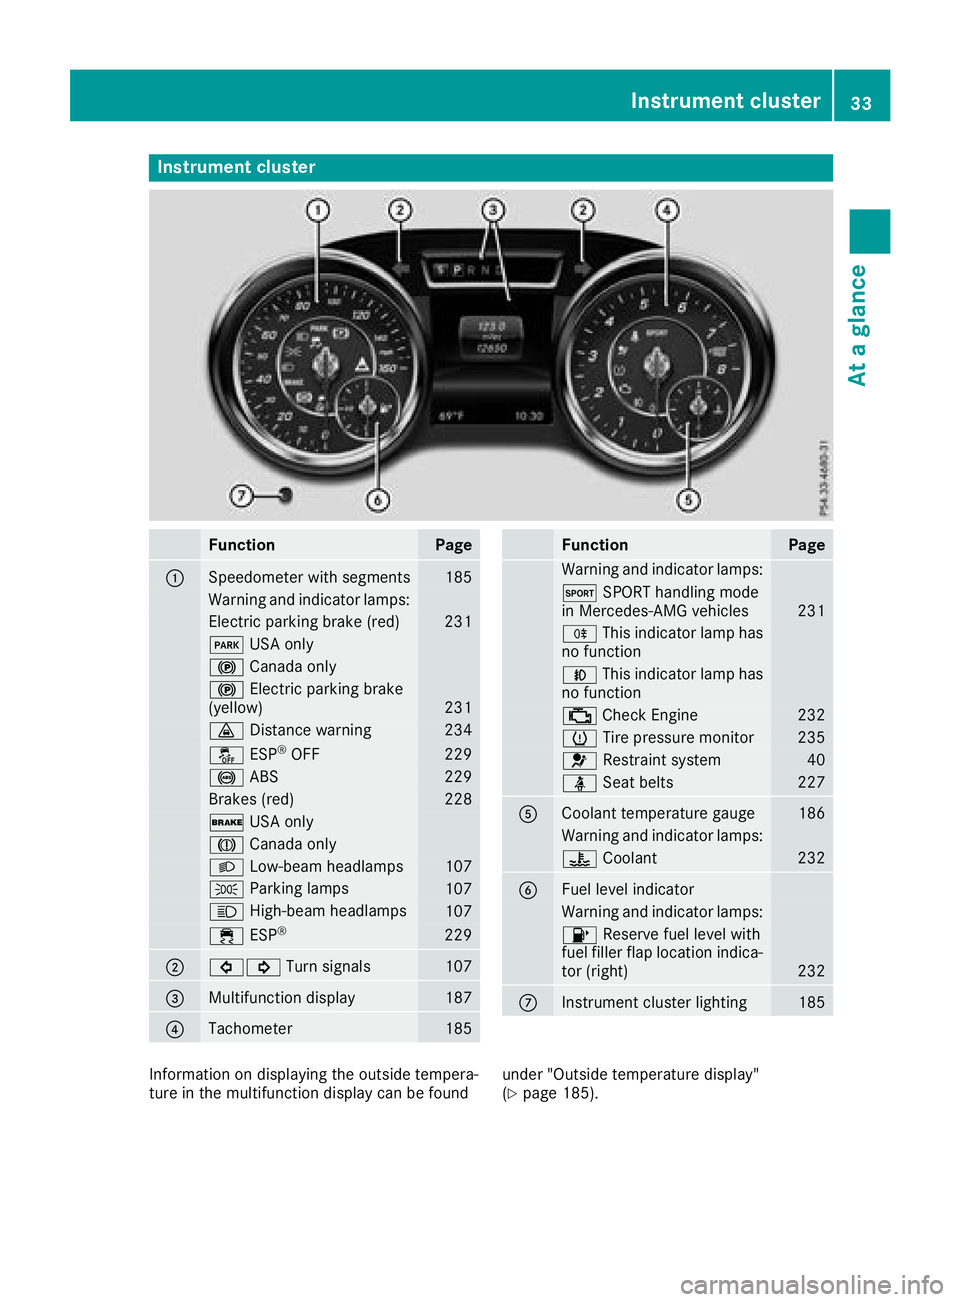
Instrument cluster
FunctionPage
:Speedometer wit hsegments18 5
Warning and indicator lamps:
Electric parking brak e(red)23 1
F USAonly
! Canad aonly
! Electric parking brak e
(yellow)23 1
· Distanc ewarning23 4
å ESP®OF F229
! ABS229
Brake s(red)22 8
$ USAonly
J Canad aonly
L Low-beam headlamps107
T Parking lamp s107
K High-beam headlamps107
÷ ESP®22 9
;#! Turn signals107
=Multifunction display187
?Tachometer185
FunctionPag e
Warning and indicator lamps:
M SPORT handlin gmod e
in Mercedes-AM Gvehicles23 1
R This indicator lamp has
no function
N This indicator lamp has
no function
; CheckEngin e232
h Tirepressur emonitor23 5
6 Restrain tsystem40
ü Seat belt s227
ACoolan ttemperature gauge18 6
Warning and indicator lamps:
? Coolan t232
BFue llevel indicator
Warning and indicator lamps:
8 Reserve fuel level wit h
fuel filler flap location indica-
to r(right )
232
CInstrumen tcluste rlighting18 5
Information on displayin gth eoutside tempera-
tur ein th emultifunction display can be foun dunder "Outside temperature display"
(Ypage 185).
Instrument cluster33
At a glance
Page 108 of 322
Exterior lighting
General notes
For reasons of safety, Mercedes-Benz recom-
mends that you drive with the lights switched on
even during the daytime. In some countries,
operation of the headlamps varies due to legal
requirements and self-imposed obligations.
Setting the exterior lighting
Setting options
Exterior lighting can be set using:
Rthe light switch
Rthe combination switch (Ypage 107)
Rthe on-board computer (Ypage 195)
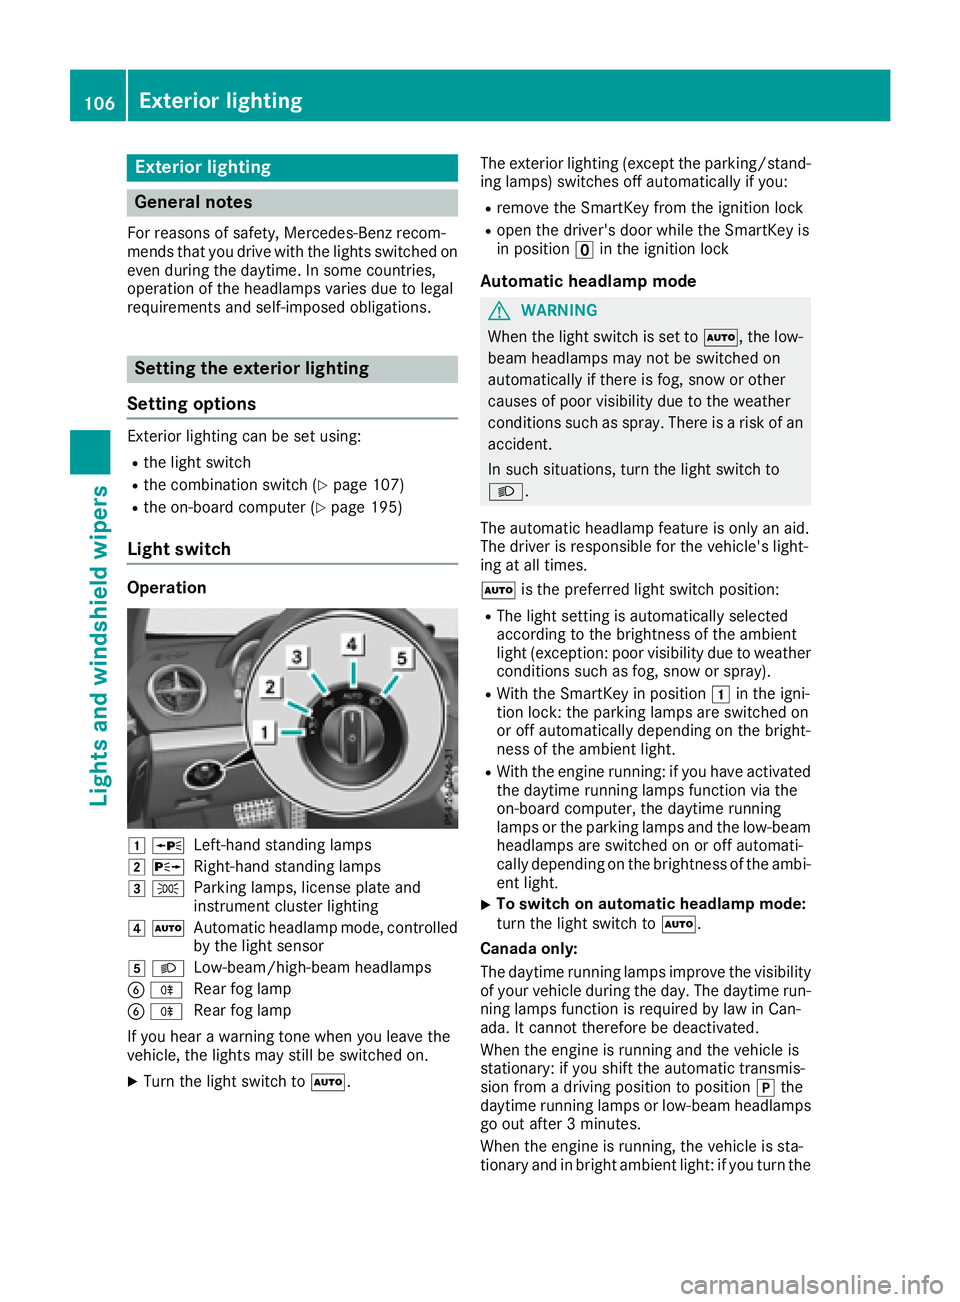
Light switch
Operation
1 WLeft-hand standing lamps
2XRight-hand standing lamps
3TParking lamps, license plate and
instrument cluster lighting
4ÃAutomatic headlamp mode, controlled
by the light sensor
5 LLow-beam/high-beam headlamps
BRRear fog lamp
BRRear fog lamp
If you hear a warning tone when you leave the
vehicle, the lights may still be switched on.
XTurn the light switch to Ã. The exterior lighting (except the parking/stand-
ing lamps) switches off automatically if you:
Rremove the SmartKey from the ignition lock
Ropen the driver's door while the SmartKey is
in position uin the ignition lock
Automatic headlamp mode
GWARNING
When the light switch is set to Ã, the low-
beam headlamps may not be switched on
automatically if there is fog, snow or other
causes of poor visibility due to the weather
conditions such as spray. There is a risk of an
accident.
In such situations, turn the light switch to
L.
The automatic headlamp feature is only an aid.
The driver is responsible for the vehicle's light-
ing at all times.
à is the preferred light switch position:
RThe light setting is automatically selected
according to the brightness of the ambient
light (exception: poor visibility due to weather
conditions such as fog, snow or spray).
RWith the SmartKey in position 1in the igni-
tion lock: the parking lamps are switched on
or off automatically depending on the bright-
ness of the ambient light.
RWith the engine running: if you have activated
the daytime running lamps function via the
on-board computer, the daytime running
lamps or the parking lamps and the low-beam
headlamps are switched on or off automati-
cally depending on the brightness of the ambi-
ent light.
XTo switch on automatic headlamp mode:
turn the light switch to Ã.
Canada only:
The daytime running lamps improve the visibility of your vehicle during the day. The daytime run-
ning lamps function is required by law in Can
-
ada. It cannot therefore be deactivated.
When the engine is running and the vehicle is
stationary: if you shift the automatic transmis-
sion from a driving position to position jthe
daytime running lamps or low-beam headlamps
go out after 3 minutes.
When the engine is running, the vehicle is sta-
tionary and in bright ambient light: if you turn the
106Exterior lighting
Lights and windshield wipers
Page 109 of 322
light switch to theTposition, the daytime
running lamps and parking lamps switch on.
If the engine is running and you turn the light
switch to L, the manual settings take prec-
edence over the daytime running lamps.
USA only:
The daytime running lamps improve the visibility
of your vehicle during the day. To do this, the
daytime running lamps function must be
switched on using the on-board computer
(
Ypage 195).
If the engine is running and you turn the light
switch to TorL, the manual settings
take precedence over the daytime running
lamps.
Low-beam headlamps
GWARNING
When the light switch is set to Ã, the low-
beam headlamps may not be switched on
automatically if there is fog, snow or other
causes of poor visibility due to the weather
conditions such as spray. There is a risk of an
accident.
In such situations, turn the light switch to
L.
Even if the light sensor does not detect that it is
dark, the parking lamps and low-beam head-
lamps switch on when the ignition is switched on and the light switch is set to the Lposition.
This is a particularly useful function in the event
of rain and fog.
XTo switch on the low-beam headlamps:
turn the SmartKey to position 2in the igni-
tion lock or start the engine.
XTurn the light switch to L.
The green Lindicator lamp in the instru-
ment cluster lights up.
Parking lamps
!If the battery charge is very low, the parking
lamps or standing lamps are automatically
switched off to enable the next engine start.
Always park your vehicle safely and in a well lit
area, in accordance with the relevant legal
stipulations. Avoid using the Tparking
lamps over a period of several hours. If pos-
sible, switch on the right-hand Xor left-
hand W standing lamps.
XTo switch on: turn the light switch to T.
The green Tindicator lamp in the instru-
ment cluster lights up.
Standing lamps
Switching on the standing lamps ensures the
corresponding side of the vehicle is illuminated.
XTo switch on the standing lamps: the
SmartKey is not in the ignition lock or it is in
position uin the ignition lock.
XTurn the light switch to W(left-hand side of
the vehicle) or X(right-hand side of the
vehicle).
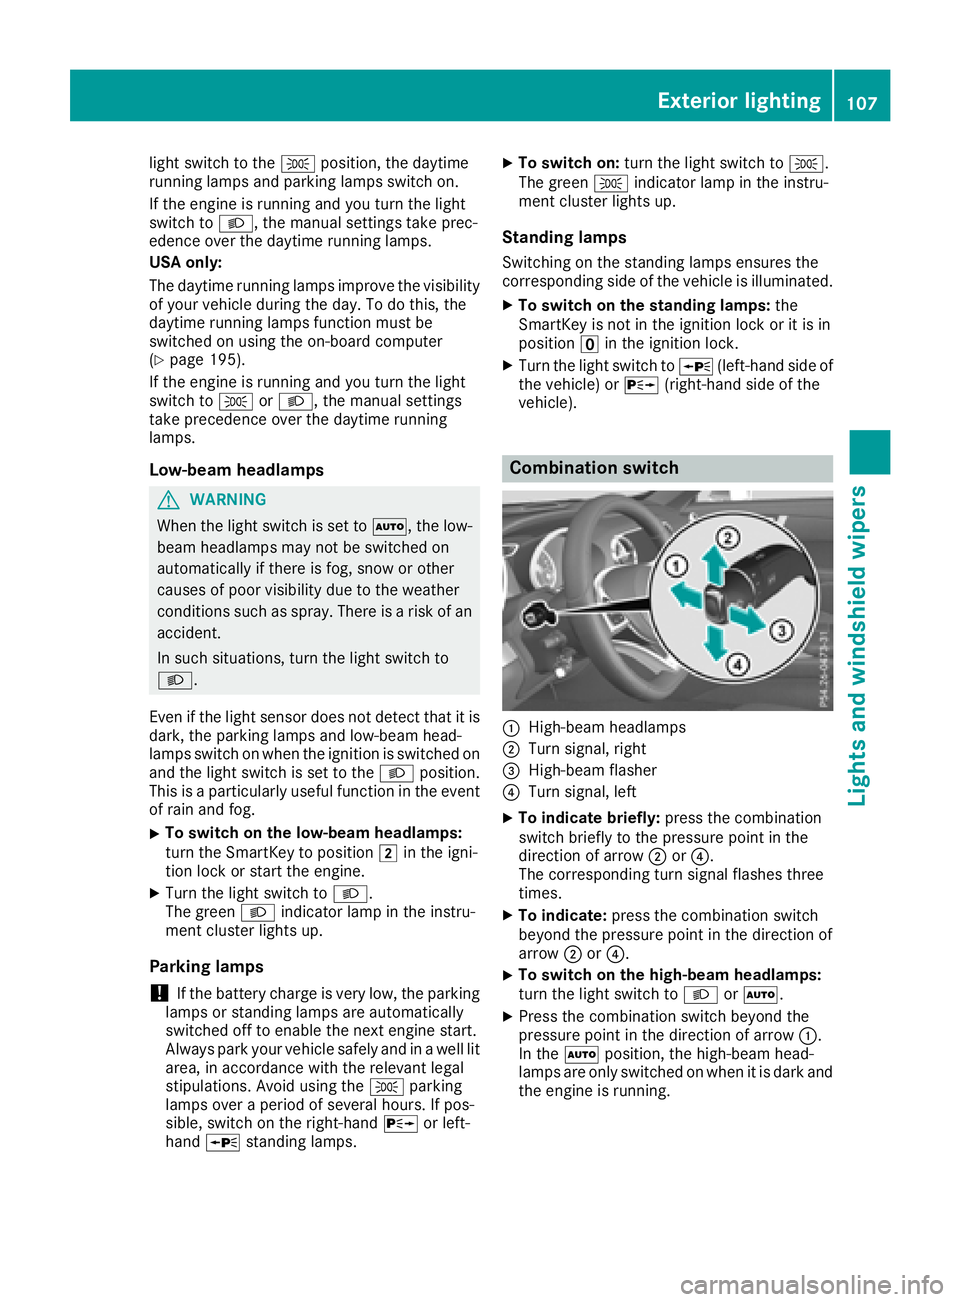
Combination switch
:High-beam headlamps
;Turn signal, right
=High-beam flasher
?Turn signal, left
XTo indicate briefly: press the combination
switch briefly to the pressure point in the
direction of arrow ;or?.
The corresponding turn signal flashes three
times.
XTo indicate: press the combination switch
beyond the pressure point in the direction of
arrow ;or?.
XTo switch on the high-beam headlamps:
turn the light switch to LorÃ.
XPress the combination switch beyond the
pressure point in the direction of arrow :.
In the Ãposition, the high-beam head-
lamps are only switched on when it is dark and
the engine is running.
Exterior lighting107
Lights and windshield wipers
Z
Page 110 of 322
The blueKindicator lamp in the instru-
ment cluster lights up when the high-beam
headlamps are switched on.
XTo switch off the high-beam headlamps:
move the combination switch back to its nor-
mal position.
The blue Kindicator lamp in the instru-
ment cluster goes out.
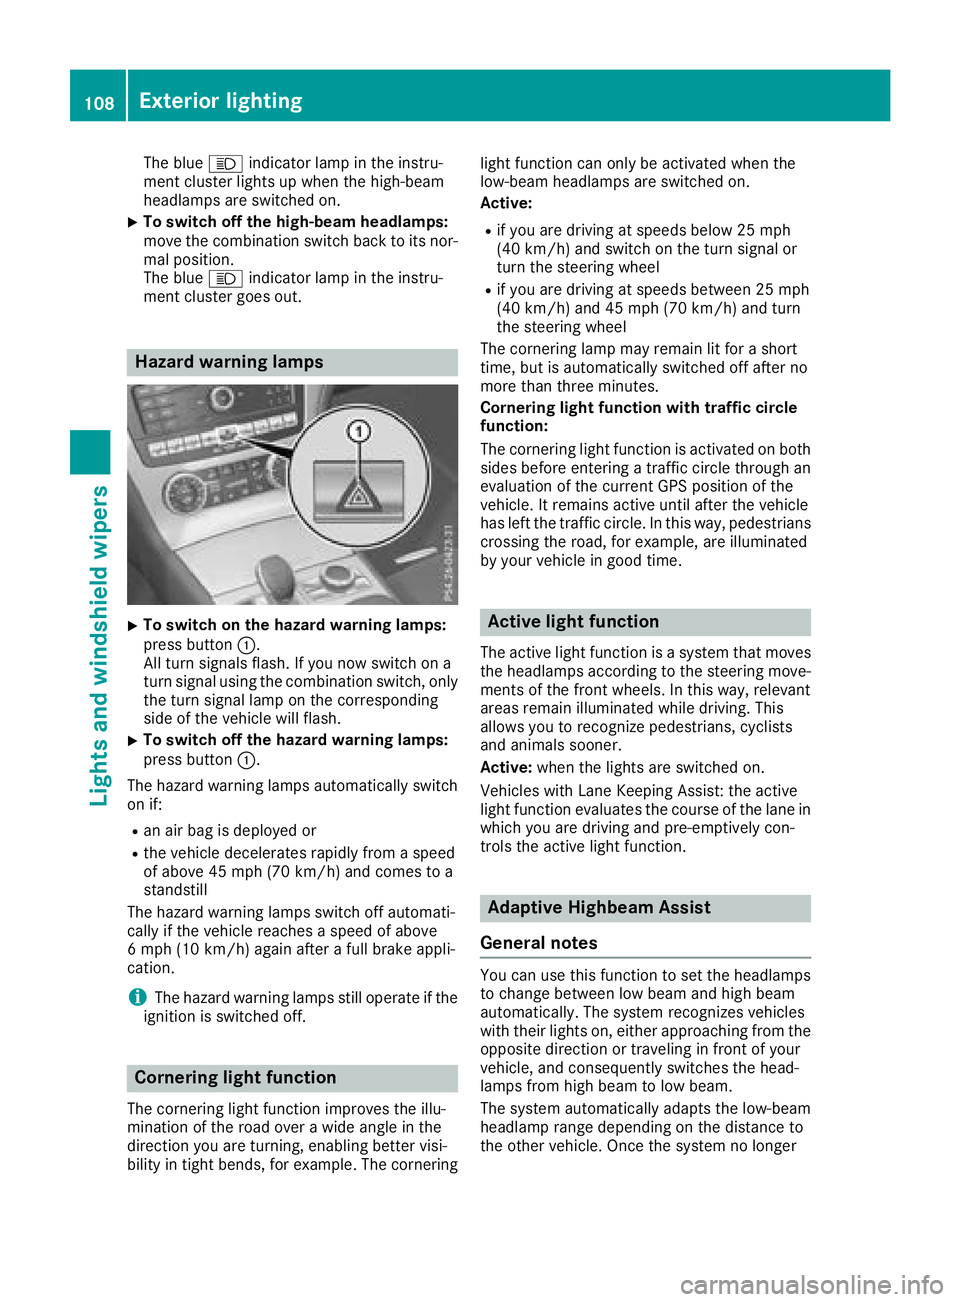
Hazard warning lamps
XTo switch on the hazard warning lamps:
press button :.
All turn signals flash. If you now switch on a
turn signal using the combination switch, only
the turn signal lamp on the corresponding
side of the vehicle will flash.
XTo switch off the hazard warning lamps:
press button :.
The hazard warning lamps automatically switch
on if:
Ran air bag is deployed or
Rthe vehicle decelerates rapidly from a speed
of above 45 mph (70 km/h) and comes to a
standstill
The hazard warning lamps switch off automati-
cally if the vehicle reaches a speed of above
6 mph (10 km/h) again after a full brake appli-
cation.
iThe hazard warning lamps still operate if the
ignition is switched off.
Cornering light function
The cornering light function improves the illu-
mination of the road over a wide angle in the
direction you are turning, enabling better visi-
bility in tight bends, for example. The cornering light function can only be activated when the
low-beam headlamps are switched on.
Active:
Rif you are driving at speeds below 25 mph
(40 km/h) and switch on the turn signal or
turn the steering wheel
Rif you are driving at speeds between 25 mph
(40 km/h) and 45 mph (70 km/h) and turn
the steering wheel
The cornering lamp may remain lit for a short
time, but is automatically switched off after no
more than three minutes.
Cornering light function with traffic circle
function:
The cornering light function is activated on both
sides before entering a traffic circle through an
evaluation of the current GPS position of the
vehicle. It remains active until after the vehicle
has left the traffic circle. In this way, pedestrians
crossing the road, for example, are illuminated
by your vehicle in good time.
Active light function
The active light function is a system that moves
the headlamps according to the steering move-
ments of the front wheels. In this way, relevant
areas remain illuminated while driving. This
allows you to recognize pedestrians, cyclists
and animals sooner.
Active: when the lights are switched on.
Vehicles with Lane Keeping Assist: the active
light function evaluates the course of the lane in
which you are driving and pre-emptively con-
trols the active light function.
Adaptive Highbeam Assist
General notes
You can use this function to set the headlamps
to change between low beam and high beam
automatically. The system recognizes vehicles
with their lights on, either approaching from the
opposite direction or traveling in front of your
vehicle, and consequently switches the head-
lamps from high beam to low beam.
The system automatically adapts the low-beam
headlamp range depending on the distance to
the other vehicle. Once the system no longer
108Exterior lighting
Lights and windshield wipers
Page 111 of 322
detects any other vehicles, it reactivates the
high-beam headlamps.
The system's optical sensor is located behind
the windshield near the overhead control panel.
Important safety notes
GWARNING
Adaptive Highbeam Assist does not recognize
road users:
Rwho have no lights, e.g. pedestrians
Rwho have poor lighting, e.g. cyclists
Rwhose lighting is blocked, e.g. by a barrier
On very rare occasions, Adaptive Highbeam
Assist may fail to recognize other road users
that have lights, or may recognize them too
late. In this, or in similar situations, the auto-
matic high-beam headlamps will not be deac-
tivated or will be activated regardless. There is a risk of an accident.
Always carefully observe the traffic conditions
and switch off the high-beam headlamps in
good time.
Adaptive Highbeam Assist cannot take into
account road, weather or traffic conditions.
Adaptive Highbeam Assist is only an aid. You are responsible for adjusting the vehicle's lighting
to the prevailing light, visibility and traffic con-
ditions.
In particular, the detection of obstacles can be
restricted if there is:
Rpoor visibility, e.g. due to fog, heavy rain or
snow
Rdirt on the sensors or the sensors are
obscured
Switching Adaptive Highbeam Assist
on/off
XTo switch on: turn the light switch to Ã.
XPress the combination switch beyond the
pressure point in the direction of arrow :.
The _ indicator lamp in the multifunction
display lights up when it is dark and the light
sensor activates the low-beam headlamps.
If you are driving at speeds above approx-
imately 16 mph (25 km/h): The headlamp range is set automatically
depending on the distance between the vehi-
cle and other road users.
If you are driving at speeds above approx-
imately 19 mph (30 km/
h)and no other road
users have been detected:
The high-beam headlamps are switched on
automatically. The Kindicator lamp in the
instrument cluster also lights up.
If you are driving at speeds below approx-
imately 16 mph (25 km/h) or other road users
have been detected or the roads are ade-
quately lit:
The high-beam headlamps are switched off
automatically. The Kindicator lamp in the
instrument cluster goes out. The _indi-
cator lamp in the multifunction display
remains lit.
XTo switch off: move the combination switch
back to its normal position or move the light
switch to another position.
The _ indicator lamp in the multifunction
display goes out.
Interior lighting
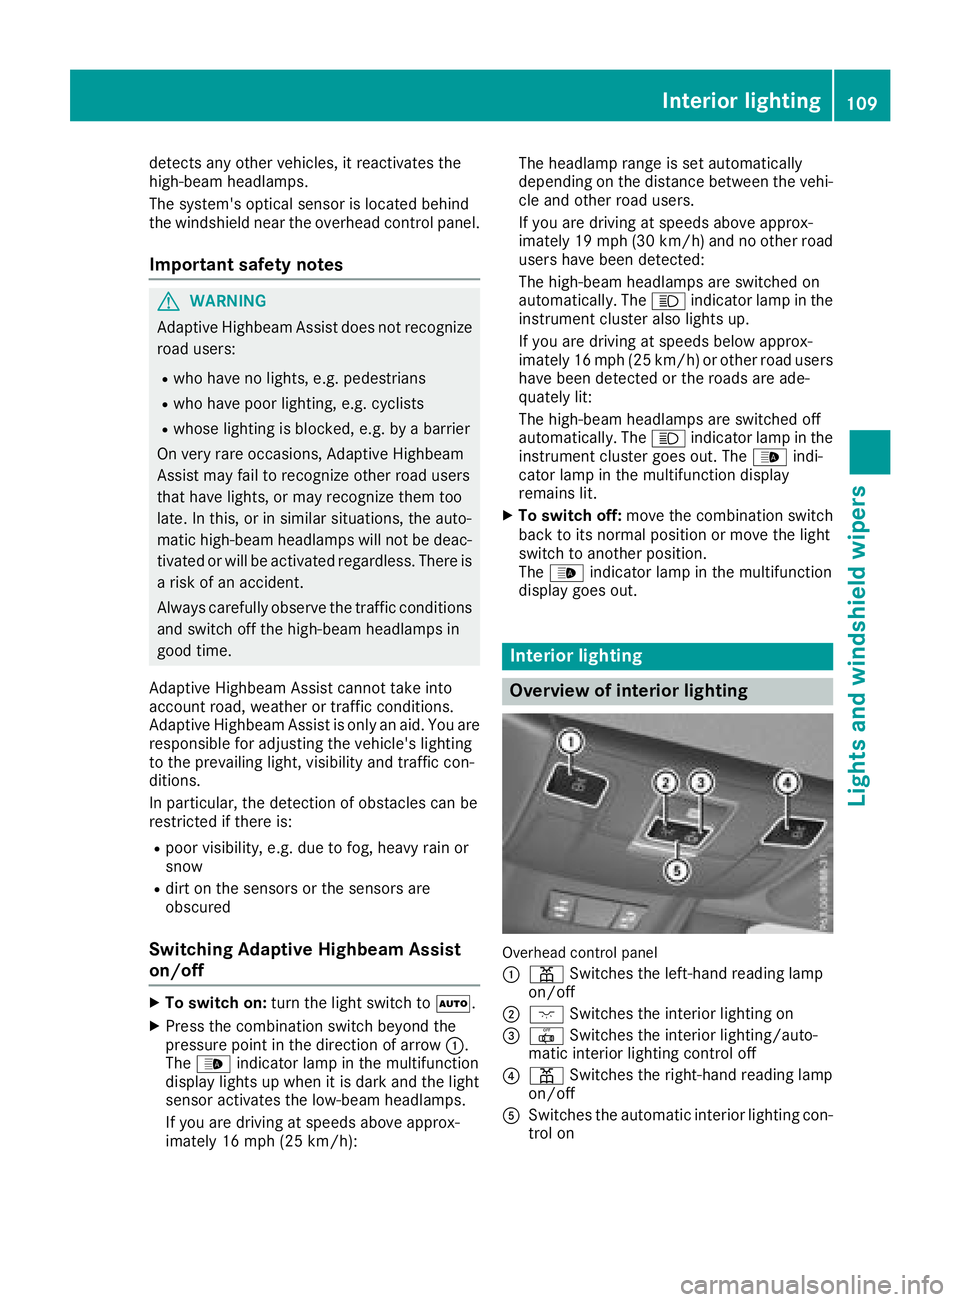
Overview of interior lighting
Overhead control panel
:
p Switches the left-hand reading lamp
on/off
;c Switches the interior lighting on
=|Switches the interior lighting/auto-
matic interior lighting control off
?p Switches the right-hand reading lamp
on/off
ASwitches the automatic interior lighting con-
trol on
Interior lighting109
Lights and windshield wipers
Z
Page 198 of 322
matic headlamp mode is activated
(Ypage 106).
Rexterior lighting delayed switch-off:the
exterior lighting remains lit for 60 seconds
after the engine is switched off. If you close all
the doors and the trunk lid, the exterior light- ing goes off after 15 seconds.
Depending on your vehicle's equipment, when
the surround lighting and delayed switch-off
exterior lighting are on, the following light up:
Rparking lamps
Rlow-beam headlamps
Rdaytime running lamps
Rside marker lamps
Rsurround lighting in the exterior mirrors
Activating/deactivating the interior light-
ing delayed switch-off
If you activate the Interior Lighting Delayfunction, the interior lighting remains on for
20 seconds after you remove the SmartKey from
the ignition lock.
XPress the=or; button on the steering
wheel to select the Sett.menu.
XPress the:or9 button to select the
Lightsubmenu.
XPress ato confirm.
XPress the :or9 button to select the
Interior Lighting Delayfunction.
When the Interior Lighting Delayfunc-
tion is activated, the vehicle interior is dis-
played in orange in the multifunction display.
XPress the abutton to save the setting.
Vehicle
Activating/deactivating the automatic
door locking mechanism
If you activate the AutomaticDoorLockfunc-
tion, the vehicle is centrally locked above a
speed of approximately 9 mph (15 km/h).
XPress the =or; button on the steering
wheel to select the Sett.menu.
XPress the:or9 button to select the
Vehiclesubmenu.
XPress ato confirm.
XPress the :or9 button to select the
Automatic Door Lockfunction.
When the Automatic Door Lockfunction is
activated, the multifunction display shows the
left-hand vehicle door in orange.
XPress the abutton to save the setting.
For further information on the automatic locking
feature, see (
Ypage 79).
Activating/deactivating the acoustic
locking verification signal
If you switch on the AcousticLockfunction, an
acoustic signal sounds when you lock the vehi-
cle.
XPress the =or; button on the steering
wheel to select the Sett.menu.
XPress the:or9 button to select the
Vehiclesubmenu.
XPress ato confirm.
XPress the :or9 button to select the
Acoustic Lockfunction.
If the Acoustic Lockfunction is activated,
the & symbol in the multifunction display
lights up orange.
XPress the abutton to save the setting.
Comfort
Activating/deactivating the EASY-
ENTRY/EXIT feature
GWARNING
When the EASY-ENTRY/EXIT feature adjusts
the steering wheel, you and other vehicle
occupants – particularly children – could
become trapped. There is a risk of injury.
While the EASY-ENTRY/EXIT feature is mak-
ing adjustments, make sure that no one has
any body parts in the sweep of the steering
wheel.
If somebody becomes trapped:
Rpress one of the memory function position
buttons, or
Rmove the switch for steering wheel adjust-
ment in the opposite direction to that in
which the steering wheel is moving.
The adjustment process is stopped.
196Menus and submenus
On-board computer and displays