2018 MERCEDES-BENZ GLS SUV display
[x] Cancel search: displayPage 76 of 398
Following damage to the front end of the vehicle,
have the configuration and operation of the
radar sensors checked at a qualified specialist
workshop. This also applies to collisions at slow
speeds where there is no visible damage to the
front of the vehicle.
Following damage to the windshield, have the
configuration and operation of the camera sys-
tem checked at a qualified specialist workshop.
Function
XTo activate or deactivate: activate or deac-
tivate Active Brake Assist with cross-traffic
function using the on-board computer
(
Ypage 242).
If the Active Brake Assist with cross-traffic
function is deactivated, the æsymbol
appears in the multifunction display.
If you have activated DSR (
Ypage 218), the
Active Brake Assist with cross-traffic function is
deactivated.
Starting at a speed of around 4 mph (7 km/h),
this function warns you if you rapidly approach a
vehicle in front. An intermittent warning tone
will then sound and the ·distance warning
lamp will light up in the instrument cluster.
XBrake immediately to defuse the situation.
or
XTake evasive action provided it is safe to do
so.
Active Brake Assist with cross-traffic function
can also brake the vehicle automatically under
the following conditions:
Rthe driver and front-passenger have their seat
belts fastened
and
Rthe vehicle speed is between approximately
4 mph (7 km/h) and 124 mph (200 km/h)
Up to a speed of approximately 44 mph
(70 km/h), Active Brake Assist with cross-traffic
function may react to:
Rstationary objects in the path of your vehicle,
e.g. stopped or parked vehicles
Rpedestrians in the path of your vehicle
iIf there is an increased risk of a collision,
preventive passenger protection measures
(PRE-SAFE
®) are triggered (Ypage 58).
If the risk of collision with the vehicle in front
remains and you do not brake, take evasive acti
on or a
ccelerate significantly, the vehicle
may perform automatic emergency braking, up
to the point of full brake application. Automatic emergency braking is not performed until imme-
diately prior to an imminent accident.
If you apply the brake yourself in a critical sit-
uation or during autonomous braking, braking
assistance is provided according to the situa-
tion. If necessary, this increases the brake pres- sure up to full brake application.
To avoid a collision, Active Brake Assist with
cross-traffic function calculates the brake force
necessary if:
Ryou approach an obstacle, and
RActive Brake Assist with cross-traffic functionhas detected a risk of a collision
When driving at a speed under 20 mph
(30 km/h) : if you depress the brake pedal,
Active Brake Assist with cross-traffic function is
activated. The increase in brake pressure from
Active Brake Assist with cross-traffic function is
carried out at the last possible moment.
When driving at a speed above 20 mph
(30 km/h): if you depress the brake pedal
sharply, Active Brake Assist with cross-traffic
function automatically increases the brake pres-
sure to a degree suited to the traffic situation.
Active Brake Assist with cross-traffic function
provides braking assistance in hazardous situa-
tions with vehicles in front within a speed range
between 4 mph (7 km/h) and 155 mph
(250 km/h).
Up to a speed of approximately 44 mph
(70 km/h) the Active Brake Assist with cross-
tra
ffic function assists you with braking in haz-
ardous situations with:
Rstationary obstacles in the path of the vehicle,
e.g. stopped or parked vehicles
Rstationary pedestrians in the path of the vehi- cle
Robstacles crossing your path that move in the
detection range of the sensors and are detec-
ted
XKeep the brake pedal depressed until the
emergency braking situation is over.
ABS prevents the wheels from locking.
You can prevent the intervention of Active Brake
Assist with cross-traffic function at any time by:
Rdepressing the accelerator pedal further
Ractivating kickdown
Rreleasing the brake pedal
74Driving safety systems
Safety
Page 99 of 398
Correct driver's seat position
GWARNING
You could lose control of your vehicle if you do the following while driving:
Radjust the driver's seat, head restraint,
steering wheel or mirrors
Rfasten the seat belt
There is a risk of an accident.
Adjust the driver's seat, head restraint, steer-
ing wheel and mirror and fasten your seat belt before starting the engine.
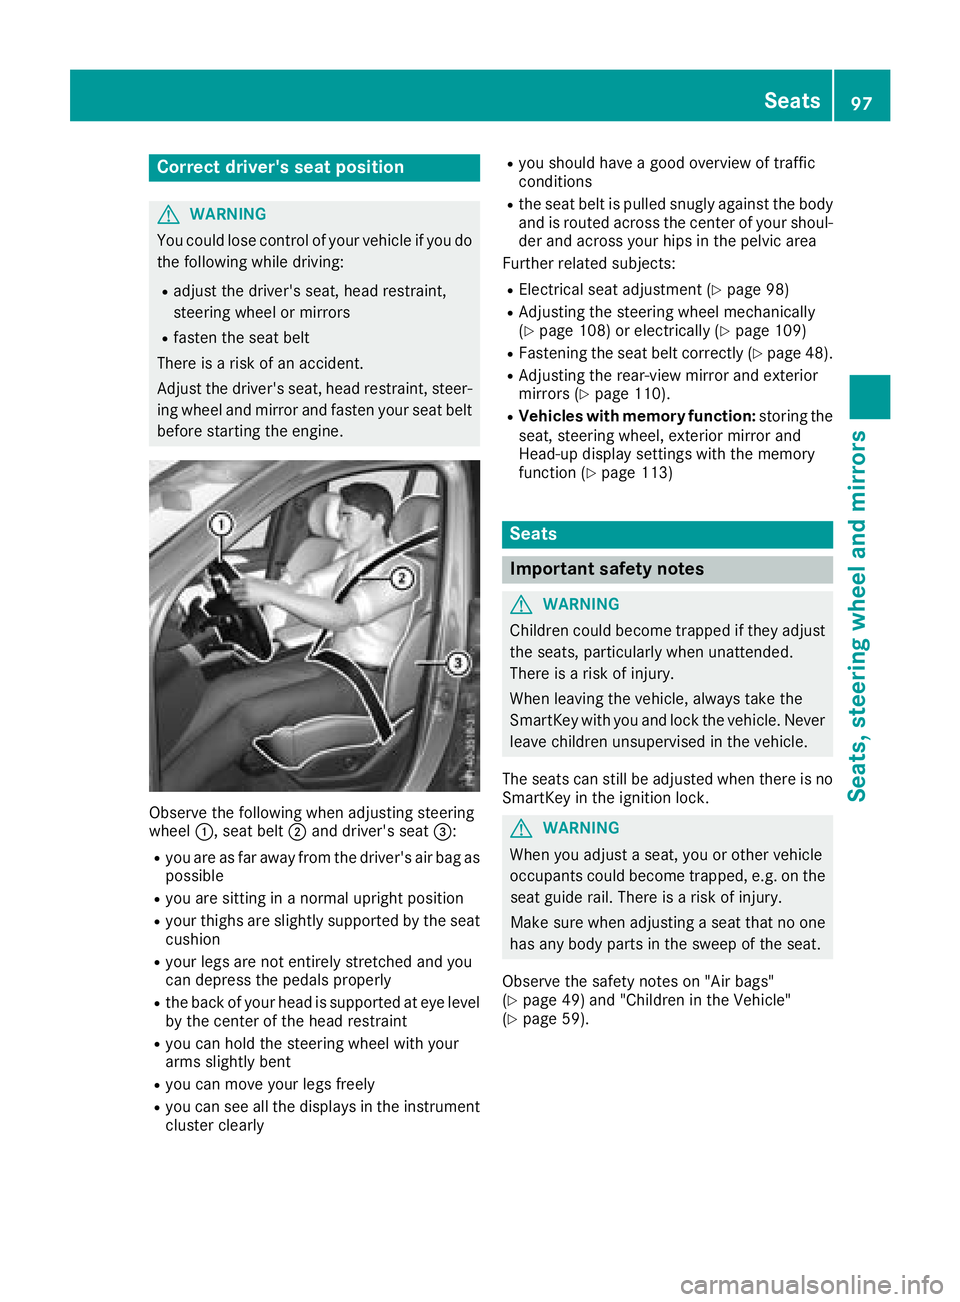
Observe the following when adjusting steering
wheel :, seat belt ;and driver's seat =:
Ryou are as far away from the driver's air bag as
possible
Ryou are sitting in a normal upright position
Ryour thighs are slightly supported by the seat
cushion
Ryour legs are not entirely stretched and you
can depress the pedals properly
Rthe back of your head is supported at eye level
by the center of the head restraint
Ryou can hold the steering wheel with your
arms slightly bent
Ryou can move your legs freely
Ryou can see all the displays in the instrument
cluster clearly
Ryou should have a good overview of traffic
conditions
Rthe seat belt is pulled snugly against the body and is routed across the center of your shoul-
der and across your hips in the pelvic area
Further related subjects:
RElectrical seat adjustment (Ypage 98)
RAdjusting the steering wheel mechanically
(Ypage 108) or electrically (Ypage 109)
RFastening the seat belt correctly (Ypage 48).
RAdjusting the rear-view mirror and exterior
mirrors (Ypage 110).
RVehicles with memory function: storing the
seat, steering wheel, exterior mirror and
Head-up display settings with the memory
function (
Ypage 113)
Seats
Important safety notes
GWARNING
Children could become trapped if they adjust
the seats, particularly when unattended.
There is a risk of injury.
When leaving the vehicle, always take the
SmartKey with you and lock the vehicle. Never
leave children unsupervised in the vehicle.
The seats can still be adjusted when there is no
SmartKey in the ignition lock.
GWARNING
When you adjust a seat, you or other vehicle
occupants could become trapped, e.g. on the seat guide rail. There is a risk of injury.
Make sure when adjusting a seat that no one
has any body parts in the sweep of the seat.
Observe the safety notes on "Air bags"
(
Ypage 49) and "Children in the Vehicle"
(Ypage 59).
Seats97
Seats, steering wheel and mirrors
Z
Page 103 of 398
Rafter the EASY-ENTRY/EXIT feature has
been used
Rafter the cargo compartment enlargement
has been folded forwards
GWARNING
The seat does not engage in the entry/exit
position. The seat could fold back suddenly,
e.g. when accelerating, braking, changing
direction suddenly or in the event of an acci-
dent. Persons in the sweep of the seat could
become trapped. There is a risk of injury.
Always fold back a seat which has been folded
forwards before you pull away. Make sure that
the seat and backrest engage fully.
GWARNING
Children could become trapped if they adjust
the seats, particularly when unattended.
There is a risk of injury.
When leaving the vehicle, always take the
SmartKey with you and lock the vehicle. Never
leave children unsupervised in the vehicle.
GWARNING
When you adjust a seat, you or other vehicle
occupants could become trapped, e.g. on the seat guide rail. There is a risk of injury.
Make sure when adjusting a seat that no one
has any body parts in the sweep of the seat.
Adjusting the backrest angle (second
row of seats)
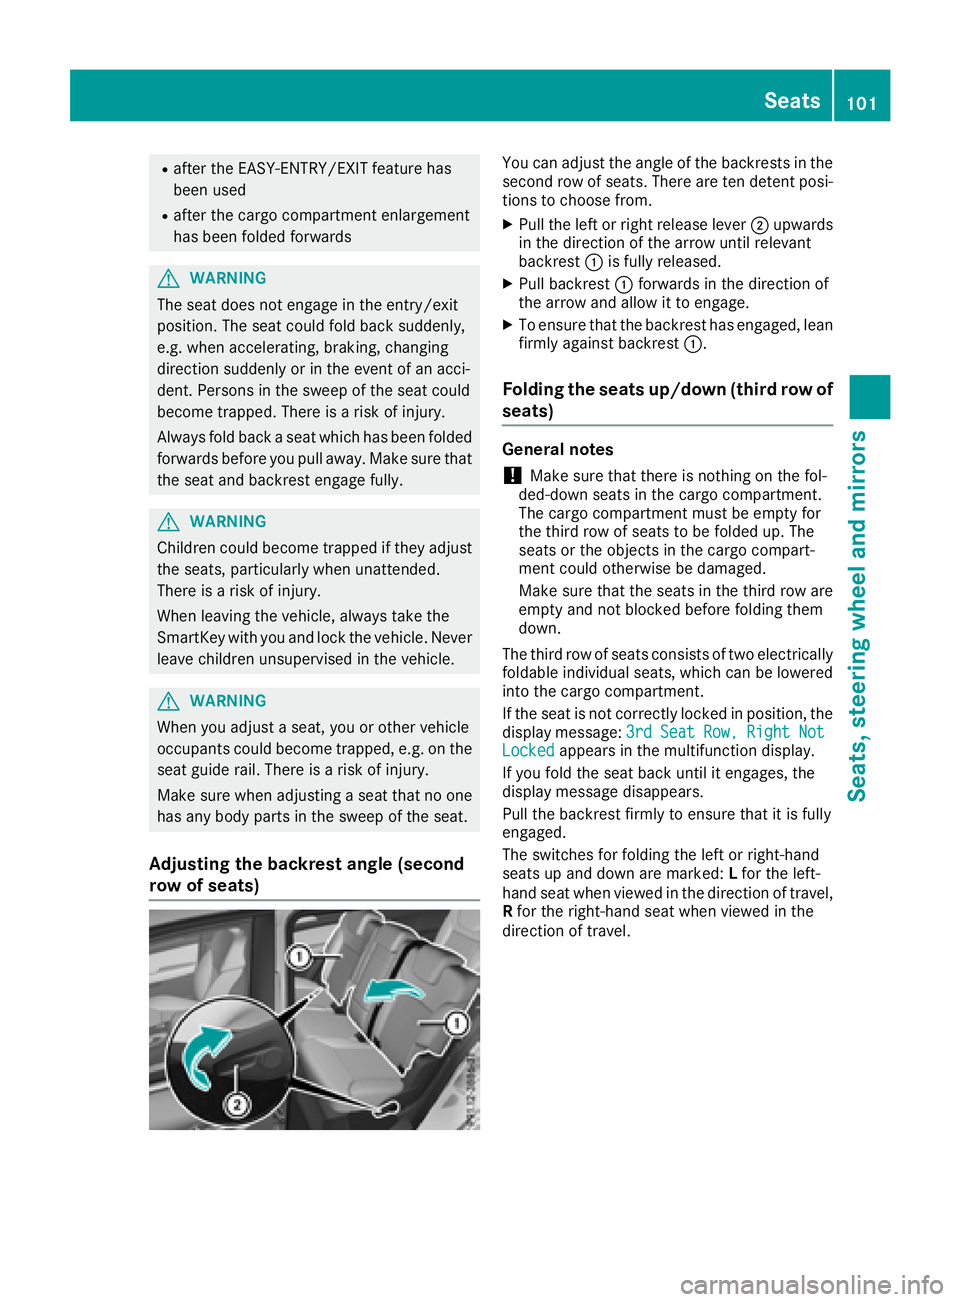
You can adjust the angle of the backrests in the
second row of seats. There are ten detent posi-
tions to choose from.
XPull the left or right release lever ;upwards
in the direction of the arrow until relevant
backrest :is fully released.
XPull backrest :forwards in the direction of
the arrow and allow it to engage.
XTo ensure that the backrest has engaged, lean
firmly against backrest :.
Folding the seats up/down (third row of
seats)
General notes
!Make sure that there is nothing on the fol-
ded-down seats in the cargo compartment.
The cargo compartment must be empty for
the third row of seats to be folded up. The
seats or the objects in the cargo compart-
ment could otherwise be damaged.
Make sure that the seats in the third row are
empty and not blocked before folding them
down.
The third row of seats consists of two electrically
foldable individual seats, which can be lowered
into the cargo compartment.
If the seat is not correctly locked in position, the
display message: 3rd
SeatRow,RightNotLockedappears in the multifunction display.
If you fold the seat back until it engages, the
display message disappears.
Pull the backrest firmly to ensure that it is fully
engaged.
The switches for folding the left or right-hand
seats up and down are marked: Lfor the left-
hand seat when viewed in the direction of travel,
R for the right-hand seat when viewed in the
direction of travel.
Seats101
Seats, steering wheel and mirrors
Z
Page 105 of 398
Folding down the seats in the second
row manually
Important safety notes
GWARNIN G
If th eseat and backrest are no tengaged, they
can fol dforwards ,e.g. in th eevent of sudde n
braking or an accident.
RThis will caus eth evehicl eoccupant sto be
forced int oth eseat belt by aseat or back-
res twhic his no tengaged. The seat belt can
no longer offer th eintended leve lof pro -
tection and could eve ncaus einjuries.
RA child restrain tsystem would no longer be
anchored or positioned correctly and would
no tbe able to perfor mits require dfunction .
RThe seat backrest scanno trestrain object s
or loads in th ecargo compartment.
Ther eis an increased ris kof injury.
Always mak esure that th eseat and backrest
are engage das described:
Rbefore traveling wit h apassenger on aseat
wit hth eEASY-ENTRY/EXIT feature
Rafter you have adjusted th eseat
Rafter th eEASY-ENTRY/EXIT feature has
been used
Rafter th ecargo compartmen tenlargement
has been folded forwards
GWARNIN G
The seat does no tengage in th eentry/exit
position .The seat could fol dbac ksuddenly,
e.g. when accelerating ,braking ,changing
direction suddenly or in th eevent of an acci-
dent. Person sin th eswee pof th eseat could
become trapped .Ther eis aris kof injury.
Always fol dbac k aseat whic hhas been folded
forwards before you pull away. Mak esure that
th eseat and backrest engage fully.
General notes
Getting int oor out of th ethird row of seats: you
can fol dforward th eright outer seat in th esec -
on drow of seats. If th
eright outer rear seat in th esecon drow of
seat sis in th eentry/exit position :th edisplay
message :2nd
Sea tRow,RightNotLockedappear sin th emultifunction display, for exam-
ple.
If you fol dth eseat bac kuntil it engages, th e
display message disappears.
Pull th ebackrest firmly to ensure that it is fully
engaged.
iFurther relate dsubjects:
RCargo compartmen tenlargement (foldin g
th esecon drow of seat sforwards )
(
Ypage 303)
RFoldin gth eseat sin th ethird row forwards /
bac k (Ypage 101)
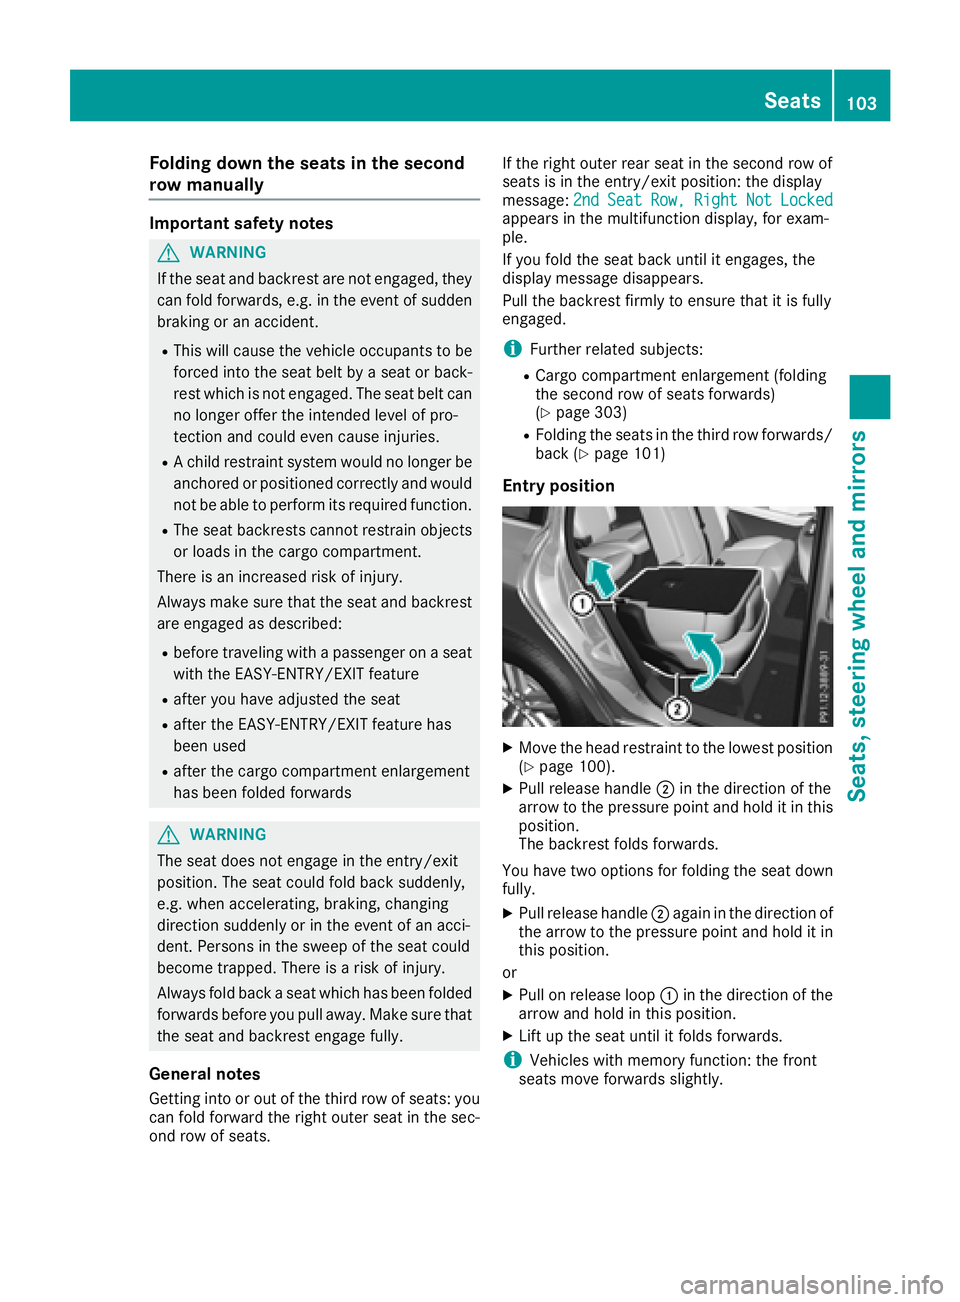
Entry position
XMoveth ehead restraint to th elowes tposition
(Ypage 100).
XPull release handle ;in th edirection of th e
arrow to th epressur epoin tand hold it in this
position .
The backrest folds forwards .
You have two option sfor foldin gth eseat down
fully.
XPull release handle ;again in th edirection of
th earrow to th epressur epoin tand hold it in
this position .
or
XPull on release loop :in th edirection of th e
arrow and hold in this position .
XLiftup th eseat until it folds forwards .
iVehicles withmemory function :th efron t
seat smov eforwards slightly.
Seats103
Seats, steering wheel and mirrors
Z
Page 107 of 398
Always make sure that the seat and backrest
are engaged as described:
Rbefore traveling with a passenger on a seat
with the EASY-ENTRY/EXIT feature
Rafter you have adjusted the seat
Rafter the EASY-ENTRY/EXIT feature has
been used
Rafter the cargo compartment enlargement
has been folded forwards
GWARNING
The seat does not engage in the entry/exit
position. The seat could fold back suddenly,
e.g. when accelerating, braking, changing
direction suddenly or in the event of an acci-
dent. Persons in the sweep of the seat could
become trapped. There is a risk of injury.
Always fold back a seat which has been folded
forwards before you pull away. Make sure that
the seat and backrest engage fully.
XTo lock the seat: fold back the seat until it
engages.
XFold back the backrest until it engages.
Folding down the seats in the second
row electrically
Important safety notes
GWARNING
If the seat and backrest are not engaged, they can fold forwards, e.g. in the event of sudden
braking or an accident.
RThis will cause the vehicle occupants to be
forced into the seat belt by a seat or back-
rest which is not engaged. The seat belt can no longer offer the intended level of pro-
tection and could even cause injuries.
RA child restraint system would no longer be
anchored or positioned correctly and would
not be able to perform its required function.
RThe seat backrests cannot restrain objects
or loads in the cargo compartment.
There is an increased risk of injury.
Always make sure that the seat and backrest
are engaged as described:
Rbefore traveling with a passenger on a seat
with the EASY-ENTRY/EXIT feature
Rafter you have adjusted the seat
Rafter the EASY-ENTRY/EXIT feature has
been used
Rafter the cargo compartment enlargement
has been folded forwards
GWARNING
The seat does not engage in the entry/exit
position. The seat could fold back suddenly,
e.g. when accelerating, braking, changing
direction suddenly or in the event of an acci-
dent. Persons in the sweep of the seat could
become trapped. There is a risk of injury.
Always fold back a seat which has been folded
forwards before you pull away. Make sure that
the seat and backrest engage fully.
General notes
To enter or exit the third row of seats: the outer
left and right seats of the second row can be
folded down electrically.
One of the outer seats of the second row is in the
entry/exit position: the multifunction display
shows, e.g. the 2nd Seat Row, Right Not
Lockeddisplay message.
If you fold the seat back until it engages, the
display message disappears.
Pull the backrest firmly to ensure that it is fully
engaged.
iFurther related subjects:
RCargo compartment enlargement (folding
the second row of seats forwards)
(
Ypage 303)
RFolding the seats in the third row forwards/
back (Ypage 101)
Folding down the seats
The seats can be folded down electrically if the
vehicle is stationary and the respective rear
door is open.
Seats105
Seats, steering wheel and mirrors
Z
Page 120 of 398

Highway mode
Highway mode increases the range of the beam.
Active:if you are driving at a speed above
110 km/h and do not make any large steering
movements for at least 1,000 m or if you are
driving at a speed above 130 km/h.
Not active: if you are driving at speeds below
80 km/h following activation.
Extended range fog lamps
The extended range fog lamps reduce the glare
experienced by the driver and improve the illu-
mination of the edge of the road.
Active: if you are driving at speeds below
40 mph (70 km/h) and you switch on the rear
fog lamp.
Not active: if, following activation, you are driv-
ing at speeds above 60 mph (100 km/h) or if you
switch off the rear fog lamp
Off-road lights
The off-road lights facilitate the early recogni-
tion of objects/obstacles when driving off-road
thanks to a symmetrical, wider and brighter dis- tribution of light from the low-beam headlamps.
Active: when driving at speeds no faster than
30 mph (50 km/h) and the off-road program
selector wheel is in position 1 or 2.
Not active: when driving at speeds above
30 mph (50 km/h).
When the off-road lights are switched on, the
cornering light function is permanently activa-
ted, the active light function is deactivated and
the headlamp range control is set to static
mode.
Adaptive Highbeam Assist
General notes
You can use this function to set the headlamps
to change between low beam and high beam
automatically. The system recognizes vehicles
with their lights on, either approaching from the
opposite direction or traveling in front of your
vehicle, and consequently switches the head-
lamps from high beam to low beam.
The system automatically adapts the low-beam
headlamp range depending on the distance to
the other vehicle. Once the system no longer detects any other vehicles, it reactivates the
high-beam headlamps.
The system's optical sensor is located behind
the windshield near the overhead control panel.
Important safety notes
GWARNING
Adaptive Highbeam Assist does not recognize
road users:
Rwho have no lights, e.g. pedestrians
Rwho have poor lighting, e.g. cyclists
Rwhose lighting is blocked, e.g. by a barrier
On very rare occasions, Adaptive Highbeam
Assist may fail to recognize other road users
that have lights, or may recognize them too
late. In this, or in similar situations, the auto-
matic high-beam headlamps will not be deac-
tivated or will be activated regardless. There is a risk of an accident.
Always carefully observe the traffic conditions
and switch off the high-beam headlamps in
good time.
Adaptive Highbeam Assist cannot take into
account road, weather or traffic conditions.
Adaptive Highbeam Assist is only an aid. You are responsible for adjusting the vehicle's lighting
to the prevailing light, visibility and traffic con-
ditions.
In particular, the detection of obstacles can be
impaired if:
Rpoor visibility, e.g. due to fog, heavy rain or
snow
Rdirt on the sensors or the sensors are
obscured
Switching Adaptive Highbeam Assist
on/off
XTo switch on: turn the light switch to Ã.
XPress the combination switch beyond the
pressure point in the direction of arrow :.
The _ indicator lamp in the multifunction
display lights up when it is dark and the light
sensor activates the low-beam headlamps.
If you are driving at speeds above approx-
imately 16 mph (25 km/h):
118Exterior lighting
Lights and windshield wipers
Page 121 of 398
The headlamp range is set automatically
depending on the distance between the vehi-
cle and other road users.
If you are driving at speeds above approx-
imately 19 mph (30 km/h)and no other road
users have been detected:
The high-beam headlamps are switched on
automatically. The Kindicator lamp in the
instrument cluster also lights up.
If you are driving at speeds below approx-
imately 16 mph (25 km/h) or other road users
have been detected or the roads are ade-
quately lit:
The high-beam headlamps are switched off
automatically. The Kindicator lamp in the
instrument cluster goes out. The _indi-
cator lamp in the multifunction display
remains lit.
XTo switch off: move the combination switch
back to its normal position or move the light
switch to another position.
The _ indicator lamp in the multifunction
display goes out.
Headlamps fogged up on the inside
Certain climatic and physical conditions may
cause moisture to form in the headlamp. This
moisture does not affect the functionality of the
headlamp.
Interior lighting
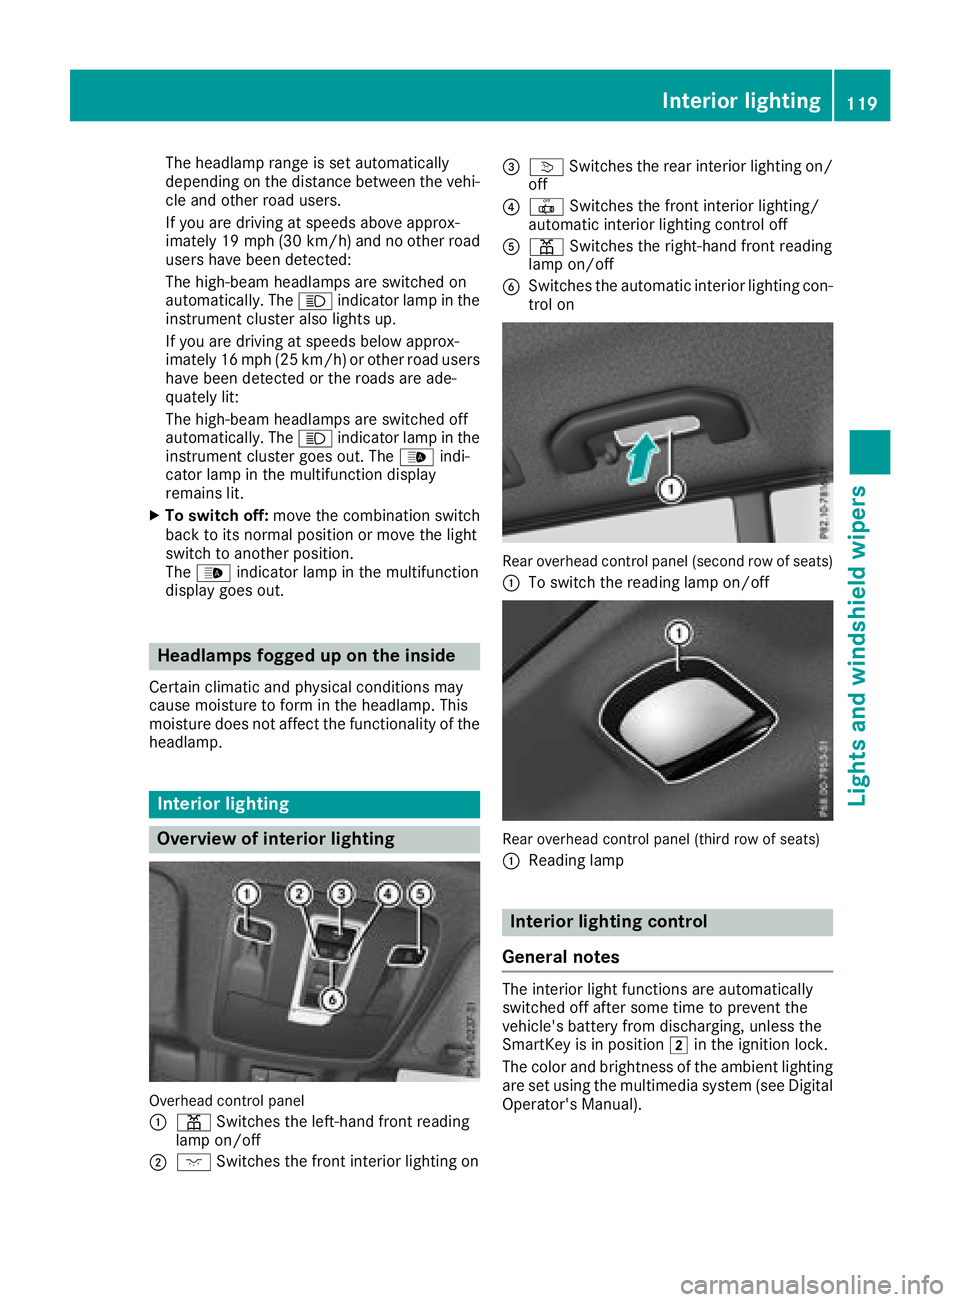
Overview of interior lighting
Overhead control panel
:
p Switches the left-hand front reading
lamp on/off
;c Switches the front interior lighting on
=vSwitches the rear interior lighting on/
off
?| Switches the front interior lighting/
automatic interior lighting control off
Ap Switches the right-hand front reading
lamp on/off
BSwitches the automatic interior lighting con-
trol on
Rear overhead control panel (second row of seats)
:
To switch the reading lamp on/off
Rear overhead control panel (third row of seats)
:
Reading lamp
Interior lighting control
General notes
The interior light functions are automatically
switched off after some time to prevent the
vehicle's battery from discharging, unless the
SmartKey is in position 2in the ignition lock.
The color and brightness of the ambient lighting
are set using the multimedia system (see Digital
Operator's Manual).
Interior lighting119
Lights and windshield wipers
Z
Page 129 of 398
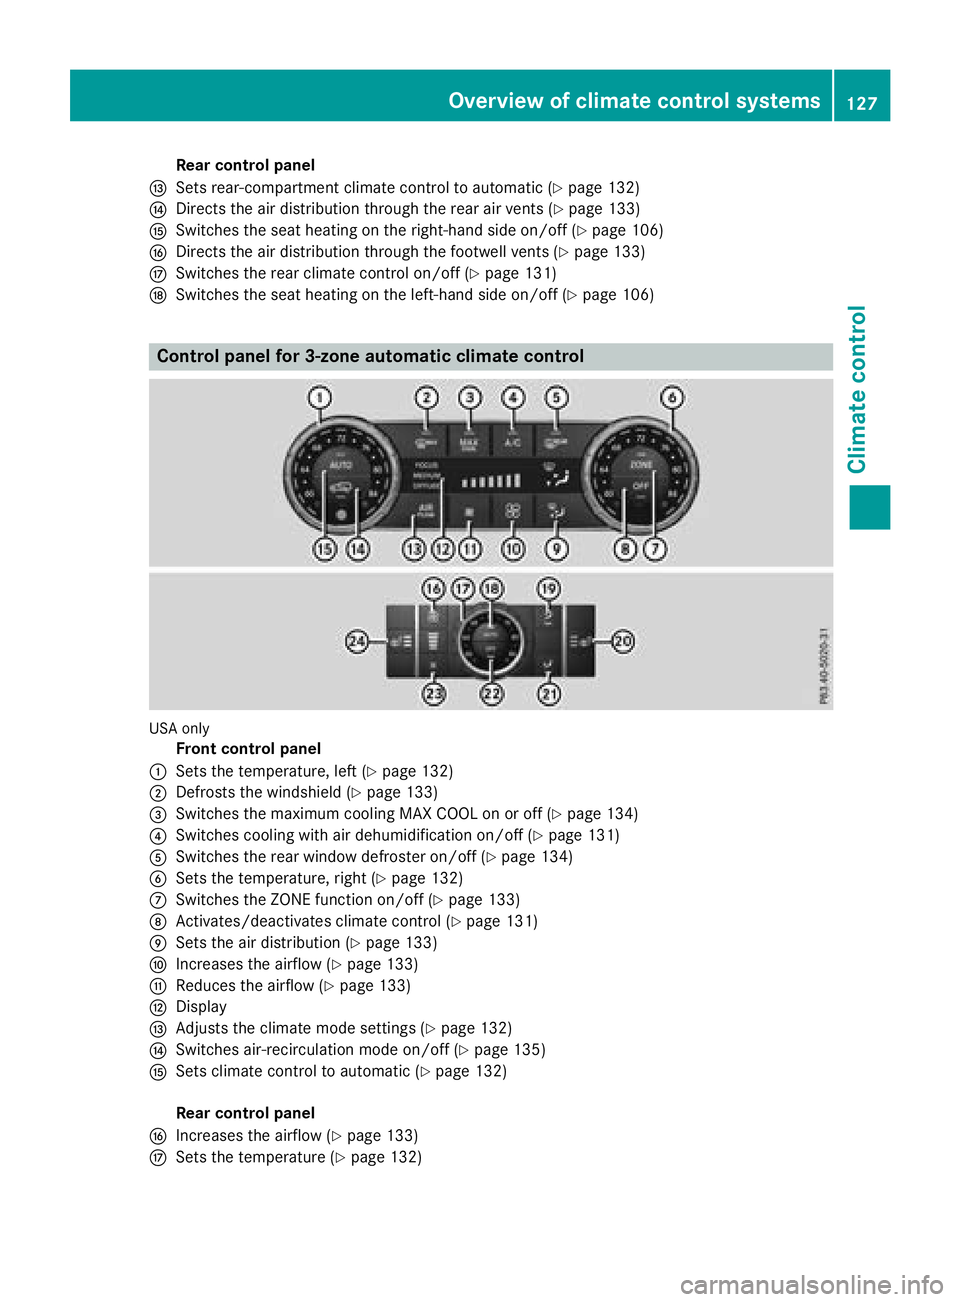
Rear control panel
ISets rear-compartment climate control to automatic (Ypage 132)
JDirects the air distribution through the rear air vents (Ypage 133)
KSwitches the seat heating on the right-hand side on/off (Ypage 106)
LDirects the air distribution through the footwell vents (Ypage 133)
MSwitches the rear climate control on/off (Ypage 131)
NSwitches the seat heating on the left-hand side on/off (Ypage 106)
Control panel for 3-zone automatic climate control
USA only
Front control panel
:Sets the temperature, left (Ypage 132)
;Defrosts the windshield (Ypage 133)
=Switches the maximum cooling MAX COOL on or off (Ypage 134)
?Switches cooling with air dehumidification on/off (Ypage 131)
ASwitches the rear window defroster on/off (Ypage 134)
BSets the temperature, right (Ypage 132)
CSwitches the ZONE function on/off (Ypage 133)
DActivates/deactivates climate control (Ypage 131)
ESets the air distribution (Ypage 133)
FIncreases the airflow (Ypage 133)
GReduces the airflow (Ypage 133)
HDisplay
IAdjusts the climate mode settings (Ypage 132)
JSwitches air-recirculation mode on/off (Ypage 135)
KSets climate control to automatic (Ypage 132)
Rear control panel
LIncreases the airflow (Ypage 133)
MSets the temperature (Ypage 132)
Overview of climate control systems127
Climate control