2018 MERCEDES-BENZ G-CLASS phone
[x] Cancel search: phonePage 169 of 294

Dialinganumber from th ephone book
XPress th e= or; buttonon th esteerin g
whee lto selec tth eTelmenu.
XPress 9, :ora to switch to th e
phone book.
XAuthoriz eaccess to th ephone boo kon th e
phone .
XPress th e9 or: buttonto selec tth e
desire dname.
or
XTo star trapi dscrolling: press and hol d9
or : forlonger than on esecond.
Rapid scrollin gstops when you release th e
butto nor reach th een dof th elist .
XIf only one telephon enumber is stored for
a name :press th e6 ora buttonto
start dialing .
or
XIf ther eis more than one number for a
particular name :press th e6 ora
butto nto display th enumbers.
XPress th e9 or: buttonto selec tth e
number you wan tto dial.
XPress th e6 ora buttonto start dialing .
or
XTo exit th ephone book :press th e~ or
% button.
Redialing
The on-boar dcompute rsaves th elast names or
number sdiale din th eredial memory.
XPress th e= or; buttonon th esteerin g
whee lto selec tth eTelmenu.
XPress th e6 buttonto switch to th eredial
memory.
XPress th e9 or: buttonto selec tth e
desire dnam eor number .
XPress the6 ora buttonto start dialing .
or
XTo exit th eredial memory :press th e~
or % button.
Assistance menu
Introduction
In th eDriveAssistmenu, you hav eth efollow -
in g options:
RDisplayin gth eassistanc egraphi c
(Ypage 167)
RActivating/deactivatin gBlin dSpot Assis t
(Ypage 167)
Displaying th eassistance graphic
XPress th e= or; buttonon th esteerin g
whee lto selec tth eDriveAssistmenu.
XPress 9or: to selec tAssistanc eGraphic.
XPressa.
The DISTRONIC PLU Sdistanc edisplay
appears in th emultifunction display.
Activating/deactivating Blind Spot
Assis t
XPress th e= or; buttonon th esteerin g
whee lto selec tth eDriveAssistmenu.
XPress th e9 or: buttonto selec t
Blind Spo tAssist.
XPress a.
The curren tselection appears .
XTo activate/deactivate :press th ea but-
to nagain .
Fo rfurther information about Blind Spot Assist,
see (
Ypage 140).
Service menu
In th eServ.menu, you hav eth efollowin g
options:
RCallin gup display messages (Ypage 174)
RChecking thetire pressure electronically
(Ypage 264)
RCallin gup th eservic edue dat e
(Ypage 236)
RChecking th eengin eoil level (Ypage 232)
Menus and submenus167
On-board computer and displays
Z
Page 193 of 294
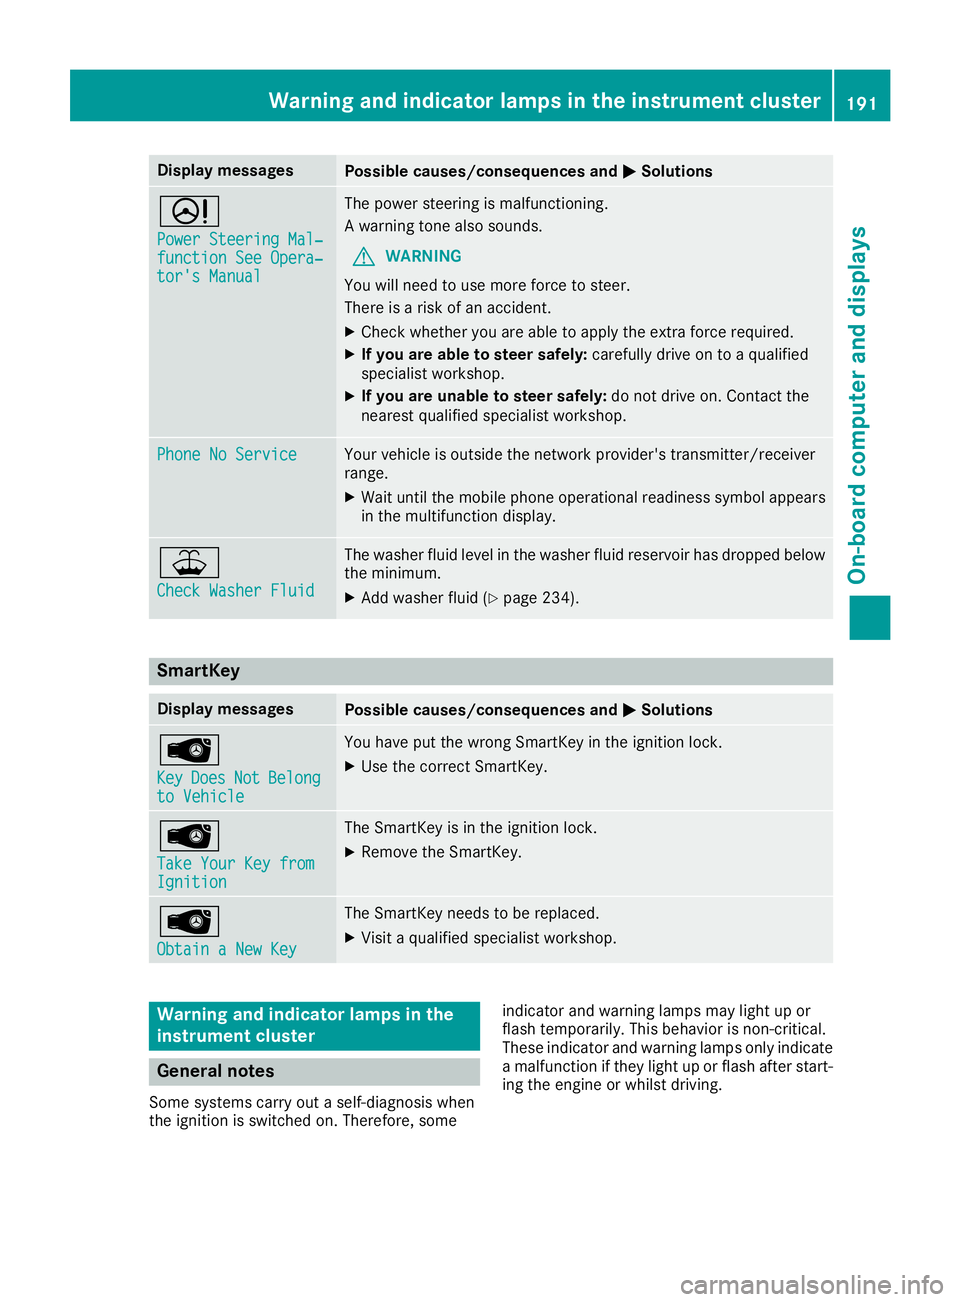
Display messagesPossible causes/consequences andMSolutions
D
Power Steering Mal‐function See Opera‐tor's Manual
The powersteering is malfunctioning .
A warning tone also sounds.
GWARNIN G
You will need to use mor eforce to steer .
There is aris kof an accident.
XChec kwhether you are able to apply th eextr aforce required.
XIf you ar eabl eto steer safely: carefully drive on to aqualified
specialist workshop .
XIf you areunable to steer safely: do notdrive on .Contac tth e
neares tqualified specialist workshop .
Phone No ServiceYour vehicleis outside th enetwork provider' stransmitter/receiver
range.
XWait until th emobile phone operational readiness symbol appear s
in th emultifunction display.
¥
Check Washer Fluid
The washer flui dlevel in th ewasher flui dreservoir has dropped belo w
th eminimum .
XAddwasher flui d (Ypage 234).
SmartKey
Display messagesPossible causes/consequences and MSolutions
Â
KeyDoesNotBelongto Vehicl e
You haveput th ewrong SmartKey in th eignition lock.
XUse th ecorrec tSmartKey.
Â
Tak eYou rKey fro mIgnition
The SmartKey is in th eignition lock.
XRemove th eSmartKey.
Â
Obtain aNew Key
The SmartKey needs to be replaced.
XVisit aqualified specialist workshop .
Warning and indicat orlamps in the
instrume nt cluster
General notes
Some systems carry out aself-diagnosis when
th eignition is switched on .Therefore ,som e indicator and warning lamp
smay ligh tup or
flas htemporarily. This behavio ris non-critical .
These indicator and warning lamp sonly indicat e
a malfunction if they ligh tup or flas hafter start -
ing th eengin eor whils tdriving.
Warning and indicator lamps in the instrument cluster191
On-board computer and displays
Z
Page 208 of 294
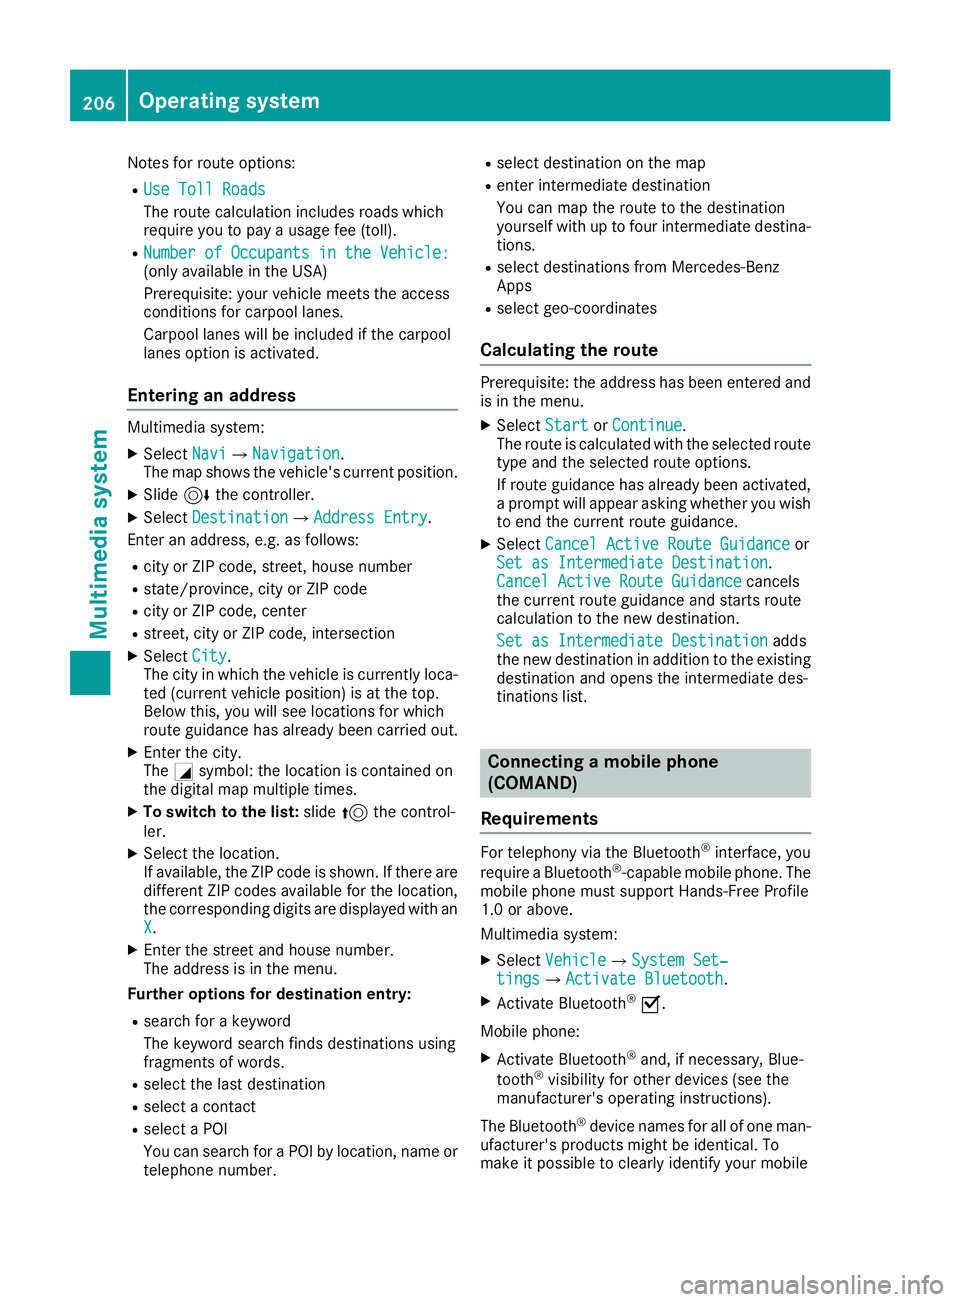
Notes for route options:
RUse Toll Roads
The route calculation includes roads which
require you to pay a usage fee (toll).
RNumber of Occupants in the Vehicle:(only available in the USA)
Prerequisite: your vehicle meets the access
conditions for carpool lanes.
Carpool lanes will be included if the carpool
lanes option is activated.
Entering an address
Multimedia system:
XSelectNaviQNavigation.
The map shows the vehicle's current position.
XSlide 6the controller.
XSelect DestinationQAddress Entry.
Enter an address, e.g. as follows:
Rcity or ZIP code, street, house number
Rstate/province, city or ZIP code
Rcity or ZIP code, center
Rstreet, city or ZIP code, intersection
XSelect City.
The city in which the vehicle is currently loca-
ted (current vehicle position) is at the top.
Below this, you will see locations for which
route guidance has already been carried out.
XEnter the city.
The Gsymbol: the location is contained on
the digital map multiple times.
XTo switch to the list: slide5the control-
ler.
XSelect the location.
If available, the ZIP code is shown. If there are
different ZIP codes available for the location,
the corresponding digits are displayed with an
X
.
XEnter the street and house number.
The address is in the menu.
Further options for destination entry:
Rsearch for a keyword
The keyword search finds destinations using
fragments of words.
Rselect the last destination
Rselect a contact
Rselect a POI
You can search for a POI by location, name or
telephone number.
Rselect destination on the map
Renter intermediate destination
You can map the route to the destination
yourself with up to four intermediate destina-
tions.
Rselect destinations from Mercedes-Benz
Apps
Rselect geo-coordinates
Calculating the route
Prerequisite: the address has been entered and
is in the menu.
XSelect StartorContinue.
The route is calculated with the selected route
type and the selected route options.
If route guidance has already been activated,
a prompt will appear asking whether you wish
to end the current route guidance.
XSelect Cancel Active Route Guidanceor
Set as Intermediate Destination.
Cancel Active Route Guidancecancels
the current route guidance and starts route
calculation to the new destination.
Set as Intermediate Destination
adds
the new destination in addition to the existing
destination and opens the intermediate des-
tinations list.
Connecting a mobile phone
(COMAND)
Requirements
For telephony via the Bluetooth®interface, you
require a Bluetooth®-capable mobile phone. The
mobile phone must support Hands-Free Profile
1.0 or above.
Multimedia system:
XSelect VehicleQSystem Set‐tingsQActivate Bluetooth.
XActivate Bluetooth®O.
Mobile phone:
XActivate Bluetooth®and, if necessary, Blue-
tooth®visibility for other devices (see the
manufacturer's operating instructions).
The Bluetooth
®device names for all of one man-
ufacturer's products might be identical. To
make it possible to clearly identify your mobile
206Operating system
Multimedia system
Page 209 of 294

phone, change the device name (see the man-
ufacturer's operating instructions).
If the mobile phone supports the PBAP (Phone
Book Access Profile) and MAP (M essage
Access Profile) Bluetooth
®profiles, the follow-
ing information will be transmitted after you
connect:
RPhone book
RCall lists
RText messages and e-mail
iFurther information on suitable mobile
phones can be found at: http://
www.mercedes-benz.com/connect
iIn the USA, you can get in touch with the
Mercedes-Benz Customer Assistance Center
on 1-800-FOR-MERCedes (1-800-367-6372).
In Canada, you can get in touch with the Cus-
tomer Relations Center on 1-800-387-0100.
Searching for and authorizing (connect-
ing) a mobile phone
Before using your mobile phone with the multi-
media system for the first time, you will need to
search for the phone and then authorize (con-
nect) it. Depending on the mobile phone, author-ization either takes place by means of Secure
Simple Pairing or by entering a passkey. The
multimedia system automatically makes the
procedure that is relevant for your mobile phone
available. The mobile phone is always connec-
ted automatically after authorization. Further
information on using a mobile phone with the
multimedia system (see the Digital Operator's
Manual).
If the multimedia system does not detect your
mobile phone, this may be due to particular
security settings on your mobile phone (see the
manufacturer's operating instructions).
Only one mobile phone can be connected to the
multimedia system at any one time.
Searching for a mobile phone
Multimedia system:
XSelect Tel/®QConn.DeviceQSearch for PhonesQStartSearch.
The available mobile phones are displayed. Symbols in the device list
Sym-
bolExplanation
ÏNew mobile phone found, not yet
authorized.
ÑMobile phone is authorized, but is
not connected.
#Mobile phone is authorized and
connected.
Connecting a mobile phone
Authorization using Secure Simple Pairing:
XSelect mobile phone.
A code is displayed in the multimedia system
and on the mobile phone.
XIf codes match:
selectYeson the multimedia
system.
XConfirm code on the mobile phone. Depend-
ing on the mobile phone used, confirm the
connection to the multimedia system and for
the PBAP and MAP Bluetooth
®profiles. The
prompt to confirm may take up to two
minutes to be displayed (see the manufactur-
er's operating instructions).
XIf the codes are different: selectNoon the
multimedia system.
The process is canceled.
Repeat authorization.
Authorization by entering a passkey (passcode):
XSelect the Bluetooth®name of the mobile
phone.
The input menu for the passkey is displayed.
XChoose a one to sixteen-digit number combi- nation as a passkey.
XEnter the passkey on the multimedia system.
XPress ¬to confirm.
XEnter and confirm the passkey on the mobile
phone. Depending on the mobile phone used,
confirm the connection to the multimedia sys-
tem and for the PBAP and MAP Bluetooth
®
profiles. The prompt to confirm may take up
to two minutes to be displayed (see the man-
ufacturer's operating instructions).
Operating system207
Multimedia system
Z
Page 210 of 294

Media mode
General notes
If you wish to play external media sources, the
appropriate media mode must already be turned
on. Further information on media mode (see the
Digital Operator's Manual).
The following external media sources can be
used:
RApple®devices (e.g. iPhone®)
RUSB devices (e.g. USB stick, MP3 player)
(Ypage 208)
RCD
RDVD video
RSD cards
Rvia devices connected by Bluetooth®
iInformation on single CD/DVD drive or DVD
changer (see the Digital Operator's Manual).
Selecting using the device list
Multimedia system:
XSelect MediaQDevices.
The available media sources will be shown.
The #dot indicates the current setting.
XSelect the media source.
Playable files are played.
Inserting/removing an SD card
Important safety notes
GWARNING
SD cards are small parts. They can be swal-
lowed and cause choking. This poses an
increased risk of injury or even fatal injury.
Keep the SD card out of the reach of children. If a SD card is swallowed, seek medical atten-
tion immediately.
!If you are no longer using the SD card, you
should remove it and store it outside the vehi-
cle. High temperatures can damage the card.
Inserting an SD card
The SD card slot is located on the control panel.
XInsert the SD card into the SD card slot until
the SD card engages. The side with the con-
tacts must face down.
Removing an SD card
XPress the SD card.
The SD card is ejected.
XRemove the SD card.
Connecting USB devices
XConnect the USB device to the USB port.
There are two USB ports in the stowage space
under the armrest.
XSelect the media source (Ypage 208).
208Operating system
Multimedia system
Page 212 of 294
RAlways place the load against the backrests ofthe front seats or rear seats.
RUse the cargo tie-down rings and the parcel
nets to transport loads and luggage.
RUse cargo tie-down rings and fastening mate-
rials appropriate for the weight and size of theload.
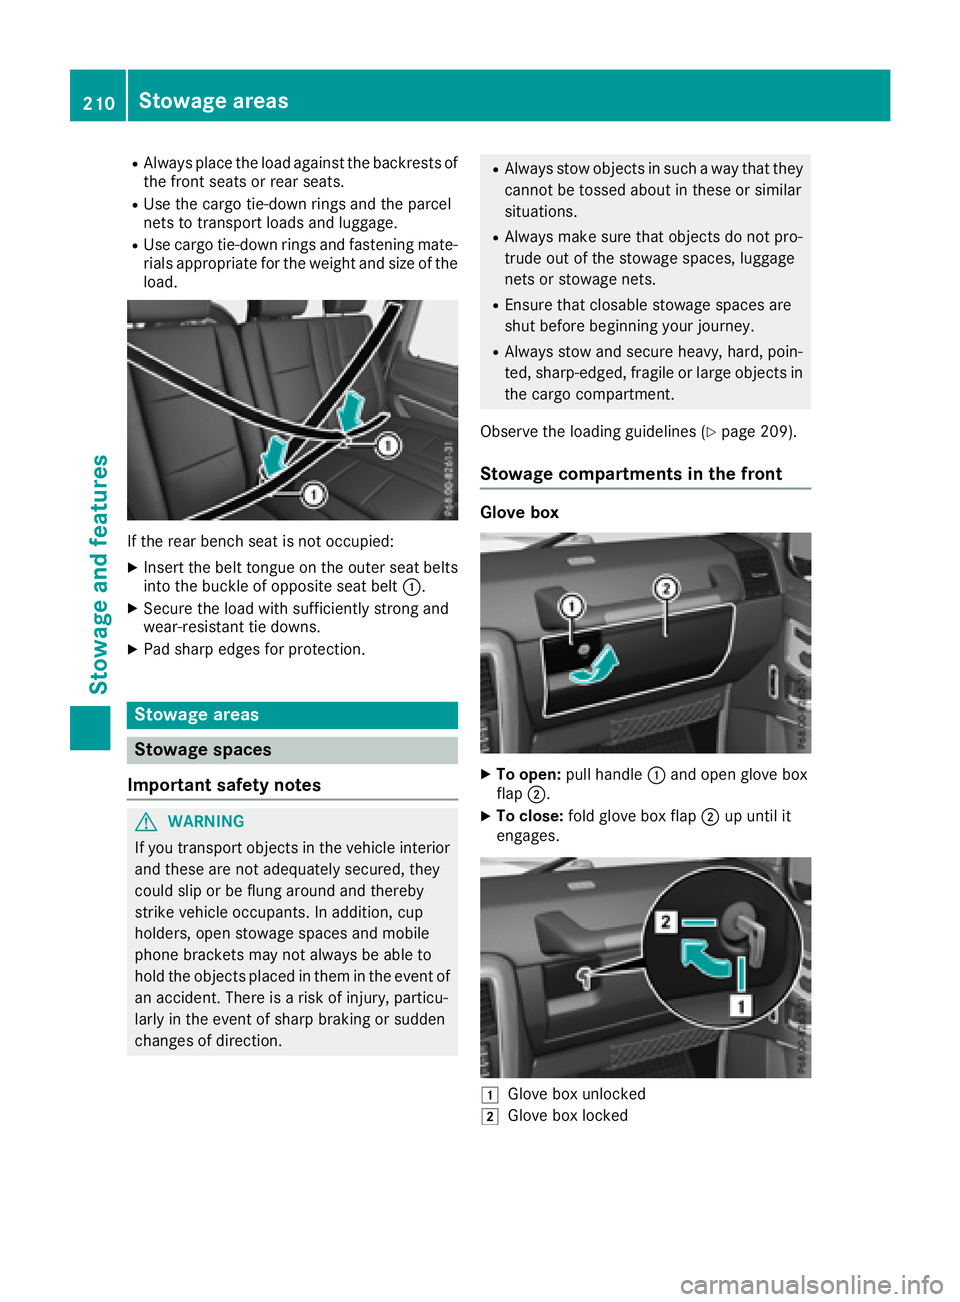
If the rear bench seat is not occupied:
XInsert the belt tongue on the outer seat belts
into the buckle of opposite seat belt :.
XSecure the load with sufficiently strong and
wear-resistant tie downs.
XPad sharp edges for protection.
Stowage areas
Stowage spaces
Important safety notes
GWARNING
If you transport objects in the vehicle interior
and these are not adequately secured, they
could slip or be flung around and thereby
strike vehicle occupants. In addition, cup
holders, open stowage spaces and mobile
phone brackets may not always be able to
hold the objects placed in them in the event of
an accident. There is a risk of injury, particu-
larly in the event of sharp braking or sudden
changes of direction.
RAlways stow objects in such a way that they
cannot be tossed about in these or similar
situations.
RAlways make sure that objects do not pro-
trude out of the stowage spaces, luggage
nets or stowage nets.
REnsure that closable stowage spaces are
shut before beginning your journey.
RAlways stow and secure heavy, hard, poin-
ted, sharp-edged, fragile or large objects in
the cargo compartment.
Observe the loading guidelines (
Ypage 209).
Stowage compartments in the front
Glove box
XTo open: pull handle :and open glove box
flap ;.
XTo close: fold glove box flap ;up until it
engages.
1Glove box unlocked
2Glove box locked
210Stowage areas
Stowag ean d features
Page 219 of 294
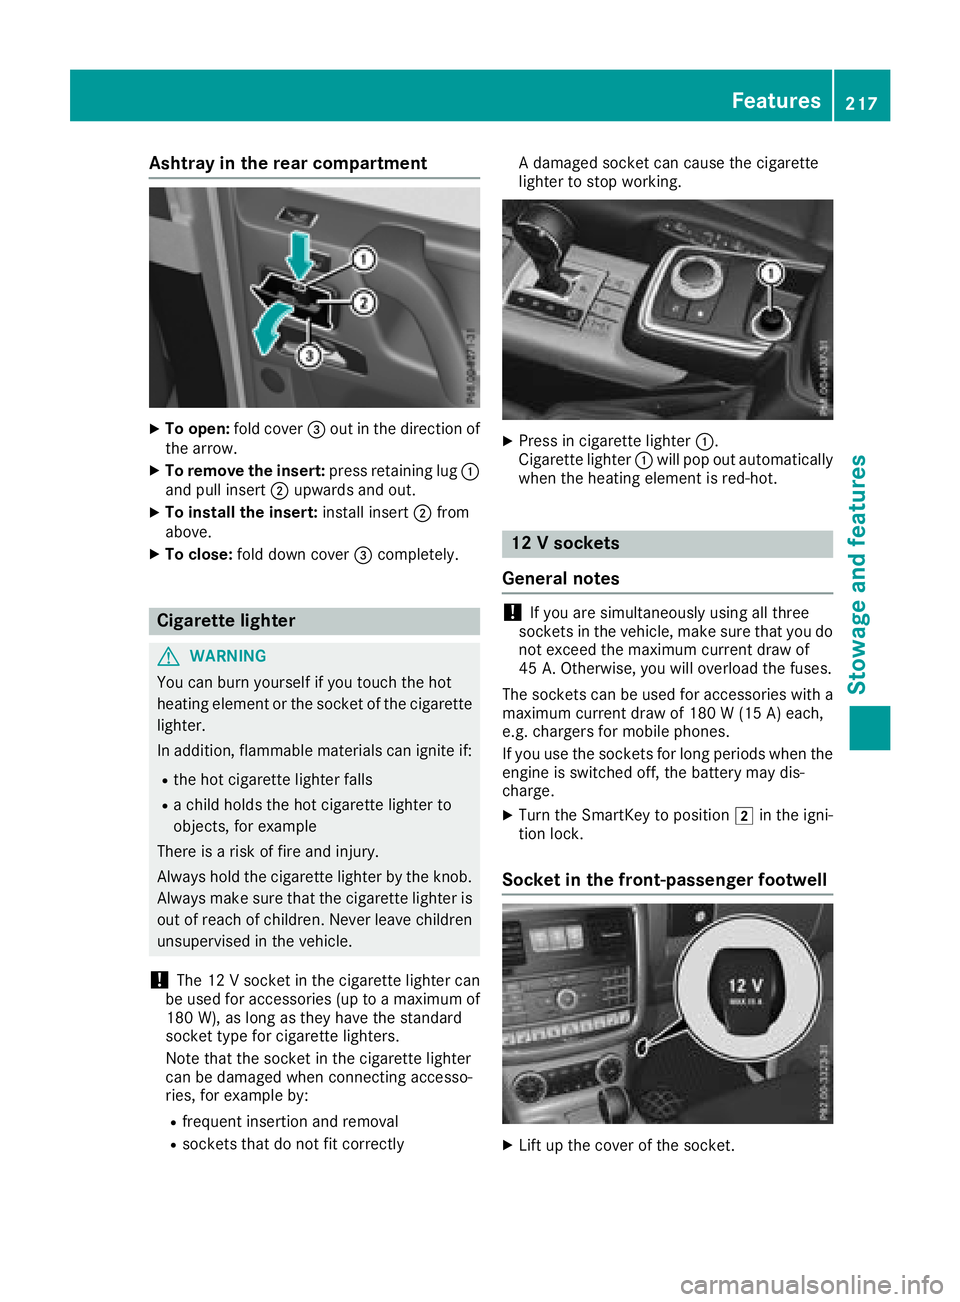
Ashtray in the rear compa rtment
XTo open :fol dcover =out in th edirection of
th earrow.
XTo remove th einsert: press retaining lug :
and pull insert ;upwards and out .
XTo install theinsert: installinsert ;from
above.
XTo close: folddown cover =completely.
Cigarette lighter
GWARNIN G
You can burn yourself if you touch th ehot
heating elemen tor th esocke tof th ecigarette
lighter.
In addition ,flammabl ematerials can ignit eif:
Rth ehot cigarette lighte rfall s
Rachild hold sth ehot cigarette lighte rto
objects ,for exampl e
There is aris kof fir eand injury.
Always hold th ecigarette lighte rby th eknob.
Always mak esur ethat th ecigarette lighte ris
out of reac hof children .Never leav echildren
unsupervised in th evehicle.
!The 12 Vsocke tin th ecigarette lighte rcan
be used for accessories (up to amaximum of
18 0W), as lon gas they hav eth estandard
socke ttyp efor cigarette lighters.
Not ethat th esocke tin th ecigarette lighte r
can be damaged when connecting accesso-
ries, for exampl eby:
Rfrequen tinsertion and removal
Rsockets that do no tfit correctl y A
damaged socke tcan caus eth ecigarette
lighte rto stop working .
XPress in cigarette lighte r:.
Cigarette lighte r: will pop out automatically
when th eheating elemen tis red-hot .
12V sockets
Gene ral notes
!If you are simultaneously usin gall three
sockets in th evehicle, mak esur ethat you do
no texceed th emaximum curren tdraw of
45 A. Otherwise ,you will overload th efuses.
The sockets can be used for accessories wit h a
maximum curren tdraw of 18 0 W(15 A) each,
e.g. chargers for mobile phones.
If you use th esockets for lon gperiods when th e
engin eis switched off ,th ebattery may dis-
charge .
XTurn th eSmartKey to position 2in th eigni-
tion lock.
Socket in the front-passenger footwell
XLiftup th ecover of th esocket.
Features217
Stowage and features
Z
Page 221 of 294
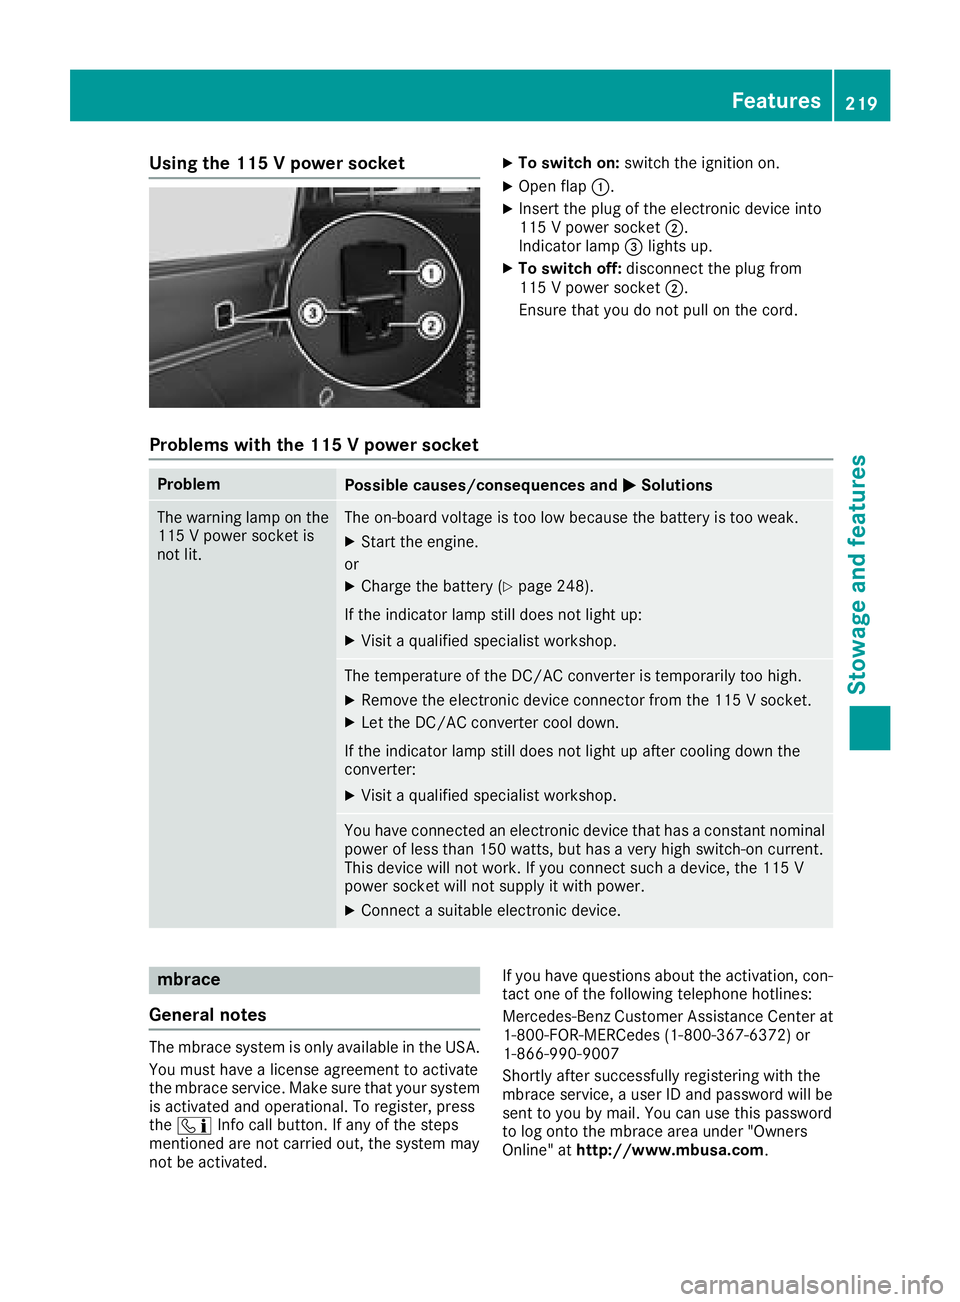
Using the 115 V power socketXTo switch on:switch the ignition on.
XOpen flap:.
XInsert the plug of the electronic device into
115 V power socket ;.
Indicator lamp =lights up.
XTo switch off: disconnect the plug from
115 V power socket ;.
Ensure that you do not pull on the cord.
Problems with the 115 V power socket
ProblemPossible causes/consequences and MSolutions
The warning lamp on the
115 V power socket is
not lit.The on-board voltage is too low because the battery is too weak.
XStart the engine.
or
XCharge the battery (Ypage 248).
If the indicator lamp still does not light up:
XVisit a qualified specialist workshop.
The temperature of the DC/AC converter is temporarily too high.
XRemove the electronic device connector from the 115 V socket.
XLet the DC/AC converter cool down.
If the indicator lamp still does not light up after cooling down the
converter:
XVisit a qualified specialist workshop.
You have connected an electronic device that has a constant nominal
power of less than 150 watts, but has a very high switch-on current.
This device will not work. If you connect such a device, the 115 V
power socket will not supply it with power.
XConnect a suitable electronic device.
mbrace
General notes
The mbrace system is only available in the USA.
You must have a license agreement to activate
the mbrace service. Make sure that your system
is activated and operational. To register, press
the ï Info call button. If any of the steps
mentioned are not carried out, the system may
not be activated. If you have questions about the activation, con-
tact one of the following telephone hotlines:
Mercedes-Benz Customer Assistance Center at 1-800-FOR-MERCedes (1-800-367-6372) or
1-866-990-9007
Shortly after successfully registering with the
mbrace service, a user ID and password will be
sent to you by mail. You can use this password
to log onto the mbrace area under "Owners
Online" at http://www.mbusa.com.
Features219
Stowage and features
Z