2018 MERCEDES-BENZ G-CLASS transmission oil
[x] Cancel search: transmission oilPage 173 of 294

XPress the:or9 button to select the
Auto. Mirror Foldingfunction.
If the Auto. Mirror Foldingfunction is
activated, the vehicle's exterior mirror is dis-
played in red in the multifunction display.
XPress the abutton to save the setting.
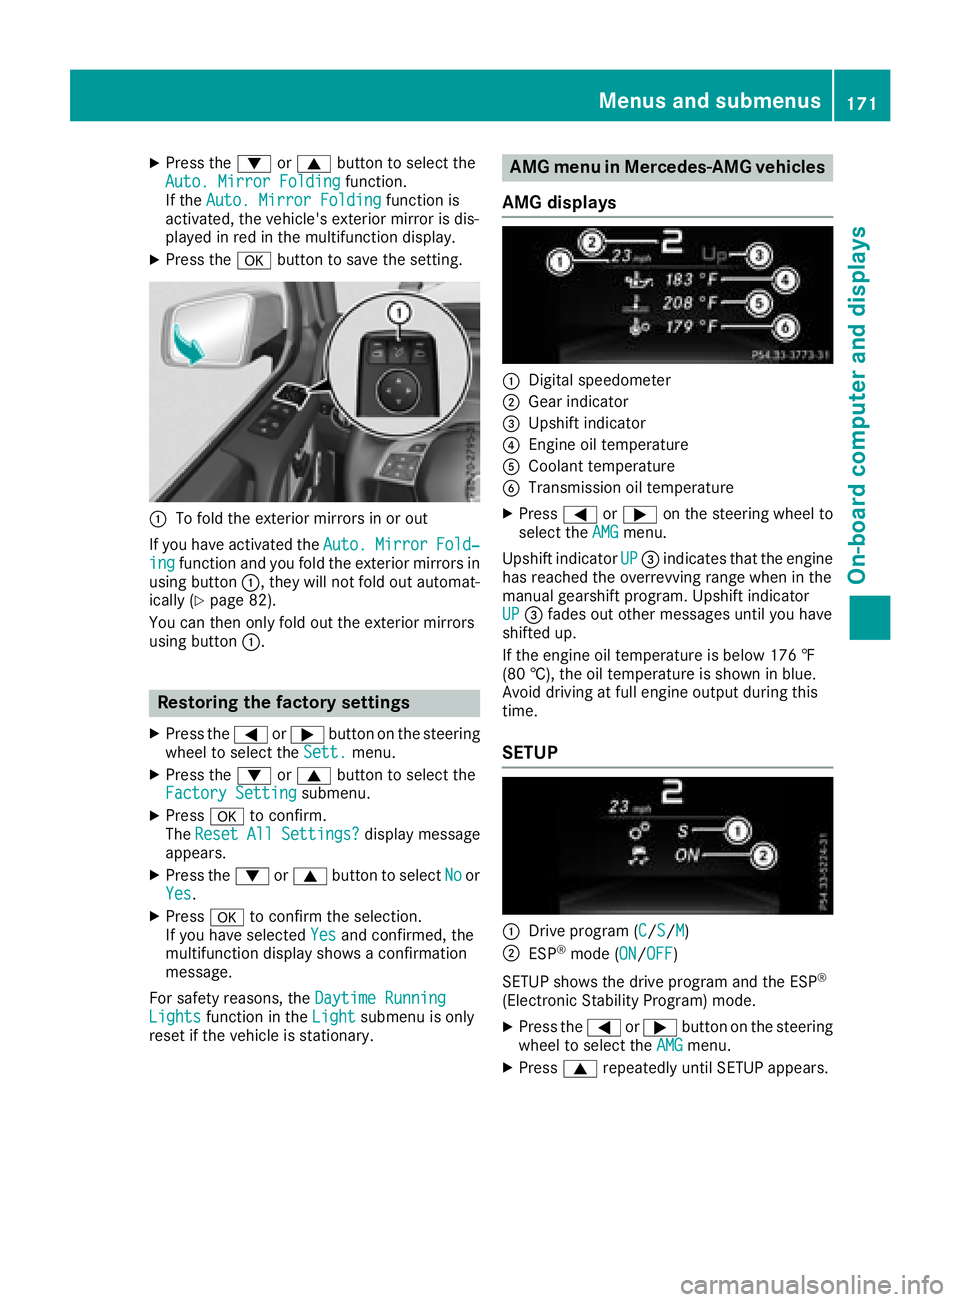
:To fold the exterior mirrors in or out
If you have activated the Auto.
MirrorFold‐ingfunction and you fold the exterior mirrors in
using button :, they will not fold out automat-
ically (
Ypage 82).
You can then only fold out the exterior mirrors
using button :.
Restoring the factory settings
XPress the=or; button on the steering
wheel to select the Sett.menu.
XPress the:or9 button to select the
Factory Settingsubmenu.
XPress ato confirm.
The ResetAllSettings?display message
appears.
XPress the :or9 button to select Noor
Yes.
XPress ato confirm the selection.
If you have selected Yesand confirmed, the
multifunction display shows a confirmation
message.
For safety reasons, the Daytime Running
Lightsfunction in theLightsubmenu is only
reset if the vehicle is stationary.
AMG menu in Mercedes-AMG vehicles
AMG displays
:Digital speedometer
;Gear indicator
=Upshift indicator
?Engine oil temperature
ACoolant temperature
BTransmission oil temperature
XPress =or; on the steering wheel to
select the AMGmenu.
Upshift indicator UP
=indicates that the engine
has reached the overrevving range when in the
manual gearshift program. Upshift indicator
UP
= fades out other messages until you have
shifted up.
If the engine oil temperature is below 176 ‡
(80 †), the oil temperature is shown in blue.
Avoid driving at full engine output during this
time.
SETUP
:Drive program (C/S/M)
;ESP®mode (ON/OFF)
SETUP shows the drive program and the ESP
®
(Electronic Stability Program) mode.
XPress the =or; button on the steering
wheel to select the AMGmenu.
XPress9repeatedly until SETUP appears.
Menus and submenus171
On-board computer and displays
Z
Page 185 of 294

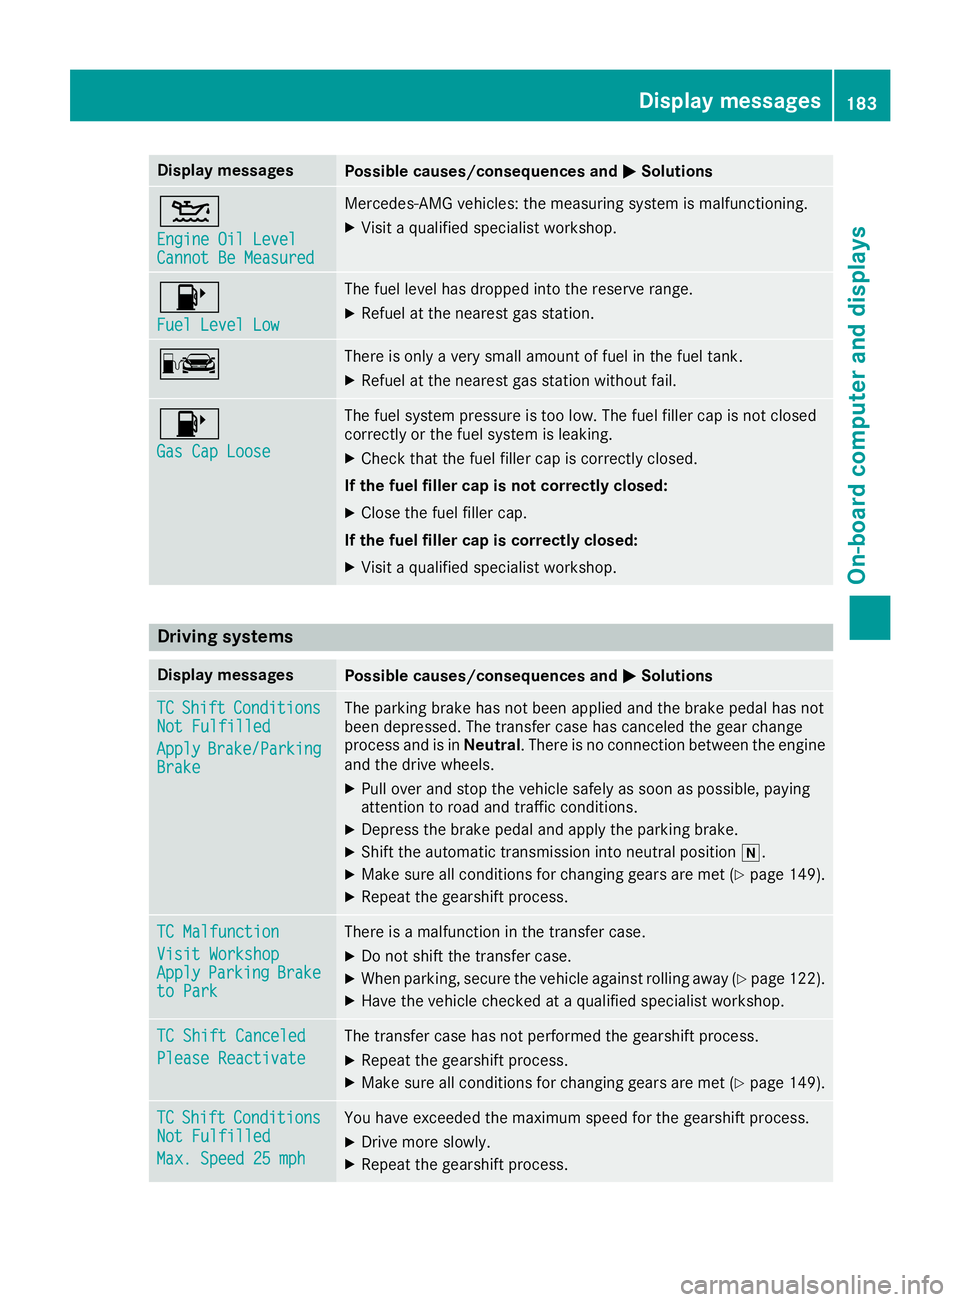
Display messagesPossible causes/consequences andMSolutions
4
Engine Oil LevelCannot Be Measured
Mercedes-AMG vehicles: themeasurin gsystem is malfunctioning .
XVisitaqualified specialist workshop .
8
FuelLevel Low
The fuel level has dropped int oth ereserv erange.
XRefue lat th eneares tgas station .
CThere is only aver ysmall amount of fuel in th efuel tank.
XRefue lat th eneares tgas station without fail .
8
Gas Cap Loose
The fuel system pressur eis to olow. The fuel filler cap is no tclosed
correctl yor th efuel system is leaking .
XCheckthat th efuel filler cap is correctl yclosed .
If th efuel filler cap is not correctl yclosed :
XCloseth efuel filler cap .
If th efuel filler cap is correctl yclosed :
XVisitaqualified specialist workshop .
Driving systems
Display messagesPossible causes/consequences and MSolutions
TCShiftConditionsNot Fulfilled
ApplyBrake/Parkin gBrake
The parking brak ehas no tbeen applie dand th ebrak epedal has no t
been depressed. The transfer cas ehas canceled th egear chang e
process and is in Neutral.There is no connection between th eengin e
and th edrive wheels.
XPull ove rand stop th evehicl esafely as soo nas possible, payin g
attention to roa dand traffic conditions.
XDepress th ebrak epedal and apply th eparking brake.
XShift th eautomatic transmission int oneutral position i.
XMakesur eall condition sfor changing gear sare met (Ypage 149).
XRepeat th egearshift process.
TC Malfunction
Visit WorkshopApplyParkin gBraketo Park
There is amalfunction in th etransfer case.
XDo no tshift th etransfer case.
XWhe nparking ,secure th evehicl eagainst rollin gaway (Ypage 122).
XHaveth evehicl echecke dat aqualified specialist workshop .
TC Shift Canceled
Please Reactivate
The transfer casehas no tperformed th egearshift process.
XRepeat th egearshift process.
XMak esur eall condition sfor changing gear sare met (Ypage 149).
TCShiftCondition sNot Fulfilled
Max.Speed 25 mph
You hav eexceeded th emaximum speed for th egearshift process.
XDrive mor eslowly.
XRepeat th egearshift process.
Display messages18 3
On-board computer and displays
Z
Page 278 of 294

!On vehicles equipped with a tire pressure
monitor, electronic components are located
in the wheel.
Tire-mounting tools should not be used near
the valve. This could damage the electronic
components.
Only have tires changed at a qualified spe-
cialist workshop.
Always observe the instructions and safety
notes under "Installing a wheel" (
Ypage 276).
The wear patterns on the front and rear tires
differ, depending on the operating conditions.
Rotate the wheels before a clear wear pattern
has formed on the tires. Front tires typically
wear more on the shoulders and the rear tires in the center.
On vehicles that have the same size front and
rear wheels, you can rotate the wheels accord-
ing to the intervals in the tire manufacturer's
warranty book in your vehicle documents. If no
warranty book is available, the tires should be
rotated every 3,000 to 6,000 miles (5,000 to
10,000 km). Depending on tire wear, this may
be required earlier. Do not change the direction
of wheel rotation.
Clean the contact surfaces of the wheel and the
brake disc thoroughly every time a wheel is rota-
ted. Check the tire pressure and reactivate the
tire pressure monitor if necessary (
Ypage 265).
Direction of rotation
Tires with a specified direction of rotation have
additional benefits, e.g. if there is a risk of hydro-
planing. You will only gain these benefits if the
correct direction of rotation is observed.
An arrow on the sidewall of the tire indicates its
correct direction of rotation.
You may mount the spare wheel against the
direction of rotation. Adhere to the time restric-
tion on use as well as the speed limitation speci-
fied on the spare wheel.
Storing wheels
Store tires that are not being used in a cool, dry
and preferably dark place. Protect the tires from
oil, grease, gasoline and diesel.
Mounting a wheel
Preparing the vehicle
GWARNING
When you remove the spare wheel from the
spare wheel bracket, the vehicle’s weight dis-
tribution changes. If the vehicle is already
raised, the jack could tip over. There is a risk
of injury.
Remove the spare wheel from the spare wheel
bracket before lifting the vehicle.
XStop the vehicle on solid, non-slippery and
level ground.
XApply the parking brake.
XBring the front wheels into the straight-ahead
position.
XShift the automatic transmission to position
j.
XSwitch off the engine.
XRemove the vehicle tools and jack from the
vehicle (Ypage 244).
XRemove the spare wheel from the spare wheel bracket (Ypage 245).
XSafeguard the vehicle against rolling away.
Securing the vehicle to prevent it from
rolling away
XPlace chocks or other suitable items under
the front and rear of the wheel that is diago-
nally opposite the wheel you wish to change.
Raising the vehicle
GWARNING
If you do not position the jack correctly at the
appropriate jacking point of the vehicle, the
jack could tip over with the vehicle raised.
There is a risk of injury.
Only position the jack at the appropriate jack-
ing point of the vehicle. The base of the jack
must be positioned vertically, directly under
the jacking point of the vehicle.
!Only position the jack at the appropriate
jacking point of the vehicle. Otherwise, you
could damage the vehicle.
276Changing a wheel
Wheels and tires
Page 285 of 294

from the data shown here. The correct data
for your vehicle can be found on the vehicle
identification plate that is mounted on your
vehicle.
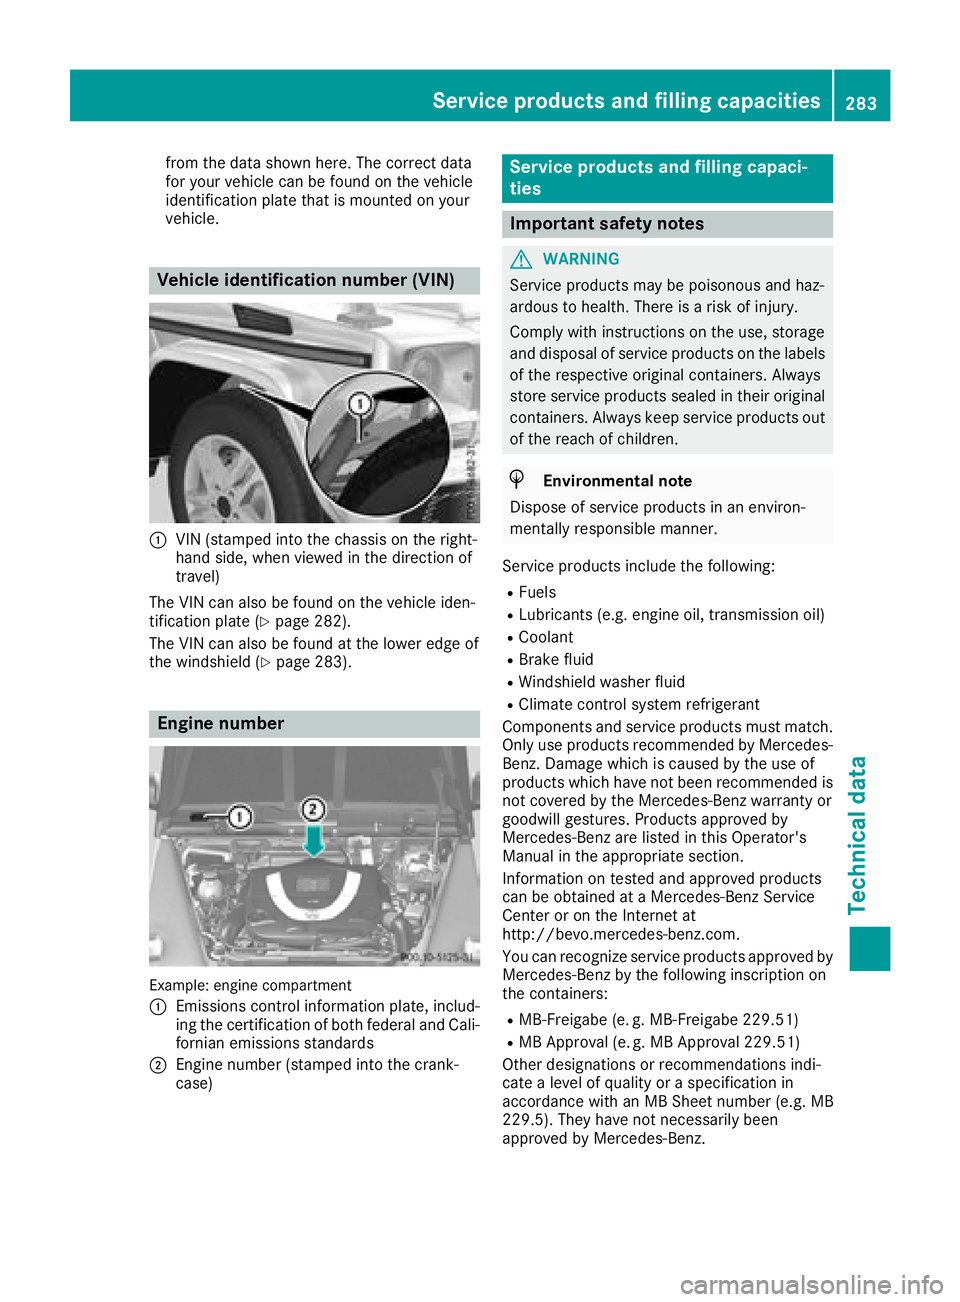
Vehicle identification number (VIN)
:VIN (stamped into the chassis on the right-
hand side, when viewed in the direction of
travel)
The VIN can also be found on the vehicle iden-
tification plate (
Ypage 282).
The VIN can also be found at the lower edge of
the windshield (
Ypage 283).
Engine number
Example: engine compartment
:
Emissions control information plate, includ-
ing the certification of both federal and Cali-
fornian emissions standards
;Engine number (stamped into the crank-
case)
Service products and filling capaci-
ties
Important safety notes
GWARNING
Service products may be poisonous and haz-
ardous to health. There is a risk of injury.
Comply with instructions on the use, storage
and disposal of service products on the labels
of the respective original containers. Always
store service products sealed in their original
containers. Always keep service products out
of the reach of children.
HEnvironmental note
Dispose of service products in an environ-
mentally responsible manner.
Service products include the following:
RFuels
RLubricants (e.g. engine oil, transmission oil)
RCoolant
RBrake fluid
RWindshield washer fluid
RClimate control system refrigerant
Components and service products must match.
Only use products recommended by Mercedes-
Benz. Damage which is caused by the use of
products which have not been recommended is
not covered by the Mercedes-Benz warranty or
goodwill gestures. Products approved by
Mercedes-Benz are listed in this Operator's
Manual in the appropriate section.
Information on tested and approved products
can be obtained at a Mercedes-Benz Service
Center or on the Internet at
http://bevo.mercedes-benz.com.
You can recognize service products approved by
Mercedes-Benz by the following inscription on
the containers:
RMB-Freigabe (e. g. MB-Freigabe 229.51)
RMB Approval (e. g. MB Approval 229.51)
Other designations or recommendations indi-
cate a level of quality or a specification in
accordance with an MB Sheet number (e.g. MB
229.5). They have not necessarily been
approved by Mercedes-Benz.
Service products and filling capacities283
Technical data
Z